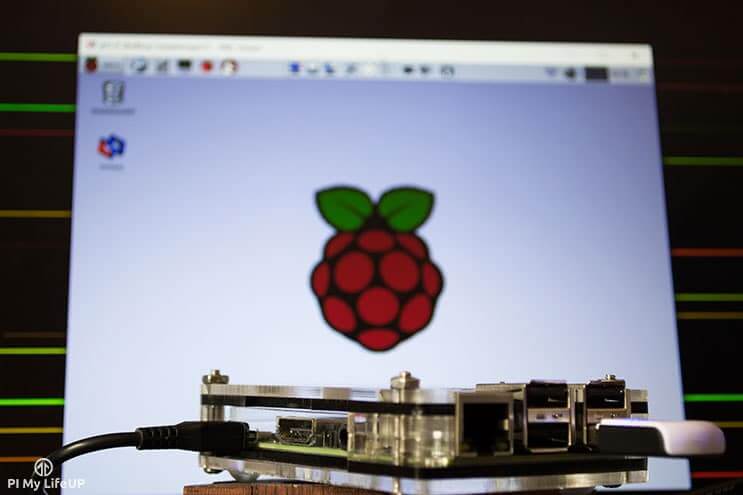
In this tutorial, we will be going to set up a VNC Server on the Raspberry Pi.
VNC is a special protocol that is designed to allow one device to control another remotely. This protocol works differently from the Remote Desktop Protocol that Windows uses.
Using VNC on your Raspberry Pi has a variety of uses. For example, you can use it to view your Pi’s desktop without having a monitor attached to it. This removes the need to use SSH as the only way of accessing your Raspberry Pi.
Setting up a VNC server on your Raspberry Pi is relatively straightforward and requires us to install and setup a single package called tightvncserver.
TightVNC is the software that will allow us to set our Pi up to accept VNC connections easily. It is lightweight, free, and open-source, which makes it perfect for the device.
If you just want a barebones command-line approach, then be sure to check out the tutorial on how to SSH into your Raspberry Pi.
One thing to note is that VNC creates a virtual desktop for the connection. If you want to share your Raspberry Pi’s desktop, check out our guide on using Vino.
While Vino implements the VNC protocol, it works by showing the current user’s desktop rather than creating the virtual desktop that TightVNC and other server software use.
Equipment List
To complete this tutorial on installing a VNC server on the Raspberry Pi, you will need the following equipment.
Recommended
- Raspberry Pi Amazon
- Micro SD Card Amazon (16gb+ is recommended)
- Ethernet Cable Amazon or Wi-Fi Amazon
Optional
This tutorial on setting up VNC was tested on a Raspberry Pi 4 that was running the latest available version of Raspberry Pi OS (Buster).
Video Tutorial
If you want to see how we install the VNC Server, then be sure to check out my video below. We go through all the steps from start to finish on getting this set up in no time at all.
We have also included written instructions below, so if you have trouble with the video, feel free to use the steps below.
Installing the VNC Server Software on your Raspberry Pi
By following this guide, you will find out how easy it is to install and configure a VNC server on your Raspberry Pi.
1. Before we install the VNC software on our Raspberry Pi, we need to make sure our operating system is up to date.
To update the packages running on our device, we need to run the following two commands.
sudo apt update
sudo apt upgradeCopy
2. Once your Raspberry Pi has finished installing all of the updates, we can move on to installing the VNC Server.
As the tightvncserver package is available through the Raspbian repository, all we need to do is run the following command.
sudo apt install tightvncserverCopyConfiguring the VNC Server on your Raspberry Pi
Now that you have the VNC server installed on your Raspberry Pi, we can learn how to configure it so that it is ready for connections.
1. With the VNC server now installed on our Pi, let us now proceed to configure it.
To start the configuration process, we need to run the command below.
vncserver :1Copy2. You will now need to set up a password for when you connect to the Raspberry Pi remotely via a VNC client.
Make sure the password that you set is no longer than 8 characters long. Any password that is longer than 8 characters will be truncated (Meaning any letters after the eighth will be removed).
You will require a password to access your desktops.

Password:Copy
As this password will give someone access to your Raspberry Pi’s desktop, make sure you set this to something secure.
3. You will next be asked to re-enter the password to verify it.
Verify:Copy4. Next, you will be asked if you want to set up a separate view-only password.
A view-only password means that a user will be able to view the desktop using VNC but not interact with it.
For our tutorial, we will be skipping this step by typing in n and pressing the ENTER key.
Would you like to enter a view-only password (y/n)?Copy5. Your VNC server should now be up and running on your Raspberry Pi.
However, whenever you restart your Pi, you will need to restart the software by rerunning the following command.
vncserver :1CopyIf you want to have the software startup automatically at bootup, then simply follow the next couple of steps. Otherwise, we are ready to set up the client-side of things.
Starting the VNC Server at Startup
Having to run the command above every time you want to use VNC on your Raspberry Pi is not ideal. To deal with this, we will make the VNC server software start up at boot.
The following steps are pretty straightforward and take you through the steps of having the server start up on boot.
We will also show you how to stop and disable the service if you ever want to stop using VNC on your Raspberry Pi.
Creating the service for VNC
As the VNC server software we are using does not have a systemctl compatible service, we will need to write our own.
Luckily for us, the process of writing a service file is a very straightforward one.
1. To get our VNC software to start on boot, we will need to write a service file for it on our Raspberry Pi.
To begin creating our service, run the following command.
sudo nano /etc/systemd/system/vncserver.serviceCopyWe will be calling this service vncserver.service.
2. Within this file, we need to enter the following lines.
Ensure you replace “<USER>” with your username. For example, since our user is called “pimylifeup“, we would use “pimylifeup“.
[Unit]
Description=TightVNC remote desktop server
After=network.target

[Service]
User=<USER>
Type=forking
ExecStart=/usr/bin/vncserver :1
ExecStop=/usr/bin/vncserver -kill :1

[Install]
WantedBy=multi-user.targetCopy
These lines instruct the service manager on how to manage the VNC server on our Raspberry Pi.
We are telling it to start the VNC server software once the network becomes available. We also tell it to run the VNC server available at the location, /usr/bin/vncserver.
For both commands defined in the service, we use :1, which tells it that we are using the first VNC virtual desktop.
We also tell the service that when it shuts down, it should use the -kill argument to stop the virtual desktop.
3. Once you have finished entering all the data into the service file, you can save it by pressing CTRL + X, then Y, followed by the ENTER key.
Starting the VNC Server on the Raspberry Pi
4. We can now test to see if our new VNC service is working by running the following command to start it.
sudo systemctl start vncserverCopyIf the service says it’s failed, try checking its status to find out where.
Checking the Status of the VNC Server
5. Let us now check the status of the VNC service to see if it has started up correctly.
To retrieve the status of the service, use the command below.
sudo systemctl status vncserverCopyIf everything is now working as intended, you should see the text Active: active (running).
If the service is marked as failed, look for the text “A VNC server is already running as :1“. This text means our command is correct, but the VNC Server has already been started.
You can kill the existing VNC desktop that’s running on your Raspberry Pi, and run the following command.
vncserver -kill :1CopyOnce the running VNC server has been killed, you can try restarting the service.
Telling the VNC Server to Start at Boot
6. Once we have verified that the VNC service is now functioning, we can tell it to start at boot.
To get our new service to start at boot, we need to enable the service by using the command below.
sudo systemctl enable vncserverCopyStopping the VNC Server
7. If, for any reason, you may want to stop the VNC server on your Raspberry Pi, all you need to do is use the following command.
sudo systemctl stop vncserverCopyDisabling the Start at Boot on the Raspberry Pi
8. If you don’t want the VNC server to start at boot, you can stop it from starting up by using the command below.
sudo systemctl disable vncserverCopySetting up a VNC client on your PC
Installing and setting up a VNC client on your computer is an incredibly easy process.
There are quite a few different VNC software packages out there, but in this tutorial, we will be using RealVNC.
1. To begin, head over to the RealVNC website and download the VNC viewer client relevant to your operating system.
2. Once downloaded, open it up. (If you want server software as well, you will need to download the full software package.)
3. Enter the IP address of your Raspberry Pi, followed by the port (:) 1 in the field that says VNC server.
For example, the setting we used is, 192.168.1.108:1
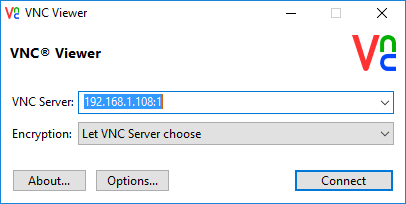
4. Now, press the “Connect” button.
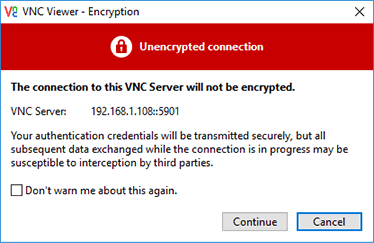
5. It should then give you a warning message as we have not previously connected to our Raspberry Pi.
To proceed, click the “Continue button.
6. Then it will ask you for the password you set earlier when you installed the VNC server software.
Enter the password to connect to your device.
7. The VNC window should load, and you will now have remote access to your Raspberry Pi’s interface.
If you do come across any issues, we have a small troubleshooting section below that you can try following.
Troubleshooting
- I can’t connect! – Be sure to double-check the IP you entered and make sure it is the same as the Pis. Also, be sure the VNC server software is running. Most routers also dynamically give out IP addresses, so the IP may change over time. To fix this, set up a static IP or check the IP address whenever you go to connect.
- I want to access it outside of my local network – This will open security issues, but you can do this by setting up port forwarding. Remember, the VNC server is running on port 1.
- I want a different/larger-sized screen on my VNC client. – When you go to start the VNC server, you can add an extra command called geometry and then the screen size width and height you want (This is in pixels). The command is:
vncserver :1 -geometry 1440x900We hope that at this point you have successfully set up the VNC server software on your Raspberry Pi and can now use it to view your desktop.
If you feel like there is something wrong with this tutorial, then feel free to leave a comment below.
You can find some of our latest DIY Raspberry Pi Projects by browsing our website.


I have a raspberry pi 3 running bookworm with all current patches installed.
I used you tutorial to install tightvncserver so I could get to the console.
Everything installed without any problems.
But when I go to use RealVNC on my laptop running windows 11 to connect to my RPI3 I get the following:
My cursor is an ‘X’ not the usual arrow.
And I can not use anything from the tool bar at the top of the screen. I click on the icons and nothing happens.
This is very frustrating as I also have a Raspberry pi 4 that is also on bookworm and it works just fine.
In checking my RPI4 I found out that it is running realvnc-vnc-server not tightvncserver. I did notice that when I installed tightvnc it uninstalled realvnc-vnc-server. Should I uninstall tightvnc and reinstall realvnc-vnc-server?
Hi Ray,
That definitely sounds like something unusual is going on here. I would recommend trying the tightvnc client instead.
However, there is a better, and kind of easier solution and that is to use the Raspberry Pi foundations connect service. I would recommend it as an easier alternative and doesnt bind you to some of these very unreliable VNC implementations.
We have a guide that walks you through setting up Raspberry Pi Connect if that is a route you would like to take.
Kind regards,
Emmet
RealVNC is no longer free – you get a 14 day trial and then have to pay a monthly subscription.
This doesn’t work – the service won’t start.
Running bookworm on a Pi Zero W
Installs fine, no errors.
When I try to start the service, I get:
“Failed at step USER spawning /usr/bin/vncserver: No such process”
Hey,
Sorry to see that you are having issues with the service. I quickly tested the tutorial and found the issues you are likely running into.
When writing the service file, the original version had the “pi” user already written within the file. This user existed by default up until recently.
All you need to do is replace “pi” within the service file with your user’s name. I have improved the steps to make this clearer.
Kind regards,
Emmet
Thank you Gus! It worked like a charm. Followed the steps carefully.. and now i can remote in my RPI with vncviewer without the need to connect to monitor/keyboard.
Thank you for the tutorial!
If people get the problem with no taskbar, just try to connect with the ip without the :1. There seem to be a problem with the taskbar when running on a virtual desktop and deleting the :1 will instead mirror it.
Pulse audio prevents the menu bar from showing. Pi 4. Remove, then re-install it and menu bar is magically back.
# clean and reinstall pulseaudio
# fixes user folder permissions
# then reboot
great step-by-step.
comment by James B is super helpful.
removing then reinstalling pulseaudio allowed the VNC interface to bring up the menu bar with wifi selecor and bluetooth and clock and drop-down menu
alsa was not present on my RPi4 with Raspbian OS on 01 Jan 2023
Hi Emmet, indeed that’s strange. Yes I’m using the standard 32bit official RPI OS. Not sure why, but after I changed the folder of that service file, it works perfectly.
Hi, I found that if I place the service file in /etc/systemd/system/, it will be flushed automatically during next boot. Instead, I placed it in /lib/systemd/system/.
Hi Ze,
Sorry to hear that you had issues with the tutorial. It’s weird that the OS is flushing those files from that directory as that is where user created services is meant to reside.
Are you just running the standard Raspberry Pi OS (Raspbian) on your device?
Cheers,
Emmet
I can connect to my Raspberry Pi from a VNC client, but it’s not the same session as the console? How can I connect to the console so if I have stuff already on the screen on the console, I can continue working on the same screen from anywhere else within my home?
Hey lawbut2,
This is how the default VNC client is designed to be, there is a solution for sharing the same screen and we plan on putting out a tutorial on that subject in the near feature.
Cheers
Great article Gus. It’s been years since playing with this stuff so trying to get back into it. I am living Cambodia and have an issue trying to install Samba. All the Mirror sites are coming back ‘Failed to fetch…’ I am using two different ISP and get the same response. Funny though, only SAMBA so far with this issue. Any ideas?
Again great article(s).
Hi, thanks for the sharing.
I followed all steps from yours and it already connected.
However, I don’t know why when I connected to that network, it seemed to be freeze.
I couldn’t do anything on the Raspberry pi
While I enter IP address in VNC viewer, should I remove connections between my R Pi and TV, which is connected using HDMI? And only power should be given to the Raspberry Pi?
No you don’t need to remove the connections. However, if you’re worried about privacy then I would unplug them.
Can you set the VNC screen size to 2550×1440?
I haven’t tried but you can attempt it by starting vncserver with the following line.
vncserver :1 -geometry 2550x1440Hi, thanks for the guide, I have one problem
I cant get it to start automatically, I followed your guide step by step…
I have RPI 3
And second question, how can i get it to copy the HDMI screen, now it starts a new desktop ?
Hello,
great tutorial , but i have permission problems with tightvnc after install, i cannot pretty much copy anything that has owner root . How can the tight vnc user be fixed to have sudo ?
It can be more simpeler, use the command:
apt-get install xrdp
After the install you can use as example the windows remote desktop client.
Could you please explain how to set up the Port Forwarding so that it can be used outside the local network, such as at a Raspberry Jam?
Thank you very much. I’ve tried to set this up several times but not managed it before. This worked first time once I’d made my IP address static. Great for my next robotics project.
Useful tutorial, VNC is great (and easy) to use. I have also recently tried nomachine for raspberry pi as my remote access protocol. Tons faster, and gives me some extra functionality. Have you tried this or any others? It’s be nice to see other tutorials of similar products.