In this tutorial, you will be learning how to install the MongoDB server software to the Raspberry Pi.

In this guide, we will be walking you through the process of installing and setting up the MongoDB server software on your Raspberry Pi.
We will be showing you two different paths for installing MongoDB on your Pi.
The first path is to install MongoDB on Raspberry Pi OS. The Raspberry Pi OS repository provides an older version of MongoDB (2.4.14) as newer ARM builds of MongoDB requires ARM64.
The second path is to install the server software to a 64-bit version of Ubuntu. Using a 64-bit version of Ubuntu will give you access to a much newer version of the MongoDB software.
For those who do not know, MongoDB is a NoSQL database. Instead of using structured relational data like MySQL, MongoDB instead stores data as documents using a semi-structured schema.
Equipment List
Here is a list of the equipment we recommend for this tutorial on installing MongoDB on your Raspberry Pi.
Recommended
Optional
Installing MongoDB on Raspberry Pi OS
In this first section, we are going to show you the steps on how to install MongoDB on your Raspberry Pi running Raspberry Pi OS.
If you rely on features that are only present in the newer versions of MongoDB, then you will need to install Ubuntu and follow the steps in the section titled Installing MongoDB on Ubuntu.
1. Our first step is to update and upgrade all existing packages by running the command below.
sudo apt update
sudo apt upgradeCopy
2. Let’s now install the MongoDB server from the Raspbian repository.
Run the following command to install the software.
sudo apt install mongodbCopy3. With the server software installed, let’s proceed to enable and start it up.
The following two commands will enable and start the MongoDB service.
sudo systemctl enable mongodb
sudo systemctl start mongodbCopy
4. Once you have installed MongoDB, you can run the following command to interact with the database by using the command line.
mongoCopyInstalling MongoDB on Ubuntu
For this section, you will need to be running a 64-bit version of Ubuntu Server.
Using Ubuntu, we can install much newer versions of MongoDB. For this part of the guide, we will be showing you how to install MongoDB 4.2 to your Raspberry Pi.
1. Before we start, let’s make sure that Ubuntu is up to date by running the following two commands.
sudo apt update
sudo apt upgradeCopy
2. With everything up to date, our next step is to add the MongoDB GPG key for their 4.2 repositories.
To add this key to the local keychain, we can run the following command.
curl -s https://www.mongodb.org/static/pgp/server-4.2.asc | sudo tee /usr/share/keyrings/mongodb-archive-keyring.asc >/dev/nullCopy3. Now that we have added the GPG key, we need to add the MongoDB 4.2 repository.
For us to add the MongoDB repository, we need to run the command below.
echo "deb [signed-by=/usr/share/keyrings/mongodb-archive-keyring.asc arch=arm64 ] https://repo.mongodb.org/apt/ubuntu bionic/mongodb-org/4.2 multiverse" | sudo tee /etc/apt/sources.list.d/mongodb-org-4.2.listCopy4. As we have modified the package list, we need to update the package list again by running the following command.
sudo apt updateCopy5. Finally, let’s install MongoDB to our Raspberry Pi by using the package manager.
The command below should install the MongoDB server software, and it’s command-line tools.
sudo apt install mongodb-org6. We can now move on to enabling the MongoDB service so that it loads at startup.
Do this by using the following two commands.
sudo systemctl enable mongod
sudo systemctl start mongod
The second command will start up the MongoDB server, so we will be able to interact with it straight away.
7. If you want to interact with your MongoDB installation on your Raspberry Pi, you can make use of the following command.
mongoThis command launches the Mongo command-line tool.
Checking the Mongo Service and Database
We should now check that we have successfully set up MongoDB on our Raspberry Pi.
1. The first thing we should do is check the status of our MongoDB server.
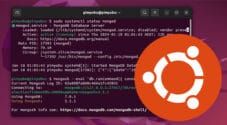
Run the following command to retrieve the status of the “mongod” service.
sudo systemctl status mongodIf everything is running as it should, you will see a response as we have shown below.
● mongod.service - MongoDB Database Server
   Loaded: loaded (/lib/systemd/system/mongod.service; enabled; vendor preset: enabled)
   Active: active (running) since Thu 2020-02-06 10:38:54 UTC; 14min ago
     Docs: https://docs.mongodb.org/manual
 Main PID: 1626 (mongod)
   CGroup: /system.slice/mongod.service
           └─1626 /usr/bin/mongod --config /etc/mongod.conf

Feb 06 10:38:54 ubuntu systemd[1]: Started MongoDB Database Server.
The service should be marked as “enabled” and “Active:” is set to “active (running)“.
2. Next, we can check the status of Mongo itself by retrieving its connection status.
Using the following example command, we can use the mongo command-line tool to check the status of its connections.
mongo --eval 'db.runCommand({ connectionStatus: 1 })'This command will return us several bits of information, including the version of the MongoDB server.
MongoDB server version: 4.2.3
{
        "authInfo" : {
                "authenticatedUsers" : [ ],
                "authenticatedUserRoles" : [ ]
        },
        "ok" : 1
}
As you can see from the result, the version of our MongoDB server is 4.2.3 and that our example command returned “ok” as 1.
Conclusion
Hopefully, at this point, you should now have successfully got MongoDB up and running on your Raspberry Pi.
If you have run into any issues with getting the server installed, feel free to post a comment below.