In this tutorial, we will show you how you can use the Syncthing software on your Raspberry Pi.
Syncthing is a software designed to synchronize files between multiple devices such as the Raspberry Pi in real-time.
Data is synchronized between nodes using TLS. This encryption will provide security and privacy, making it difficult for someone to steal the data while it’s in transit.
Each node needs to identify itself by using a strong cryptographic certificate. If the node fails to provide an allowed certificate, it will not be able to connect, ensuring no dodgy users will easily gain access.
Using Syncthing, you can synchronize files from your Windows, Mac OS, or Linux based devices to your Raspberry Pi.
Clients for Syncthing are available for each of these operating systems that make it easy to use.
Equipment
Use the list below to see what parts we utilized when we set up Syncthing on our Raspberry Pi.
Recommended
Optional
We tested this tutorial using a Raspberry Pi 400, running the latest version of Raspberry Pi OS Bullseye.
Installing Syncthing to Your Raspberry Pi
In this section, you will learn how to easily install the Syncthing software to your Raspberry Pi using straightforward steps.
To install the software, we will need to add the project’s PGP keys and add its package repository as a potential source.
1. Before installing the file synchronization software to our Pi, we should first update the system.
We can update our Raspberry Pi by running the following two commands.
sudo apt update
sudo apt upgradeCopy
2. Next, we need to make sure that we have the apt-transport-https package installed.
This package allows the package manager to handle sources that operate over the HTTPS protocol. By default, this is not supported.
Typically this is provided with most operating systems these days, however, trimmed back ones such as Raspberry Pi OS Lite might have it removed.
We can install the required package by running the command below.
sudo apt install apt-transport-httpsCopy3. Finally, we can store the Syncthing GPG keys in our keyrings directory.
These keys are designed to ensure that the packages we are installing have been correctly signed and aren’t coming from an unexpected source.
Download and save the keys by using the following command on your Raspberry Pi.
curl -s https://syncthing.net/release-key.txt | gpg --dearmor | sudo tee /usr/share/keyrings/syncthing-archive-keyring.gpg >/dev/nullCopy4. With the key added, we can now add the repository itself.
For this Raspberry Pi project, we will be utilizing the stable branch of the Syncthing software.
Add the repository to our sources list by using the command below.
echo "deb [signed-by=/usr/share/keyrings/syncthing-archive-keyring.gpg] https://apt.syncthing.net/ syncthing stable" | sudo tee /etc/apt/sources.list.d/syncthing.listCopy5. Before we will install Syncthing from the repository, we need to update the package list.
We need to update the list so that the package manager reads from our newly added source.
Refresh the package list by running the following command on your device.
sudo apt updateCopy6. Finally, let us install the Syncthing software to our Raspberry Pi.
With the package repository now added, all we need to do to install the software is run the following command.
sudo apt install syncthingCopyAllowing Outside Access to your Syncthing Web Interface
By default, we won’t be able to access the Syncthing web interface without being physically on the device.
As this would make it a frustrating experience for those running a headless Raspberry Pi, we can modify the configuration to allow outside access.
1. Our first task is to get the current local IP address assigned to our Raspberry Pi.
Please note that you should have your Raspberry Pi set up with a static IP address before completing this section.
You can retrieve the local IP of your Pi by using the following command.
hostname -ICopy2. Before we continue any further, we will need to run Syncthing once to generate config files.
For this guide, we will just be running Syncthing under the current user.
syncthingCopyAfter the initial run, kill the application by pressing CTRL + C.
3. After the first run, Syncthing will create all the configuration files we need.
This configuration file will only work as long as we run the Syncthing software with our pi user.
Begin editing the required config file using the nano text editor by using the command below.
nano ~/.local/state/syncthing/config.xmlCopy4. Within this file, you need to find the following line.
To make it easier to find this line, you can use the CTRL + W shortcut to search.
<address>127.0.0.1:8384</address>We will need to replace the local IP defined on this line (127.0.0.1) with your Pi’s local IP address.
For example, using our Pi’s IP, this line would end up turning into the following.
<address>192.168.0.193:8384</address>Using the local IP address, we are restricting access to the web interface only to users on the same local network.
Alternatively, if you want to allow access to any address, use the IP “0.0.0.0“.
5. Once you have changed the IP, save the file by pressing CTRL + X, followed by Y, then ENTER.
Setting up Syncthing as a Service on the Raspberry Pi
With Syncthing’s web interface now accessible outside of the Raspberry Pi, we need to do one last task.
That task is to enable a service for the software. The service will allow Syncthing to start at boot and let it to be easily stopped and started.
1. Syncthing will automatically save a service file to our system during installation.
All we need to do is feed this service a username for it to run under. Using the “$USER” environment variable, we can insert the current user’s name directly into the command.
If you want to run Syncthing under a different user, replace “$USER” with their name.
The following command will enable the Syncthing service to start when the operating system boots.
sudo systemctl enable syncthing@$USERCopy2. With the service now enabled, you can start Syncthing on your Raspberry Pi using the following command.
Here, you will see that we had to specify our username again, which you must do whenever you interact with the service.
sudo systemctl start syncthing@$USERCopy3. We should verify that we have successfully started the Syncthing service on our Raspberry Pi.
Rest assured, verifying the successful start of the Syncthing service on your Raspberry Pi is a simple process. Just use the following command to get the service to output its status. This will confirm that everything is running smoothly.
sudo systemctl status syncthing@$USERCopyIf the service has started correctly and is running, you should see the following displayed within the message.
Active: active (running)Using your Raspberry Pi’s Syncthing Web Interface
At this point, you should now have the Syncthing software up and running on your Raspberry Pi.
We can finally move on to configuring the software and adding a device to synchronize files with. To make this easier to follow, we will split this into smaller sections.
The web interface makes the process of setting up and connecting to devices very straightforward process.
Connecting to the Syncthing Web Interface
Before you can even use the web interface, you will need to first load it up in your favorite web browser.
1. To access the web interface, you will need to know the Raspberry Pi’s IP address.
With the IP in hand, you can go to the following web address in a web browser of your choice.
http://[PIIPADDRESS]:8384It’s essential that whatever you type in that the port number (8384) remains at the end as this is where the Syncthing software listens.
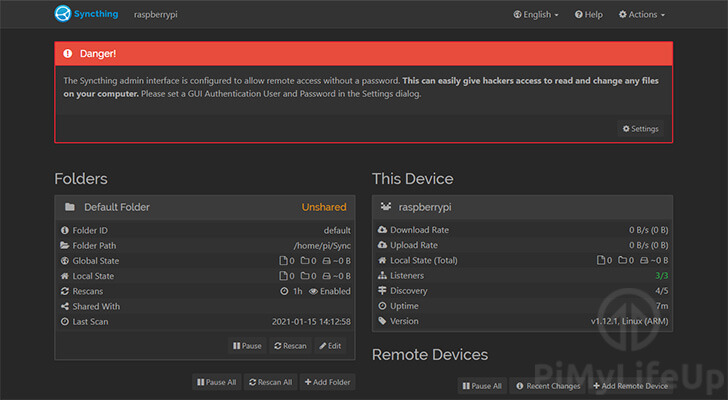
2. Upon going to the web address, you will be introduced to the Syncthing web interface.
Please note that you will be required to login before seeing the following screen once you set up a username and password.
Securing the Syncthing Interface
By default, Syncthing comes with no username or password defined. What this means is that any user can access the interface and adjust your settings.
To stop users from being able to do any unwanted damage, you can define login details.
1. If you haven’t set the username and password before, you will see a message warning you of the dangers.
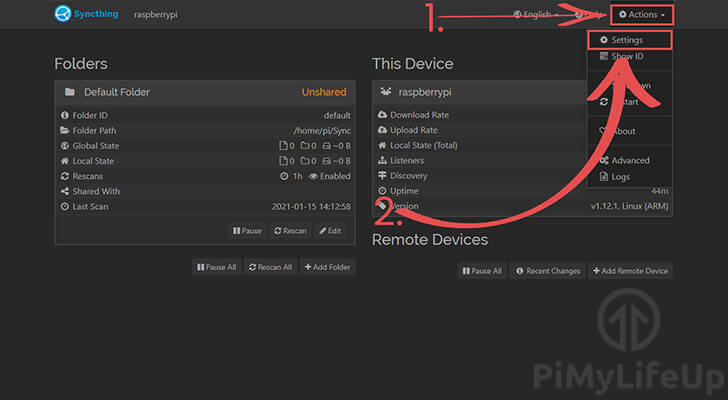
To get to the settings page quickly, we can click the “Settings” button on this warning.

If this message isn’t displaying for you, you can also find the settings page by clicking the “Actions” (1.) dropdown box in the top right corner and selecting “Settings” (2.).
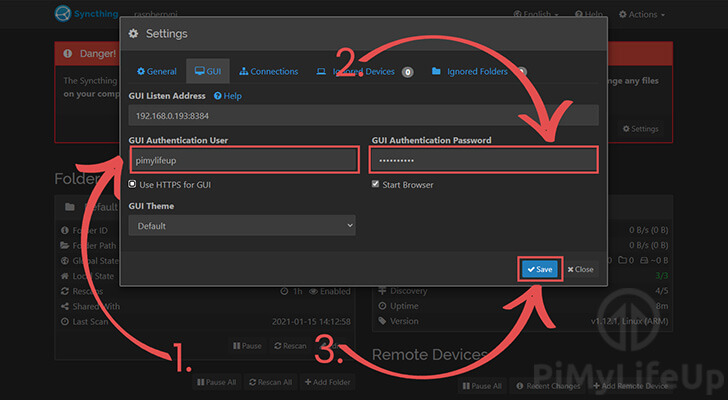
2. Within the popup settings page, you will need to change to the “GUI” tab.
You can change to this tab by clicking “GUI” in the bar at the top of the popup.

3. On this page, you will need to enter both a username (1.) and a password (2.).
Make sure you set a secure password that is not easily guessable. Try and use a combination of letters, numbers, and symbols.
Once you have entered both of these, you can save your changes by clicking the “Save” button (3.).
4. Upon saving your new password, you will be kicked out of the web interface.
Every time you want to use Syncthing’s interface, you will need to enter your new login details.
Retrieving your Devices Syncthing ID
Syncthing works by generating a unique ID for every single device. To synchronize data between devices, each one must have the other device’s ID added.
Finding the ID of your Raspberry Pi Syncthing setup is a straightforward process and can be found within the web interface.
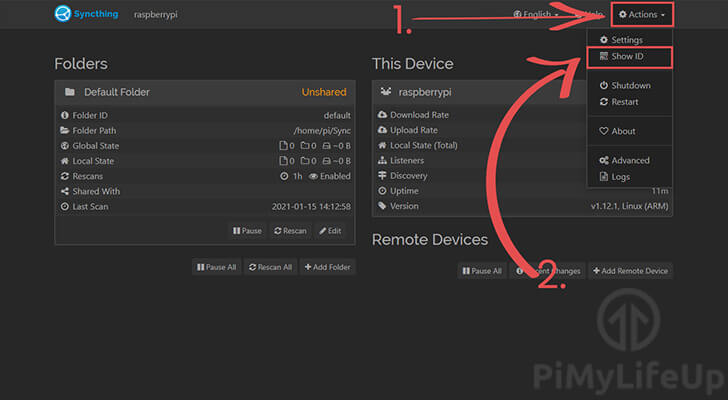
1. Back on the web interface’s main page, click the “Actions” toggle (1.) in the top right corner of the screen.
In the dropdown box, click the “Show ID” option (2.) to bring up the dialog box we are after.
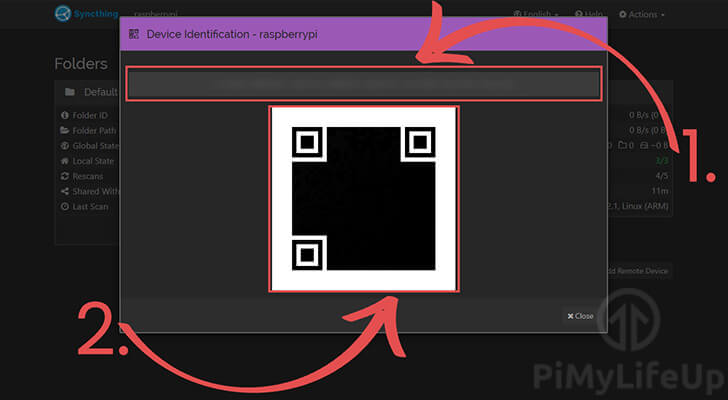
2. On this page, you will see the identification string (1.) and the matching QR code for the ID (2.).
Then identification string should be 50-56 characters long and contain numbers, letters, and hyphens. The hyphens are ignored by the system but are there to make the ID easier to read.
You will need to add your Raspberry Pi’s ID to the other devices you will be connecting to. Likewise, you will also need to add their ID.
The ID works as part of Syncthing’s method for connecting multiple devices to the same pool.
Adding a Device to your Raspberry Pi’s Syncthing Pool
Now that you know how to retrieve your device’s ID let us now show you how to add another device’s ID.
Remember, whatever device you are adding must also add your Raspberry Pi’s ID. Otherwise, the devices will not be able to connect.
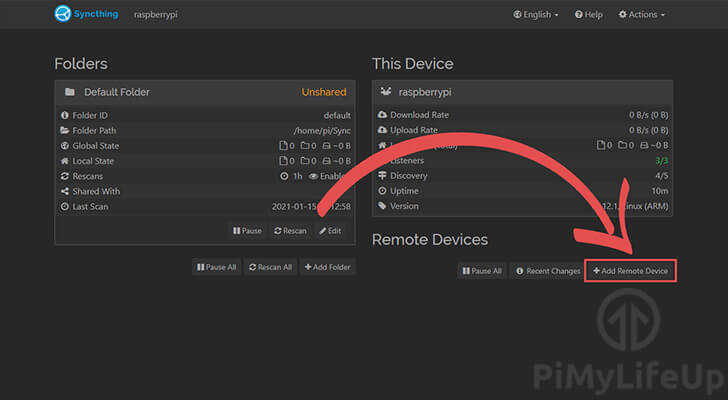
1. On the Syncthing interface, you need to click the “Add Remote Device” button located at the bottom right side.
Clicking this button will take us to the dialog that will allow us to add a device to our Syncthing pool.
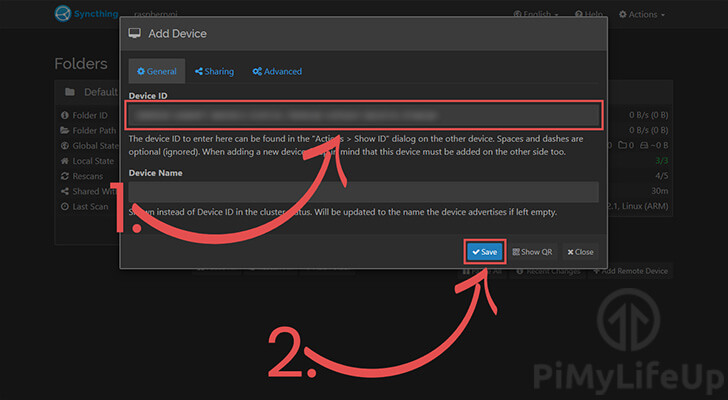
2. In this dialog, you can add the device ID you want to your pool.
In the top textbox (1.), enter the ID for the device you want to connect to. As the ID is relatively long, it will likely be easier to copy and paste the ID over.
Once done, you can click the “Save” button (2.) to add the device and begin the connection process.
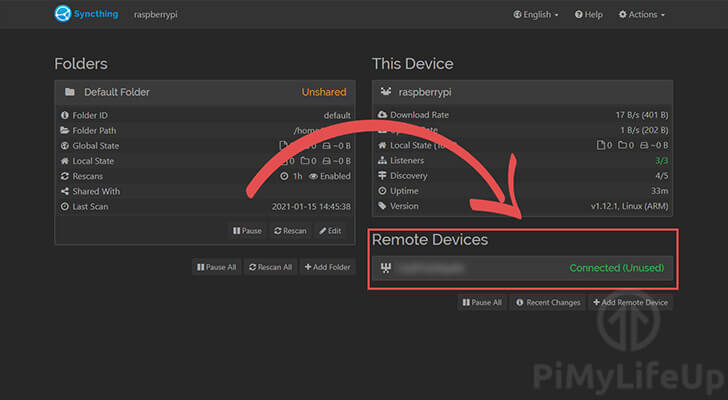
3. Once both Syncthing servers have each other’s IDs added, you should see that you’re successfully connected.
Synchronizing a Folder with your Connected Devices
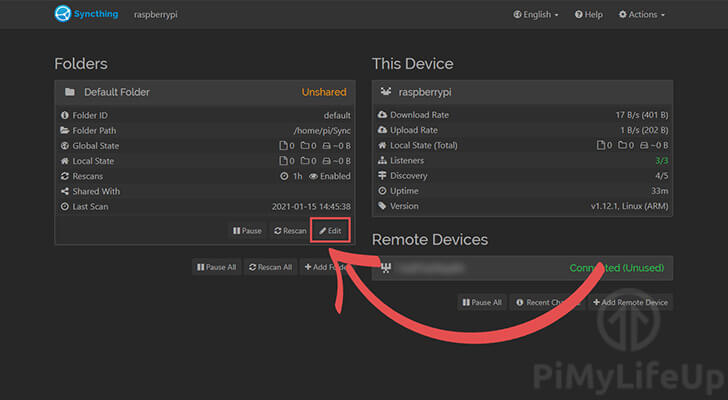
With a device now connected to our Raspberry Pi Syncthing, we can try sharing a folder with the device.
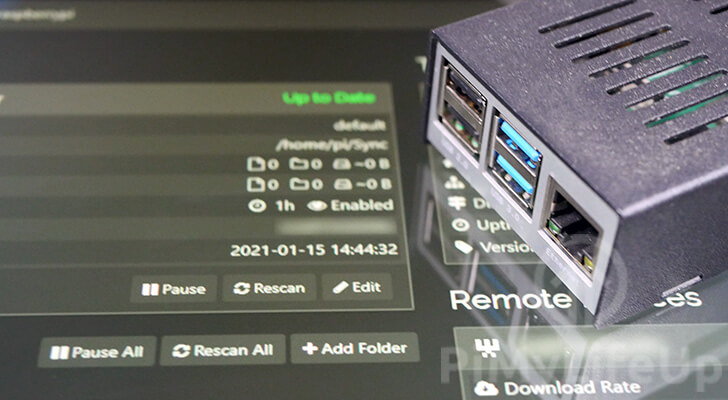
For this section, we are just going to use the default folder. In this case, the folder is located at “/home/pi/sync” on our Raspberry Pi.
1. To begin editing an existing folder’s share settings, click the “Edit” button underneath that folder.
This button will bring up the settings dialog, for that folder and will allow us to adjust who it is shared with.
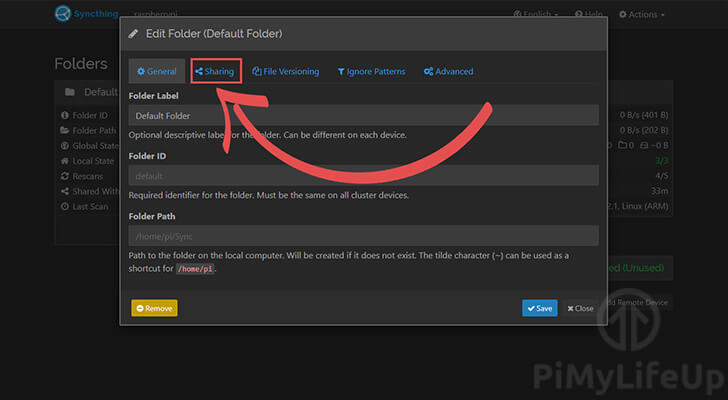
2. Within the file settings dialog we will need to change to the sharing tab.
You can change to this tab by clicking the “Sharing” tab.
3. Using this dialog, you can select the devices you want to share the folder with (1.).
Once you have the devices you want to be synchronized with selected, click the “Save” button (2.).
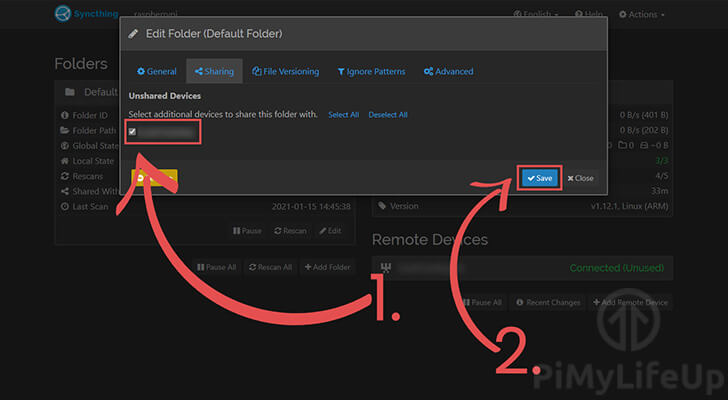
Please note that after you share a folder with another device, you will have to accept it on that device before the synchronization will begin.
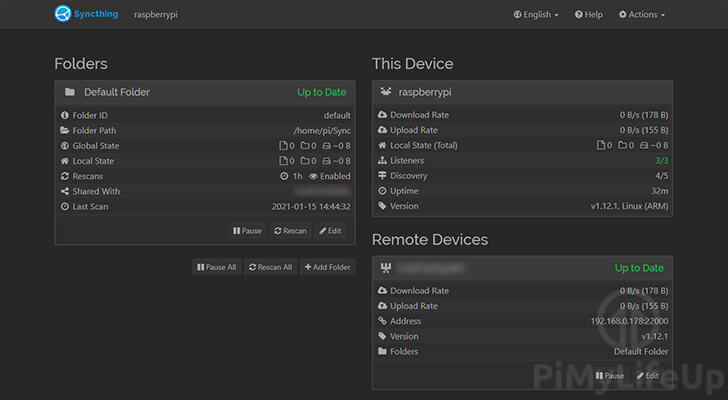
4. You should now see that your folder has now begun synchronizing.
Once it has finished synchronizing, you should see both the folder and the device marked as “Up to date”.
Conclusion
You should now have Syncthing up and running on your Raspberry Pi and know how to use it to synchronize files between different devices.
Syncthing is straightforward to use software that allows you to sync folders between multiple devices.
The software is one of the most effective ways of allowing multiple computers to keep directories in sync in real-time.
It even removes the need to rely on a third party, such as Google Cloud or Microsoft Azure, to store the files.
If you have run into any issues with setting up Syncthing on your Raspberry Pi, feel free to leave a comment below.
You can also check out the software’s official documentation to learn how you can configure the software to your needs.
Be sure to check out some of our other Raspberry Pi projects, such as our Plex server guide, or build your own VPN server.


Thanks so much for this tutorial Emmet. I had hear syncthing was the best way to sync files but without this walkthrough I was confused and ready to give up.
Hi Emmet, a clear manual, that must have cost a lot of time!
I am following your new tutorial closely and point by point.
But something goes wrong with the command ‘nano ~/.local/state/syncthing/config.xml’. It produces an empty field in the Nano editor because the
folder: /home/pi/. local/state/syncthing does not exist.
I ran the command ‘sudo nano -config/synctthing/config.xml’ where I found the desired address, but I don’t know if this is a correct solution.
Furthermore, I don’t know if my notation in the command ‘sudo systemctl enable syncthing@$USER ‘ is correct. When changing $USER for my name, for example @$CEES, I get an error: ‘Destination unit multi-user.targel is non-template’ etc…
I would like to know where the error lies.
Kind regards,
Cees
Hi Cees,
As long as you have run Syncthing with your user once then the default configuration file should exist at “
~/.local/state/syncthing/config.xml". The tilde symbol (~) is automatically replaced by bash with your users home directory.Additionally, you don’t need to replace “
$USER” with anything if you are using the user you want to run syncthing under. This is an environment variable that is automatically swapped out by the terminal.If you want to specify the username yourself, make sure that you replace “
$USER” in its entirety. For example, “sudo systemctl enable syncthing@$USER” would be rewritten as “sudo systemctl enable syncthing@pimylifeup”.Kind regards,
Emmet
Yours:
Additionally, you don’t need to replace “$USER” with anything if you are using the user you want to run syncthing under. This is an environment variable that is automatically swapped out by the terminal.
My response to this:
I also did the latter this way.
Syncthing works fine, but I would like to note that your manual is one of the few manuals on the Internet that produces a good result thanks to the presentation
My compliments.
Best Regards,
Cees
Hi Emmet,
Thank you for putting this manual on the net, its clear design.
But I still get stuck on one item.
Look “Setting up Syncthing as a Service on the Raspberry Pi, step 1:
“sudo nano /lib/systemd/system/syncthing.service”
This folder does not exist.
I looked up the folder but it is named “syncthing@service
sudo nano: with syncthing@.service then works without any problems.
I thought this solved the problem, but the following command line:
“sudo systemctl enable syncthing”, step 4, gives an error.
Because he is looking for syncthing.service and it does not exist.
You could adjust this command with enable syncthing@, but that is apparently too simple.
I hope you will solve my problem.
I hope very this site is still up to date and my message still arrives.
Best regards,
Cees vd Laan, PA3CVI
Hi Ceed,
I have finally got the time to rerun through this tutorial and have updated it to use the Systemd service that the Syncthing package installs automatically.
Additionally, I have corrected an earlier path to ensure that the correct config file is edited.
Please let me know if you still have issues and I will try and look into them.
Kind regards,
Emmet
Thank you for the post!
In some distros you should use the systemctl like this (without the use of sudo, because the user you configured previously in the syncthing.service file):
– systemctl enable syncthing.service –user –now
– systemctl start syncthing.service –user –now
– systemctl status syncthing.service –user –now
Hey,
Thank you for that, honestly didn’t know that was a thing so really handy to know for writing future guides.
Kind regards,
Emmet
Would I be able to use this to set up file sharing between an iPad and a pi4b without using a PC? I want to be able to download emulator files to my iPad and transfer them over to my pi, if such a thing is possible. I know using a PC is the simplest way to do it but I don’t have one!
Hi Em,
I believe it should be possible! Syncthing do not provide an official app for iOS but there is a third party App called Mobius Sync that I have seen mentioned before. I have never tried using it myself, but I really can’t see why this wouldn’t allow you to sync your emulator files to your Pi.
Kind regards,
Emmet
excellent guide! one thing that tripped me up was I needed to change the username from pi to the custom one I use for my PI. A little line in that instruction to change “Pi” to your username could be an idea. (Setting up Syncthing as a Service on the Raspberry Pi step 2)
Hi James,
Thank you for the suggestion. I have gone ahead and added a line saying you should replace “pi” with the name of your user.
Cheers,
Emmet
Thank you so much! This was the smoothest raspberry pi tutorial on the internet! I used this method to backup my motioneye folder.
thank you for this amazing Tutorial!
cheers from Switzerland
Wow, super tutorial. Still working without any issues in November 2021!
I got the following warning about `apt-key`:
Warning: apt-key is deprecated. Manage keyring files in trusted.gpg.d instead (see apt-key(8))
I have no doubt that this tutorial works using `apt-key` judging from previous comments. How do I tweak it to use `trusted.gpg.d` instead?
Hi Curtis,
I have updated the guide to use the new method for storing the GPG keys as noted by the deprecated warning in Raspberry Pi OS Bullseye.
Please try following the updated steps and let me know if you experience any issues.
Cheers,
Emmet
Amazing tutorial! Very good explanation…. Works very good…
Astonishingly excellent instructions!
This is a wonderful guide. It’s clearly written, the included images make it very easy to follow and it’s complete. You get a gold star, Emmet. I’ll be coming back to follow more of your guides, soon. Thanks.
I enjoyed Syncthing. It is very flexable.
I found some issues, though.
I feel it is only worth to use it if you want to mirror folders between systems.
If you need folders that mirror one side only, it might a bit more complicated.
Also, exchanging files between Windows and Linux might get you into a lot of trouble if those files are not UTF-8 named.
Emmet — Excellent tutorial.
I did the install of Syncthing on the Raspbian OS running on an older Dual-core PC to use as a device to sync files on several Raspberry Pis I have doing different tasks. One syncs with a RPi 3 Gogs repo (also a fantastic tutorial), another syncs with a RPi 3 used to backup photos from several cameras and another syncs with a RPi4 (that’s in a pi-top[4]) for Python code my kids are learning with their Foundation Kit and (soon, I hope) the Robotics Kit. Syncthing is great for having peace of mind that there’s additional copies of files being worked on. Soon after a file is updated/changed, Syncthing, does it’s “thing” and syncs that file to the other device. — Thanks for sharing this.