This tutorial will show you how to sync and manage the time on your Raspberry Pi.

To maintain your Raspberry Pi’s time, the operating system calls external servers to get the current time for your time zone.
This time synchronization is beneficial for your Raspberry Pi since it doesn’t have its own real-time clock to maintain the time. While you can add an RTC to the Pi, it requires you to purchase an additional component.
By default, Raspberry Pi OS is configured to use the timedatectl package to maintain the time. This package periodically makes a call to time servers using the NTP protocol. The time returned by these servers is set on the
In the following sections, we will show you how to use timedatectl to control the time on your Raspberry Pi.
Equipment
Below is a list of the equipment we used while controlling the network time sync on Raspberry Pi OS.
Recommended
Optional
Using timedatectl to Sync your Raspberry Pi’s Time
As mentioned earlier, the Raspberry Pi uses the timedatectl package to keep its time in sync. This section will teach you how to enable or disable network time synchronization on your Pi, set the servers it uses, and more.
Luckily for us, most of the hard work has been done as Raspberry Pi OS has already been configured to keep its time in sync.
Changing the Time Sync Network Servers for your Raspberry Pi
By default, the Raspberry Pi is configured to use the time sync servers provided by the NTP pool. This pool of servers maintains accurate time and will automatically boot servers that don’t maintain an accurate time.
However, if you are having issues with your Raspberry Pi’s time remaining in sync, you might try changing this to a different pool.
1. To change the time sync servers, you will need to modify the “timesyncd” configuration file.
You can begin editing this file by using the nano text editor and using the following command.
nano /etc/systemd/timesyncd.confCopy2. You will need to find the following line within this file. This line is where the NTP servers are defined.
#FallbackNTP=0.debian.pool.ntp.org 1.debian.pool.ntp.org 2.debian.pool.ntp.org 3.debian.pool.ntp.org
Copy
Replace that line with the following, changing the NTP servers to the ones you want to utilize.
In this example, we changed the time server to a server provided by the US National Institute of Standards and Technology.
FallbackNTP=time.nist.govCopy3. Once you have made changes to the file, you will need to save and quit by pressing CTRL + X, followed by Y, then the ENTER key.
4. After making changes to the time sync servers your Raspberry Pi is using, you will need to restart the “systemd-timesyncd” service.
You can restart this service by running the following command within the terminal.
sudo systemctl restart systemd-timesyncdCopy5. You can verify that your Raspberry Pi is now using the new time servers by using the following command within the terminal.
This command will output information about the time sync, including the server we are using to synchronize that time.
timedatectl show-timesyncCopy6. Below is an example of the data returned from the above command. You can see that our “ServerName” option is now set to “time.nist.gov“.
FallbackNTPServers=time.nist.gov
ServerName=time.nist.gov
ServerAddress=132.163.97.6
RootDistanceMaxUSec=5s
PollIntervalMinUSec=32s
PollIntervalMaxUSec=34min 8s
PollIntervalUSec=1min 4s
NTPMessage={ Leap=0, Version=3, Mode=4, Stratum=1, Precision=-29, RootDelay=244us, RootDispersion=488us, Reference=NIST, OriginateTimestamp=Sat 2022-11-05 12:32:42 GMT, ReceiveTimestamp=Sat 2022-11-05 12:32:42 GMT, TransmitTimestamp=Sat 2022-11-05 12:32:42 GMT, DestinationTimestamp=Sat 2022-11-05 12:32:42 GMT, Ignored=no PacketCount=1, Jitter=0 }
Frequency=-7393031
Copy
Disabling or Enabling Network Time Sync on your Raspberry Pi.
Enabling or disabling the Raspberry Pi’s network time synchronization is very straightforward, thanks to the timedatectl tool.
This section will show you how to enable or disable the network service. One of the reasons you might do this is if you want to manually set your Raspberry Pi’s time without it being overridden by the network server.
1. To enable the network time synchronization on your Raspberry Pi, you will want to use the following command within the terminal.
sudo timedatectl set-ntp trueCopy2. Likewise to disable the network time sync, all you need to do is use the command below.
sudo timedatectl set-ntp falseCopy3. You can confirm whether your Raspberry Pi is configured to sync the time from the network using the timedatectl command.
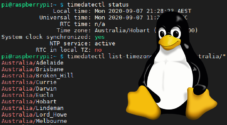
timedatectlCopyFrom this result, the “NTP service:” will either be marked as “inactive” (Disabled) or “active” (Enabled).
               Local time: Sat 2022-11-05 12:42:30 GMT
           Universal time: Sat 2022-11-05 12:42:30 UTC
                 RTC time: n/a
                Time zone: Europe/London (GMT, +0000)
System clock synchronized: yes
              NTP service: inactive
          RTC in local TZ: no
Setting the Timezone
When your Raspberry Pi syncs the time from a networked server, it typically retrieves the time in UTC.
It then applies an offset based on the set timezone to get the time for your specific area. By default, Raspberry Pi OS is typically set to the “Europe/London” time zone.
To change this to your local time zone, you can utilize the timedatectl command as shown below. Ensure you replace “TIMEZONE” with the correct one for your time zone.
sudo timedatectl set-timezone TIMEZONECopyFor example, if you wanted to change your time zone to “Australia/Hobart“, we would use the following.
sudo timedatectl set-timezone Australia/HobartCopyIf you prefer not to use this command, it is possible to set the time zone using the Raspberry Pi configuration tool.
Manually Setting your Raspberry Pi’s Time
If you have disabled network time sync on your Raspberry Pi, you will want to set the time manually.
Please note that since the Pi doesn’t contain a real-time clock, this value will become incorrect as soon as your device is powered off.
To manually set the time or date, you will want to use the following command.
sudo timedatectl set-time TIMEORDATECopyTo manually set your Raspberry Pi’s time with this command, you will want to use one of the following formats.
Y:M:D HH:mm:ssY:M:DHH:mm:ss
For example, if we wanted to set the time to 3 PM, we would use the command below.
sudo timedatectl set-time '15:00:00'CopyConclusion
Within this tutorial, we have shown you how to sync your Raspberry Pi’s time with a networked time server.
A time server allows your Raspberry Pi to keep the correct time without relying on a real-time clock.
Please comment below if you have questions about getting your Raspberry Pi to synchronize its time.
If you have found this tutorial helpful, we have numerous other Raspberry Pi guides and projects that are worth exploring.