In this tutorial, we will show you the simple steps on how to enable SSH on the Debian operating system.
SSH is a protocol for securely connecting to a remote computer, even on an unsecured network. Most people utilize SSH for remotely performing commands. However, you can use it for var tasks, such as transferring files.
Without using a protocol like SSH to connect to your Debian system remotely, such as your username and password could potentially be intercepted by a third-party hacker.
The process to enable SSH on a Debian system, such as Debian 9 (Stretch), Debian 10 (Buster), or Debian 11 (Bullseye), is incredibly straightforward.
We need to do is install the SSH server using the provided package manager and enable the service. The whole setup process should take you less than 5 minutes to complete.
Before you enable SSH on your Debian device, you should ensure that you have, at the very least, set a secure password. By switching this service on, you open up a potential attack vector.
Installing the SSH Server on Debian
In this section, we will be walking you through the simple process of installing the SSH server on a Debian system.
The server is what a remote client will connect to. It handles the incoming SSH connections and verifies the integrity of the incoming connection.
By the end of this section, you will have installed and enabled SSH on Debian.
If you are going through this tutorial on a system with a desktop interface, you can access the terminal by pressing CTRL + ALT + T.
1. Our first step is to update the package list on our system.
This ensures two things. First, it means you will be downloading the latest version from the repositories. Secondly, it makes sure you will be downloading the package from an available mirror.
You can update the package list on your Debian system by using the following command.
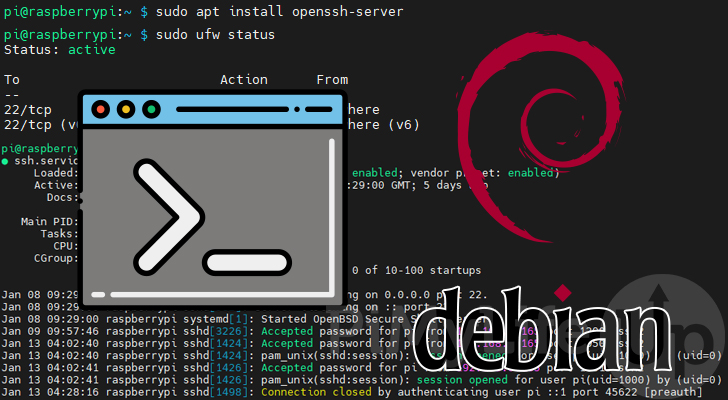
sudo apt update2. Once the update completes, you can install the SSH server on your Debian system by using the command below.
If prompted, enter the password for your superuser privileges. You will need to press the Y key then ENTER to continue the installation process.
sudo apt install openssh-server3. You can now confirm that the SSH server is installed and enabled on your Debian device by running the following command.
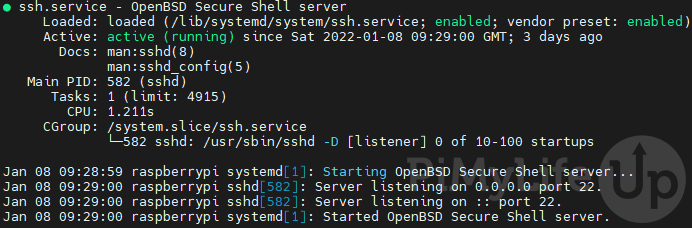
sudo systemctl status sshThis command simply retrieves the status of the SSH service. For example, if the SSH service is enabled, you should see the status marked as “Active: active (running)“.
4. If the previous command should that the service was “inactive” then enabling and starting it is a straightforward process.
Run the following two commands to enable the service, then to start it.
sudo systemctl start ssh
sudo systemctl enable ssh
Configuring your Firewall for SSH
Now that you have installed and enabled the SSH server on your Debian device, you may need to configure your firewall.
Since Debian includes UFW as its default firewall, our steps below will focus on adding a rule for that. However, if you would like to learn more, check out our guide on configuring firewall rules using UFW.
To use the following commands, you will need to use a user with superuser privileges.
1. To add a new rule that allows SSH through the firewall, all you need to do is run the command below.
sudo ufw limit sshYou can see with this command we are using “limit” instead of “allow“.
Using “limit” tells UFW to rate limit that port. If an IP address has attempted six or more connections in the last 30 seconds, it will be blocked.
Adding this will help slow down someone attempting to brute force your SSH login.
2. You can verify that you have successfully added this rule using the command below.
This command will list all firewall rules you have added if UFW is currently enabled.
sudo ufw statusIf the rule has been added, you should see something like the following within your list of rules.
22/tcp                     LIMIT       Anywhere
22/tcp (v6)                LIMIT       Anywhere (v6)
The presence of these rules indicates to you that traffic through port 22 (Port used by default by SSH) can access your Debian device.
3. Please note that even though SSH may now be allowed through your firewall to your Debian device, you may still need to port forward.
Ensure port 22 is forwarded to your device’s IP address before attempting to connect from outside of your network.
If your router requires you to specify the connection protocol, SSH uses TCP.
Connecting to Debian Using SSH
With SSH now enabled on Debian, you can connect to it using an SSH client. If you are using a Windows-based device, Putty or MobaXTerm are good solutions for connecting using SSH.
On Linux and Mac, you can use the SSH client itself. Below we will walk you through the steps of getting your Debian device’s local IP address and connecting to it using the SSH client.
1. Getting the IP addresses assigned to your Debian operating system is simple, thanks to the hostname command.
Use the following command to output all of the IP addresses assigned to your device.
hostname -IBy using this command, you should end up seeing something like what is shown below. In our case, it is only our local IP address. We will be using this address to SSH into our Debian device.
192.168.0.1342. Now that you know your device’s local IP address, you should now be able to SSH into it. Using SSH differs depending on what program you are using.
Our following steps will focus on using the SSH client on Linux to connect to our Debian device.
3. We need to start by ensuring that the SSH client is installed on to the system you want to connect from.
If you use an operating system that uses the APT package manager, you can install this by running the command below.
sudo apt install openssh-client4. Once you have the SSH client installed, you can connect to a client using the following command.
ssh [USERNAME]@[IPADDRESS]Make sure that you replace “[USERNAME]” with the user’s name you are connecting as.
Secondly, make sure you replace “[IPADDRESS]” with the IP, domain name, or hostname of the Debian device you are connecting to with SSH.
5. When you first connect to a new server, you may receive a prompt indicating that SSH can’t verify the host’s authenticity.
To proceed, you will need to type in “yes” to proceed. Always try and ensure you are connecting to the correct SSH server before proceeding.

6. Finally, you will be prompted to enter the password for your account. This is the final process for logging in to your account using SSH.
You can tell that you are now interacting with the remote device as the command line prompt will change to the username and IP address you specified.
For example, connecting to our Debian device using SSH changed the prompt to “pimylifeup@192.168.0.134“.
Controlling the SSH Service on Debian
It is possible to control the SSH service on your Debian device. This is useful if you need to stop SSH from running on your Debian system.
Thanks to Debian using “systemd” it is straightforward to stop, start, enable or disable the SSH service.
Please don’t issue any of these commands when connecting over SSH. It is possible to lose access to your system by stopping the service accidentally.
1. You can stop the SSH service from running on your Debian device by running the following command.
Even though we can stop SSH with this command, it will still be automatically started when you restart your device.
sudo systemctl stop ssh2. By using the command below, you can turn the SSH server back on.
This will immediately load SSH back up, and you will be able to begin connecting to your Debian device again.
sudo systemctl start ssh3. If you want to stop SSH from starting when you restart your Debian device, you can use the command below.
This command is useful if you want to temporarily stop using SSH but don’t want it completely removed from your system.
sudo systemctl disable ssh4. Once you are ready to start SSH at boot, you can re-enable the service using the following command.
Please note that you will still need to start the service still. Enabling a service only allows it to start back up at startup.
sudo systemctl enable ssh5. Finally, you can check the status of the SSH service by using the command below.
This command is helpful if you want to see whether SSH is working on your Debian device.
sudo systemctl status sshEarlier in the guide, we used this command to verify that Debian started the SSH server.
Conclusion
Hopefully, by this point in the tutorial, you will learn how to enable SSH on Debian.
SSH is a crucial tool for securely remotely managing your devices. It creates a secure channel on which you can issue commands, transfer files, and more.
The only real downside to SSH is opening a potential attack vector. So, always ensure that you are at the very least using a secure password.
You can improve the security of your SSH connection further by using two-factor authentication and/or SSH keys. Both make it significantly harder for an attacker to breach your system.
If this tutorial has helped you, be sure to check out our many other Linux tutorials.