In this project, we will be showing you how to setup SSH keys on the Raspberry Pi. It’s the perfect way to harden your Pi’s security.
Using SSH Keys for authentication is an excellent way of securing your Raspberry Pi as only someone with the private SSH key will be able to authenticate to your system.
This works by generating an SSH Key pair, you will retain the SSH private key, but the public key will go onto the Raspberry Pi’s operating system.
These SSH keys act as a means of identifying yourself to the SSH server using public-key cryptography and challenge-response authentication.
If you value your security SSH Keys is something you should set up, it offers a few security benefits over password authentication.
For starters, it is much harder for an attacker to be able to intercept and is also much more complicated to brute force. A standard SSH Key is usually 2048 characters long, compared to a password that is no longer than 32 characters.
Before you continue any further, to make the most out of SSH keys you will need to have enabled SSH on your Raspberry Pi.
Equipment List
Below are all the pieces of equipment that I made use of when setting up SSH keys on our Raspberry Pi.
Recommended
- Raspberry Pi Amazon 2 or newer
- Micro SD Card Amazon
- Power Supply Amazon
- Ethernet Cable Amazon (Recommended) or Wi-Fi Amazon
Optional
- Raspberry Pi Case Amazon
We last tested this tutorial on a Raspberry Pi 5 using the latest version of Raspberry Pi OS Bookworm.
Generating SSH Keys for your Raspberry Pi
You will need to generate a key pair to use SSH keys on your Raspberry Pi. A key pair comprises a public key and a private key.
You will use the private key from your SSH client, and the public key will sit on your Raspberry Pi to authenticate the connection.
Using PuttyGen to Generate an SSH Key Pair
To generate SSH keys for our Raspberry Pi on a Windows-based operating system, we will have to rely on a piece of software called PuTTY.
You can download PuTTY from their website. Make sure you get the full package version as this includes the piece of software that we need to generate the SSH Keys for your Raspberry Pi.
1. Once you have downloaded and installed PuTTY to your computer go ahead and open up the program that was installed alongside it called PuTTYgen.
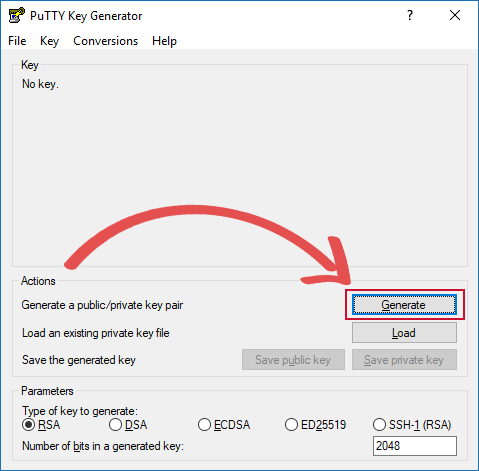
2. With PuTTYgen opened on your computer, click the “Generate” button as we have shown in the image below.
Pressing this button will generate the public and private SSH keys that we will use to make our SSH connection to our device, in our case this will be the Raspberry Pi.
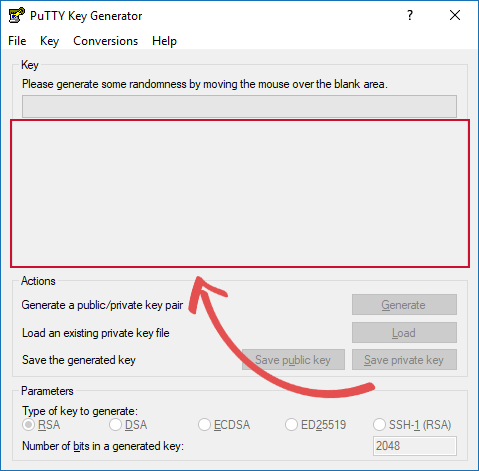
3. Once PuTTYgen has begun generating the SSH keys it will ask you to move your mouse in the space as we have indicated in the image below.
By doing this, it helps ensure that the SSH key it generates should be genuinely unique and be hard for someone to be able to generate the same key quickly.
4. With the SSH keys now generated, there are a few more things that you need to do.
- The first (1.) is to set a name for this SSH key, make this something memorable, so you know what SSH key is required when connecting. Since you are generating this SSH key for a Raspberry Pi, you probably will want to mention Raspberry Pi within this comment.
- Secondly (2.) you should set a passkey, this ensures that even if someone managed to steal your private SSH key, they would still need to enter a password.
This passkey acts as a second line of defense. If you would prefer not to have to enter a password at all, then you can skip this step and leave the two fields empty.
Even without a password, SSH keys offer significantly improved security. A passkey just stops someone from being able to steal just the passkey. - Thirdly (3.) we need to save the public key and the private key to somewhere safe on the computer. Make a note of the location that you save both of these files as you will need these to make a connection to your Raspberry Pi.
Also, make sure you end the files in “.ppk” so that PuTTY can pick them up. - Finally (4.) copy down the public SSH key that is featured in the text box shown in the image below. You can quickly select all the text by clicking on the box and pressing CTRL + A then CTRL + C.
We will need this text shortly to add to our Linux systems SSH Authorized keys file. Without this, the system won’t be able to see our private key as a proper authentication method.

5. The next steps of this tutorial will walk you through the process of copying the public SSH key to your Raspberry Pi. We need to copy the public key across so that it can authenticate our connection.
Since you have generated an SSH key already, you can skip down to the manually copying your SSH key section.
Generating SSH Keys on Linux based systems
1. Generating SSH keys for your Raspberry Pi on a Linux system is a little easier as the SSH tools to do this are usually included with the main operating system. This means we do not have to install any additional packages.
To generate SSH Keys open up a terminal session on your Linux device enter the following command.
ssh-keygenCopy2. With the ssh-keygen tool now running you will be first asked to enter a file in which to save the key. For this tutorial, just press ENTER to leave this as the default.
Since our username was “pi“, this directory was located at the following path: “/home/pi/.ssh/id_rsa“.
Enter file in which to save the key (/home/pi/.ssh/id_rsa):3. After setting the file in which to save the key we now need to decide whether we want to use a passphrase.
Personally, we recommend that you utilize a passphrase as it ensures that your private key will have a bit of extra security. This additional security means that even if someone manages to steal the file as they will need to enter the passphrase to decrypt the private key.
So, at this step enter a passphrase (Make sure that this is something secure but memorable).
Alternatively, if you do not like having to enter a password, you can press ENTER but remember this means that anyone who has your private key can access your device without entering any password.
Enter passphrase (empty for no passphrase):
Enter same passphrase again:
4. Now you have the choice to either copy your SSH public key by utilizing the “ssh-copy-id” tool or manually copy the key itself.
If you want to copy the key over manually, then follow step 5 and step 6, otherwise skip to the next section titled “Copying the Public Key using SSH Tools“.
5. The SSH key should now be generated so we can grab the contents of the public key file, we will need the contents of the file for setting up authentication on the device we want to use the SSH keys to authenticate to.
To get the contents of the public key, you can utilize the following command on your Linux based device.
cat ~/.ssh/id_rsa.pubCopy6. With the contents of the public key now handy we can now proceed to the next step of actually adding the SSH key to the “authorized_keys” file.
Now skip to the section titled “Copying the Public Keys manually” to learn how to utilize the public keys contents to allow the private key to act as an authorization key.
Copying your Public SSH Key to a Raspberry Pi
These next two sections will show you two ways to copy the public SSH key to a Raspberry Pi.
This is one of the most crucial steps, as it is how you will get your Pi to authenticate your private key when you connect.
Copying the Public Key using SSH Tools
1. On your Linux device (In our case it’s one of our Raspberry Pis), run the following command. Make sure that you replace “<IP_ADDRESS>” with the IP address of the remote machine that you want to copy the keys to.
Please note that you will be asked to log in with both your username and password for that remote machine as the tool needs these to copy over your public key.
ssh-copy-id -i ~/.ssh/id_rsa <IP_ADDRESS>CopyOnce done, this tool will automatically add your public key to the “authorized_keys” file on the remote machine.
Copying the Public SSH Key to your Raspberry Pi Manually
1. Back on the Raspberry Pi, we need to utilize a few commands to setup our “authorized_keys” file. This is the file that the SSH daemon will check when a private key is used for authentication.
To begin let’s create the folder that our “authorized_keys” file will be sitting in. To do this, we will be using the “install” command with a few parameters to set the correct permissions.
Run the following command on your Raspberry Pi.
install -d -m 700 ~/.sshCopy2. With the folder created let’s go ahead and put our public key in the “authorized_keys” file.
To do this run the following command to begin editing it.
nano ~/.ssh/authorized_keysCopy3. In this file copy and paste the contents of the public SSH key that you generated earlier using either your Windows device or your Linux device.
SSH will authenticate any private keys against the public key present to see if it is a legitimate connection to authorize.
4. Once you have your public SSH key entered into the “authorized_keys” file, you can save and quit out of the file by pressing CTRL + X then Y and finally ENTER.
5. With the file now saved we need to make sure it has the correct permissions. To do this, we need to run the following chmod and chown commands.
These commands will assign the correct permissions to the file so that it can be read by SSH when you try to log in.
If you are not using the default “pi” user, make sure you replace the text “pi” in the following command with the name of the user, you want to use this for authentication.
sudo chmod 644 ~/.ssh/authorized_keys
sudo chown pi:pi ~/.ssh/authorized_keysCopy
6. With the SSH public key now saved and the permissions correctly set we can now proceed to login. We will do this before we disable password authentication, so we do not lock ourselves out of our Raspberry Pi.
For our SSH key authentication tutorial, we will be showing you how to connect to your Raspberry Pi using your private key and PuTTY.
Connecting using your Private Key on Linux
1. Utilizing the private key is dead easy on the Linux device that you generated the key in the first place.
The SSH tool by default on most Linux based systems is designed to automatically make use of the private key when attempting to make a connection.
As long as you are using the machine you used to generate the private key, you can use the SSH command as shown below.
The system will automatically try to use the private key that we created earlier to make the connection.
Thanks to copying the public key into the “authorized_keys” file of the remote host, it will be able to recognize our incoming private key and accept our connection.
ssh IP_ADDRESSCopy2. If you set a passphrase, you will now be asked to enter that before you can continue, this is required to unlock your private key.
After entering your passphrase, you should now be logged into the remote machine.
If you don’t like having to enter your passphrase every time, don’t worry as we will go into how to cache this later on in the tutorial.
Connecting to your Raspberry Pi using a SSH Key with PuTTY
1. In this section of the Raspberry Pi SSH keys tutorial, we will be showing you how to use your private key with PuTTY to connect to the Raspberry Pi.
Connecting using a private key is a relatively simple process.
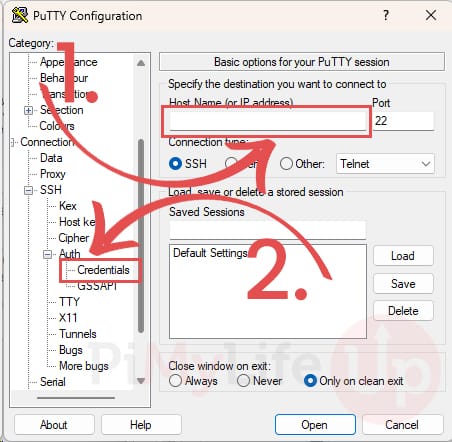
Start by opening up PuTTY on your computer and entering your Raspberry Pi’s IP address (1.).
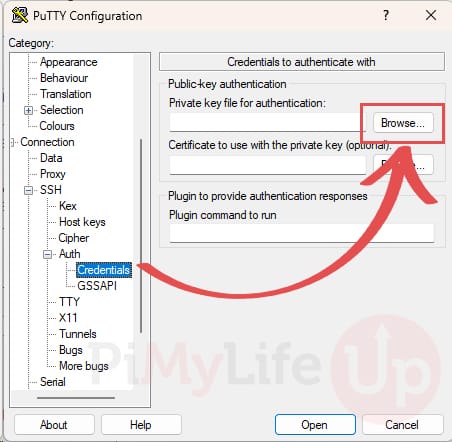
Next, you will need to click the “Credentials” option (2.). This menu is hidden under the “SSH” and then “AUTH” sections. You may need to click the little plus symbol (+) to reveal these settings.
2. Once you are on the credentials screen, you must click the “Browse” button next to the “Private key file for authentication” option.
This button will allow you to find and select the private key that we saved earlier in the tutorial. Selecting this file will allow PuTTY to try and use it for authentication.
After you have selected the private key from the browser, you should now click the “Open” button to start the connection.
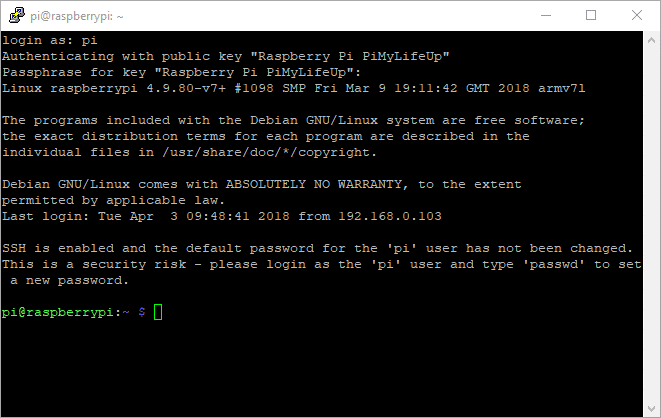
3. Upon connecting you will be first asked to enter a username, Make sure this is the username that belongs to the private key that you are using otherwise authentication will fail.
After entering the correct username, you will be now asked to enter a passphrase for your private key if you set one earlier.
Upon entering a correct passphrase you will be logged into the SSH session. You can now proceed to disabling password authentication completely.
Force your Raspberry Pi to use a SSH Key
1. To disable password authentication and force your Raspberry Pi to use SSH keys, we need to modify the “sshd_config” file. Within this file, we can change the behavior of the SSH daemon.
To modify this file run the following command on your Raspberry Pi.
sudo nano /etc/ssh/sshd_configCopy2. Within this file, we need to find the following line and change “yes” to “no“.
This simple change will completely disable the ability to login to your Raspberry Pi with just a password. From now on you will require the private key to gain access to the system through SSH.
If you are having trouble finding the line you can use CTRL + W to find it quickly. (If you’re using the nano editor)
Find
#PasswordAuthentication yesReplace with
PasswordAuthentication no3. You can now save and quit out of the file by pressing CTRL + X then Y and finally ENTER.
4. With the changes now made to the “sshd_config” file, we should restart our Raspberry Pi to ensure the changes are loaded in.
Remember to make sure that your private key is allowing you to connect to your Raspberry Pi as passwords won’t work after restarting.
Once you are happy with everything, use the following command on your Raspberry Pi to restart it.
sudo rebootCopy5. If everything is working correctly you should only be able to perform an SSH connection if you have a valid private key.
Without the private key, the connection will be refused by the SSH agent. As you can no longer use your password, keeping your private key safe is a very crucial task as it is now your only way of remotely accessing your device.
If for some reason you manage to lose your private key or forget the passphrase for your private key there is still one way of gaining access to your device.
To fix any issues that may arise with your SSH connection you can still physically connect a keyboard and mouse to your device to regain control.
To restore password access over the SSH connection, you should try reverting the change we made to the “PasswordAuthentication” setting and then refollow the tutorial to set up the SSH keys again.
Caching SSH Passphrase for the Current Terminal Session
1. If you are using the SSH bash tool, then you can cache the passphrase for your private key while the current session is still going.
To do this, we must first start up another session of the ssh-agent. We can do this by running the following command within the terminal session.
eval $(ssh-agent -s)CopyUpon entering this command, you will be shown a process id for the ssh-agent that we just loaded. You can use this process id later on to kill the agent and remove the passphrase caching.
The process id should appear something like, “Agent pid 26484“, you need to make a note of the number.
2. Now that we have started up our additional session of the ssh-agent let’s go ahead and add our private key to it.
We can do this by just typing in the following command, be prepared to enter your private key’s passphrase.
ssh-addCopy3. With your SSH key now added to the agent, you should be able to login to any remote machine that has your key authorized without needing to enter your passphrase.
4. To remove your private key from the SSH-agent cache, you will need to kill the ssh-agent we started earlier.
The easiest way to do this is to make use of the process id that we grabbed earlier. Just insert that process id after the command ‘kill’ to kill the process.
kill PROCESSIDCopyConclusion
Hopefully, since you have got to this point in the tutorial, you will have a good understanding of how to enable and use SSH keys on a Raspberry Pi.
SSH keys are one of the best ways to help secure an SSH connection, as an attacker must break a significantly more complicated key to gain access to your system.
If you have any thoughts, tips, or anything else you would like to mention, please don’t hesitate to leave a comment below.
If you found this tutorial helpful, we invite you to explore our diverse range of other Raspberry Pi projects.


Thanks for this clear explanation. Best and most current I could find.
Does Raspberry PI OS still support RSA 2048 only.
I tried ECDSA – nistp256 while this is what I used for Home Assistant ssh access on raspberry PI as well, but ran into an error. Doubt if I made a mistake or else this is not compatible.
Great writeup, clear and easy to follow.
Only thing I’d change is to add ‘user-id@ipaddress’ to the examples in case you wanted to log in as a different user on the remote machine.
I don’t know if this will help anyone else. But I found that when I generated the keys with putty on windows, everything worked well.
The problem was when I tried to access ssh from another raspberry pi on my network. I received Permission denied (publickey) error. I finally figured out that I needed to run ssh-keygen and create id_rsa and id_rsa.pub in your .ssh folder on the raspberry pi I could not connnect to. Then you can copy the contents id_rsa.pub file to the authorized_keys file of the pi your trying to connect FROM. Now I can connect with both putty from windows and my other raspberry pi computer on the network.
Sorry if it sound confusing, but I hope this will help someone having this issue
Great tutorial
Note: Don’t enable SSH in Raspberry pi imager (if you’re using it) because it will probably corrupt the OS and you have to make a clean reinstall. That happend to me anyways.
I can’t replicate this issue.
Thank you ! You do an amazing job with your site especially for pi users like me.
This is an excellent explanaion, thanks so much!
Thank you for this titorial. Best SSH explanation I have read.
Thanks for the tutorial, it’s very helpful.
I did this tonight. Very good tutorial – the clearest I found on this topic. Thank you.
Great tutorial. Working great!
Great tutorial, very well explained!