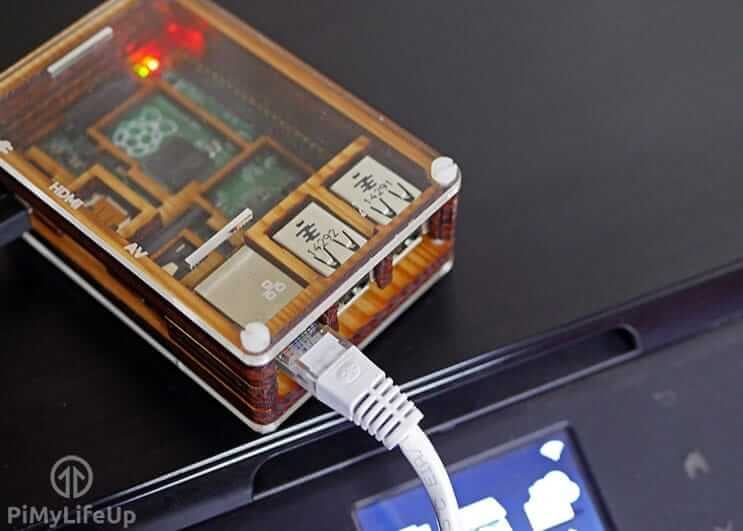
In this tutorial, I will be going through the steps on how to set up a Raspberry Pi Print Server.
The process of getting the software installed is pretty simple, but configuring it and getting a Windows network to find the print server is a bit more of an involved process.
Setting up a print server is a simple way of bringing your regular USB printer to more modern standards without you having to shell out hundreds of dollars.
The software allows you to move the printer to wherever you want and have it accessible by multiple computers rather than having it connected straight into a single computer.
It’s also a great way to share a printer without needing a costly tower computer running all the time.
To make this all work, we will be making use of a piece of software called CUPS. CUPS stands for Common Unix Printing System and is the backbone of most Linux printing software.
Basically it is the software that communicates with your printer and gets it to print files correctly.
If you want to make sure the CUPS printing software supports your printer, then go to their website at open printing and look up your specific model number.
Equipment List
Below are the pieces of equipment that you will need for this Raspberry Pi print server tutorial.
Recommended
- Raspberry Pi Amazon
- Micro SD Card Amazon or an SD card if you’re using an old version of the Pi.
- Ethernet Cable Amazon or Wi-Fi Amazon
- USB Printer Amazon
Optional
Video
If you are interested, we have embedded a video on how you can set your Raspberry Pi up as a Print Server. Of course, if you prefer our written content, be sure to skip this video and proceed to the next section.
Installing the Raspberry Pi Print Server Software
Installing the print server for the Raspberry Pi is a simple process since it is available as a software package.
I will be using the latest version of Raspberry Pi OS throughout this tutorial so if you need to install it then be sure to check out my how to install Raspberry Pi OS tutorial.
1. To get started we should first update the Raspberry Pi to ensure we are running the latest software.
You can do this by entering the following commands into the terminal.
sudo apt update
sudo apt upgradeCopy
2. Once the Raspberry Pi has been updated, we can now start installing the print server software.
In this case, we will be installing CUPS. This software manages printers connected via USB or over the network, and it has the bonus of providing a management interface that you can view over the internet.
Alongside Cups we will also be installing two additional packages that help improve the number of printers that it will be able to work with.
printer-driver-gutenprint: This particular package provides drivers for many different brands of printers ranging from Canon to Epson. It greatly improves the number of printers that will work withs CUPS.hplip: The one major brand missing from the Gutenprint package is HP, luckily, this brand happens to provide their own drivers that can be installed with this package.
On top of these two packages, we will also be installing Samba as it will allow you to share your printer with Windows devices a little easier.
Install CUPS and these packages by typing the following command into the terminal on your Raspberry Pi.
sudo apt install cups printer-driver-gutenprint hplip samba Copy3. When CUPS has finished installing there are a few extra things that we will need to do.
The first thing to do is add your user to the lpadmin group.
This group will allow your user to access the administrative functions of CUPS without needing to use the superuser.
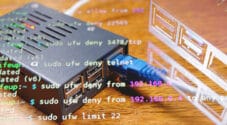
sudo usermod -a -G lpadmin $USERCopy4. There is one other thing that we will need to do to CUPS to ensure that it runs well on the home network and that is to make CUPS accessible across your whole network.
At the moment Cups is set up so that it will block any non-localhost traffic.
We can get it to accept all traffic by running the following two commands:
sudo cupsctl --remote-any
sudo systemctl restart cupsCopy
5. Now we should be able to access the Raspberry Pi print server from any computer within the network.
If you are unsure on what your Raspberry Pi’s local IP Address is then you can make use of the following command.
hostname -ICopy6. Once you have your Raspberry Pi’s IP Address, go to the following web address in your favorite web browser.
Make sure to swap out my IP address (192.168.1.105) with your own.
http://192.168.1.105:631Below we look at setting up SAMBA correctly to ensure Windows can properly identify the print server running on the Raspberry Pi.
We will also show you how to add a printer using the CUPS interface.
Setting up SAMBA for the Pi Print Server
If you intend on using your print server with Windows, then setting up SAMBA correctly is necessary.
We will need to install SAMBA and make a few changes to its configuration to ensure that it runs correctly and utilizes the CUPS print drivers.
1. Now firstly, we should make sure we have SAMBA installed, the easiest way to do this is simply run the install command in the terminal.
We can do that by entering the following command in the terminal.
sudo apt install sambaCopy2. With SAMBA now installed to our Raspberry Pi, we will need to open its configuration file and make several edits.
We can open the file with the nano text editor by using the following command:
sudo nano /etc/samba/smb.confCopy3. Now with the file open, we will need to scroll to the bottom of the file. The quickest way to do this is to use the following key combination: CTRL + V.
Once at the bottom of the file you should add or change the following lines.
In my case, the “[printers]” and the “[print$]” sections were already in the file, so I just needed to change the values to match the following.
# CUPS printing.
[printers]
comment = All Printers
browseable = no
path = /var/spool/samba
printable = yes
guest ok = yes
read only = yes
create mask = 0700

# Windows clients look for this share name as a source of downloadable
# printer drivers
[print$]
comment = Printer Drivers
path = /var/lib/samba/printers
browseable = yes
read only = no
guest ok = noCopy
Save the file by pressing CTRL + X and then pressing Y and then ENTER.
4. We can now restart SAMBA to get it to load in our new configuration.
To restart SAMBA, all we need to do is type the following command into the terminal.
sudo systemctl restart smbdCopyAdding a printer to CUPS
1. Adding a printer to CUPS is a rather simple process, but first, we need to load up the CUPS web interface.
If you’re unsure what your Raspberry Pi’s IP address is, then run the hostname command in the terminal.
hostname -ICopy2. With your Raspberry Pi’s IP address in hand, you need to go to the following address in your web browser.
When typing in this address make sure that you swap out our IP address (“192.168.1.105“) with your own.
https://192.168.1.105:6313. You should be greeted with the following homepage.
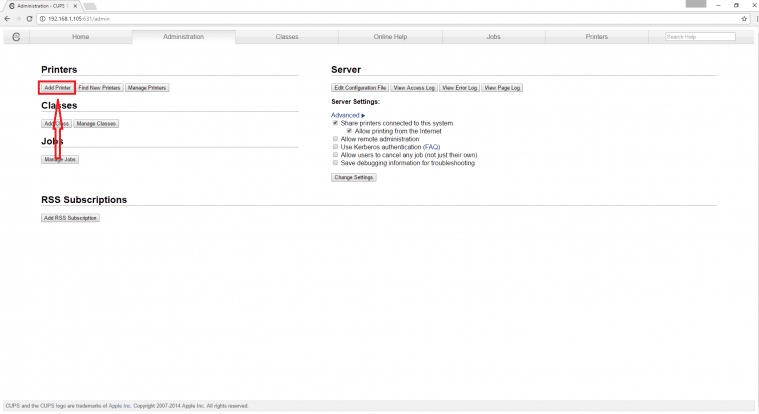
On here we need to click “Administration” in the navigation menu at the top of the screen.

4. You will be taken to the Cups administration page.
On here, we need to click on the “Add Printer” button.
5. With the “Add Printer” screen now loaded, we can select the printer we want to set up Cups for.
In our case, that printer is the “Canon MG2500 series” printer.
Once you have your printed selected, click the “Continue” button.
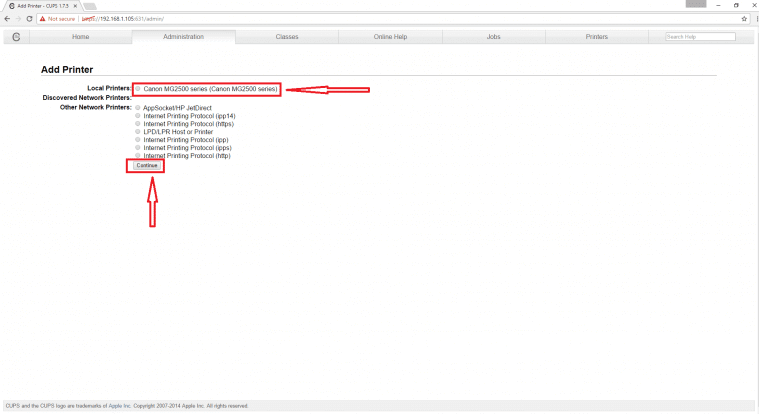
If your printer is not showing up on this screen, ensure that you have plugged it into one of the USB ports on the Raspberry Pi and that it is turned on.
You may need to restart your Raspberry Pi if it is still refusing to show up, ensure the printer is turned on and plugged in when you restart.
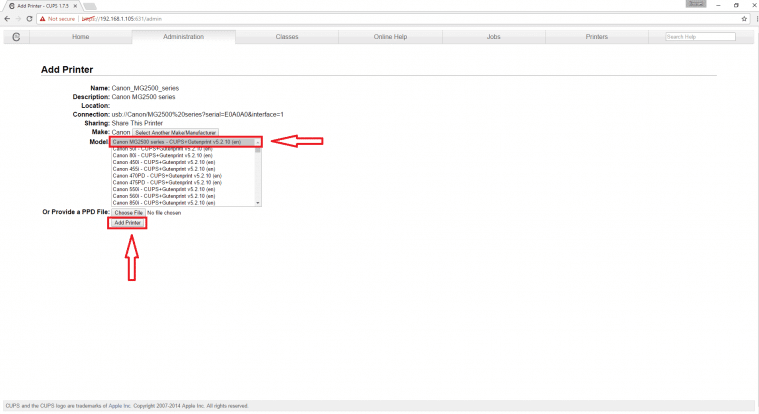
6. On this screen, you need to select the model of your printer. CUPS will try and automatically detect the model and pick the correct driver.
However, in some cases this will not function correctly, so you will have to go through the list yourself and find the most relevant driver.
Once you are satisfied everything is correct, click the “Add Printer” button.
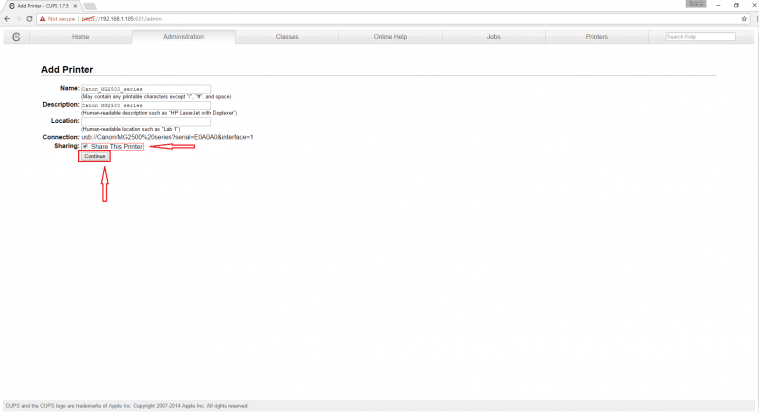
7. Now, this is the last screen you need to deal with before the printer is successfully added.
On this screen you can set the name and description to whatever you want.
It is helpful to set the location if you have multiple printers in your house that you need to deal with.
Also, make sure you enable “Share This Printer“, otherwise other computers will not be able to access it.
Once you are happy with the settings, feel free to click the “Continue” button.
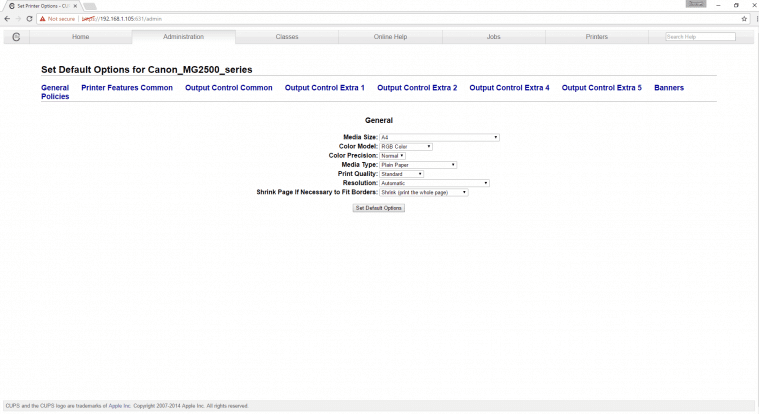
8. The final screen that you will be presented with after setting up your printer is pictured right below.
This screen allows you to change a few of the printer’s specific settings. Such as the page print size, the print quality, and various other options.
Now we will go over how to add our newly setup Raspberry Pi print server to Windows.
It should be a relatively easy process thanks to setting up SAMBA earlier in the tutorial.
Adding a Raspberry Pi Print Server to Windows
1. Adding a CUPS printer to Windows can be a bit of work, mainly because you need to select the driver for Windows to be able to connect to and understand the printer.
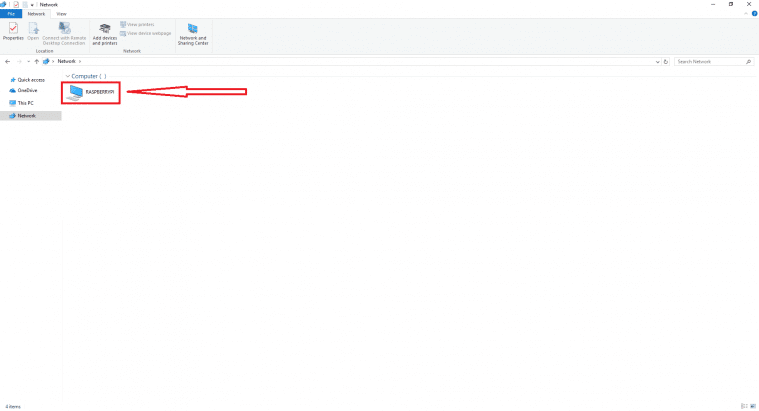
To get started, first go to the network page in Windows, one of the fastest ways to get to this is to load up “My Computer” or “This PC” and click on “network” in the sidebar.
Once there you should have a screen that looks like the one below with your Raspberry Pi’s hostname there, in my case it is RASPBERRYPI.
Double click on your Raspberry Pi’s share, it may ask for a username and password.
If just pressing enter doesn’t work, try entering pi as the username.
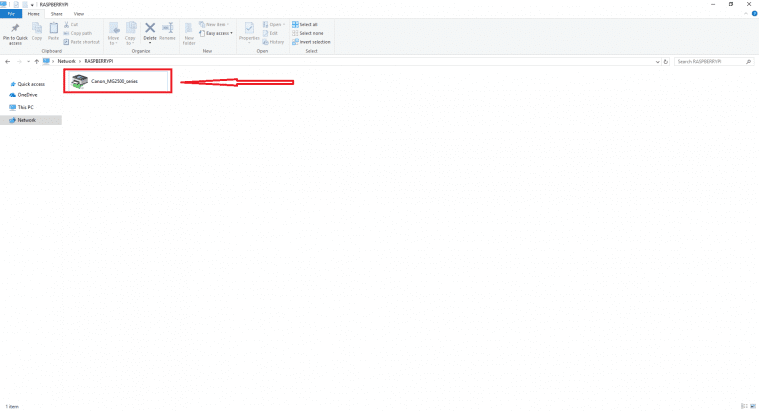
2. You should now be greeted with a screen displaying the printers available on your Raspberry Pi print server.
Double click on the printer you want to have connected to your computer.
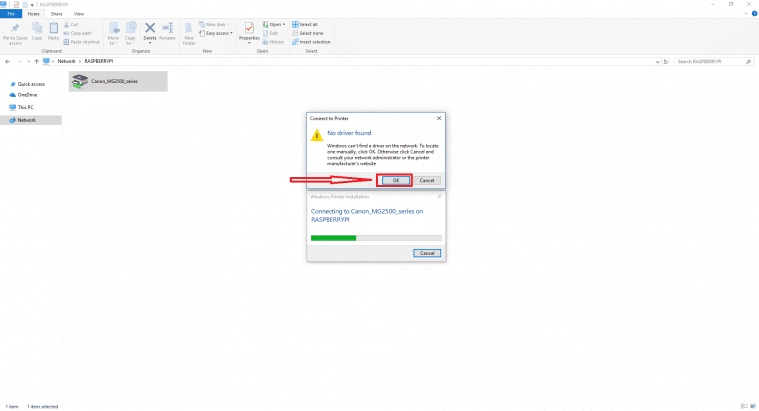
3. Upon double clicking this, you will likely be greeted with the warning message below.
Just click the “OK” button to continue with the tutorial.
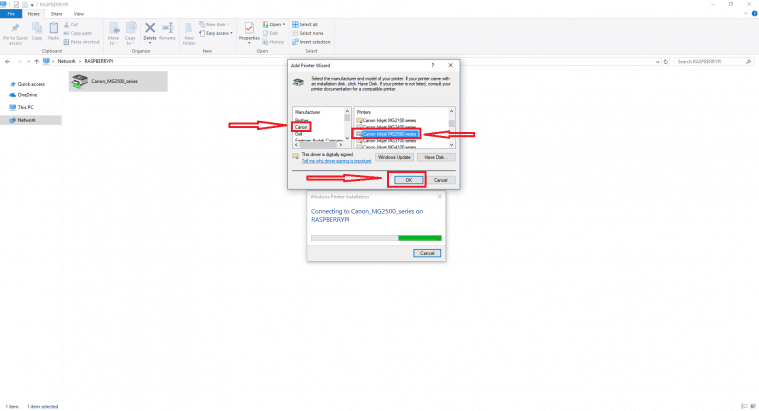
4. Now you will need to find your printer within this list, on the left is a list of all the brands, and on the right, is a list of all the printers for that brand that Windows has drivers for.
If you don’t find your printer on here, then try looking up your printer’s model online and download the appropriate drivers for it.
In my case, I had to look for the Canon MG2500 series as shown below.
Once you have selected your printer, click the “Ok” button to continue.
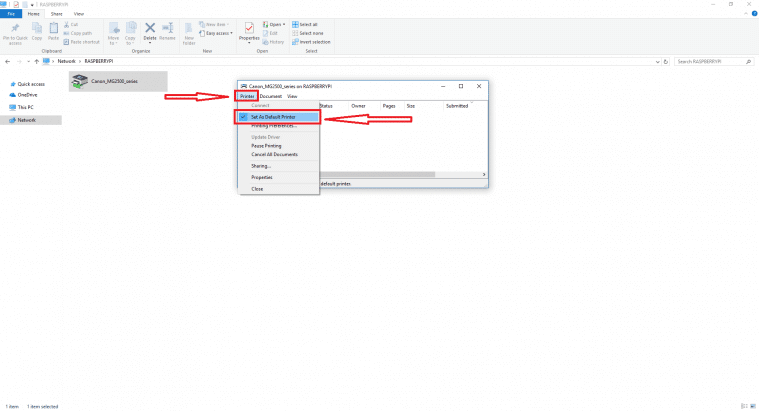
5. This process will now load up a connection with your printer.
If you want to make this the default printer for the computer, then click “Printer” -> “Set as Default Printer“.
6. The printer should now be successfully added to your computer and be available for any program to use.
You can ensure the printer is correctly set up by printing a file.
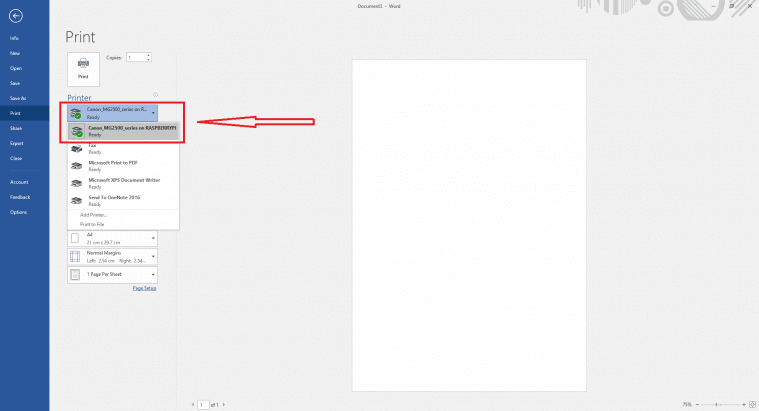
If you have any issues with the file printing, ensure that you have selected the correct printer driver in both CUPS and Windows.
Make sure your printer is also switched on, some printers like the Canon MG2500 series don’t automatically turn back on when a file is sent to it to be printed.
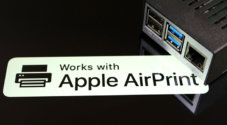
You can extend your Raspberry Pi print server further by adding Apple AirPrint support to it.
Conclusion
I hope that this tutorial has shown you how to set up a Raspberry Pi print server and that you haven’t run into any issues.
If you have some feedback, tips or have come across any issues that you would like to share, then please don’t hesitate to leave a comment below.


For those using canon printers. I specifically use a canon mg 2522 which is part of the mg 2500 series. You will have one hell of a time getting them to work. But I found this amazing package that once you install it just works!
https://gimp-print.sourceforge.net/p_Features.php
This was an absolutely marvellous tutorial, thank you very much!
Additionally, I needed to install hplip for my ancient LaserJet 1022, which was to be expected.
The other minor snag I ran into was Windows 10 not finding my rasp-box with just network browsing in file explorer. I had to explicitly enter “\\[my rasp-box hostname].local” into the file explorer address bar to find the printer. But after this, everything worked flawlessly.
works great. I’m running mmdns and airprint now on a raspberry pi on my network. I can see and print from anything
for Canon MF3010 you have to install Raspberry pi os x64 bit version otherwise wont succeed installing printers
worked like a charm..
especially the samba setup
thanks
Another awesome tutorial. My RPi4 is now printing from a network printer. You are my go to guy for all things Pi.
Excellent guide, easily got my Canon MX490 set up and tested w/ Windows 10 using this method. I can now stop lugging my WiFi challenged printer up and down the stairs at home when I need to use it. Thank you!
This is a wonderful guide and, as a Raspberry Pi novice, I was able to get this working on Mac OS. But I can’t get the Raspberry Pi to appear on Windows Network. Curiously, I can still select the printer from both of our household Windows machines, and the jobs appear in CUPS, but they don’t actually print. If I tell them to print via CUPS, it asks me for login information for my hostID, which doesn’t exist. I’m not sure where or what went wrong for Windows. Anyone else encounter this problem?
Thanks! This worked like a charm for me. I had to create a PPD file for my brother printer…..but it all went smooth and works great!
how did u do it
Has anyone ran into the issue of not being able to print ANY PDF documents through adobe or 3rd patry pdf readers?
I can print any other type of document type except for PDFs and am struggling to find any solution.
im using Raspberrypi zero w and a brother hl-l2300d printer.
Hey Gus!
This was super straightforward, thank you!
Having an issue.
I’m not sure I was able to completely successfully add my Canon LBP 6000.
It appears to be supported by CUPS (https://openprinting.org/printer/Canon/Canon-LBP6680_3480)
When adding the printer, I uploaded the PPD file from the above-linked website.
Now, when I print, I get stuck at “Sending data to printer”.
Will try and remove the printer and re-add; would appreciate any suggestions (I’d love to be able to replace my old 2010 Mac mini as a printer server and just use my Raspberry Pi!)
Nope, this printer is not supported.
https://openprinting.org/printer/Canon/Canon-LBP6000_LBP6018
Oh well, time to find another solution!
You Need 64 bit Raspbian .
For my HP printer I had to install hplip and cups on the raspberry pi
sudo su
apt-get update
apt-get install hplip cups
usermod -a -G lpadmin pi
Thanks for the instructions. Worked a treat for me as a Raspberry Pi novice. I am using all Apple hardware otherwise.
There is a bug with the cups webfront end that causes a timeout when searching for the print driver list. It gives an “Unable to get list of printer drivers: Success” error message.
I encountered this when trying to configure my old rpi model b as a print server. I’m not sure if newer pi’s would be affected as they would be a bit faster.
However the workaround is to run this from the commandline:
sudo /usr/lib/cups/daemon/cups-driverd list 1 0 requested-attributes=’ppd-make’
Once the command completes – go through the process in the cups webfrontend again and it should work this time.
Hi Neil,
In my case, your recommendation hit the problem right on the nail! (No pun intended!) I tried many different things but your strange looking ‘ppd-make’ resolved the issue.
Thanks!
Michael
This guide worked great, thank you.
To restart samba service the command mentioned here doesn’t work anymore.
New cmd is
sudo systemctl restart smbd.service
Hi Kamran,
Thank you for pointing that out.
We have updated the tutorial to use the new correct command as Raspbian phased out the old init.d system.
Cheers,
Emmet
Thanks ! I quickly succeded to use Laserjet 1018 over a Pi Zero Wifi 🙂
Thanks so much for this link it so easy to fall .
I was able to add the printer on to my raspberry pi and I tested to print online and documents.
great tutorial, thank you very much. Works perfectly on the PI. the only difference for me was the windows 10 setup. I was not able to see the RPI in ‘networks’ on windows 10. So I did this instead:
from the windows 10 printer settings screen (the new one):
choose ‘the printer I want isn’t listed’
choose ‘add printer by ip address or hostname’
enter 192.168.2.139 (whatever your RPI IP address is), click OK
when it locates the printer and asks for the driver to use, choose your driver.
that worked for me.
Great article Gus !!
I successfully configured my father’s old Samsung ML 2245 laser printer to be completely wireless using this tutorial. The setup was cheap, easy to configure, and is now very useful. My father loves it !! He prints easily with his iPhone. I use it with my android phone, and my Windows laptop.
Would love to hear about more practical raspberry pi tutorials from you. Best wishes !!