In this guide, we will show you how to change the hostname on an Ubuntu operating system.
Hostnames are a vital part of computer networking and are labels that a computer broadcasts to a network. Other computers can use this label to identify the device easily.
You should avoid having two devices that utilize the same hostname on the same network, as this can cause issues with identifying your correct device.
These steps for setting the hostname should work for most Ubuntu versions since they all come with a special tool call ed “hostnamectl”. We can use this tool to easily control the hostname on our Ubuntu machine..
The following methods we will be showing you will be entirely within the terminal. Don’t worry though as it the tool we are using is relatively easy to use. If you are running the desktop version of Ubuntu, you can open the terminal by pressing CTRL + ALT + T.
Different Classes of Hostnames
Ubuntu has three different classes of hostnames that you are able to change. Each have their purpose, but the main one you will be interested in is a static hostname.
The hostnamectl tool will allow us to adjust each of these different classes of hostnames with ease.
Below you can see the three different hostname classes.
static– A static hostname is the traditional version that you should be familiar with.
This is the hostname presented to the end-user and is stored within the “/etc/hostname” file.pretty– The pretty hostname is a human-readable version of the hostname.
It is presented to the end-user and not the machine itself and can utilize any valid UTF-8 name.transient– The kernel dynamically allocates the transient hostname.
This class of hostname is typically only used when the static hostname is invalid.
When setting the static or transient hostnames, you need to consider a few things.
The hostname has a maximum length of 64 characters and must conform to the requirements of a fully qualified domain name.
They must only contain letters (a-z, A-Z), numbers (0-9), hyphens (-), underlines (_), and a dot (.).
Displaying Ubuntu’s Current Hostname in the Terminal
Displaying your Ubuntu operating system’s current hostname is a reasonably straightforward process thanks to the hostnamectl command.
1. Run the following command on your Ubuntu device to retrieve your hostname.
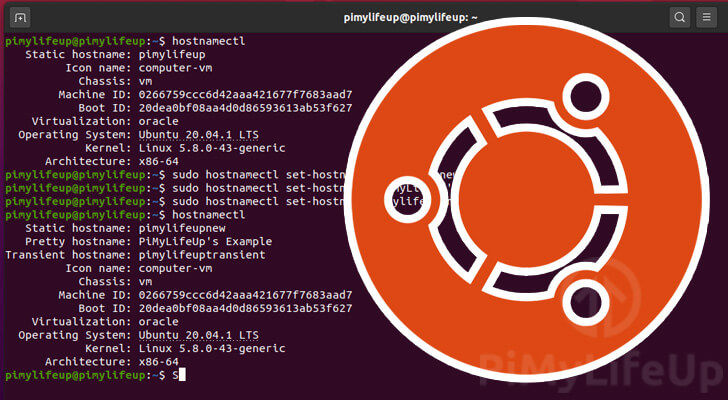
Invoking hostnamectl without any arguments will print out various bits of information about the system, including the hostname.
hostnamectl2. From this command, you should see a result as we have below.
   Static hostname: pimylifeup
         Icon name: computer-vm
           Chassis: vm
        Machine ID: 0266759ccc6d42aaa421677f7683aad7
           Boot ID: eb60a91dba4e43e8ac661e9bcc874bd1
    Virtualization: oracle
  Operating System: Ubuntu 20.04.1 LTS
            Kernel: Linux 5.8.0-43-generic
      Architecture: x86-64
From this result, you can see the hostname next to “Static hostname:“.
In our example, you can see that our hostname is “pimylifeup“.
Using the Terminal to Change the Hostname on Ubuntu
In this section, we will be showing you how easy it is to change the hostname on Ubuntu.
The process that we will be showing you is fairly straightforward since we have access to the hostnamectl command.
As we mentioned earlier in the tutorial, there are a few different types of hostnames that you can change on Ubuntu. We will explore how you can easily set these hostnames with a simple command.
As there are a few different ways of setting the Ubuntu hostname we will explore each of these below.
Please note to change the hostname on your Ubuntu device you will need to either be the root user or have superuser privileges.
Setting a Static Hostname on Ubuntu.
The following method is the one most people will want to follow when changing their hostname on Ubuntu. In particular this guide focuses on how to update your device’s static hostname.
A static hostname is what your network router and other devices will see when your Ubuntu machine connects to a network.
Below is the syntax for using the hostnamectl command to set the hostname on your machine. All you need to do is replace “[YOURHOSTNAME]” with the hostname you want to set.
hostnamectl set-hostname [YOURHOSTNAME]For example, if we wanted to set our Ubuntu hostname to “pimyhostname” you would use the following command.
sudo hostnamectl pimylifeupChanging the Pretty Hostname
It is also just as straightforward to set the pretty hostname. The pretty hostname, as mentioned earlier, is only used for display purposes within the Ubuntu desktop interface.
This class of hostname is never actually sent across the network to other devices.
To use hostnamectl to set the pretty hostname you need to utilize the “--pretty” argument.
Below is the typical syntax for specifying a pretty hostname. Make sure you swap out “[YOURPRETTYHOSTNAME]” with the hostname you want to set.
hostnamectl "[YOURPRETTYHOSTNAME]" --prettyFor example, to set the Ubuntu device’s pretty hostname to “PiMyLifeUp's Ubuntu Device” we can use the following command.
hostnamectl "PiMyLifeUp's Ubuntu Device" --prettyModifying the Transient Hostname
The final class of hostname you can change using the hostnamectl command is the transient hostname.
Please note that even if you modify the transient hostname, it will be reset back to the static IP address on startup or taken from the network devices.
We can use the following hostnamectl command alongside the “--transient” option to set the transient hostname.
Swap out “[YOURTRANSIENTHOSTNAME]” with the transient that you want to set.
hostnamectl "[YOURTRANSIENTHOSTNAME]" --transientAs an example, we can set the transient hostname to “pimytransient” by utilizing the command below.
sudo hostnamectl pimytransientUpdating the Ubuntu Hostname in the hosts File
Once you have changed the static hostname for your Ubuntu device, you will need to modify the hosts file.
At the moment, the “hosts” file will be referencing your old hostname to the loopback address (127.0.0.1).
We need to modify this so that it references our new hostname instead. For our example we will say that our old hostname was “pimylifeup” and our new one is “pimynewup“.
1. We can open the “/etc/hosts” file using the nano text editor by running the command below.
We are using the nano text editor as it is one of the easiest command line text editors around.
sudo nano /etc/hostsCopy2. Within this file, you should see text similar to what we have below.
127.0.0.1       localhost
127.0.1.1       pimylifeup

# The following lines are desirable for IPv6 capable hosts
::1     ip6-localhost ip6-loopback
fe00::0 ip6-localnet
ff00::0 ip6-mcastprefix
ff02::1 ip6-allnodes
ff02::2 ip6-allrouters
With this text, you can see that our current hostname is “pimylifeup“, we will need to modify this line to specify your new hostname.
127.0.1.1 pimylifeup3. For example, after changing the hostname to your new one, it should look something like the following instead.
127.0.0.1       localhost
127.0.1.1       pimynewup

# The following lines are desirable for IPv6 capable hosts
::1     ip6-localhost ip6-loopback
fe00::0 ip6-localnet
ff00::0 ip6-mcastprefix
ff02::1 ip6-allnodes
ff02::2 ip6-allrouters
4. Once you have finished modifying the file, save it by pressing CTRL + X, then Y, followed by the ENTER key.
Conclusion
By the end of this tutorial, you should know how you can change the hostname of your Ubuntu device.
Changing the hostname is useful for those wanting to make their device more identifiable or to stop having multiple of the same hostname.
If you have had any issues with changing your Ubuntu system’s hostname, feel free to leave a comment below.
Be sure to check out our other Linux tutorials or our other Ubuntu Guides.