In this project, I am going to set up a Mumble server on the Raspberry Pi. It is an excellent project if you want to set up your own VOIP system.

For those who have not heard of Mumble before, it is an open-source VOIP (Voice Over Internet Protocol) chat software that provides a low-latency high-quality voice chat.
Mumble is often used amongst gamers to coordinate over voice chat while playing video games. It is very similar to TeamSpeak. It can also be used as an open voice chat room or pretty much anything where you require voice chat rooms.
Mumble is not the only Raspberry Pi VOIP solution out there. Other VOIP solutions such as Asterisk offers a much more complete package. It offers features such as inbound and outbound calls, audio, and video conferencing and much more. Mumble is much easier to set up and provides enough functionality for most people.
Equipment
Here is a list of equipment that you will need for this project. There are also some optional pieces of equipment that you might be interested in picking up.
Recommended
Optional
Video
I have put together an excellent video guide to take you through all the steps required to have a fully functioning Mumble server.
If video is not your thing, you can find the full written tutorial underneath the video.
Setting up the Raspberry Pi Mumble Server
The first step you will need to do is make sure you have a good operating system installed on your Raspberry Pi. If you haven’t done this, then you can follow my guide on installing Raspberry Pi OS. It will provide you with all the information you need to get started.
Installing the Mumble Server
1. On the Raspberry Pi, open the terminal application or SSH to the Pi.
2. First, install the Mumble server onto the Raspberry Pi by typing the following command into the terminal.
sudo apt install mumble-serverCopy3. Now we need to do some basic configurations, such as setting up a superuser so we can connect. You can do this by running the following command.
sudo dpkg-reconfigure mumble-serverCopy4. This command will present you with a few options, set these to how you would like Mumble to operate.
- Autostart: I selected Yes
- High Priority: I selected Yes (This ensures Mumble will always be given top priority even when the Pi is under a lot of stress)
- SuperUser: Set the password here. This account will have full control over the server.
5. You will need the IP address to connect to the server. You can get this by typing the following command into the terminal.
hostname -ICopy6. The command may respond with multiple IP addresses. The only IP address you will need to make a note of is the first one on the list. It should look similar to the example below.
192.168.1.103Configuring the Mumble Server
Now we will want to set up a few things on the Mumble server such as a welcome message and password.
1. Using SSH or the terminal app enter the following command. This command will open the server config in the nano text editor.
sudo nano /etc/mumble-server.iniCopy2. Everything here is pretty self-explanatory:
- Find
welcomeTextand update to whatever you would like displayed when a user joins the channel. - Find
serverpasswordand update if you would like a password for users looking to join the server. - Uncomment
registerserverby removing the # and replacemumble serverwith the name that you would like to use for the base channel.
3. You will need to restart the server for changes to take place. Enter the following command.
sudo /etc/init.d/mumble-server restartCopyOnce the server has rebooted, you can now move onto accessing it via the Mumble client.
Accessing the Mumble Server
There are a few things we will need to do to access the server, and this includes downloading the Mumble software.
1. Download and install the Mumble client from the Mumble website.
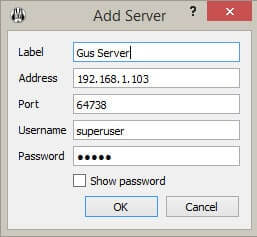
2. Open the program and go to Server->Connect.
3. In here, add the details:
- Label: The name that will appear in your server list.
- Address: This is the IP Address we wrote down earlier.
- Port: 64738 (Unless you changed it)
- Username: superuser
- Password: The one you set earlier using the dpkg command.
You should now be able to connect to your server.
4. Now we have it working, there are a few more things you may want to configure and setup.
Setting up an Admin User
You might want to give yourself admin rights so that you don’t need to login to the superuser again.
1. In the Mumble client login as the superuser. Make sure you have logged in under a different account first.
2. Right-click on the servername and go edit.
3. In here, go to the group’s tab and select admin from the drop-down box.
4. Either type in or add your username in the drop-down box next to add in the members’ column.
5. Click add and then exit.
6. Now login under the username you just added. You should be able to add, edit channels, and complete other admin tasks on your Raspberry Pi murmur server.
Setting up External Access to the Mumble Server
To set up external access, we will need to change some settings in the router to allow port forwarding to the Mumble server.
All routers are different, so I will provide the details on what I have done to mine, and you will most likely need to adapt to different brands or models. Mine is the AC1750 TP-Link Router.
1. Head to your Router admin page. This will typically be 192.168.1.1 or 192.168.254.
2. Enter the username and password. The default typically is admin and admin. You should change this if this is the case.
3. Go to forwarding->Virtual Server and then click on add new.
4. Now, enter the following.
- Service port: In this case
64738. You can change this port if you want. - IP Address:
192.168.1.103 - Internal Port: We want this to be the same as our server, so
64738 - Protocol: All
- Status: Enabled
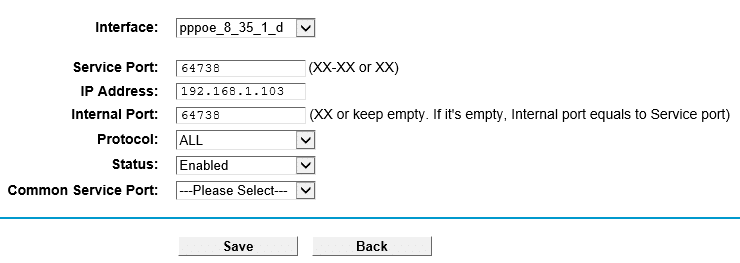
5. These settings will route all traffic destined for port 64738 to the Mumble server (192.168.1.103) on port 64738.
6. You should be able to connect to the Mumble server on the Raspberry Pi outside your network. You may need to restart the router for changes to take effect.
The best way to test if this is working is to get a friend who has Mumble installed or is willing to install the client to connect to your server. Provide them with your external IP and or dynamic DNS, and they should be able to connect to the Raspberry Pi Mumble server.
If you wish to learn how to set up dynamic DNS, then be sure to check out our guide on it.
Troubleshooting
If they are unable to connect, you can try the following:
- Check your router settings and confirm they are correct.
- Check your IP hasn’t changed (Some ISPs will provide you with a dynamic IP rather than a static IP)
- Restart the router.
- Restart the Raspberry Pi.
Conclusion
I hope that this tutorial has shown you all the necessary steps to getting the Raspberry Pi Mumble server up and running.
If you come across any problems, have feedback, or anything else, then please don’t hesitate to leave a comment below.


I love this mumble business. It is exactly what need. Lightweight resource wise. No video requirement. I am replacing the walker-talkie on a hiking trip with a Raspberry PI 3B+, which is configured as a wifi AP as well.
The installation instructions are all good. The client side configuration tips might be off a bit as the client has changed some. But, it is manageable after I tinkered with it. Thanks!
Thank you for the tutorial, and thank you for keeping it up to date. Much love
Thanks for your nice tutorial. I followed all your steps and my mumble server was working well on my raspberry 1. Unfortunatly I can not establish a remote connection to it anymore (either from mumble clients nor ssh). Everything is set like local static ip and port forwarding (it was working fine yesterday). I am also using my curren IP4 Adress when I try to connect. I rebooted my raspberry and as well my router nothing worked. Can someone help me with that?
Edits to my post: I configured mumble on the 26 and it was in use (also remote access) and it was working fine. The next day it did not work any more without changing anything. I had a new IP4 and I used the new one to connect via ssh and my mumble client on PC, but both is not working out. Nevertheless I am able to connect via ssh to my raspberry in my locale System to its static local IP
I also tried iptables, but since I am not very familar with that I don’t know if I was on the wrong path with that
please help
help me
root@raspberrypi:/home/pi# sudo apt-get install mumble-server
Reading package lists… Done
Building dependency tree
Reading state information… Done
E: Unable to locate package mumble-server
Try updating your repositories.
sudo apt-get updateCan Someone please help me fix this problem ?
After I have created My mumble server my friends could not join when they join they automatically disconnect for some reason ( i have port forwarded everything)
But i have tested a minecraft server and they seem to join perfectly fine with no issues
Is there something to do so they can join I have been searching for solutions and couldn’t find any , So this is the last place where i can find Solutions
Thank you
also I can join to my server but my friends cant
Good afternoon,
First of all … great site and very well explained, I decided to create my server mumble in pi2 rasp with all the information of this site 5 STARS!
I would like to help, as follows:
the users when they connect via the Android to add them as reliable, but for those who use iPhone, you can not get the trust User! I wonder how.
By the way how to create the permissions of the users? Where will be the change that supposed to be in the raspberry pi terminal
Thank you in advance
It seems the mirror site from raspbian.org is no longer available when I go to install the mumble server. Any ideas on where else to get these files?
I like the Plumble app for android
Hej there,
Thanks for the tutorial! I’ve checked a german one plus yours. And yours is way better for idiots like me.
But at this point it just works (seemingly*) within the local network. *Seemingly, cause here’s no one to test with me. But my both MacBooks feedback against each other. 🙂
I recently installed another, my first Raspi as Minecraft-Server after your tutorial and it works fine. The kids are happy!
There was this point how to make your server available for people outside your local network. And here in the mumble tutorial this point was missing. I expect it to be quite similiar/the same workflow except of Port Forwarding. Correct?
*d
I followed your steps and at first it worked. But after i restarted my Pi later, it stop working.
in the server log it says:
"Object::connect: No such slot MurmurDBus::userTextMessage(const User *, const TextMessage &)"next line :
"Caught SIGTERM, exiting"
Can some help me with this problem ?
@John Snow
The output you’re getting indicates a problem with the DBUS service itself, or with the mumble-server’s configuration that ties it to dbus.
The following example reflects my working configuration:
# Murmur defaults to not using D-Bus. If you wish to use dbus, which is one of the# RPC methods available in Murmur, please specify so here.
#
dbus=system
# Alternate D-Bus service name. Only use if you are running distinct
# murmurd processes connected to the same D-Bus daemon
#dbusservice=net.sourceforge.mumble.murmur
# If you want to use ZeroC Ice to communicate with Murmur, you need
# to specify the endpoint to use. Since there is no authentication
# with ICE, you should only use it if you trust all the users who have
# shell access to your machine.
# Please see the ICE documentation on how to specify endpoints.
ice="tcp -h 127.0.0.1 -p 6502"
I also have dbus and ice setup and working locally. These two points are critical, because without one or the other, you have no external method to manage the server itself (other than the really weak implementation of controls located within the mumble client, when you’re connected via localhost to your mumble server directly, and logged in as the SuperAdmin).
I’d look at your dbus service configuration first. If you’re on Ubuntu Server, or a similar apt-get-using derivative OS, try doing a command line based install of dbus:
apt-get updateapt-get install dbus
It may very well be that DBUS just wasn’t found to be installed already, particularly if you’re working with a server that has no local desktop installed. Dbus is generally used for communications between the underlying OS and GUI based end-user applications. That’s why it’s so tightly integrated into Gnome, Mate, etc. When you setup a fresh server with no desktop though, dbus usually won’t be installed by default, so you have to do it manually, which is easy… if you know you need it.
Anyway, let me know if that helps. If not, I might be able to assist further. I’ve built several mumble servers over the years since I heard about it, researched it, and used it to replace my TeamSpeak servers, so I’ve encountered a wide range of the problems one will go through in getting mumble-server running on different OS’s. I primarily host on Linux, but I’ve worked as a systems engineer for well over a decade on multiple platforms in an enterprise settings, and maintain a multi-OS dev environment at home where I use pretty much everything except OSX (which I don’t have anything against, other than the fact that it’s locked to Apple hardware).
First of all, thank you for your help.
My mumble-server.ini is exactly the same as yours,
and i run Raspbian as OS, where dbus is already installed.
A good follow up article might be web based administration of the mumble server.
What performance can we expect from the PI Mumble? How many clients could connect and still be stable?
Hi
Can i use a “Linksys PAP2T” to log in to the mumble-server and speak that way?
@Henrik no. The ‘PAP2T’ is a SIP based VOIP device, but Mumble is not technically a SIP based server. It uses it’s own proprietary standard for encoding, transmitting, receiving and relaying.
There are however several 3rd party clients available for mobile devices. Plumble is the name of the client I use for Android, which works perfectly both on my Samsung SG4 smartphone and my Lenovo A10-70F tablet, and I’ve also successfully used it under Android-x86 across a variety of hardware (I do R&D, multiplatform). If you want to use Mumble Server for normal voip chatting, to essentially have your own private voip services, just use the mobile client and have your other users do the same, and either only advertise the server privately to your intended group of users, or don’t advertise it at all and just send the connection info to those you want using it.
I have a multi-instance Mumble server with a Mumble-Django based management console. I’ve got the Mumble-Django instance setup as a name-based-vhost on an Apache server, and have it hosting currently 4 server instances, each with it’s own set of admins, rules, etc.
Now having read over the HowTo above, I’m probably going to rebuild one of my RPi2 systems into a portable Mumble Server, complete with Mumble-Django, a dynamic IP client to give it consistent addressing no matter where it’s located, and maybe an OpenVPN client instance that is pre-configured to connect back to my home network, or to connect through one of my VPS’s hosted at Digital Ocean, allowing a persistent address that can be connected to locally or remotely, either one, depending on need. My existing instance is great, but I’ve found a few times at work where the firewall or proxy filtered the connection in a way that hampered performance or functionality, and I’d rather just fix up something that I can throw in a bag, plugin at my destination, and everyone connect in locally and blazing fast at max bitrate for each user. This particular unit won’t need to host nearly as many users as my existing instances, so that’ll make things easy as far as tuning it for performance.
Anyway, good HowTo. 🙂