In this tutorial, we will be showing you how to install/enable Network Manager on your Raspberry Pi.
Network Manager is a piece of software that handles network functionality for your system. It is a powerful suite that makes many more complicated tasks very simple.
For example, using Network Manager on your Raspberry Pi makes setting up your device as a wireless access point very simple.
By default, the Raspberry Pi uses an older software called dhcpcd for its network handling. It is a bit more complicated to configure and has been superseded by Network Manager.
Within this tutorial, we will be showing you how you can enable Network Manager on Raspberry Pi OS. This involves using the “Raspberry Pi configuration tool” and installing the “network-manager” package.
Please note, only follow these steps if you have fast, physical access to your Raspberry Pi. Also, the move to Network Manager can break your existing network connection as it will need to be reconfigured.
Lastly, you will need to be running Raspberry Pi OS Bullseye or later. These instructions will not work for older releases.
Equipment
Below is a list of equipment we used when setting up Network Manager on our Raspberry Pi.
Recommended
- Raspberry Pi Amazon
- Micro SD Card Amazon
- Power Supply Amazon
- Ethernet Cable Amazon or Wi-Fi Amazon
- Monitor Amazon
- USB Keyboard Amazon
- USB Mouse Amazon
Optional
We tested this tutorial on a Raspberry Pi 400 running the latest version of Raspberry Pi OS Bullseye.
Preparing your Raspberry Pi for Network Manager
If you just downloaded Raspberry Pi OS Bullseye and flashed it to your SD card, you can skip to the next section.
These steps are purely for those wanting to upgrade to Network Manager from an existing installation of Raspberry Pi OS. However, if you are on a fresh installation, all of these initial steps have already been completed.
Upgrading the System
1. To prepare for Network Manager, we must update the package list and perform a full upgrade.
A full upgrade will upgrade all packages to the latest available versions.
To perform both of these tasks, use the following command within the terminal.
sudo apt update
sudo apt full-upgradeCopy
Reloading the Desktop Interface
2. Once the update completes, we can move on to the next task. You can skip to the next section if you are using a “lite” version of Raspberry Pi OS.
We now need to reset the network interface back to its defaults so that it will load in the new taskbar plugins. These new plugins implement support for the network manager.
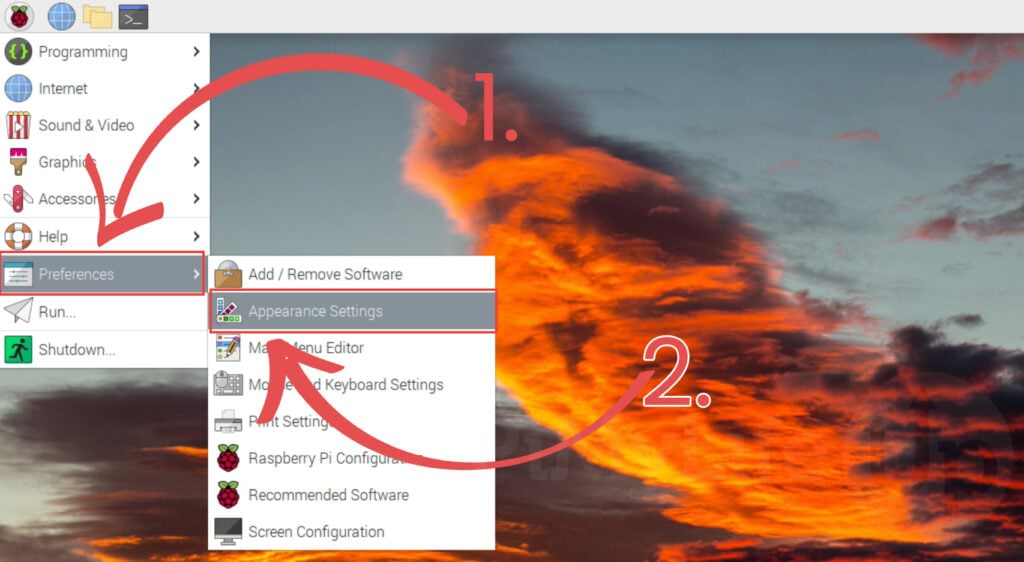
We can do this by first opening up the start menu by clicking the Raspberry icon in the top-left of the screen.

3. With the start menu open, you need to hover over “Preferences” (1.).
In the list of items that appear, you need to click the “Appearance Settings” option (2.).
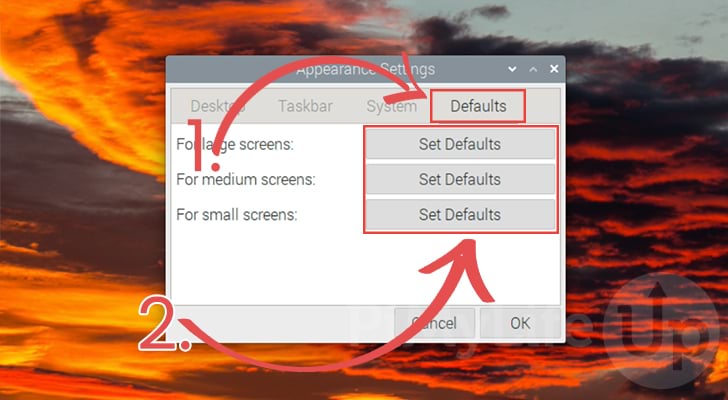
4. With the appearance settings application open, you will want to change to the “defaults” tab (1.).
You then need to select the default that is relevant to the size of your screen. Once decided, click the “Set Defaults” button next to it (2.).
5. For all of these changes to take effect and for the new plugins to be loaded, you will need to restart your device.
To restart your Raspberry Pi, run the following command in the terminal.
sudo rebootCopyInstalling Network Manager on Raspberry Pi OS
6. The last task we need to complete before we enable Network Manager on our Raspberry Pi is to install the actual software.
To install the “network-manager” package to your device, run the command below in the terminal.
sudo apt install network-managerCopyEnabling Network Manager on the Raspberry Pi
To enable Network Manager on your Raspberry Pi, we will use the “raspi-config” tool. This tool will configure anything needed without us typing in any extra commands.
1. To launch the Raspberry Pi Configuration tool on your device, you must use the following command in the terminal.
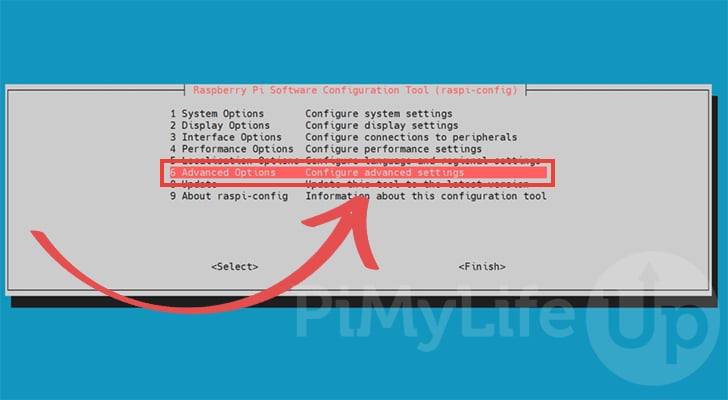
sudo raspi-configCopy2. With the raspi-config tool open on your device we can now enable Network Manager.
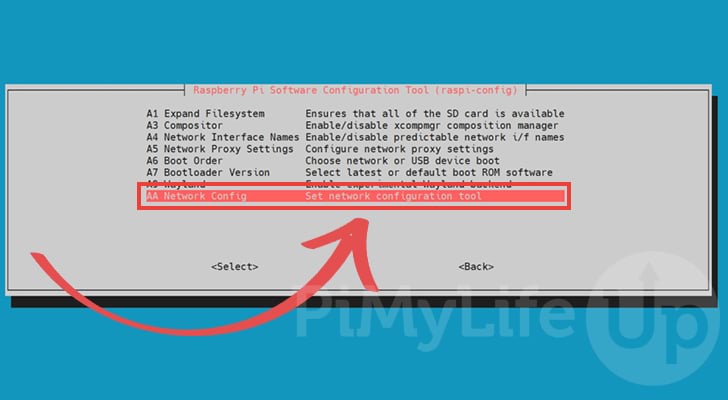
First, go to the “5 Advanced Options” option. You can navigate this menu using the ARROW KEYS and select an option by pressing ENTER.
3. Now, navigate to the “AA Network Config” option and select it.
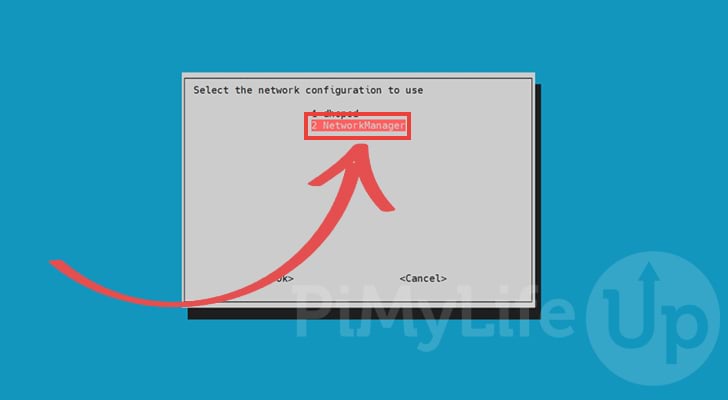
4. Finally, you will have two options to choose from. The first option is the software that the Pi will be using by default.
However, the option we want to pick is the second one. Use your ARROW KEYS to select “NetworkManager“, then press the ENTER key.
5. After enabling Network Manager on your Raspberry Pi, you will be asked if you want to restart your device.
You must select the “<Yes>” option to restart your device.

If, for some reason, you didn’t get this message, you can restart your Raspberry Pi by using the command below within the terminal.
sudo rebootCopyUsing Network Manager through the Raspberry Pi Desktop
With Network Manager installed on Raspberry Pi OS, let us quickly show you how to control it from the desktop interface.
One of the main advantages of moving to Network Manager is that it is far easier to control your network from the desktop interface. On the flip side, however, it does make it slightly more complicated when using the terminal.
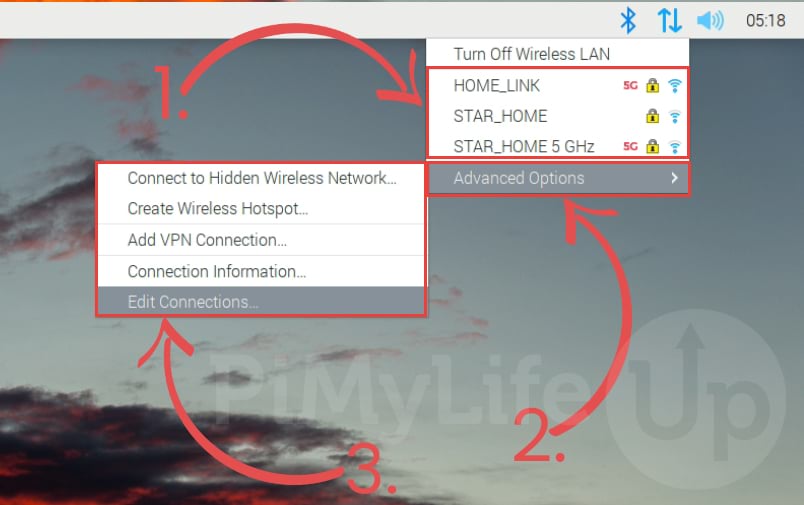
1. To get to your network settings, you should see an icon with two arrows in the top-right of your screen.
Click this icon to open the Network Manager settings on your Raspberry Pi.

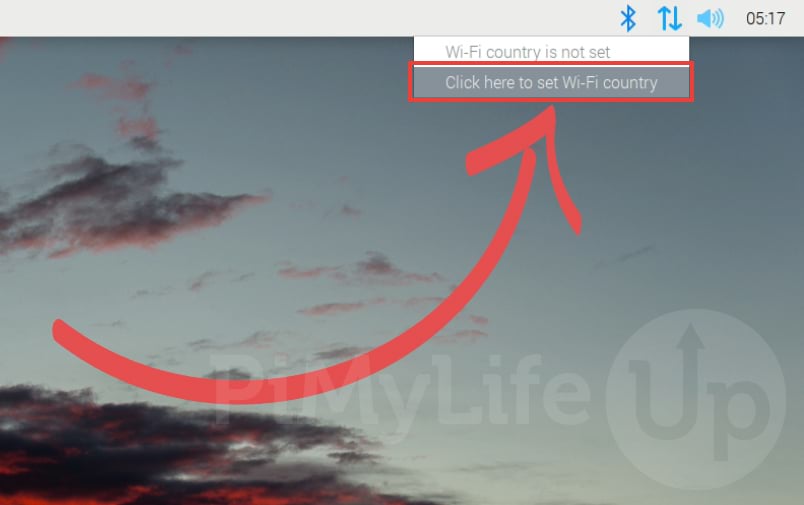
2. If you haven’t set your Wi-Fi country, you will be prompted to do so now. If you don’t see this prompt, skip to step 4 of this guide.
To continue, you need to click the “Click here to set Wi-Fi country” option, even if you don’t intend on using Wi-Fi.
3. With this prompt, you need to use the select box (1.) to choose the countr you currently reside in. In our case, we set thos option to “AU Australia“.
Once you have set your country, click the “OK” button (2.) to proceed.
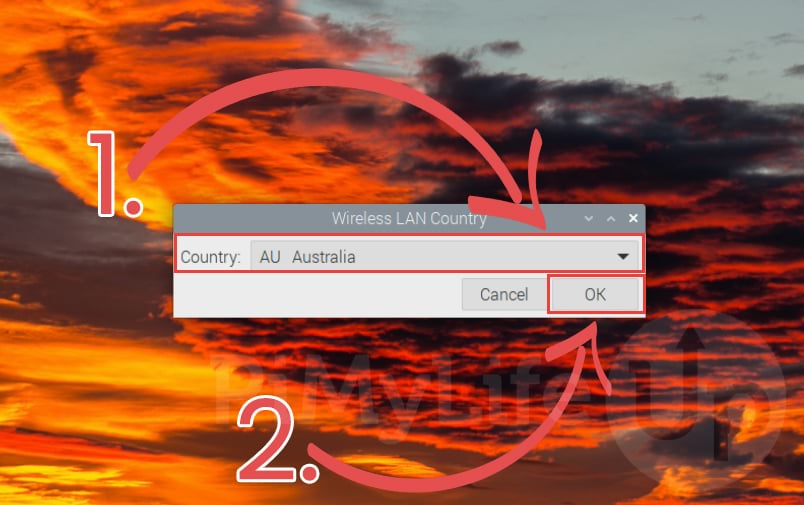
After selecting your Wireless LAN country, you must click the network icon again.
4. You can see a variety of options for Network Manager on your Raspberry Pi.
- The first thing you will probably notice is the list of nearby Wi-Fi networks. If you want to connect to a particular one, click it and then follow the prompts.
- If you want to find more advanced options, you will need to start by hovering over the “
Advanced Options” option at the bottom of the list. - Within the advanced options, you will see variety of tools that you can utilize.
From here, you can do tasks such as creating a wireless hotspot, adding a VPN connection, and more.
You can even use this interface to edit specific network connections, allowing you to configure things such as a static IP address.
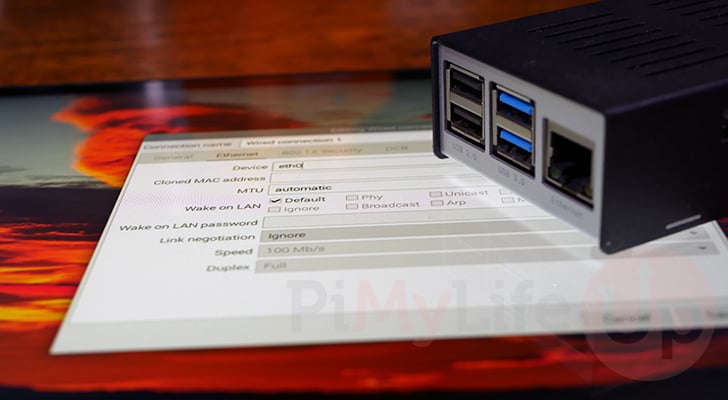
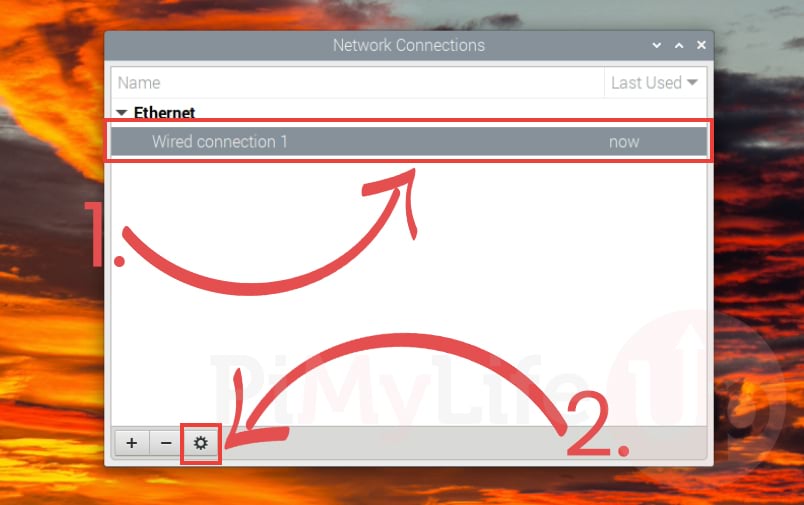
5. If you choose the “Edit Connections...” option from the previous step, you will be greeted with the following screen.
You can select any of your available connections to edit (1.).
Once a connection is selected, click the cog icon (2.) on the bottom-left of the window to open its settings.
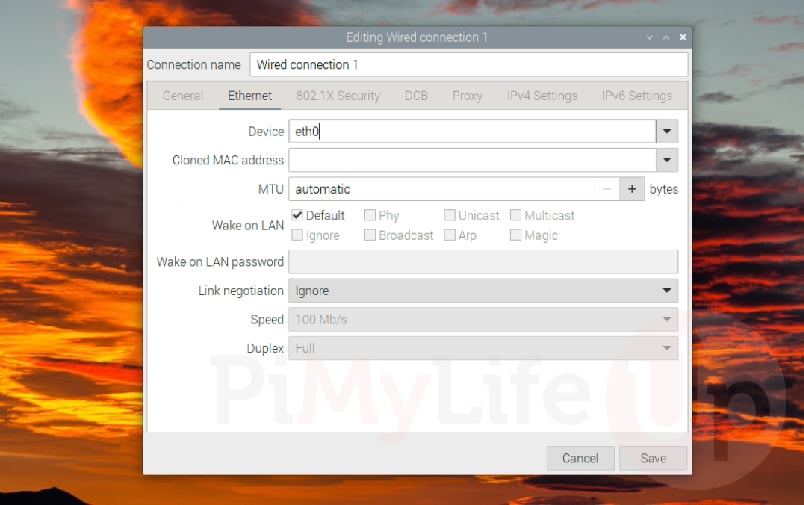
6. With the edit connections screen you can control numerous details of your connection.
This is the same screen where you would use Network Manager to set a static IP address for your Raspberry Pi.
Using Network Manager from the Terminal
Editing the network settings from the terminal on your Raspberry Pi is significantly different when using Network Manager.
Instead of editing specific files you will need to rely on a tool called “nmcli“. This tool is the command-line interface to Network Manager.
Since this tool is more involved, we will split each particular task into its own tutorial. If you have any suggestions, please leave a comment below.
Conclusion
Hopefully, at this point in the tutorial, you will successfully get Network Manager running on your Raspberry Pi.
This software is the future of managing the network on Raspberry Pi OS. While it is currently disabled by default, it will eventually become the core way of controlling the network.
Many advantages come along with the use of Network Manager. For example, setting up a wireless hotspot is straightforward and far less problematic.
Please comment below if you have any issues with getting Network Manager installed on your Raspberry Pi.
Be sure to check out our many other Raspberry Pi projects. We cover a wide variety of different things, including many networking tutorials.


“3. Now, navigate to the “A4 Network Config” option and select it.”
This should be AA Network Config.
Thank you, fixed it.