In this guide, I will take you through on how to setup Raspberry Pi port forwarding on the router and also setting up Raspberry Pi Dynamic DNS. Both of these complement each other, but port forwarding is very important if you want web applications accessible over the internet.

I have prepared a video further down the page that takes you through everything you need to know about setting up both of these.
It’s important to remember that opening up ports will have an increased security risk. Tools such as Fail2ban will help protect your Raspberry Pi from intrusion. Also, make sure you pick strong, secure passwords.
If you enjoy this tutorial, then please subscribe so you can stay up to date on all the latest awesome Raspberry Pi projects, guides and much more.
Video
It’s important to know that the video goes through an older method than the text version provided below does.
Both methods will work just fine but if you’re looking for the latest, then be sure to check out the full-text version.
Setting Up Raspberry Pi Port Forwarding
Raspberry Pi port forwarding is a method where can allow external access to the Pi. To do this, we will need to change some settings on the router.
All routers are different but I will try and make this as generic as possible however there could still be a lot of differences between these instructions and your router. The router I am using for this tutorial is the TP-Link AC1750 wireless dual band gigabit router.
1. On a computer that is connected to the local network, connect to the router admin page via a web browser.
A router IP typically is 192.168.1.1 or 192.168.1.254
2. Enter the username and password for the router. By default, this is typically admin & admin.
3. In the router admin page head to forwarding->virtual server.
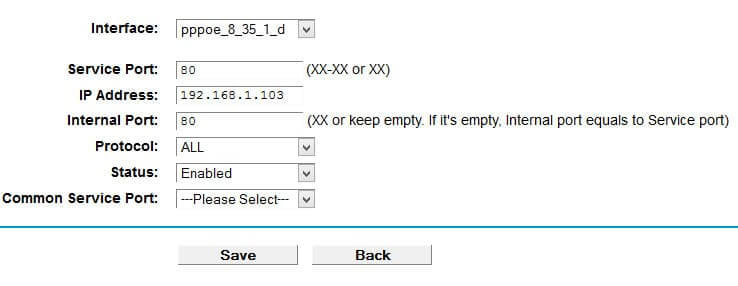
4. On this page enter the following
- Service Port: This is the external port.
- IP Address: This is the IP of the Pi.
- Internal Port: Set this to Pi’s application port. (A web server runs on port 80 for example)
- Protocol: Set this to ALL unless specified.
- Status: Set this to enabled.
5. These settings will route traffic destined for the port specified to the port on the Raspberry Pi.
6. You should now be able to connect to the application on the Raspberry Pi outside your network.
The best way to check if you have port forwarded correctly would be to either get a friend to connect or go somewhere outside your local network (A VPN could achieve this).
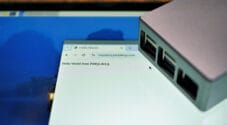
Below is an example of setting up access to a web server that is running on port 80 with the Raspberry Pi having an IP of 192.168.1.103.
Troubleshooting
There are a few issues that might occur when attempting to set up your Pi for external access. Below are just a few issues you might come into when setting up Raspberry Pi port forwarding.
- Double check your router settings and confirm they are correct.
- Check that your external IP hasn’t changed. ISP’s will provide you with a dynamic IP rather than a static IP.
- Restarting the router might clear problems.
- Restarting the Raspberry Pi might also clear any problems.
Setting up Raspberry Pi Dynamic DNS
If your ISP supplies you with a dynamic IP (An IP that changes often), then it will probably be worth setting up the Raspberry Pi dynamic DNS (Sometimes Routers has this feature in them). This method means you will always be able to connect to the application on the Pi even if your external IP changes.
To get started we will need to install the DDclient, and it’s a pretty straightforward process that won’t take too long to get installed.
1. To begin, run the following lines to install the DDclient. Please note, just skip through the install, we will override these settings.
sudo apt update
sudo apt install ddclient libjson-any-perl libdata-validate-ip-perlCopy
2. After all of that, we will now need to replace that version of DDclient with a more recent one. This newer version will enable better support for services such as Cloudflare.
To download the latest version, enter the following wget and tar commands.
wget https://files.pimylifeup.com/portforwarding/ddclient-3.9.1.tar.gz
tar -zxvf ddclient-3.9.1.tar.gzCopy
3. Once that has finished downloading and extracting, we will make use of the newer binary by copying it over the current one using the following command:
sudo cp -f ddclient-3.9.1/ddclient /usr/sbin/ddclientCopy4. Due to changes made in the most recent version of DDclient, the location of the configuration file has moved. We will use the following commands to reposition the one that came with the first install.
sudo mkdir /etc/ddclient
sudo mv /etc/ddclient.conf /etc/ddclientCopy
5. Once the ddclient has completed installing, we will now go and directly edit the configuration file to make a few crucial changes. Use the command below to launch an editor for the file.
sudo nano /etc/ddclient/ddclient.confCopy6. We will need to add a few lines to this file, and we will use these same lines throughout every different configuration. They define whether to use SSL and how to obtain the external IP address of the Raspberry Pi.
7. Add the following to below the commented header in the file, also remove anything else in the file.
We will add more to the file later on with our guides on using No-IP or Cloudflare.
use=web, web=checkip.dyndns.com/, web-skip='IP Address'
ssl=yesCopy
8. OK, now that this is done we can proceed to the next couple of steps on how to setup ddclient with a Dynamic DNS provider.
Just to quickly point out that the main difference between CloudFlare and No-IP is that you need to own a domain name to make use of CloudFlare. No-IP However offers free subdomains, meaning it’s a costless service to use.
It’s important to note that while Cloudflare isn’t truly a Dynamic DNS provider, we can use it the same way thanks to its API. Cloudflare also offers more protection such as free SSL, anonymized IP, DDOS protection and more. You can turn off the Cloudflare features and just use it as a DNS provider if you want. You may find that you need to do this anyway.
Dynamic DNS using Cloudflare
1. Before you start using Cloudflare as a Dynamic DNS provider, you will need to purchase a domain name. If you have a domain name already, you can skip ahead to the next step in this guide. Otherwise, you can purchase a domain name from somewhere such as NameCheap.
2. Now you will need to sign up to Cloudflare, don’t worry as it won’t cost you anything.
3. Sign up and follow the steps given for updating your domain name to point towards Cloudflare’s DNS (Domain Name Servers).
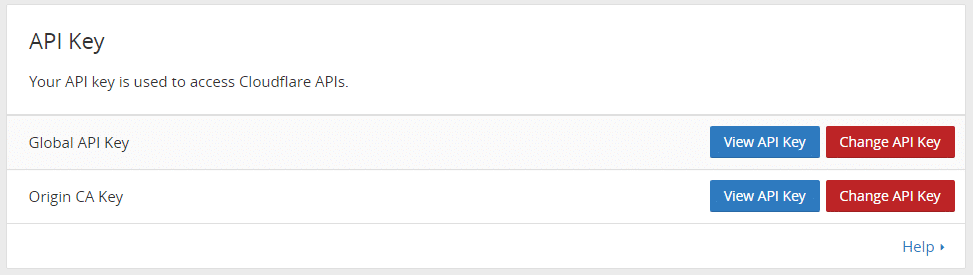
4. Next, you will need the Cloudflare API-key that you’re able to find on the account page. You want the global API key, copy and paste this somewhere safe for now.
5. Now we need to enter the Cloudflare details into the DDclient configuration file. Open it by running the following command.
sudo nano /etc/ddclient/ddclient.confCopy6. Update or add the following lines to the bottom of the file, making sure to replace the username, api-key, zone and the hostname with the ones you used to setup your Cloudflare account.
The zone is the domain name itself and then underneath is the record/domain you wish to update. Either enter a subdomain or the primary domain itself. Make sure the record exists within Cloudflare on the DNS page, it will need to be an “a” record.
protocol=cloudflare
server=api.cloudflare.com/client/v4
login=your_email
password=your_api-key
zone=your_domain.com
anything.your_domain.comCopy
7. Once you have updated the file, you can save and quit by using CTRL + X.
8. Now, all we need to do is restart DDclient, as long as you have entered the correct information in step 3. everything should work correctly. Use the following command to restart the dynamic DNS client. (Sometimes you need to restart twice for the changes to take place)
sudo /etc/init.d/ddclient restartCopy9. The IP should now be updated within Cloudflare, and you should now be able to use your chosen domain name to connect to your Raspberry Pi. You may need to turn off the Cloudflare proxy for it to work, you can do this by going to the DNS page within Cloudflare and clicking the cloud next to the domain record, so it becomes grey.

You will now want to continue to the “Running ddclient as a Daemon” section of this guide so that you can have the IP automatically update otherwise you will need to restart the ddclient manually every time you want to update the IP.
Dynamic DNS using NOIP
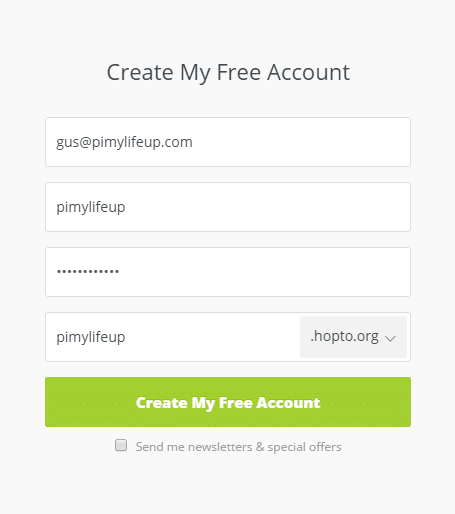
1. To setup Raspberry Pi Dynamic DNS with NOIP, you will need to create a free account over at their website. Make sure you keep note of the username, password and the hostname that you pick as we will need them in the next step.
2. After you have finished creating your account, it’s time to enter these into the DDclient configuration file. You can open up the config file by running the following command.
sudo nano /etc/ddclient/ddclient.confCopy3. Now, either update or add the following lines to the bottom of the file, making sure to replace the username, password and the hostname with the ones you used to create your No-IP account.
protocol=dyndns2
server=dynupdate.no-ip.com
login=your_username
password=your_password
your_domain.comCopy
4. Once you have updated this file, save it and quit by using CTRL + X.
5. Now, all we need to do is restart ddclient, as long as you have entered the correct information in step 3. everything should work just fine. Use the following command to restart the client.
sudo /etc/init.d/ddclient restartCopy6. Your IP address should now be updated, and you will be able to use your chosen domain name to connect to your Raspberry Pi given that the correct ports are open.
Continue the tutorial below to ensure that the ddclient automatically updates the IP.
Running ddclient as a Daemon
Since we don’t just want the IP address to update once, we still need to setup ddclient to run as a daemon so it can check for a change of IP address periodically and notify the chosen dynamic DNS provider if necessary.
1. To make DDclient runs as a Daemon, we need to make a change to a configuration file. Run the following command to begin editing the file.
sudo nano /etc/default/ddclientCopy2. In the file, you will need to change run_daemon so that it matches the line below.
This change basically tells it to run ddclient in daemon mode.
run_daemon="true"Copy3. You will also need to check two other lines in this file to make sure that they are false. Otherwise, ddclient will not run in daemon mode correctly.
Ensure the following two lines are matching, if they are set to true then change them to false.
run_dhclient="false"
run_ipup="false"Copy
4. Press CTRL + X and then Y to save the changes to the configuration file.
5. Now enter the following command to startup ddclient as a service.
sudo service ddclient startCopy6. To ensure the service has properly started, you can use the following command to check its status.
sudo service ddclient statusCopy7. Some dynamic DNS providers require you to update your IP address quite frequently. We can help ensure that you don’t get timed out by forcing ddclient to update your IP address once a week. We achieve this by first opening up the weekly crontab by using the following command.
sudo nano /etc/cron.weekly/ddclientCopy8. To that file, add the following lines.
#!/bin/sh
/usr/sbin/ddclient -forceCopy
9. Save the changes by pressing CTRL + X and then Y to accept the changes.
10. Lastly, we need to allow our new script to execute, and we can do this quickly by doing the following.
sudo chmod +x /etc/cron.weekly/ddclientCopy11. ddclient should now be successfully running as a daemon, use the following command to make sure that it is running correctly.
sudo service ddclient statusCopy12. That should be all you need to do to have everything running smoothly.
If you find that something isn’t working correctly, then the following line is great for debugging. It will spit a ton of lines just look for anything that might look like an error or a hint at why it is not working.
sudo ddclient -daemon=0 -debug -verbose -noquietCopyAs long as you have Raspberry Pi port forwarding setup correctly, you should now be able to access your Pi outside your local network using a domain name. If the above instructions do not work for you, then you can always try out the old method which is detailed below.
Setting up Dynamic DNS (Old Method)
This next part is an old process that I replaced with the method above. It should still work, but the one above should be much easier to get up and running.
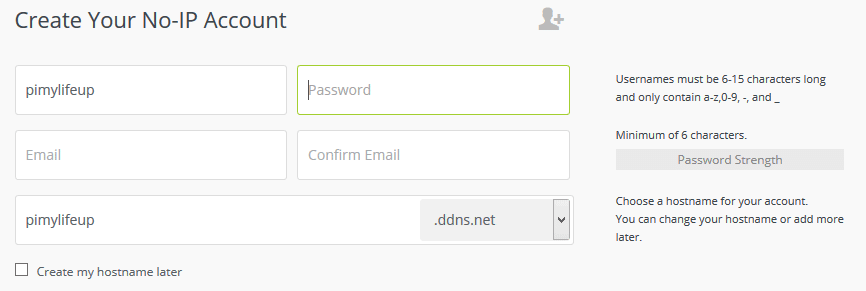
1. First, you will need to create an account over at No-IP (Make sure “create a hostname later” is unticked)
2. Now on the Raspberry Pi enter the following commands
sudo bash
cd /usr/local/src/
wget http://www.no-ip.com/client/linux/noip-duc-linux.tar.gz
tar xf noip-duc-linux.tar.gz
cd noip-2.1.9-1/
make installCopy- You will be now presented with a few settings you will need to set.
- Enter the email and password for the account you wish to connect the Pi to.
- Next set the update interval with the default being 30 minutes. (This checks to see if the IP has changed)
- You can now also set something to run whenever the IP updates.
3. Now add a new line into the rc.local file just before the last line exit 0 this ensures that no-ip will automatically start on reboot.To do this enter the following commands:
nano /etc/rc.localCopy4. Enter the following line right above the exit 0 line.
/usr/local/bin/noip2Copy5. Use CTRL + X to exit (Make sure you save)
6. You can start no-ip with the following command:
sudo /usr/local/bin/noip2Copy7. Check the status with the following command:
sudo /usr/local/bin/noip2 -SCopy8. You can close it using the following command. Replace pid with the pid from the -S command.
sudo /usr/local/bin/noip2 -K 'pid'Copy9. You’re able to recreate the default config file if required by entering the following command:
sudo /usr/local/bin/noip2 -CCopyNow you should have a Raspberry Pi dynamic DNS server setup and be able to connect with a domain name rather than an IP. This name will remain the same even if your IP address changes.
This setup means you will always be able to connect to the Pi or other home network devices without needing to find out your new external IP.
If you’re looking for a project that requires access to the internet, then you should check out either the Raspberry Pi Web Server, mumble server or even the webcam server.


Not trying to over post, but my success on ddns:8081 works, but doesn’t prompt for p/w. I thought this was because I saved it but the wife was able to get in w/o pw from work. Yikes.
Needing some guidance on securing this down in addition to earlier message. Sorry for multi-posting.
OK so after multiple videos I have successfully made my pi cam accessible via web. Verified this on phone. I opened port 8081 on firewall and the forward works beautifully. The big issue now is that the pi cam works and streams, but the usb webcam doesn’t. internally when accessed it shows both. Externally it just shows the pi cam. I went back in to verify that the cams were on 8081 and they are.
Ideas?
Another ?
I have the motion-eye downloaded and can now ssh. The directions apt-get doesn’t work off the bat. And old method doesn’t enter bash, and also the full path to
/usr/local/sourceisn’t available./usris only one that is there.I have tried and tried. I have searched and all say the login via ssh is just admin. I used this and it didn’t work. I wiped drive and restarted; same problem!
I need help to get the updates for motion-eye to send updated dyndns info re pi password
According to the MotioneyeOS site, the default password for admin, if you haven’t changed it through the admin GUI is the board’s serial number – this ONLY applies if you are trying to SSH. I’d suggest changing the password in the Web GUI (default admin ID doesn’t have a password AFAIR), reboot (password only takes effect after reboot) then try to SSH to root@ (root is just an alias for admin)
Cheers
Simon
I have been trying to build a MYcloud server as per your video. but Comcast only allows Dynamic IPs and I have been trying for several months to get around that. Any and all help would be great.
Thanks,
Kody
The best way to deal with the dynamic IP is to use a Dynamic DNS. This tutorial takes you through the steps to setting this up.
helpful and successful. Thanks. Got all the pieces up. ddns motion eye port fwd firewall etc. Now I have to figure out why my pi camera (ribbon cable) shows with myddnsaddress:8081 but the usb plugged in to the same pi doesnt show externally. from inside my network it shows both. This is last piece of the puzzle for my master plan…lol
Hello Sir,
Thanks for the tutorial!
I have a question. Have i to configure the DNS to Raspberry Pi if my router can set the dinamyc dns from noip? I’m using motioneye from your tutorial and I want to access it from external networks.
Thanks in advance!
No, if your router can handle dynamic DNS then you don’t need to do it on the Pi.
As long as the right ports are open then you’re good to go.
Thank you for the quick reply!
I’m having trouble with external access for motioneye.
Alway I try to reach it from an external network, the browser gives the time out error.
I forwarded the ports correctly ( 9898 to 9898 in motioneye, I changed it locally). I also set a static ip to my Raspberry Pi MAC address.
I tried to restart the motioneye server and my router and I had no success.
I didn’t know what to do now.
Hi,
Looks like its fails for me. any idea why? thanks
Fails at the lines:
root@raspberrypi:/usr/local/src/noip-2.1.9-1# make installif [ ! -d /usr/local/bin ]; then mkdir -p /usr/local/bin;fi
if [ ! -d /usr/local/etc ]; then mkdir -p /usr/local/etc;fi
cp noip2 /usr/local/bin/noip2
cp: cannot create regular file ‘/usr/local/bin/noip2’: Text file busy
Makefile:28: recipe for target 'install' failed
make: *** [install] Error 1
root@raspberrypi:/usr/local/src/noip-2.1.9-1#
Hi Greg,
I’m looking into this, I might have a better solution soon that doesn’t rely on the no-ip package.
Thanks mate. Good tutorials by the way. Thanks for taking the time to produce.
I might try and locate another solution in that case as I’m keen to complete my little project soon. I pressume your solution wouldn’t work with a vpn? Was giving some thought to openvpn, and ipvanish subscription.
Thanks
Can you give us some tips around users who already have a static ip from their ISP? also users who have bought a domain they wish to use?
Appreciate your time and effort on these tutorials, probably have the answer somewhere which I missed….
Hi D,
If you have a static IP from your ISP, you can still use Dynamic DNS – the principal reason for using it is to give you a “friendly name” to access your device. Technically, whether you have a dynamic IP or a static, it still needs to be mapped to a name – this is what Dynamic DNS will give you, it simply won’t change.
The other part of the question is a bit of a minefield. If you’ve purchased a domain AND you’re hosting it, or a sub domain that’s part of it, then it’s fairly straightforward, but I would consider it’s probably beyond the scope of this article realistically.
Cheers
Simon
Hey Gus,
I am having the same issue what Leon is having up there too. I was wondering if you could help. I tried deleting the existing files and directories already and re-doing following your video but same result as Leon.
Here is the error:
I get as far as:
make install
…then get the following error:
root@max2play:/usr/local/src/noip-2.1.9-1# make installgcc -Wall -g -Dlinux -DPREFIX=\"/usr/local\" noip2.c -o noip2
In file included from /usr/include/stdio.h:28:0,
from noip2.c:136:
/usr/include/features.h:356:25: fatal error: sys/cdefs.h: No such file or directory
compilation terminated.
Makefile:25: recipe for target 'noip2' failed
make: *** [noip2] Error 1
root@max2play:/usr/local/src/noip-2.1.9-1# make install
gcc -Wall -g -Dlinux -DPREFIX=\"/usr/local\" noip2.c -o noip2
In file included from /usr/include/stdio.h:28:0,
from noip2.c:136:
/usr/include/features.h:356:25: fatal error: sys/cdefs.h: No such file or directory
compilation terminated.
Makefile:25: recipe for target 'noip2' failed
make: *** [noip2] Error 1
root@max2play:/usr/local/src/noip-2.1.9-1#
What’s going wrong?
Hi Derek,
I just ran through it and had no issues. Is there anything that you be using that’s different just so I can check. (I’m using latest version of Raspbian on the Raspberry Pi 3)
I do have another method that I should have up by the end of the week that doesn’t use the no-ip linux package.
Only had a quick look at this, but it looks as though the build tools/libraries aren’t installed/installed properly.
The make tool is complaining that it can’t find some of the include files, but as it’s 4AM, I’m afraid I can’t be more helpful at the moment 🙁
Good luck
Simon
Hi Derek, you are missing one of the include files (cdefs.h) for some reason.
To confirm this is the issue, if you navigate to the following directory:
/usr/include/arm-linux-gnueabihf/sys
once there, do an ‘ls’ of the directory, and see if you can see cdefs.h listed – I suspect it will be missing.
It would be worth an ‘apt-get update’ then ‘apt-get upgrade’ to see if this fixes the problem.
I’m not sure which of the packages includes these files now, but I wouldn’t want to point you at the wrong file – ALL the libraries need to be kept in sync.
Sorry I can’t be more help.
Cheers
Simon
Good Evening, I am down to the very last step of the Dynamic IP Set….. I do not understand how to close it.. and when I enter my domain name in a browser window… It takes me to Router Config page… what did I do wrong?
Hi Gus, thanks for the tutorial, I am using a TalkTalk router model HG633 and am unable to figure out how to port forward. There is no option for a virtual server so I am stuck at the very beginning of the tutorial, also the other settings in no way match anything in your tutorial. Any idea’s mate to help a newbie at this.
PS got my cameras set up great on my local network thanks to your other tutorials
Protocol WAN port LAN port Destination IP
TCP/UDP 54321 80 10.0.0.86
This is my setting. When I put my IP address in the browser, it jumps to 10.0.086, but the Owncloud doesn’t come out.
Why is that?
Really appreciate your tutorial, it is very detailed and helps a lot.
Hi Tom,
This an issue with Owncloud, it rewrites the URL to the local IP. I have a worked around in the OwnCloud tutorial which involves adding your external IP to the trusted IP’s and changing the IP for ‘overwrite.cli.url’ to your external IP. These are found in the following file
nano /var/www/owncloud/config/config.phpI hope this helps! 🙂
Hi Gus,
Thank you for the reply.
I have done that already, but it is not working.
This is so weird.
Hello,
I don’t have port forwarding compatibility on my router. When I access video streams from my pi in local network it works fine.
Please help me out so I can connect my pi over internet.
I bought an on/off switch for my Raspberry Pi with kodi on it. However, to get a certain script added for the on/off switch to work, I try to use putty to connect with de Raspberry, but I can’t connect. I have the IP address, and default port 22 is on in Putty. Does anyone know what to do?
Got my Pi web server on no-ip all set up thanks to the tutorials on this site! However, I can only get eternal port 80 to work. Every other port I try hangs for a few seconds then just redirects without the port. My router is an Apple Airport Extreme and the settings seem to be pretty straight forward.
port settings
Description: MyPi
public UDP Ports: 80 (the only one that works)
public TCP Ports: 80 (the only one that works)
private IP Address: 10.0.1.18 (via #hostname -I)
private UDP Ports: 80
private TCP Ports: 80
Hello,
My ISP allows me to opt for a dynamic dns, which I already did. But what can I do if the IP changes after a restart? The RPi IP won’t remain the same as the one I saved previously…
Hi Quentin,
It sounds like you will need to setup a static IP for the Pi on your Router.
Depending on your brand of router you should have a menu option called address reservation or similar. In here you can permanently assign an IP to a MAC address.
You can usually find the MAC address from the router or you can do this on the Pi itself. Use the following command:
ifconfig -aYou should get output similar to the following the mac address is bold. Also make sure you’re looking at he correct interface this example is the Ethernet port.:
eth0 Link encap:Ethernet HWaddr 08:27:ED:EC:E0:B8So, I was able to get the external access via my IP and port 8081 up and working. Signed up and installed no-ip, did the configs and everything seemed okay. I can not however access the webcam via my (hostname).ddns.net.
How is it supposed to know that it’s port 8081, whereas if I type in my ip, it’s clearly stated (x.x.x.x:8081)?
Was there a step I missed or is no-ip just figuring out the open ports? I tried looking at the FAQs and support sections of no-ip, but didn’t find an answer.
Any help would be greatly appreciated. Thanks for this tutorial and others, they have been great.
Hi YohnnyJoe,
You will still need to type in the port when using no-ip or any dynamic DNS service.
Try using the following:
http://(hostname).ddns.net:8081If this doesn’t work then please let me know and I will look into it further!
I have the same problem as Joe. Port 8081 is open, No-ip totally set up and I followed this tutorial step by step, but at the end of it all my RPi CPU goes to 100%, but my laptop can’t connect to the server. Any ideas?
Also just wanted to note that before following this tutorial, i created a wordpress site using my pi as a server following another one of your tutorials. Just figured id mention that in case thats the issue. (my plan with this tutorial was to make my WordPress site accessible from any network)
UPDATE for Logif’s question:
I just looked a bit harder at the wiki for the motion pie project, and there’s something there which you should look at which involves setting up a cron job:
https://github.com/ccrisan/motionpie/wiki/Tweaks
Look for “Running Commands At Regular Intervals (Cron Support)” as it shows how to do exactly what you are trying to do.
Regards
Simon
I get as far as:
make install
…then get the following error:
root@max2play:/usr/local/src/noip-2.1.9-1# make installgcc -Wall -g -Dlinux -DPREFIX=\"/usr/local\" noip2.c -o noip2
In file included from /usr/include/stdio.h:28:0,
from noip2.c:136:
/usr/include/features.h:356:25: fatal error: sys/cdefs.h: No such file or directory
compilation terminated.
Makefile:25: recipe for target 'noip2' failed
make: *** [noip2] Error 1
root@max2play:/usr/local/src/noip-2.1.9-1# make install
gcc -Wall -g -Dlinux -DPREFIX=\"/usr/local\" noip2.c -o noip2
In file included from /usr/include/stdio.h:28:0,
from noip2.c:136:
/usr/include/features.h:356:25: fatal error: sys/cdefs.h: No such file or directory
compilation terminated.
Makefile:25: recipe for target 'noip2' failed
make: *** [noip2] Error 1
root@max2play:/usr/local/src/noip-2.1.9-1#
Whats going wrong?
I have the same error too. I still haven’t figure it out. Did you find a solution to this?
I love your articles.
I have cabin out in the countryside and want to be able to access my Motionpie there. I followed your raspberry-pi-security-camera article and it worked at ones. Small issues to get the port right for email notification, but after some trials and error I got it right.
Now I am having problems setting up “Setting up Raspberry Pi Dynamic DNS” as this article is based on debian/ubuntu I do not know how to set it up on my motionpie box(pi2) as it is not debian and it has not sudo and location /usr/local is not present in this OS.
Can you give me some help her, I would appreciate it?
Hi Logif,
Having also just setup a motion pie box following the guide here, I had a requirement to port forward to make it accessible from the internet.
The distro used for motion pie is VERY different to Raspian/Debian and it’s not a trivial task to set it up as per the guide here.
I would suggest doing the following instead:
1 – make the motion pie box have a static IP address on your LAN (let’s assume this address is
192.168.1.111) This won’t work if you leave it as DHCP.2 – setup your ROUTER to register with no-ip or a similar dynamic DNS service (you’ll need to consult your router’s guide for specific details on how to do this) – let’s assume you’ve registered the name “myrouter.somedns”
3 – In the motion pie software, check which port is being used for the “Streaming Port” in section “Video Streaming” (default is 8081 – you should probably change this to another number that isn’t being used elsewhere on your LAN – but for now, we’ll leave it at that)
4 – Pick a random number, less than 65535, but greater than 10000 (just to be safe) that isn’t being used on your LAN (above 10000 should be safe) Let’s assume you’ve chosen 54321.
5 – On your router, find where you can set-up port forwarding and set it so that EXTERNAL traffic from ANY IP address using TCP port 54321 (and ONLY 54321) is forwarded to INTERNAL (LAN) port 8081 on IP address 192.168.1.111 (your motion pie’s LAN address)
6 – Now, from anywhere OUTSIDE your LAN, you can enter
http://myrouter.somedns:54321in a browser and this will connect to your motion pie’s video stream.I should mention I’ve had problems with some browsers (ie. Safari & Chrome on iPhone) showing the streaming feed, so you might also want to set up port forwarding to port 80 on your motion pie to give you the normal web page.
Sorry this is a bit convoluted, hope it helps.
Good luck
Simon
Thanks so much Simon. I was stuck on the step to setup a public IP. Your comment helped me out.
I am running a freepbx and asterisks on the pi but I need to know what ports to forward and I am gonna use no-Ip too