In this quick guide, we will be showing you how to install the popular Brave Web Browser onto the Raspberry Pi.

The Brave web browser has become popular as a privacy-focused web browser with a built-in tracking and ad blocker. Of course, you could use network-wide adblockers such as PiHole or AdGuard Home, but with Brave, you don’t need to install additional software.
Being built off of Chromium means you still get the performance and compatibility provided by the Chrome web browser.
This web browser allows you to enable optional features, such as allowing a limited set of approved ads in return for receiving special tokens. The downside is that you still get ads, and the website gets nothing unless they have signed up to Braves creator program.
Best of all, unlike Chrome, Brave Software does actually provide versions of their web browser for the Raspberry Pi.
The one caveat is that you must run a 64-bit version of Raspberry Pi OS to install this web browser. This means you must be using a Raspberry Pi 3 or newer.
If you decide to install this adblocking web browser, please check out PiMyLifeUp Premium to support our content.
Equipment
Below you can find a list of the equipment we used when setting up the Brave Web Browser on the Raspberry Pi.
Recommended
Optional
This tutorial was last tested on a Raspberry Pi 5 running the latest version of Raspberry Pi OS 64-bit Bookworm.
Installing the Brave Web Browser onto your Raspberry Pi
Over the following steps, you will learn how to install the Brave web browser on your Raspberry Pi.
These steps will show you how to add the official repository so you will always get the latest available versions.
Preparing your Raspberry Pi for the Brave Web Browser
1. Before we install the Brave web browser to our Raspberry Pi, there are a few things we must do first.
The first task is to update the package list cache and upgrade any out-of-date packages using the following commands.
sudo apt update
sudo apt upgrade -yCopy
2. After updating the Raspberry Pi’s operating system, your next step is to install the “curl” package.
We will use curl to grab the GPG key for the Brave package repository.
sudo apt install curlCopyAdding the Official Brave Web Browser Repository
3. With this command, we will grab the GPG key for the Brave web browser and save it to our “keyrings” directory.
The package manager uses this key to verify the packages it downloads from this repository.
sudo curl -fsSLo /usr/share/keyrings/brave-browser-archive-keyring.gpg https://brave-browser-apt-release.s3.brave.com/brave-browser-archive-keyring.gpgCopy4. With the command below, we will add the Brave Web Browser repository to our Raspberry Pi’s list of sources.
Next time we run an update, the package manager will be able to install Brave.
echo "deb [signed-by=/usr/share/keyrings/brave-browser-archive-keyring.gpg] https://brave-browser-apt-release.s3.brave.com/ stable main"|sudo tee /etc/apt/sources.list.d/brave-browser-release.list
Copy
5. Since we changed the available package repositories, we must update the package list cache using the following command.
If we don’t update the cache, the package manager will be unaware it can install Brave.
sudo apt updateCopyInstalling
6. With the official repository, all we need to do to install the Brave Web Browser to our Raspberry Pi is to run the following command within the terminal.
The package manager will grab and install the browser from the repository we added in the last section.
sudo apt install brave-browserCopyLaunching the Brave Web Browser on the Raspberry Pi
7. If you are still in the terminal, you can easily open the Brave browser using the following command.
If you open the browser using this command, skip to step 10.
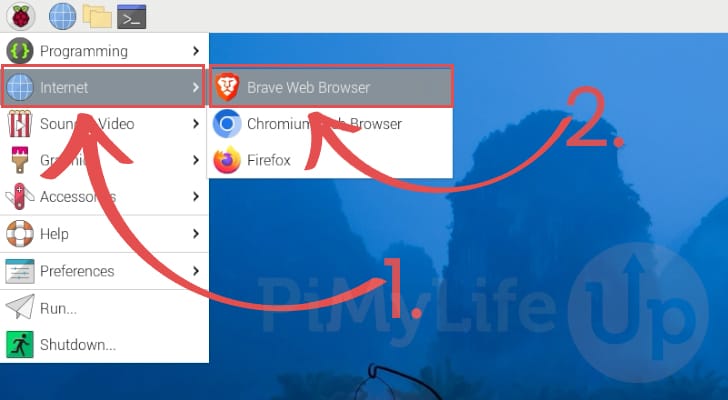
brave-browserCopy8. Alternatively, you can open the Brave web browser through the desktop interface.
Your first step is to open the start menu by clicking the Raspberry icon in the top-left corner.

9. With the start menu open, first hover over the “Internet” (1.) option to reveal a list of your installed web browsers.
In the pop-up menu, click the “Brave Web Browser” option (2.).
10. When you first open the Brave browser on your Pi, you will be asked to choose a password for a keyring.
This keyring is where the browser will store any saved passwords. Type in a password to lock this keyring (1.).
After typing out a password, click the “Continue” button (2.).

11. You should now have the Brave web browser open on your Raspberry Pi.

Conclusion
Hopefully, at this stage, you will now have the Brave web browser installed on your Raspberry Pi.
This web browser is an excellent alternative to Firefox and Chromium, thanks to its focus on privacy and performance. It packs many features that you would normally have to install additional plugins to get.
Please feel free to drop a comment below if you have any issues with getting this web browser installed.
If you found this tutorial to be helpful, we highly recommend checking out our many other Raspberry Pi tutorials.


Success as I have aarch64 on rpi 5.
Fail
Hi Adk,
As mentioned at the start of this guide, you must be running a 64-bit operating system on your Raspberry Pi to use the Brave web browser. The error you are facing indicates you are running a 32-bit OS (armhf).
Kind regards,
Emmet
These instructions are out of date:
“repository ‘https://brave-browser-apt-release.s3.brave.com stable InRelease’ doesn’t support architecture ‘armhf'”
I assume this is an only article/web page that’s had the date at the top of the page updated to make it look recent. Typical SEO trick. You should wither update the page with correct valid information or remove web page altogether.
Hi Andy,
As indicated by the message you are seeing, you are running a 32-bit operating system (“
doesn’t support architecture ‘armhf'”“). As stated in the tutorial, you must be running a 64-bit operating system such as the 64-bit release of Raspberry Pi OS to install Brave.Unfortunately Brave, like most modern web browsers, lack support for 32-bit operating systems.
Kind regards,
Emmet