In this project, we will guide you through setting up the NUT dashboard, known as PeaNUT, on your Raspberry Pi.
If you have an NUT server running on your Pi or another device, you may sometimes find it challenging to check the status of your UPSs quickly.
Now, you could SSH into your machine and then use upsc to check each UPS; however, this isn’t the best solution for all cases. That is where a web dashboard is incredibly useful.
Using a web dashboard, you can easily track the status of your UPS and access all the necessary information at a glance. You can even use this to build a neat little kiosk that displays all your UPS information.
One of the best web dashboards that you can set up for NUT is a piece of software called PeaNUT. PeaNUT is perfect for the Raspberry Pi, as it is super lightweight and reveals all the information you might need to check the status of your UPS. While you could use NUT-CGI like we set up in our Raspberry Pi NUT server guide, you will find PeaNUT to be significantly more helpful and easier to interpret.
Best of all, PeaNUT even features support for multiple NUT servers and multiple UPSs. In our own case, it made checking on both UPSes we have connected to our Raspberry Pi incredibly easy.
You can even integrate PeaNUT into InfluxDB for monitoring your UPS information through a heavier dashboard like Grafana. It even has the ability to integrate with the open-source monitoring system called Prometheus.
Thanks to PeaNUT supporting both ARM64 and ARMv7, you will be able to run this NUT dashboard on a Raspberry Pi 2 or newer.


Equipment
Below is a list of equipment you will need to set up a NUT web dashboard on your Raspberry Pi using PeaNUT.
Recommended
- Raspberry Pi Amazon
- Micro SD Card Amazon
- Power Supply Amazon
- Ethernet Cable Amazon or Wi-Fi Amazon
- UPS
Optional
We last tested this tutorial on a Raspberry Pi 5 running the latest version of Raspberry Pi OS Bookworm.
Installing and Configuring PeaNUT on a Raspberry Pi
In the following sections, we will guide you through the easy steps to install and run PeaNUT on your Raspberry Pi.
For these steps, you will need to have a device running the NUT server and connect it to a compatible UPS. If you have never set up this software before, we have a guide that walks you through the process of setting up NUT on your Raspberry Pi.
PeaNUT itself is really simple to get running as it is distributed as a Docker container. Once you are all ready, proceed with this guide.
Preparing your Raspberry Pi
1. Before we begin setting up PeaNUT on your Raspberry Pi, let’s ensure we have a well-updated operating system to work with.
You can update the package list cache and upgrade any out-of-date packages by using the following two commands.
sudo apt update
sudo apt upgrade -yCopy
2. Once the update completes, the next thing we need you to do is install Docker onto your machine. Docker is what will make this whole process incredibly straightforward while also making it easy to update PeaNUT to the latest release.
If you have never installed Docker on your machine before, follow our guide on installing Docker on the Raspberry Pi.
https://pimylifeup.com/raspberry-pi-docker/3. Now that we have Docker installed, we can create a directory to store the Docker Compose file for PeaNUT and designate a location for its configuration files.
We will be creating a directory at “/opt/stacks/peanut” by utilizing the mkdir command and its “-p” option. You can use any folder you like, but we personally like to keep our Compose stacks organised under the “/opt/stacks” folder.
sudo mkdir -p /opt/stacks/peanutCopy4. After creating the folder, you must change into it by utilizing the cd command. We need to be in this folder so that we can write the Compose file for PeaNUT and then run it.
cd /opt/stacks/peanutCopyCreating a Compose File for PeaNUT on the Raspberry Pi
5. We can now proceed with creating the Docker Compose file that will set up PeaNUT on our Raspberry Pi. A Compose file is like a set of instructions that Docker follows when setting up a piece of software, such as PeaNUT.
You can begin writing this file with the Nano text editor by using the command below.
sudo nano compose.yamlCopy6. Within this file, you will want to type out the following lines.
These lines define the image we are using to run PeaNUT on our Raspberry Pi, the ports it will be exposed on as well as the place it will store its config files. There isn’t anything in this file that you should need to edit.
services:
  peanut:
    image: brandawg93/peanut:latest
    container_name: PeaNUT
    restart: unless-stopped
    volumes:
      - ./config:/config
    ports:
      - 8080:8080
    environment:
      - WEB_PORT=8080Copy
7. After filling out the Compose file, you can save and quit out of Nano by pressing CTRL + X, Y, and then ENTER.
Starting up PeaNUT on your Raspberry Pi
8. Since we are using Docker, starting up and keeping PeaNUT running on our Pi is as straightforward as using the command below.
After running the command, Docker will download the latest available release of PeaNUT and start it up on your Pi. Since we are using the “-d” option, it will then detach from the current terminal session and continue to run in the background.
If you have issues with getting PeaNUT to start, ensure that you try this command again, but this time remove the “-d” option. This will enable you to see any logs being produced by the software.
docker compose up -dCopyAccessing the Web Interface
9. With PeaNUT now running, you will want to access its web interface to finish configuring the software.
To access it, you will need to know the IP address of your Raspberry Pi. One of the easiest ways to get this IP is to use the hostname command.
hostname -ICopy10. Now, in your favorite web browser, go to the following address. Ensure that you swap out “<IPADDRESS>” with the IP of your Raspberry Pi.
http://<IPADDRESS>:8080For example, if you had the IP “192.168.0.215” you would go to the following address.
http://192.168.0.215:8080Configuring PeaNUT to Talk with your NUT Server
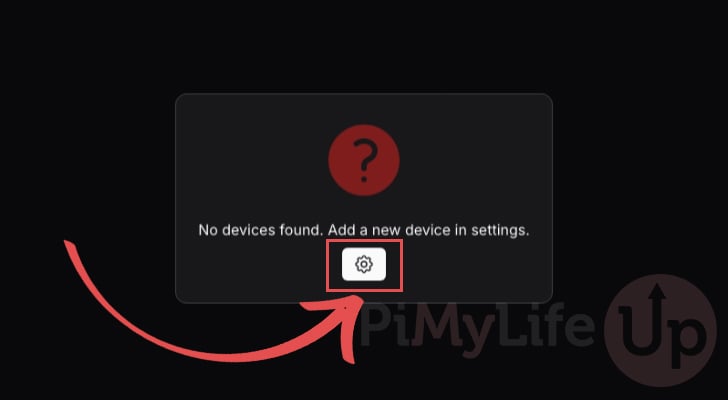
11. The first time you access the PeaNUT dashboard, you will find that it cannot currently communicate with your NUT server, as it requires some crucial connection details.
To add your NUT server to your PeaNUT UPS dashboard, click the cog icon.
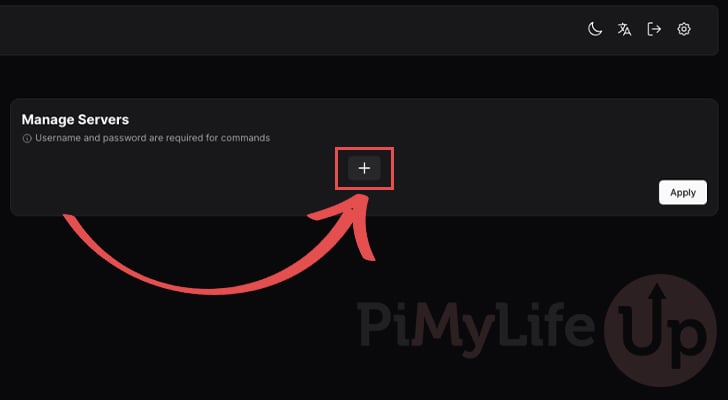
12. On this next screen, click the plus symbol button to begin adding a new NUT server.
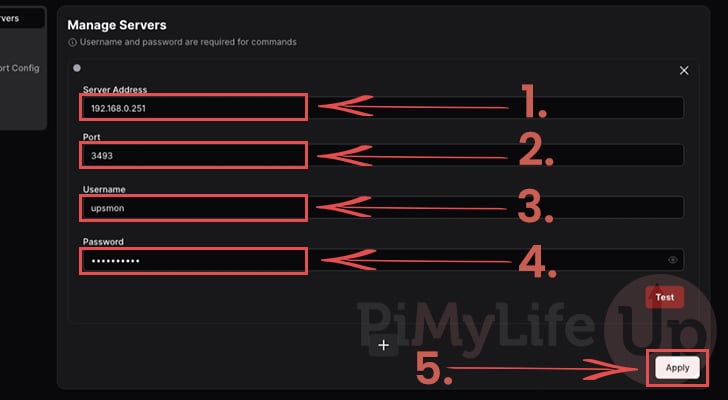
13. You will now be required to fill out the information that PeaNUT requires to communicate with your NUT server and display UPS information on its dashboard.
- Server Address (1.): IP Address of your NUT server. Even if you are running this on the same Pi, you still need to use your local IP address.
As this is running within a Docker container, you can’t use localhost. - Port (2.): IF you have followed our guide, you will use port
3493. - Username (3.): Specify the username of a user you created within the NUT server’s “
upsd.users” file. - Password (4.): Enter the password for the given user.
After filling out these five text boxes, you can click the “Test” button to verify the connection.
If everything is working properly, you can now click the “Apply” button (5.).
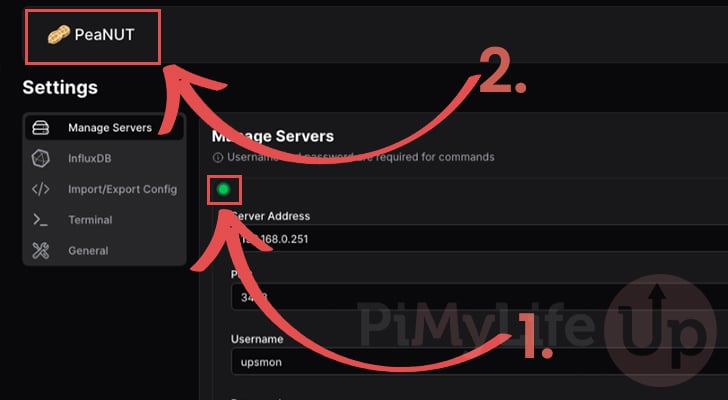
14. If your Raspberry Pi is now successfully communicating with the given NUT server, you should see a green icon appear in the upper-left corner (1.).
You can now view the status of your UPSs through PeaNUT by clicking the icon in the top-left corner (2.).
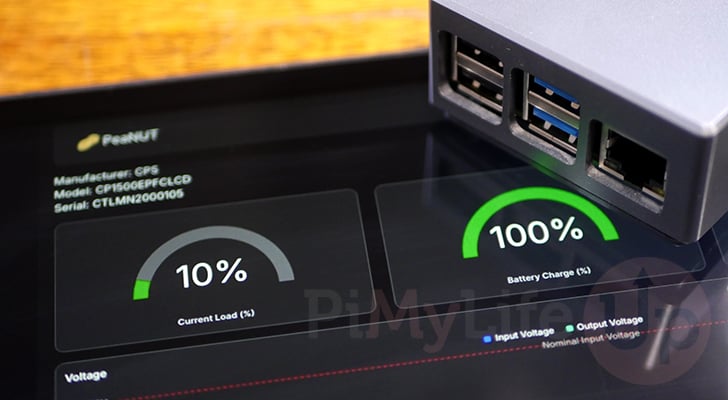
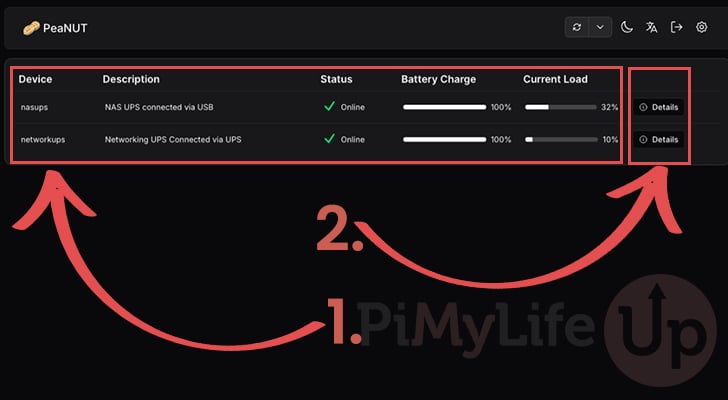
15. Back on the dashboard, you will now see that PeaNUT is showing information about each of the UPSs that you had configured on your NUT server.
In our case, we have two UPSs now available to us, with it showing the status, battery charge, and current load of each UPS (1.).
To get even more information about the UPS’s PeaNUT can talk with, you will want to click the “Details” (2.) button.
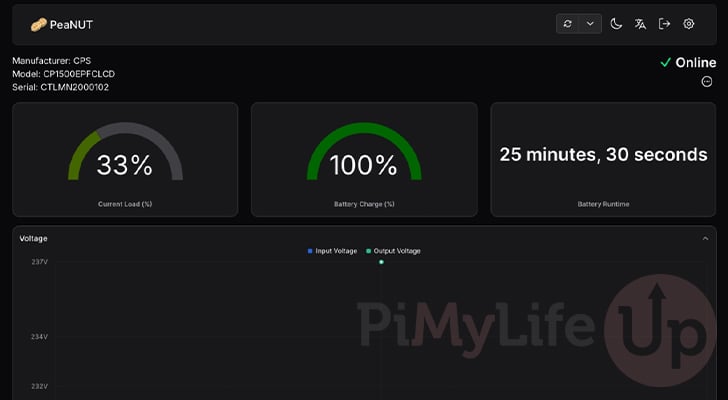
16. If you view the details screen, you will see all the information that your new PeaNUT dashboard, running on the Raspberry Pi, can gather from your UPS.
Conclusion
Hopefully, by this point in the project, you will have successfully set up the PeaNUT UPS dashboard on your Raspberry Pi.
This dashboard allows you to easily view the status of any UPS connected to a NUT server from your web browser. It is a much better alternative to NUT-CGI thanks to its use of modern web technologies.
Please leave a comment below if you encounter any issues with getting this web dashboard running on your Pi. Most issues with PeaNUT will likely be caused by connectivity issues with a NUT server.
If you liked this tutorial, we highly recommend exploring some of our many other Raspberry Pi projects.


Thanks for the tutorial! I’m the author of PeaNUT. I’m glad so many people find this useful. It’s just been a passion project to force me to learn the latest web technologies.
Good work! Thank you very much 🙂