This tutorial will show you how to install and run Dashy on the Raspberry Pi.

Dashy is an open-source dashboard that aims to be the ultimate homepage for your home lab. It is easy to use and highly customizable while respecting your privacy.
This dashboard has many features that make it one of the easiest to use on your Raspberry Pi. For example, when adding a link to a service, Dashy will automatically grab the icon from that service if it has one, saving you the need to fetch the image to use.
Dashy even features an interactive editor that makes adding elements to your dashboard a breeze. This is an improvement over other dashboards, such as Homepage, that requires you to learn how its config files yourself.
This dashboard even offers various widgets for a wide variety of API services; at the time of publishing, the team claims to offer support for over 50 services out of the box.
Equipment
Below is a list of equipment we used to set up and run Dashy on our Raspberry Pi.
Recommended
Optional
This tutorial was last tested using a Raspberry Pi 5 running the latest version of Raspberry Pi OS Bookworm 64-bit.
Installing Dashy on the Raspberry Pi
In the following sections, we will walk you through all the steps required to install the Dashy Dashboard onto your Raspberry Pi.
This process is relatively simple, especially if you already have Docker installed on your system.
Preparing your Raspberry Pi
1. We must ensure everything is updated before we can set up Dashy on our Raspberry Pi.
You can update the package list cache and upgrade any out-of-date packages using the following two commands.
sudo apt update
sudo apt upgradeCopy
2. To run Dashy, we will use a Docker container. This container makes installing, running, and updating Dashy a straightforward process.
Of course, to run this container, you will need the Docker runtime. Before continuing, follow our guide on installing Docker on the Raspberry Pi.
https://pimylifeup.com/raspberry-pi-docker/3. After installing Docker, we can create a folder to store the Docker Compose file for Dashy alongside its configuration file on our Raspberry Pi.
Create this directory by using the mkdir command within the terminal.
sudo mkdir -p /opt/stacks/dashyCopy4. Once the directory has been created, we can change into it by using the cd command.
cd /opt/stacks/dashyCopyWriting a Docker Compose File for Dashy on the Raspberry Pi
5. Our next step is writing the Docker Compose file for Dashy on your Raspberry Pi. This Compose file is a set of instructions Docker will follow when downloading and running the dashboard software.
To write this file, we will use the nano text editor, which is relatively simple for beginners.
sudo nano compose.yamlCopyIf you want a better way of managing Docker Compose files on your Pi, check out Dockge.
6. Within this file, type in the following lines.
There isn’t anything you need to configure within this to get the dashboard running on your Pi.
services:
  dashy:
    image: lissy93/dashy
    container_name: Dashy
    volumes:
      - ./config.yml:/app/public/conf.yml
    ports:
      - 4000:8080
    environment:
      - NODE_ENV=production
      - UID=1000
      - GID=1000
    restart: unless-stopped
    healthcheck:
      test: ['CMD', 'node', '/app/services/healthcheck']
      interval: 1m30s
      timeout: 10s
      retries: 3
      start_period: 40sCopy
7. After filling out the Compose file, save and quit by pressing CTRL + X, Y, and then ENTER.
Creating a Starting Config File for Dashy
8. Before we can run Dashy on our Raspberry Pi, we will also need to create a basic configuration file.
Begin writing this configuration file using the command below in the terminal.
sudo nano config.ymlCopy9. What is in this file doesn’t matter a huge amount, so let us start with a basic configuration directly from the official website.
You can adjust this now or use the interactive editor through the web interface.
---
# Page meta info, like heading, footer text and nav links
pageInfo:
  title: Dashy
  description: Welcome to your new dashboard!
  navLinks:
  - title: GitHub
    path: https://github.com/Lissy93/dashy
  - title: Documentation
    path: https://dashy.to/docs

# Optional app settings and configuration
appConfig:
  theme: colorful

# Main content - An array of sections, each containing an array of items
sections:
- name: Getting Started
  icon: fas fa-rocket
  items:
  - title: Dashy Live
    description: Development a project management links for Dashy
    icon: https://i.ibb.co/qWWpD0v/astro-dab-128.png
    url: https://live.dashy.to/
    target: newtab
  - title: GitHub
    description: Source Code, Issues and Pull Requests
    url: https://github.com/lissy93/dashy
    icon: favicon
  - title: Docs
    description: Configuring & Usage Documentation
    provider: Dashy.to
    icon: far fa-book
    url: https://dashy.to/docs
  - title: Showcase
    description: See how others are using Dashy
    url: https://github.com/Lissy93/dashy/blob/master/docs/showcase.md
    icon: far fa-grin-hearts
  - title: Config Guide
    description: See full list of configuration options
    url: https://github.com/Lissy93/dashy/blob/master/docs/configuring.md
    icon: fas fa-wrench
  - title: Support
    description: Get help with Dashy, raise a bug, or get in contact
    url: https://github.com/Lissy93/dashy/blob/master/.github/SUPPORT.md
    icon: far fa-hands-helpingCopy
10. Once you have entered some basic configuration, save and quit by pressing CTRL + X, Y, and then ENTER.
11. This config file must be owned by the same user the container will run under.
Give ownership to the user with the id “1000” by using the chown command.
sudo chown 1000:1000 ./config.ymlCopyStarting Dashy
12. With everything now configured, starting Dashy on our Raspberry Pi is as easy as using the following command.
Docker will begin to download and run Dashy immediately. Using the “-d” option, Docker will detach from the running terminal once it has successfully started.
docker compose up -dCopyAccessing your New Dashy Dashboard on your Raspberry PI
13. With Dashy now running on your Raspberry Pi, you will want to access its dashboard.
To access the dashboard, you will need your Raspberry Pi’s IP address. If you don’t know it already, you can get your IP by using the following command.
hostname -ICopy14. In your favorite web browser, go to the following address to access Dashy.
Ensure that you replace “<IPADDRESS>” with the IP of your Raspberry Pi.
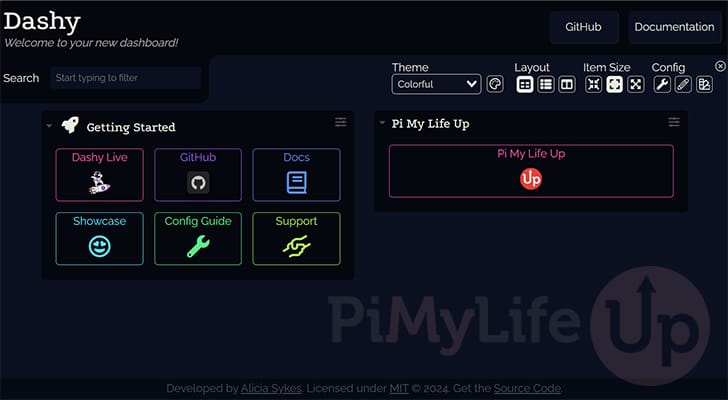
http://<IPADDRESS:400015. Below, you can see that we now have Dashy up and running on our Raspberry Pi. At this point, you can add your own elements and customize the dashboard to suit your needs.
The official documentation has a many tips on how to best use the interface to configure the dashboard.
Updating the Dashy Dashboard
One massive advantage of using a Docker container to run Dashy is that it makes updating the software easy.
The following steps will show you how to update Dashy on your Raspberry Pi to the latest release.
1. Your first step is to change to the same directory where you wrote the Compose file.
You can change to this directory using the command below.
cd /opt/stacks/dashyCopy2. We can tell Docker to download the latest version of the Dashy container by using the following command.
docker compose pullCopy3. If an update was downloaded successfully, the running version of Dashy won’t automatically move to it.
Luckily, using the same command we used to start Dashy, Docker will detect the new image and automatically restart your current running container using it.
docker compose up -dCopyConclusion
At this point, you should now have the Dashy dashboard up and running on your Raspberry Pi.
Dashy is a great and easy-to-use dashboard aimed at being your home page for all your home lab software. It is a great alternative to other dashboards such as Heimdall and Homarr.
Please leave a comment below if you have any questions about running Dashy on your Pi.
If you liked this tutorial, we highly recommend checking out our many other Raspberry Pi projects.


Hi Sir,
It seems that the steps above are not working anymore. I get the following message at the last step: docker compose up -d
‘yaml: mapping values are not allowed in this context’
Please advice,
Gendie
Hi Gendie,
I just re-ran through the tutorial and am unable to replicate the issue.
Please ensure that you copied the “yaml” file correctly and that you are running the latest version of Docker.
Kind regards,
Emmet