In this tutorial, we will show you how to set up a NUT server on your Raspberry Pi, allowing you to remotely manage a UPS.
NUT stands for Network UPS Tool and allows a device like your Raspberry Pi to communicate with a UPS and monitor it.
Best of all, NUT lets you broadcast UPS information to other NUT clients. This server functionality allows other systems to access your UPS information and react accordingly.
For example, we use a Raspberry Pi running NUT on our network, allowing other computers connected to the UPS to read the remaining power and shut down accordingly.
Setting up NUT on the Raspberry Pi is relatively straightforward, especially if your UPS offers a USB connection.
Before proceeding, you should view the official hardware compatibility list to see if NUT supports your UPS. If your UPS is supported, plug it into your Raspberry Pi.
Equipment
Below is a list of the equipment we used when setting up a NUT server on our Raspberry Pi.
Recommended
- Raspberry Pi Amazon
- Micro SD Card Amazon
- Power Supply Amazon
- Ethernet Cable Amazon or Wi-Fi Amazon
- UPS
Optional
This tutorial was last tested on a Raspberry Pi 5 running the latest version of Raspberry Pi OS Bookworm.
Video
Below, you can find a video that walks you through the whole process of setting up the NUT server on your Raspberry Pi. If you prefer our written guide, please skip to the next section.
Installing the NUT Server to the Raspberry Pi
In the following steps, we will install the NUT server on the Raspberry Pi. Luckily, the software was available through the official package repository, making this a relatively straightforward process.
1. The first thing we need to do is update our Raspberry Pi’s package list and upgrade any out-of-date packages.
You can complete both of these tasks by using the following command.
sudo apt update
sudo apt upgradeCopy
2. Once the update completes, we can install NUT to the Raspberry Pi by running the command below.
sudo apt install nutCopyAlongside the core version of NUT, the client and server will be installed by running this command. Additionally, if you use conflicting software such as apcupsd, it may automatically remove it.
Configuring NUT to Read Your UPS
Now that the NUT server is installed on your Raspberry Pi, we can move on to configuring the software to read from the UPS.
Getting your UPS Vendor and Product ID
1. We will need additional information to make it easier for NUT to discover the UPS you connected to your Raspberry Pi.
The easiest way to get information is to use the “nut-scanner” tool that was installed alongside the NUT server.
sudo nut-scanner -UCopy2. After running this command, you should see a result similar to the one shown below. In our example, we actually have two UPSs connected to our Raspberry Pi.
For each UPS you want to be monitored by your Raspberry Pi, there are five pieces of information you must write down:
- Driver: This value will help NUT understand how to communicate with your UPS.
- Port: In most cases, this will be “
auto“. With this, NUT will auto-detect the right device using three additional pieces of information. - VendorID: Identifies the vendor that manufactured your UPS. In our example, this corresponds to Cyber Power System.
- ProductID: Used to identify the specific product that the connected UPS is.
- Serial: Used as a unique identifier for your UPS. Be warned that some UPSes don’t set a unique value for this, which can complicate things slightly.
If you are trying to attach multiple UPSs but they have the exact same details, you will need to specify the port instead of relying on “auto“.
Scanning USB bus.
[nutdev1]
	driver = "usbhid-ups"
	port = "auto"
	vendorid = "0764"
	productid = "0501"
	product = "CP1500EPFCLCD"
	serial = "CTLMN2000102"
	vendor = "CPS"
	bus = "001"
[nutdev2]
	driver = "usbhid-ups"
	port = "auto"
	vendorid = "0764"
	productid = "0501"
	product = "CP1500EPFCLCD"
	serial = "CTLMN2000105"
	vendor = "CPS"
	bus = "001"Copy
Modifying the NUT UPS Configuration on the Raspberry Pi
3. For NUT to be aware of the UPS connected to your Raspberry Pi, you must modify one of the configuration files. NUT stores all of its UPS definitions within the “/etc/nut/ups.conf” file.
Run the following command to edit the configuration file that tells NUT which UPS to communicate with.
We can open this configuration file for editing by using the Nano text editor.
sudo nano /etc/nut/ups.confCopy4. Scroll down to the bottom of this file and add a new section for each UPS that you want to monitor using NUT on your Raspberry Pi. Since we are using Nano, you can jump to the bottom by pressing CTRL + W, and then CTRL + V.
While filling out each section, you must type in the information you got in the previous section.
<NAME>: Swap this out with the name that you intend on using for your UPS. This name should not have any symbols or spaces.
A couple of examples of how you can write a UPS name are “myups1“, “nasups“, “networkingups“.<PORT>: With this, you must specify the port that will be used to connect to your UPS.
In the vast majority of cases, you can get away with using “auto“. This mode enables NUT to select the correct port to connect with your UPS automatically.<VENDORID>: The Vendor ID of your UPS.
An example of a valid vendor ID is “0764“<PRODUCTID>: UPS Product ID.
For example, “0501“.<SERIAL>: Unique Serial for the UPS.
Using our example from earlier, a valid serial number would be, “CTLMN2000102“<DESCRIPTION>: Short descriptor for your UPS.
For example, you could use the value, “NAS UPS connected via USB“.<SHUTDOWNORDER>: With this option, you can configure the order in which your Raspberry Pi NUT server will shut down the connected UPSs.
Please note that restarting your Raspberry Pi can actually trigger the UPS to be switched off.
To get around this behaviour, you can set this value to negative 1 (-1). Once set to negative one, NUT will not shut down your UPS.
[<NAME>]
driver = "<DRIVER>"
port = <PORT>
vendorid = "<VENDORID>"
productid = "<PRODUCTID>"
serial = "<SERIAL>"
desc = "<DESCRIPTION>"
sdorder = <SHUTDOWNORDER>Copy
To illustrate how this works, below is an example of our file after adding both of our UPSs to the configuration file.
[nasups]
	driver = "usbhid-ups"
	port = "auto"
	vendorid = "0764"
	productid = "0501"
	serial = "CTLMN2000102"
        desc = "NAS UPS connected via USB"
        sdorder = -1
[networknas]
	driver = "usbhid-ups"
	port = "auto"
	vendorid = "0764"
	productid = "0501"
	serial = "CTLMN2000105"
        desc = "Networking UPS Connected via UPS"
        sdorder = -1Copy
5. Once you have added your new UPS block to the NUT configuration file, you can save and quit.
Save and quit by pressing CTRL + X, Y, then the ENTER key.
Enable NUT to Be Accessible Outside your Raspberry Pi
6. By default, the NUT server on your Raspberry Pi is designed to only listen on the local IP address. This means that clients on the network will be unable to communicate with the server.
Luckily, NUT allows us to modify and adjust the default behavior so the server will listen to all addresses.
Begin editing the “upsd.conf” configuration file using the following command.
sudo nano /etc/nut/upsd.confCopy7. Now add the following line to the bottom of this file. This line will allow your devices to connect and talk to the NUT server.
If you only want NUT to listen on a particular IP address, then replace “0.0.0.0” with that IP. For most basic home uses, you can probably get away with exposing NUT on all network interfaces.
LISTEN 0.0.0.0 34938. With that line added, save and quit by pressing CTRL + X, followed by Y, then the ENTER key.
Setting up a NUT User
9. To set up users, you must modify the “upsd.users” file. This file allows you to define users who can access the NUT server. running on your Raspberry Pi.
You can edit this file using the Nano text editor by running the command below.
sudo nano /etc/nut/upsd.usersCopy10. Within this file, you will want to define new users by adding an additional block to the bottom of the file. To define a new user, use the following template.
<USERNAME>: Set the username you want to use for your user. This username should only contain letters and numbers.
For example, “pimon” would be a valid user.<PASSWORD>: Define a long and secure password for your user.
You will need to write this password down somewhere, as you will need to use it when connecting to your Raspberry Pi NUT server to get your UPS status.upsmon primary: We aren’t adjusting this line, but this tells the NUT server that this user will be used to access the current NUT installation.
If you wanted to use this user to monitor a remote NUT server, you would change “primary” to “secondary“.
[<USERNAME>]
    password = <PASSWORD>
    upsmon primaryCopy
For example, if we wanted to create a user named “upsmon” with the password “pimylifeup“, we would use the following lines
[upsmon]
    password = pimylifeup
    upsmon primaryCopy
11. Once you have finished adding your users, you can save and quit by pressing CTRL + X, followed by Y, then ENTER.
Setting up NUT as a Net Server on the Raspberry Pi
12. Now that we have created our users and told NUT what UPSs it should monitor, we can reconfigure NUT to work as a server on our Raspberry Pi
To enable the net server mode, we must edit the “/etc/nut/nut.conf” config file by using the following command in the terminal.
sudo nano /etc/nut/nut.confCopy13. There are actually four different modes that we can put the NUT server into:
- none: With this option, NUT will be in its “unconfigured” mode. This means the NUT server will not start up any of its components on your Raspberry Pi.
- standalone: With this mode, no outside devices will be able to access your NUT server.
- netserver: To enable outside access to your NUT server, this is the mode that you will want to use. It will allow devices other than the current machine to be able to retrieve the status of a monitored UPS.
- netclient: Enables NUT to work purely as a client. With this mode, NUT would retrieve UPS information from a NUT server.
14. Since we are setting up our Raspberry Pi to work as a NUT server, we will want to use the option “netserver“.
Within this configuration file, scroll down until you find the MODE option. You can find this easier by using Nano’s search functionality by pressing CTRL + W, typing in “MODE” and then pressing ENTER.
MODE=noneCopyOnce you have found this line, replace “none” with “netserver“.
MODE=netserverCopy15. With that change made, save and quit by pressing CTRL + X followed by the Y key, then ENTER.
Restarting and Testing the Raspberry Pi’s NUT Server for your UPS
16. After making all those changes, you must restart the NUT server on your Raspberry Pi.
You can restart the server using the following two commands within the terminal.
sudo systemctl restart nut-serverCopy17. Once the service restarts, we can test whether our NUT server is working and successfully retrieving information from your UPS.
To do this, all you need to do is use the following command. The “upsc” command is a call to the NUT client, the value directly after is the name of the UPS that we are polling information from.
Replace “<UPSNAME>” with a name that you have assigned to a connected UPS. This is the value you defined within the “/etc/nut/ups.conf” file earlier.
upsc <UPSNAME>CopyYou can also test that your user is working properly by providing the command with your username and password.
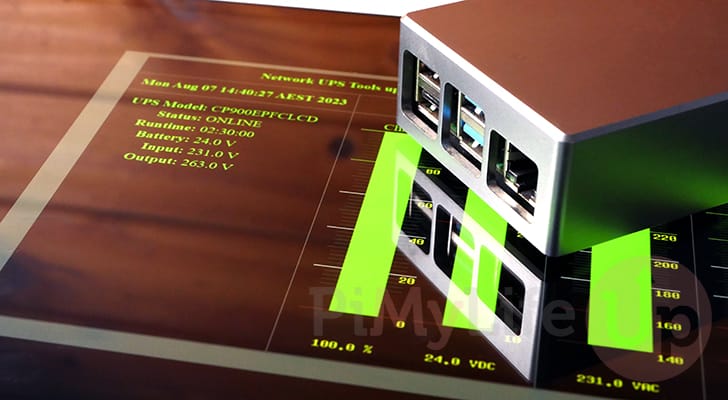
upsc <UPSNAME> -u <USERNAME> -p <PASSWORD>18. Below is an example of the information your Raspberry Pi NUT server can retrieve from your UPS.
Init SSL without certificate database
battery.charge: 100
battery.charge.low: 10
battery.charge.warning: 20
battery.mfr.date: CPS
battery.runtime: 9000
battery.runtime.low: 300
battery.type: PbAcid
battery.voltage: 24.0
battery.voltage.nominal: 24
device.mfr: CPS
device.model: CP900EPFCLCD
device.serial: 000000000000
device.type: ups
driver.name: usbhid-ups
driver.parameter.pollfreq: 30
driver.parameter.pollinterval: 2
driver.parameter.port: auto
driver.parameter.synchronous: no
driver.version: 2.7.4
driver.version.data: CyberPower HID 0.4
driver.version.internal: 0.41
input.transfer.high: 260
input.transfer.low: 170
input.voltage: 236.0
input.voltage.nominal: 230
output.voltage: 268.0
ups.beeper.status: disabled
ups.delay.shutdown: 20
ups.delay.start: 30
ups.load: 0
ups.mfr: CPS
ups.model: CP900EPFCLCD
ups.productid: 0501
ups.realpower.nominal: 540
ups.serial: 000000000000
ups.status: OL
ups.test.result: No test initiated
ups.timer.shutdown: -60
ups.timer.start: -60
ups.vendorid: 0764
Enabling a GUI to View your Raspberry Pi NUT Server
Now that you have your Raspberry Pi set up with NUT and monitoring the connected UPS, you may want an easy way of viewing the information it’s gathering.
There are two options you can follow here. You can either set up NUT-CGI as we do over the next section, or alternatively, you can set up PeaNUT on your Pi instead.
Luckily, this is relatively simple, as NUT has its own web interface. This web interface provides an easy way to remotely monitor your UPS without setting up a NUT client.
As this web server operates using CGI scripts, we will use Apache on our Raspberry Pi for the following steps.
Installing the Nut-GUI Server
1. As we need to install some additional packages, ensure the package list is up to date by using the command below.
sudo apt updateCopy2. Next, install the Apache web server and the NUT-CGI software. “NUT-CGI” will allow you to monitor your Raspberry Pi’s connected UPS from the web.
You can install these additional packages using the following command in the terminal.
sudo apt install apache2 nut-cgiCopy3. For NUT-GUI to work on our Raspberry Pi, we must modify the “hosts” configuration file.
You can begin editing this file by using the following command.
sudo nano /etc/nut/hosts.confCopy4. To the bottom of this file, you will want to enter the following line. This line defines a new monitor, the UPS to monitor, and assigns it a display name.
While filling out this line there is two placeholders that you must replace.
<UPSNAME>: Replace “<UPSNAME>” with the name you assigned to this particular OS earlier on in this guide.
To connect to the UPS we configured in our example, we would swap this out with “ups“.<DISPALYTEXT>: Swap this placeholder out with text that briefly describes your UPS. This text is used within the NUT web interface.
For this example, we will be just using “Local UPS” as our text.
MONITOR <UPSNAME>@localhost "<DISPLAYTEXT>"5. After you have made this change, save and quit by pressing CTRL + X, followed by Y, then ENTER.
6. Our next step is to enable the “CGI” Apache 2 module.
You can enable this module by running the command below within the terminal.
sudo a2enmod cgiCopy7. For everything to function, you must restart the Apache web server.
Restart the server by running the command below on your Raspberry Pi.
sudo systemctl restart apache2CopyAccessing the NUT-CGI Web Interface
8. Now that you have the NUT web server on your Raspberry Pi, you can view the interface it generates.
To access this web interface, you will need to know your Pi’s IP Address. You can easily find this address by using the hostname command.
hostname -ICopy9. Once you have your Raspberry Pi’s IP address, you can access NUT’s web interface by going to the following URL in your favorite web browser.
Ensure that you replace “<IPADDRESS>” with the IP of your Raspberry Pi.
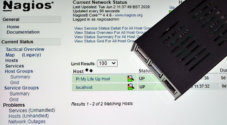
http://<IPADDRESS>/cgi-bin/nut/upsstats.cgi10. By browsing to the URL you should see the following web interface. This page will allow you to quickly monitor all the UPSs your Raspberry Pi is connected to.
If you want a more in-depth view of your UPS, click the link under the “System” column.

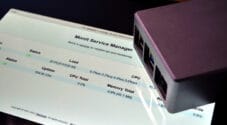
11. If you access the more in-depth view, you will see the vital details of your UPS presented with a simple bar graph.

Conclusion
Hopefully, by this point in the tutorial, you should now have your Raspberry Pi set up with NUT and be successfully monitoring a UPS.
Thanks to its exhaustive compatibility list, NUT is one of the go-to tools for monitoring a UPS.
Please comment below if you have had any issues with getting a NUT server to run on your Raspberry Pi.
Check out our many other Raspberry Pi projects if you found this guide helpful.


Just wanted to say thank you for the excellent write-up. Also I found on Cyberpower UPS system if the polling is longer than 20 seconds the service fails with “driver not connected”. I fixed this by adding pollinterval =15 to the ups.conf
Hello Emmet,
thank you so much for this great guide. I followed it to set up NUT on a RaspberryPI 3, running pihole (Linux pihole 6.1.21-v7+ #1642 SMP Mon Apr 3 17:20:52 BST 2023 armv7l) and it just worked.
Just recently I found out that after a restart of the system, the nut-server was no longer available. As a workaround I manually started nut-server, which worked.
It took me a while to find out that during a reboot the nut-server could not bind to the network interface, apparently because the network was not yet fully up and running.
In the end the solution was to change a dependency in the systemd service startup file
/lib/systemd/system/nut-server.service:Instead of
After=local-fs.target *network.target* nut-driver.serviceI changed it to
After=local-fs.target *network-online.target* nut-driver.serviceThen the service was able to bind the network address during reboot and UPS data could be retrieved.
Maybe there are better solutions – I am a Linux beginner – but this worked for me and my system.
I just want to share this, in case other people experience the same issue.
If anyone cares, if you have multiple UPSs physically separated (different parts of the house, office, warehouse, etc) and you have multiple RPis, you can add another ‘monitor ups@ip “name”‘ under the
upsmon.conf. Then you can view multiple UPSs from one webUI. You also only need the apache2 install on one of the devices as the main monitor, all others just allow monitoring since they were setup as ‘netserver’-is my understanding.Sorry, brain not functioning this morning. I mean the hosts.conf file
Hello,
Is it possible to manage 2 UPS with nut on a rpi ?
Regards
Hi TiTiTHeBad,
Yes it is definitely possible and something we do with our own NUT server. Our guide should give you an idea of how you can do this, but please let me know if you need any better direction.
Kind regards,
Emmet
I followed this tutorial for a Raspberry Pi 2 Model B v 1.1 and it perfectly works. I just realized that it might even be possible to use a single NUT web interface to monitor my 3 UPS but never did it.
This worked great thank you!!
Thank You, Thank You!
Especially for offering the text walk-through option. i eschew “video tuturials” as i’m a lousy typist and appreciate the ability to copy / paste most of the major bits & bobs.
Emmet, you’re the man! Thank you for this superb and concise guide. It really helped me get my Pi quickly connected to my new UPS w/in 15 minutes!
Excellent guide. Made it with a raspberry pi 3D and greencell 1200VA 900W (3D print system).
Works fine with blazer_usb driver.
Thanks you very much 🙂
Worked perfectly on a PI 5, thanks for writing this up.
Thanks for the tutorial. Very clear.
Could you share a tutorial how I can now with NUT on the RPI use this to gracefully shutdown my Unifi Dream Machine SE, Unifi 24 PoE switch and Synology NAS (DS224+)?
Thanks!
Firstly Emmet, THANK YOU! The cuide made this easy to set up. Like Niels, I have a UDM (Pro in my case) that I woul dlike to shut down gracefully.
Perhaps you could at least extend this guide to just talk about how, generically, to the the RPi to SSH to another box on the network?
Thanks
Mark
Thanks for this tutorial. I was able to set up a generic UPS without any issues using this. I was so looking up to getting this thing working, and in the end it was so easy – I’m sure if I did not have this guide it would have been a nightmare.
I was trying to get this done using the reference documentation on NUTS but was getting frustrated. Then I found your how-to here. Boy, you made it so easy, and clear. I know the product can monitor many UPSs but I just wanted to configure a monitor for my UPS. I thought I bought a model that had a webcard intreface but alas, my model didn’t. So I went the Raspberry PI 4B route and this made so much sense and made it so easy. My 2 weeks of frustration were eliminated in 2 hours of config and following your guide. Thank you so much!
Awesome guide. Really clear. Thanks!
Seems that under the “Installing the Nut-GUI Server” section, steps 1-3 of editing the /etc/nut/hosts.conf file is premature as it is not there yet. It is installed via step 5 after which it will exist and can be edited. (Note: yes, you could create it and the install will ask what you want to do about it but I find it’s always best to have the original intended file in place and then edit that). Thanks for these great instructions for setting it all up.
Hi Laurette,
Thank you for the heads up about the ordering of the steps. I have updated the tutorial to correct it.
Kind Regards,
Emmet
You Sir are a legend! love the write up. very very very impressed!
Next, you should make a guide on how to connect your Synology NAS to the NUT ups server! There are some weird things with having to use the “ups” name and a set password.. I could not get it to work but i barely understand what im doing.
To make my NAS shut down i need to connect it to USB but then i cant have the NUT server connected so the NUT server has to control the Synology NAS..
I would love to see such a guide! 😀
Very detailed and well explained! I have already used several of your guides and they are great!
In the step “Installing the Nut-GUI Server” the file that needs editing is hosts.conf and not host.conf. The current command is missing an “s”. Instead you should run the following:
sudo nano /etc/nut/hosts.conf
Hi Matt,
Thank you for the heads up, it is much appreciated. I have now corrected the typo within the tutorial.
Cheers,
Emmet