In this tutorial, we will show you how to use Apcupsd on the Raspberry Pi.
Apcupsd is short for APC UPS daemon and is used to interact with and monitor APC UPSes. While initially designed for the APC, it can also talk with some other brands of UPS, including some by Cyberpower.
One of the advantages of using Apcupsd over something like NUT on your Raspberry Pi is that it can be considerably simpler to get up and running.
The downside is that it doesn’t support nearly as many UPSes and lacks other functionality that the NUT server supports.
By the end of the following sections, you will have APCUPSD running on your Raspberry Pi and have it monitoring the status of your attached UPS.
Equipment
Below is a list of equipment we used when setting up APCUPSD on our Raspberry Pi.
Recommended
- Raspberry Pi Amazon
- Micro SD Card Amazon
- Power Supply Amazon
- Ethernet Cable Amazon or Wi-Fi Amazon
- UPS
Optional
This tutorial was last tested on a Raspberry Pi 400 running the latest version of Raspberry Pi OS Bullseye.
Installing and Setting up APCUPSD on your Raspberry Pi
Over the next few sections, we will show you how to install and set up the APCUPSD software on your Raspberry Pi.
These steps are relatively simple thanks to APCUPSD being available through the official package repository.
Installing APCUPSD
1. Before installing APCUPSD to the Raspberry Pi, we should update the package list and upgrade any out-of-date packages.
You can achieve these simple tasks using the following command in the terminal.
sudo apt update
sudo apt upgradeCopy
2. Once the update completes, all you need to do to install APCUPSD is to type in the command below.
As you can see, installing this software is a very straightforward process.
sudo apt install apcupsdCopyConfiguring APCUPSD on the Raspberry Pi
3. With APCUPSD installed on your Raspberry Pi, we can begin configuring it. With the default settings, the software can have issues detecting a UPS plugged into your Raspberry Pi’s USB port.
We can begin configuring APCUPSD by using the command below. This command will open the configuration file using the nano text editor.
sudo nano /etc/apcupsd/apcupsd.confCopySetting a UPS Name
4. The first value you will want to change within this config file is the name given to your UPS.
If you plan on using this as a network UPS server, setting a proper name is crucial for identification. Find the following line within the file to set a name for this APCUPSD instance on your Raspberry Pi.
#UPSNAMEOnce found, remove the hashtag (#) at the front and specify the name of your UPS. The name must be less than 8 characters long.
For example, we set ours to the following. This gives our APCUPSD instance the name “PIMON“.
UPSNAME PIMONEnable USB Autodetection
5. If you use a USB to connect your UPS to your Raspberry Pi, you must remove the device definition.
While this value is defined, APCUPSD will not detect the UPS plugged into a USB port.
DEVICE /dev/ttyS0Once you have found the above line, replace it with the following. Removing the definition will allow autodetection.
DEVICEAllowing Outside Access to the APCUPSD Net Server on the Raspberry Pi
6. While the APCUPSD net server is enabled by default on your Raspberry Pi, it is not set to allow outside access.
To adjust this, we need to find and change the “NISIP” setting. This setting defines the IP that APCUPSD will listen for incoming connections on.
NISIP 127.0.0.1By replacing “127.0.0.1” with “0.0.0.0“, we are allowing APCUPSD to listen for connections on all IP addresses, not just the local loopback address.
NISIP 0.0.0.0Saving your Changes
7. While there is plenty more that you can configure in this file, that is all that we will be touching on in this guide.
You can now save and quit by pressing CTRL + X, followed by Y, then the ENTER key.
Restarting APCUPSD
8. Since we made changes to the configuration of APCUPSD, we will need to restart its service.
You can restart the APCUPSD service by using the command below.
sudo systemctl restart apcupsdCopy9. You can verify that APCUPSD is up and running by checking the status of its service.
sudo systemctl status apcupsdCopyIf everything is working correctly, you should see that the service is marked as “active” and “running“.
Active: active (running) since Fri 2023-09-01 05:28:17 BST; 50s agoGetting Values from APCUPSD On the Raspberry Pi
Now, you will have APCUPSD up and running on your Raspberry Pi. It will now be able to retrieve any information that is provided from your UPS.
1. Retrieving information about your UPS from APCUPSD is as simple as using the command below.
The apcaccess tool can even pull information from remote APCUPSD servers. Using the command without any options will mean it will poll the local UPS.
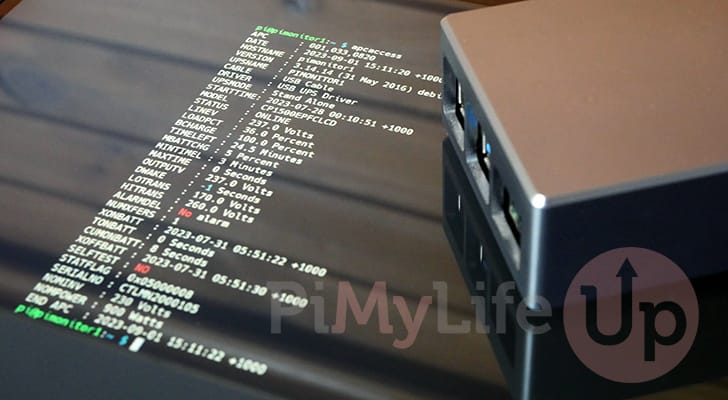
apcaccessCopy2. Below, you can see all of the information provided by the daemon about the UPS connected to our Raspberry Pi.
As you can see, even though we are using a Cyberpower UPS, it can still retrieve information about it.
APC      : 001,033,0820
DATE     : 2023-09-01 14:34:44 +1000
HOSTNAME : pimonitor1
VERSION  : 3.14.14 (31 May 2016) debian
UPSNAME  : PIMONITOR1
CABLE    : USB Cable
DRIVER   : USB UPS Driver
UPSMODE  : Stand Alone
STARTTIME: 2023-07-28 00:10:51 +1000
MODEL    : CP1500EPFCLCD
STATUS   : ONLINE
LINEV    : 238.0 Volts
LOADPCT  : 33.0 Percent
BCHARGE  : 100.0 Percent
TIMELEFT : 25.5 Minutes
MBATTCHG : 5 Percent
MINTIMEL : 3 Minutes
MAXTIME  : 0 Seconds
OUTPUTV  : 238.0 Volts
DWAKE    : -1 Seconds
LOTRANS  : 170.0 Volts
HITRANS  : 260.0 Volts
ALARMDEL : No alarm
NUMXFERS : 1
XONBATT  : 2023-07-31 05:51:22 +1000
TONBATT  : 0 Seconds
CUMONBATT: 8 Seconds
XOFFBATT : 2023-07-31 05:51:30 +1000
SELFTEST : NO
STATFLAG : 0x05000008
SERIALNO : CTLMN2000105
NOMINV   : 230 Volts
NOMPOWER : 900 Watts
END APC  : 2023-09-01 14:35:30 +1000
Conclusion
Hopefully, at this point in the tutorial, you will now have APCUPSD running on your Raspberry Pi and gathering information about the connected UPS.
APCUPSD is a useful alternative to running NUT, especially using a supported UPS.
Please comment below if you have any issues getting APCUPSD to work on your device.
We also have many other projects for the Raspberry Pi that are worth checking out.


How low spec can the Pi be for running this?
I’m hoping to add a UPS by my router to maintain wifi access, and Home Assistant, throughout the house in the event of a powercut, and would like to be able to monitor the UPS in Home Assistant.
If this will run on a Zero, then it’s half the cost of buying a Pi3/4 just to monitor the UPS. What would be perfect is something like this that could run on a Pico2 W, but doubt that is an option.
Hi Gordon,
You should be able to get away with a Raspberry Pi Zero, there isn’t a huge amount going on within apcupsd that would cause it to have issues, and I have read about people even using the original Raspberry Pi which is ever so slightly weaker than a Zero.
Kind regards,
Emmet
Hello Gordon ,
I am running on a Raspberry Pi Zero W 2 and on Raspberry Pi Zero W.
APCUPSD can monitor Powerwalker VI 850 and 850SHL.
It has an integration for Home Assistant too and add-on too.
Regards
Angel
Proper tutorial to get apcupsd working, however I would appreciate a deeper dive into the material. Setting up remove shutdown script, getting information to monitor would be a great improvement.
Thank for this. It is extremly useful!
Great tutorial!
APCUPSD successfully installed and running however I would like to get GapcMon running so that I have a GUI to access APCUPSD. Can you give a tutorial on how to do this please?