In this tutorial, we will be showing you how to set up NetAlertX (PiAlert) on your Raspberry Pi.
NetAlertX (Previously PiAlert) is a Network Security Scanner and notification framework that can run off of a Pi. While originally developed by Pucherot, this project is now actively maintained by jokob-sk.
Using this scanner, it can immediately notify you about any network changes, whether a new network device or a port change.
This software also features a web interface that lets you easily visualize your entire network and view information such as their open ports.
The Raspberry Pi makes a great device to install NetAlert as it is relatively cheap to run 24/7 with more than enough power to process your network.
NetAlert provides a docker container for 32-bit and 64-bit ARM systems, so you can use whichever flavor of Raspberry Pi OS you want.
Equipment
Below is a list of the equipment we used for setting up NetAlert on our Raspberry Pi.
Recommended
Optional
We last tested this tutorial on a Raspberry Pi 5 running the latest version of Raspberry Pi OS Bookworm 64-bit.
Setting up PiAlert/NetAlert on the Raspberry Pi
Over the following sections, we will show you how to set up the NetAlert (PiAlert) network scanner on your Raspberry Pi.
Since we are using Docker, this process is relatively straightforward, especially if you have Docker installed already.
Preparing your Raspberry Pi for NetAlert
1. Before installing NetAlert, we must ensure our Raspberry Pi is up-to-date.
The easiest way to do this is to utilize the following two commands within the terminal.
sudo apt update
sudo apt upgrade -yCopy
2. After updating your Raspberry Pi, you must now install Docker.
We will be using Docker to run the NetAlert Network scanner on our Pi. The guide we linked above will have Docker running on your Pi in a few short steps.
https://pimylifeup.com/raspberry-pi-docker/3. Our next step is to create a directory to store the Compose file for NetAlert. We will store NetAlert and its data in the “/opt/stacks/netalertx” directory.
We can create this directory by using the command below. We use the “-p” option to ensure the full directory is created.
sudo mkdir -p /opt/stacks/netalertxCopy4. After creating the directory, we must change into it by utilizing the cd command.
cd /opt/stacks/netalertxCopyWriting the Compose File for NetAlert
5. We can finally move on to writing the Compose file for NetAlert on the Raspberry Pi. This Compose file is like a set of instructions for Docker to follow.
You can begin writing this file using the nano text editor using the command below in the terminal.
sudo nano compose.yamlCopy6. Within this file, you will want to type in the following lines.
- “
<TIMEZONE>“: You must replace this value with a valid TZ identifier. If you are unsure what to use for your area, we highly recommend checking out the TZ database Wikipedia page.
For example, we would use “Australia/Hobart” for our region.
services:
  netalertx:
    container_name: netalertx
    image: "jokobsk/netalertx:latest"
    network_mode: "host"
    restart: unless-stopped
    volumes:
      - ./data/config:/app/config
      - ./data/db:/app/db
      - ./data/logs:/app/front/log
    environment:
      - TZ=<TIMEZONE>
      - PORT=20211Copy
7. After adding the lines above, you can save and quit by pressing CTRL + X, followed by Y, and then the ENTER key.
Starting the NetAlert Container
8. Once the Compose file has been written, we can start up the NetAlert Network scanner on our Raspberry Pi.
To start this software, we must use the following command in the terminal. By using the “-d” option, we are telling Docker to detach once the container has been started.
docker compose up -dCopyImproving the NetAlert Configuration on the Raspberry Pi
9. The default configuration for NetAlert has it listening on the “192.168.1.0/24” subnet using the “eth1” adapter.
If your setup is anything like ours, you must adjust this to listen on the “192.168.0.0/24” subnet instead and switch it to using the “eth0” adapter.
Luckily, the NetAlert network scanner can monitor multiple subnets simultaneously; we only need to modify its configuration.
sudo nano /opt/stacks/netalertx/data/config/app.confCopy10. Once you open the config file, you will want to find the line that starts with “SCAN_SUBNETS“.
By default, it should look similar to what we have shown below.
SCAN_SUBNETS=['192.168.1.0/24 --interface=eth1']CopyTo add a new subnet, we need to add a comma after the current one, followed by the subnet and then the interface you want to scan.
For example, if we wanted to scan the subnet “192.168.0.0/24” and the interface “eth0“, we would change the line to look like the following.
SCAN_SUBNETS=['192.168.1.0/24 --interface=eth1','192.168.0.1/24 --interface=eth0']Copy11. After making the above changes, you can save and quit by pressing CTRL + X, followed by Y, and then ENTER.
The NetAlert software will automatically detect any changes to this configuration and update to use the new settings.
Accessing the NetAlert Web Interface
12. To access the NetAlert web interface, you must know the IP address of your Raspberry Pi.
If you are unsure what the local IP address of your Raspberry Pi is, you can utilize the hostname command as shown below.
hostname -ICopy13. Once you know the IP address of your Raspberry Pi, you will want to go to the following address in your favourite web browser.
Ensure you replace “<IPADDRESS>” with the IP of your Pi.
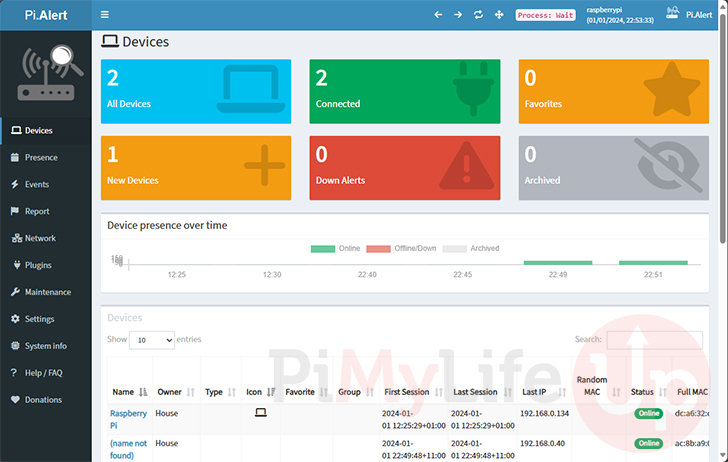
http://<IPADDRESS>:2021114. You should now be greeted by the NetAlert dashboard. You can now take your time to navigate and learn how to use this software.
You can check out the official documentation to learn more about this software.
Updating NetAlert on the Raspberry Pi
Running NetAlert (PiAlert) as a Docker container on our Raspberry Pi makes updating straightforward.
We can update the container using a few straightforward commands in the terminal.
1. Before we can update NetAlert, we must ensure that we are in the same directory in which we wrote the Compose file earlier.
You can change to this directory by utilizing the command below.
cd /opt/stacks/netalertxCopy2. Once we are in the correct directory, you can tell Docker to pull the new version of NetAlert by using the following command.
Docker will only pull parts of the container that have changed since it last downloaded the image.
docker compose pullCopy3. Finally, after downloading a new version of NetAlert, we must get our container to utilize it.
The easiest way is to run the command you used to start NetAlert. Docker will detect that the container is running and restart it using the new image.
docker compose up -dCopyConclusion
You should now have the NetAkert/PiAlert network scanner up and running on your Raspberry Pi.
Once the software starts, it will automatically begin to scan your network for all devices.
Using the web interface, you can see the visualization of your network while being able to configure the software.
Please feel free to leave a comment below if you have any questions about running the NetAlert software.
If you found this tutorial to be helpful, we highly recommend checking out our other Raspberry Pi projects.


I had trouble with my FritzBox own DNS Server. This helped out:
-> edit compose.yaml
-> add two new lines at the end. The IP is the one of your router:
dns:
– 192.168.1.1
There is far too much heavy lifting for a “beginner project.” Sure, both the jokob-sk and leiweibau forks install quickly and easily but that is literally just the beginning. After installing each version and examining the results, I’d say that they each get an A for ease of installation and a D for ease of use.
For example, neither version had any scanners turned on, jokob-sk’s bulk editing does not work and leiweibau’s version produces a very incomplete scan result. And don’t get me started about the “icons.”
If the two projects were merged you’d have the makings of a winner. Otherwise, your “beginner” will simply be frustrated by a project which promises a lot but delivers much less.
Will pialert run under Bookworm 64-bit?
Hi Thomas,
PiAlert provides builds for both 32-bit and 64-bit ARM Systems so it will work perfectly.
We actually tested this tutorial under a 64-bit version of Bookworm.
Kind regards,
Emmet
How do I remove pi alert from my Pi ? It doesn’t appear very user friendly for a beginner and doesn’t seem very useful to me.
Hi James,
You just need to change into the “
/opt/stacks/pialert” directory and run the following command.You can then safely remove the entire pialert directory by using the command below.
Kind Regards,
Emmet