In this Raspberry Pi Gogs tutorial, we will be showing you how to set up the Gogs Git service on the Raspbian operating system.
Gogs is a performance-friendly Git web interface written in the Go programming language. It makes setting up and managing GIT repositories on the Raspberry Pi a simple process.
You will find that Gogs is one of the best choices for setting up a self-hosted Git web interface on the Raspberry Pi thanks to its relatively low memory footprint.
The Gogs software also sports an interface that is very much like Github’s, making it a simple switch if you are used to its web interface but want a self-hosted Git solution.
Equipment List
Here is all the equipment that I recommend for this Raspberry Pi Gogs tutorial.
Recommended
Optional
Preparing for Gogs on the Raspberry Pi
1. Our first task is to update the packages on our Raspberry Pi. Updating helps prepare our Raspberry Pi for installing and setting up Gogs.
Run the following two commands on your Raspberry Pi to update the package list and packages.
sudo apt update
sudo apt upgradeCopy
2. With our Raspberry Pi up to date, we can now go ahead and install all the packages that we will be relying on for the Gogs software.
The two packages we are interested in installing is the MariaDB MySQL server and the Git software.
sudo apt install mariadb-server git unzipCopy3. Now with a MySQL server installed we need to now set that up for use with Gogs.
To start with we need to secure the installation, we can do that by running the command below.
sudo mysql_secure_installationCopyFollow the prompts to set a password for the “root” user and secure the MySQL installation.
Make sure you remember the password that you defined for the “root” user as you will need that later.
4. We need to now log in to the MySQL command-line interface by running the command below.
sudo mysql -u root -pCopy5. Let’s first create a database within this MySQL interface by running the following command.
We will be calling this database “gogs” as we will be using it with the Gogs software.
CREATE DATABASE gogs;Copy6. Next, we will create a user that has all privileges to interact with our “gogs” database. We will be calling this user “goguser” and assigning it the password “pimylifeup“
Make sure you replace the password with something a bit more secure, make a note of what you set.
Run the command below in the MySQL interface to create the user and assign it privileges.
GRANT ALL PRIVILEGES ON gogs.* TO 'goguser'@'localhost' IDENTIFIED BY 'pimylifeup';Copy7. As we created a new user and assigned privileges, we need to flush the privilege table.
FLUSH PRIVILEGES;Copy8. With that done you can now exit out of the MySQL command line by typing in “exit“.
exitCopy9. One of the last things we need to do to prepare for Gogs is to create a user for it to run as.
We will be naming this user “git” and using “--disabled-login” so that no one can log in using this user.
sudo adduser --disabled-login gitWe can now move on to downloading and setting up Gogs on our Raspberry Pi. Gogs will make use of the database and user we created in this section.
Installing Gogs on the Raspberry Pi
1. Now that we have set up our MySQL database for Gogs, we can now proceed to download and run the Gogs software.
Before we download Gogs to our Raspberry Pi, let us first use the cd command to change to the “/home/git” directory.
cd /home/gitCopy2. Let’s now download the Gogs software to the “/home/git” directory by running the command below.
These commands differ slightly depending on whether you are using a 64-bit or 32-bit release of Raspberry Pi OS.
32-Bit Operating System
sudo wget https://dl.gogs.io/0.12.9/gogs_0.12.9_linux_armv7.zip -O gogs.zipCopy64-Bit Operating System
sudo wget https://dl.gogs.io/0.12.9/gogs_0.12.9_linux_armv8.zip -O gogs.zipCopy3. With the Gogs archive now on our device, we will need to extract it using the “unzip” tool that we installed earlier.
Unzip the contents of the “gogs.zip” file and then remove it by using the rm command as shown below.
sudo unzip gogs.zip
sudo rm gogs.zipCopy
4. With Gogs now downloaded and unzipped, let’s go ahead and use the chown command to make sure that the git user has rights over all the files we just created
sudo chown -R git:git /home/gitCopy5. Next, we can go ahead and enable the Gogs service file that came with our Gogs installation.
By running the command below, systemctl will run the service file when the system starts up.
sudo systemctl enable /home/git/gogs/scripts/systemd/gogs.serviceCopy6. Finally, let’s start up the service that we just enabled. This command will fire up Gogs web service, and it will immediately become accessible.
You can do enable the Gogs service by running the command below.
sudo systemctl start gogs.serviceCopy7. To ensure Gogs service has started up correctly, we need to go ahead and run the command below.
This command will retrieve the status of the service from the systemctl service manager.
sudo systemctl status gogs.serviceCopyIf the status command shows “Active: active (running)” then everything is running correctly.
8. Finally, we should grab our Raspberry Pi’s local IP address by running the command below. You might want to setup a static IP, so it’s easier to remember.
hostname -ICopyConfiguring Gogs on the Raspberry Pi
1. In your favorite web browser, go to the following address. Make sure you swap “<IPADDRESS>” with the IP address of your Raspberry Pi Gogs installation.
This will take you to Gogs web interface.
http://<IPADDRESS>:30002. Upon first loading, the Gogs web interface, you will be first greeted with an initial setup screen.
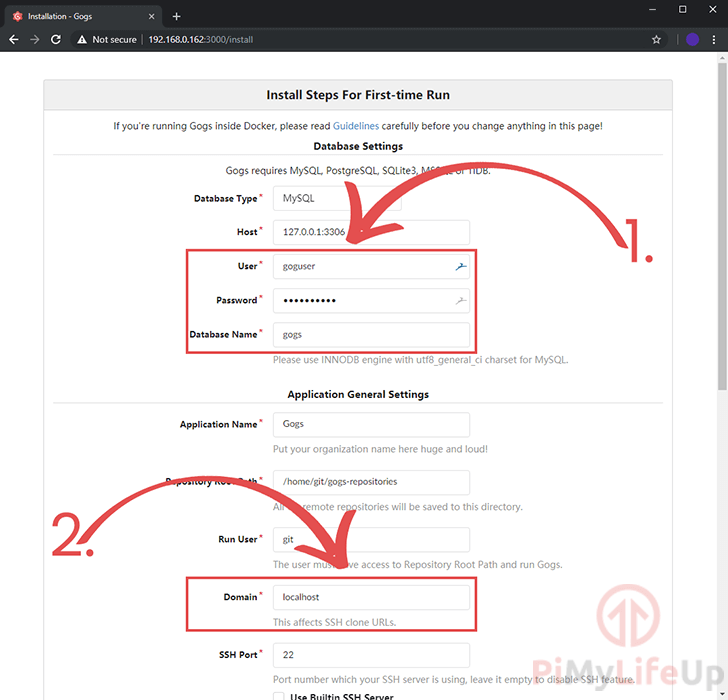
This screen will ask you for several details to complete the Gogs installation.
First, we need to set the “Database Settings” (1.). Here we specify “gogsuser” for the database username. We also need to specify the “Password” for the user that you set earlier on in this tutorial.
Also, in the “Application General Settings” section, we need to replace the current “Domain” value (2.) with your Raspberry Pi’s local IP address.
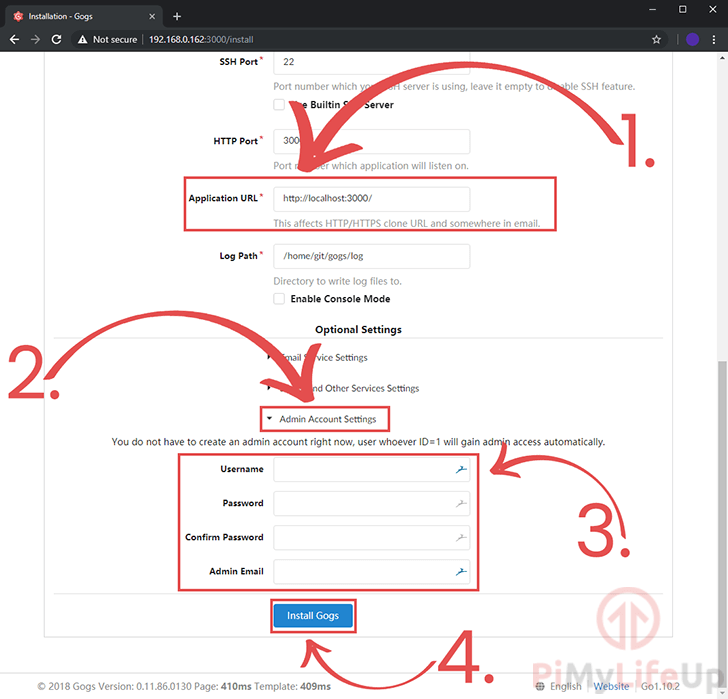
3. Next, we need to update the “Application URL” (1.), replace “localhost” within this string with your Raspberry Pi’s IP address.
Now we need to set up an admin user for the Gogs interface. To do this, you must first click the “Admin account Settings” (2.) dropdown box to reveal the admin account options.
In the four text boxes that appear under the “Admin Account Settings” section (3.), enter in the various details to set up your admin account.
While you can skip this step and complete it later, it’s safer to complete it during the initial installation phase as whoever creates the first user becomes the admin.
Finally, once all the settings have been changed to your liking, go ahead and click the “Install Gogs” button (4.).
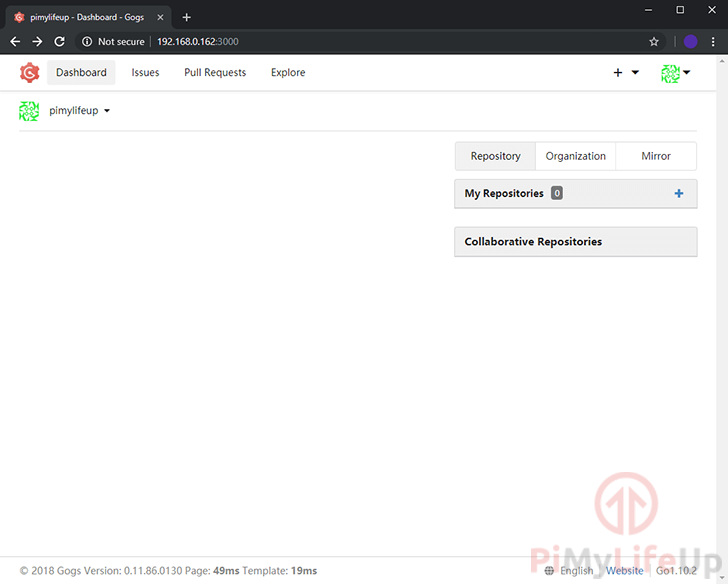
4. Once the Gogs installation process has completed, you will be greeted by the following screen.
This screen means that Gogs has now been successfully setup on your Raspberry Pi, and you should now be able to create Git repositories through the web interface.
Conclusion
At this point you should hopefully have Gogs up and running on your Raspberry Pi.
If Gogs doesn’t take your fancy, then there are always other solutions such as Gitea or even the much heavier GitLab. It all comes down to personal preference.
That’s all we have for setting up Gogs on the Raspberry Pi. If you have some feedback, tips, or anything else then please don’t hesitate to leave a comment below.
We have numerous other Raspberry Pi projects that are well worth exploring if you enjoyed this guide.


This is really, really cool. Thank you.
Hey, great article. Once I figured out I needed to use the armv8 version for my RPI it worked smoothly. The only thing I’m missing now is how to enable https for the gogs service. If someone has any pointer, I’d be really thankful for it.
I followed all these instruction and IT WORKS!
The only thing I had to change is the url to download gogs.
THANKS
Hi Lucluc,
Glad to hear the tutorial worked out for you.
Thank you for letting me know about the download link being broken, I should now hopefully have corrected this issue.
Cheers,
Emmet