In this Raspberry Pi Gitea tutorial, we will be showing you all the steps to getting Gitea up and running on the Raspberry Pi.
Gitea, if you have never heard of it, is a self-hosted Git service, offering an interface much like Github for those who want to self-host there Git repositories but still want to be able to view them through a robust graphical interface. This graphical interface is perfect if you find pusing to a Git server via the command line a bit daunting.
Gitea is written in Go with the intention of having minimal requirements meaning it is designed to even run fine on the Raspberry Pi’s limited resources. This design helps make it a much better choice than the more demanding Gitlab.
The tutorial below will take you through all the steps to getting this set up.
Equipment List
Below are all the pieces of equipment that I made use of for this Raspberry Pi Gitea tutorial.
Recommended
Optional
- Raspberry Pi Case Amazon
Getting prepared for Gitea on the Pi
1. Before we begin setting up Gitea on the Raspberry Pi we need first to make sure that Raspbian is entirely up to date.
We can do this by running the following two commands on our Raspberry Pi.
sudo apt update
sudo apt upgradeCopy
2. Now that Raspbian is entirely up to date we can now install the packages that we require to get started with Gitea.
In this case, we need to install Git and the MYSQL server. Use the following command to install these.
sudo apt install git mariadb-server -yCopy3. Let’s now create a user that we will be running Gitea under. This command will also create a folder for the user.
We use –disabled-login as we don’t want people logging into the Raspberry Pi as this user and use –gecos to allow us to set a name for the user, in this case, “Gitea“.
sudo adduser --disabled-login --gecos 'Gitea' gitCopySetting up MYSQL for Gitea
1. Before we go ahead and create an MYSQL user and database, we need first to improve the security of our MYSQL server.
To do this, we will by making use of the following command on our Raspberry Pi, this we will run the mysql_secure_installation tool.
sudo mysql_secure_installationCopy2. This tool will ask you several things. We will quickly run through these options over the next few steps.
The first of these is “Enter current password for root (enter for none) :“, to this just press Enter as there is currently no password for the root MYSQL user.
3. Next, you will be asked if you want to “Set root password?“, To this type in Y and press ENTER. Setting a password is essential to ensure your data remains secure.
You will then be asked to enter a new password, make sure you set this to something secure and not easily guessable.
4. Now you will be asked if you want to “Remove anonymous users?“, to this type Y and press ENTER.
Removing anonymous users is essential for data security as it prevents the ability for people to log into the MYSQL server without having a user account created for them.
5. The next option is whether to “Disallow root login remotely?“, to this type Y and press ENTER.
Disallowing root login remotely makes it more difficult for someone to compromise your database. To perform a root login, you will have to be on the device directly. A remote connection to the SQL database as a root user will be rejected.
6. Now one of the final options is to “Remove test database and access to it?“, to this type Y and press ENTER.
This final option removes some test data that is included with a default installation of MySQL. These are only there for testing purposes.
7. Now with our MYSQL installation far more secure, let’s go ahead and log into it by running the following command on our Raspberry Pi.
Since MariaDB uses sockets for authentication by default, we can log in without a password since we are elevating ourselves to be the root user by using sudo.
sudo mysql -u rootCopy8. Now that we are logged into the MYSQL client we can now start off by creating a new database which Gitea will store its data.
To do this just run the following command within the MYSQL client, this will create a new database called gitea.
CREATE DATABASE gitea;Copy9. With the gitea database now created we can now go ahead and create a user for this database.
We will be naming this user gitea, make sure you replace “ENTERPASSWORD” with your password.
Make sure this password is different to your root password and is secure.
GRANT ALL PRIVILEGES ON gitea.* TO 'gitea'@'localhost' IDENTIFIED BY 'ENTERPASSWORD';Copy10. You by now should have created a new gitea database, and created a new gitea user that has all privileges on the Gitea database.
To ensure this is all loaded into MYSQL, we need to flush the privileges table.
FLUSH PRIVILEGES;Copy11. Finally, quit out of the MYSQL client by typing in the following command.
exitCopy12. Now that we have everything set up and also have MYSQL all configured with a new database and user we can now actually install Gitea to the Raspberry Pi.
Installing Gitea to the Raspberry Pi
1. To start off for installing Raspberry Pi Gitea, lets first switch to the “git” user that we created earlier, we will perform the next few steps within it.
To switch to this user use the following command on your Raspberry Pi.
sudo su gitCopyIf for some reason you can no longer access your Raspberry Pi through SSH you can physically connect a keyboard and mouse to revert the PasswordAuthentication setting change and then refollow the tutorial.
2. Let’s now change into the home directory for the Git user, as this is where we will be creating folders and downloading the Gitea binary for our device.
Use the following command on your Pi to change directories.
cd ~Copy3. Creating the folder we need is dead easy, just type the following command into the terminal on your Raspberry Pi.
mkdir giteaCopy4. Now we need to switch to our new folder and download Gitea itself to our Raspberry Pi.
We can do this by running the following wget command on our Raspberry Pi.
While we will try to ensure we have the latest version here, you can always go to Gitea’s official download website to check for newer versions of the program. Just place the URL below with a newer version, if one exists.
cd gitea
wget https://dl.gitea.io/gitea/1.17.0/gitea-1.17.0-linux-arm-5 -O giteaCopy
5. Let’s now give execution rights to the file by entering the following chmod command. Giving the file execution permissions will allow us to use a service file to run it.
chmod +x giteaCopy6. At this point, we no longer need to be using the “git” user.
Exit back to your normal user by typing the following command within the terminal.
exitCopy7. Now that we have downloaded Gitea to our Raspberry Pi let’s go ahead and now create a service for it.
This service will allow us to have Raspberry Pi Gitea launched automatically at startup and will enable us to stop and restart it easily.
Run the following command on your Raspberry Pi to begin writing the service file.
sudo nano /etc/systemd/system/gitea.serviceCopy8. Within this file, we need to enter the following lines.
These lines tell the service manager how to handle the service, where to start the application and what user to run it under.
[Unit]
Description=Gitea (Git with a cup of tea)
After=syslog.target
After=network.target
[Service]
# Modify these two values and uncomment them if you have
# repos with lots of files and get to HTTP error 500 because of that
###
# LimitMEMLOCK=infinity
# LimitNOFILE=65535
RestartSec=2s
Type=simple
User=git
Group=git
WorkingDirectory=/home/git/gitea
ExecStart=/home/git/gitea/gitea web
Restart=always
Environment=USER=git
HOME=/home/git
[Install]
WantedBy=multi-user.targetCopy9. Once you have entered everything into the service file and are sure everything is correct, we can save it by pressing CTRL + X then Y and finally pressing ENTER.
10. Finally, let’s enable our Gitea service and start it up by running the following command on our Raspberry Pi.
This service will start up Gitea so we will be able to begin the process of configuring it.
sudo systemctl enable gitea.service
sudo systemctl start gitea.serviceCopy
Setting up Gitea on the Raspberry Pi
1. Now that we have installed and setup MYSQL and installed Gitea itself we can proceed to configure and set up Gitea itself.
To do this, you will need to have your Raspberry Pi’s IP address handy.
In a web browser go to your Raspberry Pi’s IP Address followed by :3000. We have an example of a valid URL below.
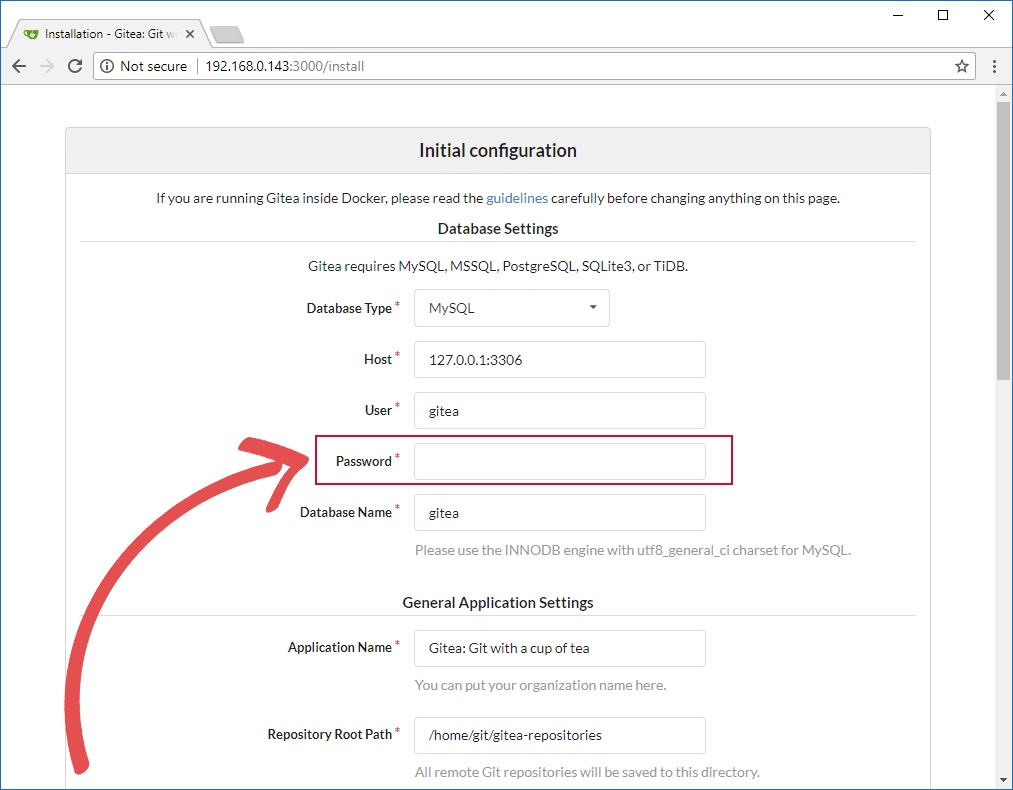
http://192.168.0.143:30002. When you go to your Raspberry Pi’s IP Address followed by :3000 you should be initially greeted with the screen below.
This screen allows you to configure everything you might need for setting up Gitea such as changing the domain name, the HTTP Port the domain name and numerous other things.
The first thing we are going to deal with though is the database settings, for this you will need to have the password you set handy.
If you followed our guide correctly, you can keep user and database name the same.
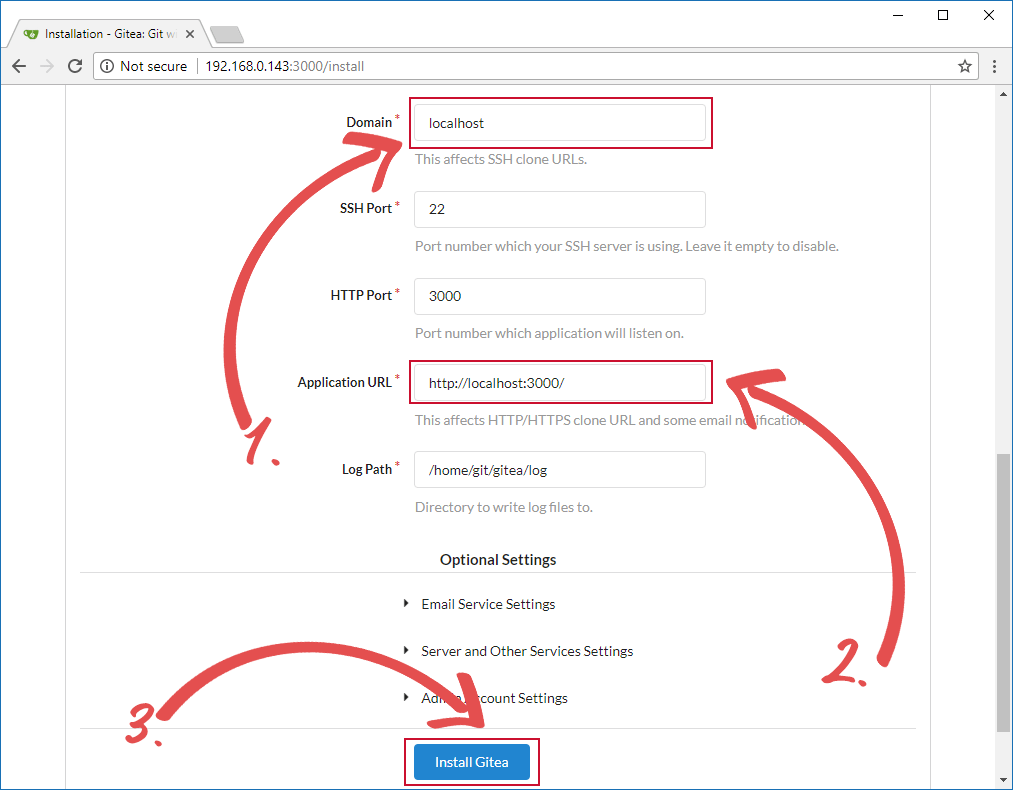
3. Scroll down till you see a setting for the Domain (1.), and Application URL (2.) These are quite important to set as they can create a very broken version of Gitea if they are set incorrectly.
You can use your Raspberry Pi’s local IP address such as 192.168.0.143. It’s recommended to use your local IP address instead of localhost as it allows other devices on the network to interact with Gitea.
Alternatively, you could use your external IP address or a domain name with proper port forwarding. For example, you could use something like git.pimylifeup.com which is pointed towards your Raspberry Pi’s IP address. Of course, to do this, you will require a static IP address.
Next, you need to use what you set for the Domain (1.) to replace “localhost” in the Application URL (2.)
Once you have set everything, you can go ahead and press the “Install Gitea” button located at the bottom of the web page.
4. Now is a perfect time to grab a cup of coffee as the installation process of Gitea can take considerable time to complete.
Once the installation process has completed, your web browser will be redirected to the login page as shown below.
Now all you have to do is register an account, then you will have Gitea up and running perfectly.
Take some time to explore its interface and learn the ropes. If you are familiar with GitHub, you should be familiar with this.

We hope by the end of this Raspberry Pi Gitea tutorial you have setup Gitea successfully on your Raspberry Pi. If you have any thoughts, feedback or anything else then be sure to leave a comment below.


I’m having an issue with step #6 under “Installing Gitea to the Raspberry Pi”. When I attempt to invoke nano, the Pi is asking me for the password for the user git. At no point, did I specified a password when I created the git user in step #3 under “Getting prepared for Gitea on the Pi”.
Hi Richard,
I’m fairly confident the problem that is occurring here is due to it trying to elevate to the “superuser” under the git user.
Before running step 6 can you please use the following command to exit back to the normal user.
Cheers,
Emmet
Step 2 in section “Getting prepared for Gitea on the Pi” fails
Solution is to install maria db instead:
Step 7 in section “Setting up MYSQL for Gitea” fails. Cannot login.
Not sure how to fix this.
Hi Neo,
Sorry to hear that you are having issues with the tutorial. I have updated the installation steps so that you will now install “mariadb-server” instead of the now remove “mysq-server”.
Additionally, I have corrected the SQL steps to work with how MariaDB is set up by default. Basically all you need to do is remove the “-p” option from that mysql command and put “sudo” in front of it.
Please let me know if this solves the issues you are having.
Cheers,
Emmet