In this tutorial, we will take you through the steps on how to install the popular MySQL administration tool phpMyAdmin to your Raspberry Pi.
For anyone who doesn’t know, phpMyAdmin is a free tool that has been designed to allow for easy administration of MySQL. It is hugely popular and used in a lot of web server environments throughout the world.
You will find that installing phpMyAdmin on the Raspberry Pi is very easy to do and won’t take long. You to need have a web server on your Raspberry Pi set up and ready to use.
Learning how to use phpMyAdmin is quite daunting for beginners. I recommend checking out some tutorials if you’re completely new to managing databases.
If you haven’t already installed a web server, you can learn from our guide on installing Apache or our guide to installing NGINX.
Equipment List
You will need the pieces of equipment listed below to complete this Raspberry Pi phpMyAdmin tutorial.
Recommended
Optional
Setting up phpMyAdmin on the Raspberry Pi
As with all of our tutorials, we will be using the latest version of Raspberry Pi OS to complete this tutorial.
First, make sure that you followed the previous tutorial on installing a web server (NGINX or Apache) with PHP support. You will also need to install and setup MYSQL.
You will need to have the password you set up for the root MYSQL account. If you don’t have this, you will not be able to install phpMyAdmin.
1. To install the PHPMyAdmin package to our Raspberry Pi, we need to run the command below.
sudo apt install phpmyadminCopy2. phpMyAdmin will now begin to install to your Pi. It will require your input on various steps along the way. You will be presented with a screen asking the type of web server you want it to run off.
Select the “apache2” option by pressing SPACE and then ENTER. Select this option even if you are using NGINX as we will configure that ourselves latest on.
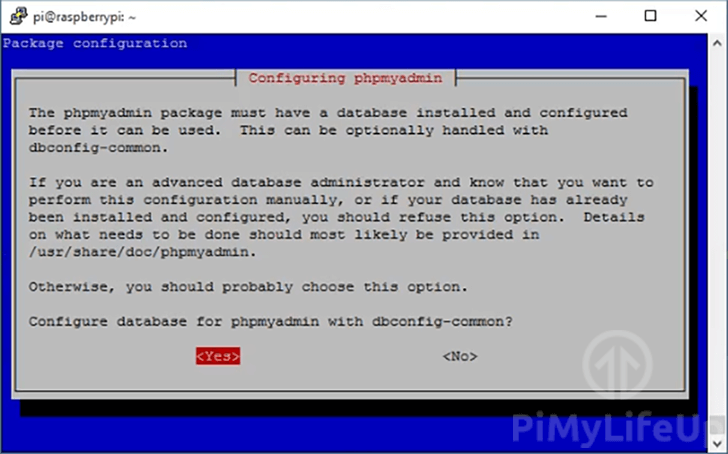
3. Next, we will need to configure phpMyAdmin to connect to our MYSQL server. We will also need set up some details so that we can log in to the phpMyAdmin software.
To do this select “<Yes>” at the next prompt.
4. It will now ask you to set a password for phpMyAdmin itself. It is best to set this password to something different to your root SQL password. Doing this will help secure the server.
This password is what phpMyAdmin will use to connect to the MySQL server.
5. With the phpMyAdmin installation process complete, there is one last thing we need to do. phpMyAdmin by default will block you from logging into the phpMyAdmin interface using the “root” user.
Instead, you will need to create a new user if you wish to create and access data tables within phpMyAdmin.
To do this, we will need to first login to the MySQL command line interface using the “root” user with the password you set up.
sudo mysql -u root -pCopy6. Now run the command below to create a user and permit it to access all databases on the MySQL server. Remember the details you enter here as you will use these to log in to phpMyAdmin
Make sure you replace “username” with the username of your choice.
Also, replace “password” with a secure password of your choice.
GRANT ALL PRIVILEGES ON *.* TO 'username'@'localhost' IDENTIFIED BY 'password' WITH GRANT OPTION;Copy7. You can exit out of the MySQL command line interface by typing “quit” in the terminal.
Once done you can proceed to configure phpMyAdmin for Apache or NGINX.
Configuring Apache for phpMyAdmin
1. Before we can load the phpMyAdmin interface on our Raspberry Pi, we will need to make some configuration changes to Apache.
To get started, we need to edit the Apache2.conf file, we can do this by entering the following into the terminal.
sudo nano /etc/apache2/apache2.confCopy2. Now we need to add the following line to the bottom of this file.
This line will include phpMyAdmin’s configuration and allow it to be loaded in and listened to by Apache.
Include /etc/phpmyadmin/apache.confOnce done we can save and exit by pressing CTRL + X and then pressing Y then ENTER.
3. Now we need to restart the Apache service on our Raspberry Pi by running the command below.
We need to do this to flush out its current configuration and make it load in our modified file.
sudo systemctl restart apache2CopyConfiguring NGINX for phpMyAdmin
1. To setup NGINX to work with phpMyAdmin, we need to do is create a link between the phpmyadmin folder and our root HTML directory.
To do this, we need to run the following command on our Raspberry Pi.
sudo ln -s /usr/share/phpmyadmin /var/www/htmlCopy2. Restart NGINX so the changes come into effect.
sudo systemctl restart nginxCopyAccessing phpMyAdmin
1. You should now be able to access your Raspberry Pi’s phpMyAdmin interface from a web browser.
To test this, go to the following address in your favorite web browser. Use the user you created earlier on in the tutorial to log in. Do not use your root user as this is disabled by default.
Remember to replace the IP Address with your Raspberry Pi’s IP Address. If you don’t have it, run the hostname –I command on your Raspberry Pi.
http://192.168.1.108/phpmyadmin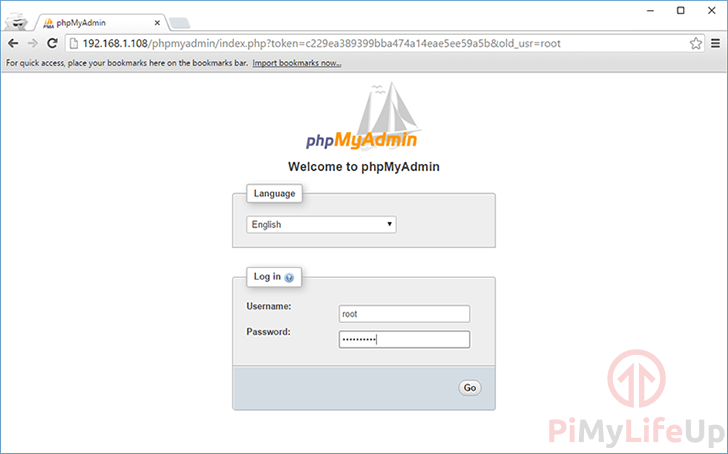
Conclusion
At this point, you should now have phpMyAdmin up and running on your Raspberry Pi.
You will find this tutorial to be very handy if you decide to set up heavy database applications or websites. For example, WordPress is very reliant on a database, so being able to access and manage it is a must.
I hope that you have enjoyed this Raspberry Pi phpMyAdmin tutorial and if you run into any issues, feel free to drop a comment below.


I was having issues and so uninstalled mysql. I then followed your tutorial to reinstall it and it worked. So thank you. Great work.
Thank You.
Very helpful !!!
Excelentes tutoriales, había intentado instalar Nginx, PHP y PHPMyAdmin con otros tutoriales y siempre me generaba errores; con tus tutoriales, que seguí paso a paso, no tuve ningún problema, muchas gracias por tu dedicación.
Saludos cordiales.
MOD EDIT: (Spanish to English Google Translation)
Hi Emmet,
I had phpmyadmin installed a long type ago.
Lately I noticed it is not working anymore. Sometimes I get the log in page but with a notice of depreciation. After loginI get a blank page.
It is probably because I upgraded PHP to version 8.1. I found in the internet that there incompatibilities between older phpmyadmin versions and PHP >8.0
The phpmyadmin version that is installed now is 4.5.0.4
I tried to remove and reinstall phpymyadmin all with problems in authorisation.
Do you have any idea how to overcome the problems?
Thanks, your site is a great help.
Hi Henk,
The version of phpMyAdmin your OS is installing looks to only support PHP 7.0 and older. PHP 8.0 introduced a few breaking changes so that is likely what is going wrong here.
1. The first would be to update your OS to a newer release that offers newer versions of phpMyAdmin. Downside of this solution is you basically have to set everything back up.
2. The second would be to manually update phpMyAdmin to a newer version. I can provide steps for this if you would like.
3. Final idea would be to install phpMyAdmin through a Docker container. With that solution you don’t have to worry about upgrading PHP somehow managing to break phpMyAdmin.
Please let me know what direction you would like to take and ill try and provide some steps.
Kind regards,
Emmet
Everything went great except when I try to change privilege’s in PHPMyAdmin GUI, I get this error when I click the privilege’s button:
#1267 – Illegal mix of collations (utf8mb4_general_ci,COERCIBLE) and (utf8mb4_unicode_ci,COERCIBLE) for operation ”
I understand the issue just cant figure out the fix.
Hi William,
While this issue was fixed with a newer version of Phpmyadmin (5.1.0) it looks like an older version is being installed through the package repository.
To work around this issue, here is someones suggestion: https://github.com/phpmyadmin/phpmyadmin/issues/15463#issuecomment-529280932
Cheers,
Emmet
Great tutorial! But I get stuck at:
GRANT ALL PRIVILEGES ON *.* TO ‘username’@’localhost’ IDENTIFIED BY ‘password’ WITH GRANT OPTION;
ERROR: bash: GRANT: command not found.
Hi Blnukem,
It looks like you tried running that command within the normal terminal and not the SQL CLI.
Make sure you are within the CLI by using the following command before trying to grant the privileges.
Cheers,
Emmet
Thank that was the issue you are a “great asset” to the Pi community!
Hi Blnukem,
Thank you for your kind words. I am glad to hear that fixed your issue!
Cheers,
Emmet
Really outstanding information an very well presented.
Thank you!
Hi there.
Great tuto, it is very enjoyable to follow some direction that work well!
Hi, Once I fully set everything up, I try to connect to “192.168.1.54/phpmyadmin” (my pi’s ip address). When I connect, I get a giant wall of text with no way to input anything.
Hi Quinton,
Are you using Apache or NGINX?
If you are using Apache you may be missing the “libapache2-mod-php” module.
If you followed our Apache guide for Raspberry Pi, you should be able to install this package by using the following command.
Cheers,
Emmet
I had a small problem making phpmyadmin work, here you will see the error:
[PHP Script being shown as text rather than being processed]
The installation was from scratch “eyebulls” (last) without graphical environment and having followed step by step, everything said when installing the database and the apache server.
I want to congratulate for the super quality of content, it is a luxury to stop by here.
1000 thanks.
Hi Albert,
This problem occurs when PHP isn’t running properly. Since you are using apache2 this is typically caused by missing the “libapache2-mod-php” moudle.
Please try installing the package again and let me know if it solves your issues.
Cheers,
Emmet
Awesome !!
Thank you so much for sharing. very straight forward. and absolutely no problems following your direction.
One question, how do I ftp into our new server.??
Thanks again
Dan H.
Arlington, Texas
Hi Dan,
Our FTP tutorial should help you setup FTP for the Raspberry Pi. You may need to also tinker with file permissions if you find you cannot write to certain files/folders.
I installed the Webserver – NGINX, PHP 7.3 and MariaDb, with PHPMyAdmin on an “old” B+ Raspi, everything seem perfect…..let me try and thank´s a lot for your tutorial.
See you ;-))
Hi,
I have followed the instructions of your “Build your own Raspberry Pi NGINX Web Server” article and “MariaDB (MYSQL) installation tutorial” and they work perfectly. Now, I’m trying to install PHPMyAdmin following this guide but I don’t understand why it’s necessary to edit the apache2.conf file and, after that, restart the apache service. In fact, and in my case, the file apache2.conf don’t exist in my system and, when I’m trying to restart the service I obtain the message “Failed to restart apache2.service: Unit apache2.service not found.”
I’m sure I’m doing something wrong, but I can’t see what so, can you give some help, please?
Thanks in advance,
Joaquin.-
Hi Joaquin,
If you are using NGINX then you should not do the “Configuring Apache for PHPMyAdmin” section and instead follow the “Configuring NGINX for PHPMyAdmin” section that is directly after that.
Cheers,
Emmet
Thank you very much, Emmet.
Best regards,
Joaquin.-
Hi, Thanks for the details , you might wanted to add “sudo mysql_secure_installation” step to add protections, for development stage this might not needed, for production usage this is needed.
Hi,
Thanks for the feedback, but this tutorial is purely for installing PHPMyAdmin. In our MariaDB (MYSQL) installation tutorial we advise running that command.