In this tutorial, you will learn how to setup the popular WordPress CMS on your Raspberry Pi.
For those who do not know, WordPress is a content management system (CMS) that is used by over 60 million websites. It is very popular amongst bloggers but is also used by large websites.
I currently have WordPress running on my Raspberry Pi to act as a development server as it’s faster than using something like XAMPP.
Setting up WordPress on the Raspberry Pi is not hugely complicated. Once you have Apache, PHP and the MYSQL server set up, it is smooth sailing.
Before you go too far ahead in this tutorial, make sure that you have your MYSQL root password ready. We will be running through the steps to setting up a database for WordPress and showing you how to set up an SQL user to interact with the database all by using the MYSQL Command line.
If you’re interested, now is the time to set up WordPress on the Raspberry Pi.
Equipment List
Below are all the bits and pieces that I made use of for this Raspberry Pi WordPress tutorial.
Recommended
Optional
Setting up WordPress on a Raspberry Pi
Before you start this tutorial make sure you have set up Apache and PHP. You will also need to have a MYSQL server running and accessible. As I mentioned earlier, you will need to have your MYSQL root password ready.
The video below will take you through all the steps required to setting up WordPress on the Raspberry Pi. Alternatively, the full written tutorial continues immediately after the video.
Downloading and Extracting WordPress
1. To start, we need to download and extract WordPress to our “/var/www/html” directory on our Raspberry Pi. Once extracted we will remove the wordpress setup directory, zip file, and the original example Apache index.html if it still exists.
To achieve this, we will run a few commands, just type each line below into the terminal.
cd /var/www/html
sudo wget https://wordpress.org/latest.tar.gz
sudo tar xzf latest.tar.gz
sudo mv wordpress/* ./
sudo rm -rf wordpress latest.tar.gz
sudo rm -f index.htmlCopy
2. Now we need to make some permission changes. We first add our user to the www-data group so we can make changes to files if required.
We will need to take ownership of the “/var/www/html” folder with the “www-data” user and group. Doing this will allow PHP to process WordPress without running into any permission errors.
Lastly, we want to set the directories and files, so they have the correct read, write, execute permissions. For directories we will set 755 and for files we will set 644. Ensure that you are within /var/www/html directory before running these commands.
sudo usermod -a -G www-data $USER
sudo chown -R -f www-data:www-data /var/www/html
find . -type d -exec chmod 755 {} \;
find . -type f -exec chmod 644 {} \;Copy
Preparing Apache
3. There are a few steps that we will need to take to prepare Apache for WordPress. These steps are important if you want to use the WordPress custom permalink settings.
We must first enable the rewrite module for the Apache web server. You can do this by using the a2enmod command.
sudo a2enmod rewriteCopyAfter running the above command restart Apache so our new module is loaded in correctly.
sudo systemctl restart apache2Copy4. Next, we will need to change a setting within the main Apache config file. So, first open the config file by running the following command.
sudo nano /etc/apache2/apache2.confCopy5. Within the file you will need to find the code snippet that matches the following text.
Using CTRL + W will allow you to search the file and speed up finding specific text. For example, searching for AllowOverride will take you to the area where you will find these settings.
<Directory /var/www/>
    Options Indexes FollowSymLinks
    AllowOverride None
    Require all granted
</Directory>Copy
Within this block, change the AllowOverride setting from None to All. By doing this we allow Apache to read the WordPress .htaccess file. This is highly important as the .htaccess file is where WordPress will save its rules for the permalinks.
<Directory /var/www/>
    Options Indexes FollowSymLinks
    AllowOverride All
    Require all granted
</Directory>Copy
Once done, save and exit by pressing CTRL + X, then Y, and then Enter.
6. Once you are done, with the steps above you will need restart Apache for the changes to take effect. You can do this by running the following command.
sudo systemctl restart apache2CopyIf everything worked correctly, Apache will restart without any issue. You can check the status of Apache by running the command below.
sudo systemctl status apache2CopyCreating the WordPress Database
7. Now that WordPress is downloaded and extracted to our Raspberry Pi, we will also need to set up a database within MYSQL for WordPress to store its information.
We need to first use the MySQL command to login. Use the “–p” flag for the password and “–u” for the username. Make sure your password is written right next to the “-p“ tag with no space.
Note: Replace password with the one you set up for the root user when you setup MySQL
sudo mysql -u root -pCopy8. Now that we have logged into the MYSQL server, we can issue a command to create a database for WordPress using this simple line:
CREATE DATABASE wordpress;Copy9. Now we will create a separate user for this database, this is far safer from a security perspective.
While still in MYSQL issue the following command:
CREATE USER 'new_user'@'localhost' IDENTIFIED BY 'new_password';CopyNote: Make sure you replace new_user and new_password with details of your choosing, just remember what you choose as you will need to know both when we setup WordPress.
10. Once we have a new user, we will need to give it permissions to manage our new database.
We can do that with the command below, make sure you swap new_user, with whatever you entered in the previous step.
GRANT ALL ON wordpress.* TO 'new_user'@'localhost';Copy11. Now we have created our database and our user that we want to interact with it. We need to quit out of the MYSQL command interface.
We can do that by pressing CTRL + D.
WordPress First Setup Wizard
12. With that all done, we can now finally finish setting up WordPress, we can start this process by going to your Raspberry Pi’s IP address in a web browser.
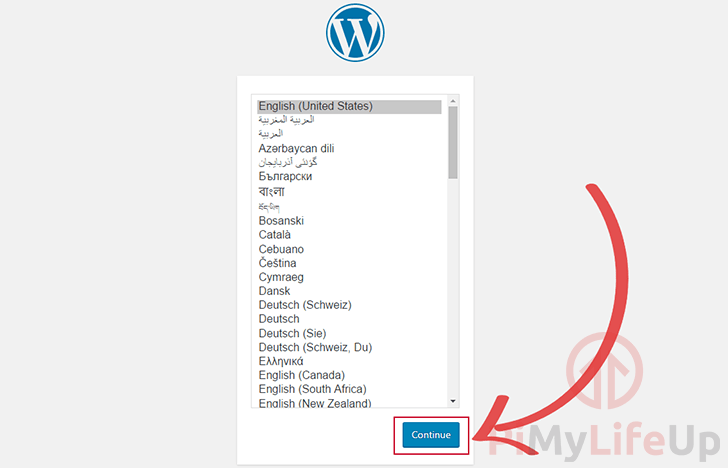
You will be greeted with the following screen asking for you to select a language.
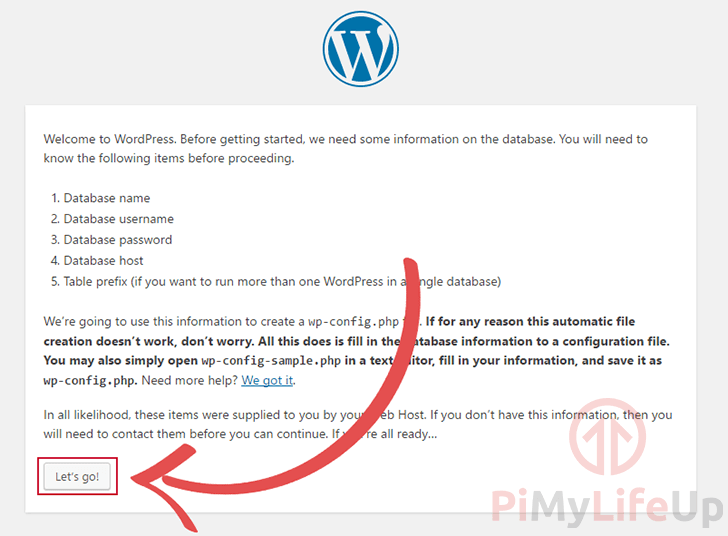
13. The next page will explain the details you need to have handy to install WordPress. You can just press “lets go” to get to the important screen.
14. You will now need to enter various details so that WordPress can connect to the MySQL database we setup.
- Database Name – This is the database WordPress will connect to. Earlier in this tutorial we created a database called
wordpress. - Username – This is the user we created in step 4, make sure you get this detail correct as it needs to connect to the above database.
- Password – This is the password we set while creating the MYSQL user in step 4, again make sure you enter this correctly as it’s needed to connect to the database.
- Database Host – Keep this to the default setting, we only need it to connect locally.
- Table Prefix – Keep this to the default setting as well, there is no real need to change this
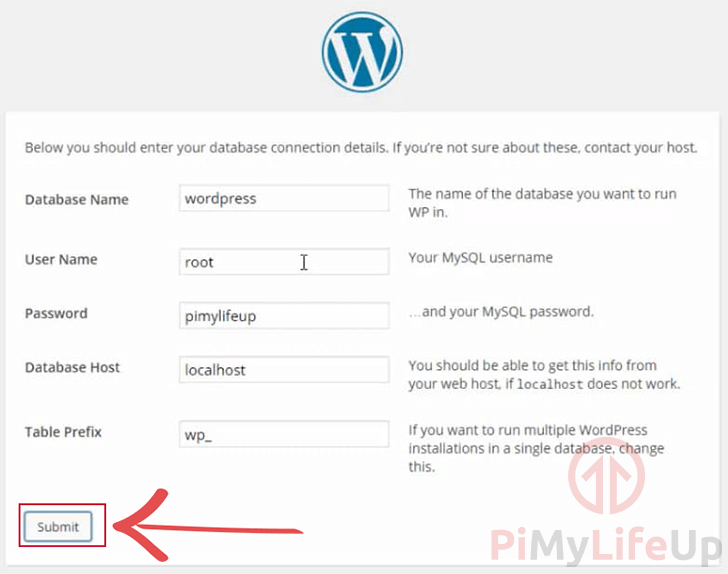
15. Assuming you entered all the correct details, you will now be able to press “Submit” to successfully install the software, follow the rest of the prompts to finalize the installation.
Conclusion
There is quite a bit more to learn about WordPress such as installing a WordPress theme or setting up plugins. Using a Raspberry Pi is a great way to learn all the basics without investing in an expensive web server.
You should now have WordPress setup on the Raspberry Pi and accessible. If you run into any issues, then be sure to let us know by leaving a comment.


Had the same problem, but got:
rm: cannot remove ‘/var/www/html/index.html’: Permission denied
Hi Max,
Sorry to hear that you are having issues. Can you try placing “sudo” in front of that command.
I have updated my original comment to include it.
Cheers,
Emmet
With gratitude I thank you for showing me the path through the barbed wired mine field. I couldn’t have so easily accomplished this task without your tutorial. Thank you for your generosity.
I’ve successfully followed your guides to setup Apache, PHPmyadmin, SQL, and WordPress. Can you either advise or do some guide on how to change the ports used, so that the webpage can be seen outside of my local network? For some reason my router doesn’t like using port 80 as an option.
I tried elsewhere, but got one part working, which then stopped another part from working, and would like to understand where I’m going wrong.
Many thanks for your guides, I find them clear to follow.
Hi Alasdair,
If you would like to change the port that your website is accessible from then there is a couple of config files you need to modify.
First you need top open up the
/etc/apache2/ports.conffile.Within this file you should see something like below. All you need to do is add the port you want it to listen to below it.
For example if we wanted Apache to also learn on port
8080we would do the following.Find
Add Below
With that done you will also need to modify the virtual host you created or the default one. If you are just using the default configuration you can modify the file
/etc/apache2/sites-enabled/000-default.confWithin this file find and change the following line. We also have a example of changing the port to
8080.Find:
Replace with:
Once save, save file.
Then restart Apache by running the following command.
Cheers,
Emmet
Hi there! once I finished the commands to add a new user and grant permissions to wordpress database, I followed the step to fire up wordpress by going to the server ip address, and I am only greeted with the Apache welcome screen. any ideas?
Hi Wllard,
Theres a chance the default “index.html” file is being read before the “index.php” file provided by WordPress.
Can you try running the following command to remove this file.
Cheers,
Emmet
run without sudo may fail.
Amazing guide!