In this guide, you will learn how to install and setup up AdGuard Home on the Raspberry Pi.
AdGuard Home is a powerful piece of software that allows you to block both ads and trackers on your entire network.
The software even boasts extra functionality that is great for families, allowing you to easily block access to websites you don’t want your family accessing.
It is very much like Pi-Hole in that it acts as a DNS server for your network, allowing it to easily filter out and block ad servers.
AdGuard Home has a few benefits over Pi-Hole, one of those being that it has built-in support for encrypted DNS and HTTPS right out of the box.
While you can extend the functionality of Pi-Hole to include a lot of these features, AdGuard Home works out of the box on your Raspberry Pi.
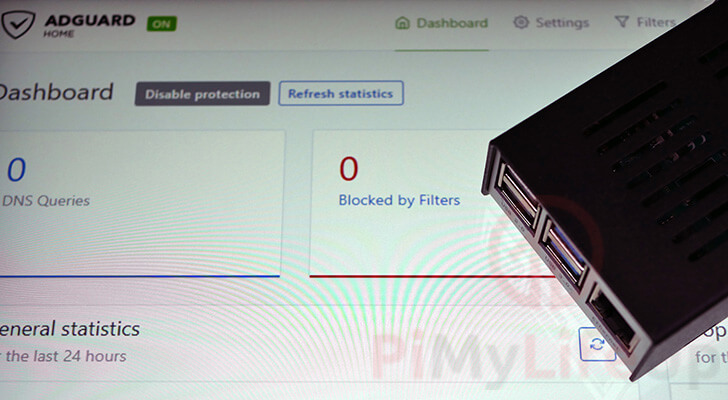
AdGuard Home features a super useful web interface that shows you useful statistics and provides you with an easy way to configure your blocklists.
Thanks to the web interface, you can even use AdGuard Home on a headless Raspberry Pi.
Setting up AdGuard Home is a fairly straightforward process and can be set up and running in a few short minutes.
Equipment
Below you can view all of the equipment we used for running AdGuard Home on the Raspberry Pi.
Recommended
Optional
We tested this tutorial on a Pi 400 running the latest version of Raspberry Pi OS Bullseye.
Installing AdGuard Home to your Raspberry Pi
This section will show you how to install the AdGuard home software to your Raspberry Pi.
This is a relatively simple process as we can download the compiled version of the ad blocker directly from their website.
Before beginning, we highly recommend that you set up your Raspberry Pi with a static IP address.
As AdGuard Home works by acting as a DNS server, it must retain the same IP address every time it reboots.
1. Our first step is to update and upgrade our operating system.
We can update the package list and upgrade all of the installed packages using the following two commands.
sudo apt update
sudo apt full-upgradeCopy
2. To download AdGuard Home, we are going to make use of the wget command.
Run one of the following commands to download the latest available version of the AdGuard Home software to your Raspberry Pi.
The command you need to run will differ slightly depending on if you are running a 32-bit or 64-bit operating system.
Raspberry Pi OS 32-Bit
wget https://static.adtidy.org/adguardhome/release/AdGuardHome_linux_armv7.tar.gz -O AdGuardHome_linux_arm.tar.gzCopyRaspberry Pi OS 64-bit
wget https://static.adtidy.org/adguardhome/release/AdGuardHome_linux_arm64.tar.gz -O AdGuardHome_linux_arm.tar.gzCopy3. With the archive downloaded to our Raspberry Pi, let us now extract it.
We can extract AdGuard Home to your device’s home directory by using the command below.
tar xvf AdGuardHome_linux_arm.tar.gzCopy4. Since we extracted the archive, we no longer need it, so let’s now clean up by deleting it
We can delete the archive by running the following command.
rm AdGuardHome_linux_arm.tar.gz5. Let us now change into the newly extracted directory so that we can interact with the software directly.
You can change to the directory by using the command below.
cd AdGuardHomeCopy6. We can finally install the AdGuard Home software to our Raspberry Pi by using the command below.
By running this command, the software will get installed on the device, and it will be set up as a service that will automatically start at boot.
sudo ./AdGuardHome -s installCopy7. Once the install process has been completed, you will see a message appear in your command line.
You should see two URLs provided in this message: the localhost IP and the local network IP address.
The second address is the one you will be using for accessing the web interface from another device.
Initial Configuration of AdGuard Home
Now that we have successfully installed AdGuard Home to our Raspberry Pi, we can now use its web interface.
When you first load up the AdGuard home web interface, you will need to go through some initial setup steps.
Accessing the Web Interface
Before we can configure AdGuard, we need to load up its web interface.
Accessing the web interface only requires you to access a web browser on the same network as your Raspberry Pi.
1. To access the AdGuard Home web interface, you will need to know your Raspberry Pi’s IP address.
You can either use the address that was provided at the end of the previous section. Alternatively, you can use the following command to retrieve the local IP address.
hostname -ICopy2. Once you know your Raspberry Pi’s IP address, you can now access the web interface.
To open the AdGuard Home web interface, go to the following address in your favorite web browser.
http://[YOUR IP ADDRESS]:3000Make sure that you replace “[YOUR IP ADDRESS]” with the correct IP.
Running the Initial Configuration Steps
When you first launch the web interface for AdGuard Home on your Raspberry Pi, you will need to follow some initial setup steps.
These steps get you to set up certain details such as the interfaces you want it to operate on and the username and password for the admin account.
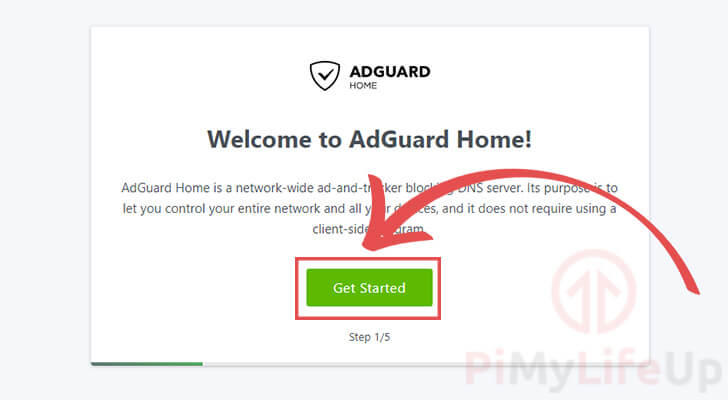
1. The first step will welcome you to the AdGuard Home software.
To proceed with the initial setup steps, click the “Get Started” button.
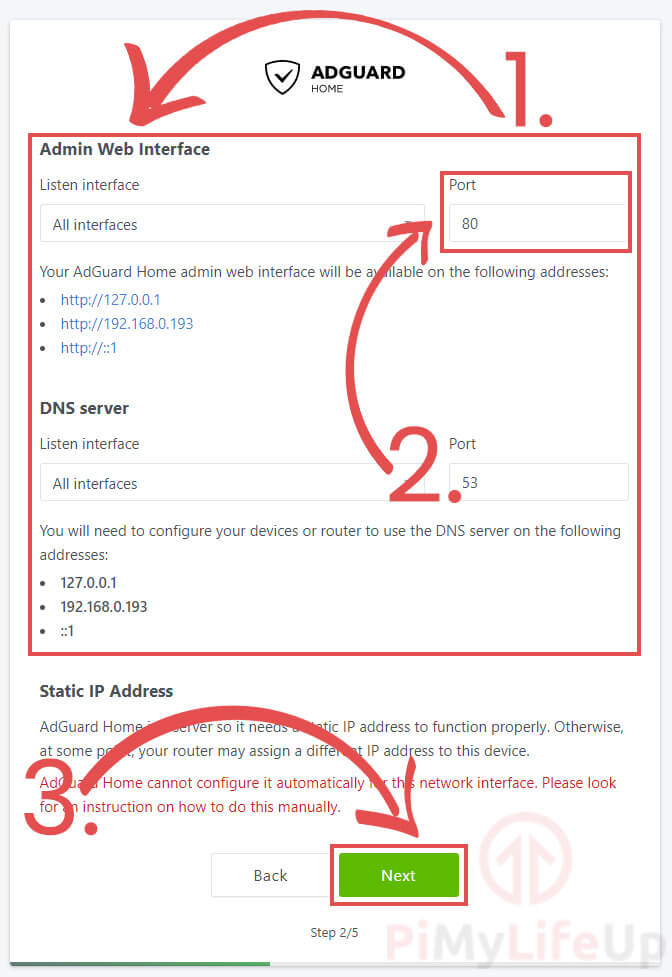
2. Next, you will be asked if you want to configure the ports and interfaces you want AdGuard Home to operate on with your Raspberry Pi (1.).
Most people will be able to skip the settings on this page. However, if you are using another program that will be using port 80, you can change this using the provided textbox (2.).
Port 8080 is a good alternative if port 80 is going to be consumed for another device.
Once you are happy with all of your settings, click the “Next” button to proceed (3.).
3. We can now create an administrator user for accessing the web interface (1.).
You can set the username to whatever you would like it to be. However, for the password, make sure you set something that is secure and not easily guessable.
Even if your network is not accessible from the outside world, it will help ensure that no one on the local network can mess with your settings.
Once you have set a username and password, click the “Next” button to proceed with the setup.

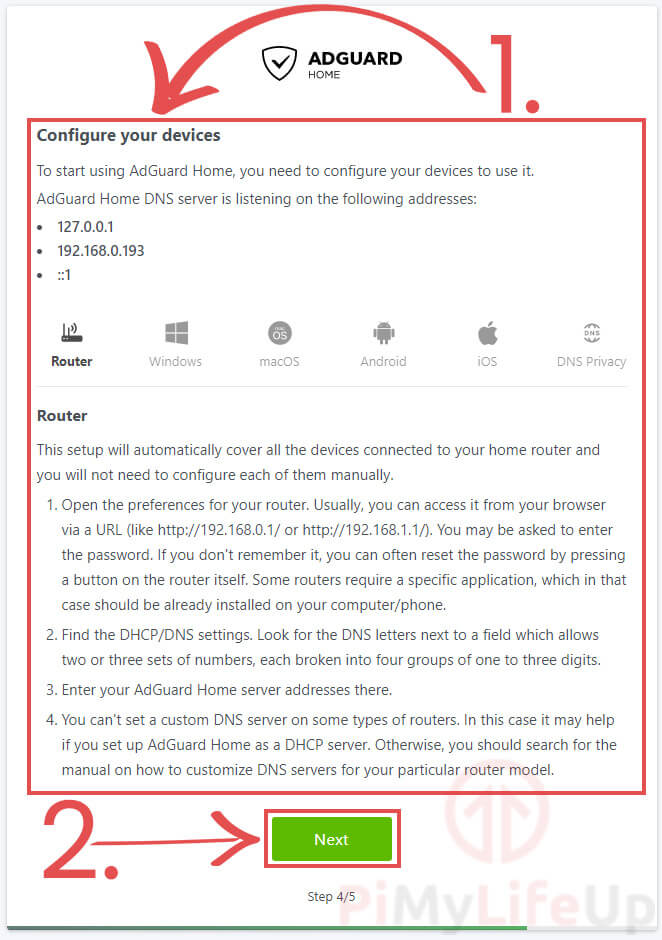
4. This screen tells you the steps you can follow to use your new Raspberry Pi AdGuard Home as your DNS server (1.).
To get the benefits of AdGuard Home, you have to either change your router’s DNS to point to the Raspberry Pi or modify the settings of each device.
Once you have configured your devices to point at the Raspberry Pi’s IP address, you can click the “Next” button to proceed.
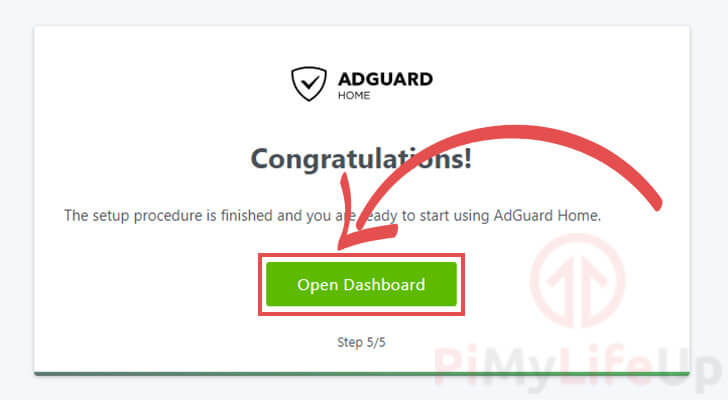
5. You have now completed the initial setup steps for the AdGuard Home software.
You can now proceed to the dashboard by clicking the “Open Dashboard” button.
At this point, you can now proceed to use the web interface.
Accessing and Using the AdGuard Home Dashboard
Now that we have run through all the initial setup steps for AdGuard home on your Raspberry Pi, we can finally access the dashboard.
1. You can access the AdGuard Home dashboard by going to the following address in your web browser.
Make sure that you swap out “[YOUR IP ADDRESS]” with the IP of your Pi.
http://[YOUR IP ADDRESS]Please note that if you are not using the default port that AdGuard tries to use, you will need to add it to the address.
For example, if you set it to use port 8080 for the web interface, you will need to go to the following address instead.
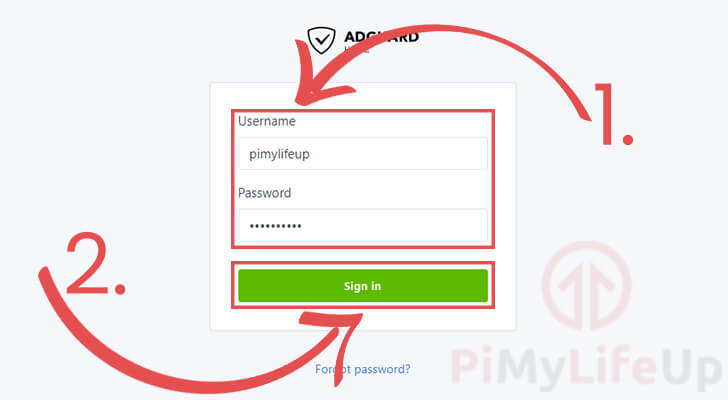
http://[YOUR IP ADDRESS]:80802. Upon going to the dashboard, you will be forced to log in.
To login to AdGuard Home, you will need to enter the username and password you set when going through the initial setup steps (1.).
Once you have entered your details, click the “Sign in” button to proceed.
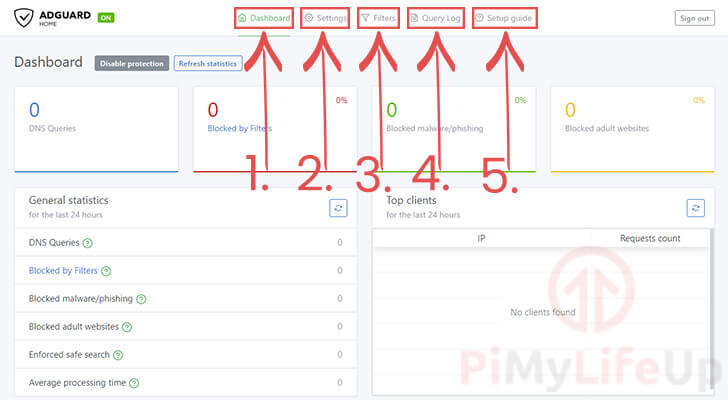
3. You will now have full access to the AdGuard Home dashboard and all of its settings.
If you have already configured one of your devices to use AdGuard Home, you should already see some statistics here.
At the top of the screen, you will notice five different menu options that you can use.
1 – The first is the dashboard. The dashboard is the current screen you are using and provides you with a brief overview of what AdGuard is doing.
2 – The second option is the settings menu. If you want to change the behavior of AdGuard, this is where you need to look.
You can also use this menu to enable extra functionality. For example, you can enable HTTPS support or change the upstream DNS server.
3 – The third menu option is where all the settings for your filters exist.
You can use these options to configure your DNS blocklists, whitelists, and also rewrites.
By default, the only filter that is enabled is the AdGuard DNS Filter.
4 – The fourth menu option takes you to the query log screen.
On this screen, you can see all the DNS requests that are being made by your devices. This allows you to keep track of what websites users on your network might be accessing.
If you would prefer AdGuard Home not to keep track of these, you can modify this behavior within the “Logs Configuration” section of the “General Settings“.
5 – The fifth and final menu option will take you to the setup guide.
The setup guide provides steps for configuring devices to make use of the AdGuard Homes filtered DNS.
4. Hopefully, at this stage, you will have a good idea of using AdGuard and finding all of its settings.
You will quickly find that AdGuard is very straightforward to configure, with most settings being clear and concise.
Conclusion
You should now have the AdGuard Home software up and running on your Raspberry Pi with devices using its DNS server.
Using AdGuard Home is a relatively straightforward process, and you will quickly see that it is relatively effective at blocking ads from loading.
It’s ease of use, and it’s simple settings allows AdGuard to be an excellent alternative to the Pi-Hole software.
If you have run into any issues with getting the AdGuard Home software to work on your Raspberry Pi, feel free to leave a comment below.
Be sure to check out some of our other Raspberry Pi projects to maximize your device usage.


Great guide and works a treat. Thanks.
Does this tutorial use raspberry pi os lite? It didn’t mention it
Hi Michael,
This tutorial will work fine on both Raspberry Pi OS Lite and Raspberry Pi OS desktop. We would actually recommend most people to use OS lite if you aren’t in need of a desktop interface.
Kind regards,
Emmet
AdGuard Home was a disaster when I tried to use it. None of my devices could connect to the internet. Pi-Hole worked much better and was easier to setup for me.
Very nice tutorial and good use of a Raspberry Pi 4 now that the Raspberry Pi 5 is out there. My old Raspberry Pi 4 now functions as a wireless bridge, WireGuard VPN server, and AdBlock DNS. All of them run at the same time and now it’s “permanent” in my home network setup. You could even use the Raspberry Pi OS desktop interface too, but that’s too slow for most people nowadays even if you didn’t have three background processes going.
How do you update this to latest version. I followed the instruction but now it shows banner of “AdGuard Home v0.107.11 ” available. Can you update the link to latest version and also share steps to update adguard home if you have already installed it on your raspberry pi. Thanks
Hi Frank,
It looks like the Adguard team might have changed where they provide their latest packages from.
I have updated the guide to use the same repository they do in their official installation scripts.
Please let me know if this solves your issue.
Cheers,
Emmet
This worked great for me! It hardly used any CPU on the RPi3, so it’s a great use for an older Pi. You could probably install Nextcloud or some other server at the same time.
-John
I actually like how this is versatile and the functionality. But is anyone else having load issues with this on a Raspberry Pi 2? It seems that the CPU is always pegged at 80+% and spikes to 90+.
I have several other pis but figured this would be a good use case for an old RasPi2.
I followed the very good instructions and have AdGuard Home working well. I seems that version 0.102.0 was installed. However, the Dashboard shows that v0.104.3 is now available. How do I go about updating on to a new version on my Raspberry Pi?
Answer: I just click the update button and it complete the update successfully.
A very useful tool and you once again described the installment perfectly! Thanks!
I want to uninstall AdGuard Home, please guide how to do that. I am unable to find any tutorial on internet regarding this.
Hi Aman,
Uninstalling AdGuard Home is a very simple process.
Assuming you followed our tutorial, first change in to the directory where we extracted it to.
Then run the uninstall command that the AdGuard home software features. Running this will remove the service that it installed.
Next change back out of that directory.
Then delete the remains of AdGuard home.
Cheers,
Emmet
Does AdGuard block YouTube adds?
I have running Pihole, everything good except YouTube adds
Hi Demos,
Sadly, with the way these DNS adblockers work it will not be able to block the ads provided from YouTube or Twitch.
To get around that you will need to use a traditional adblocker.
Cheers,
Emmet
pihole is better especially when used in combination with dnscrypt