In this tutorial, we will be showing you how to install and configure Unbound for Pi-Hole on your Raspberry Pi.
Unbound is what is called a recursive DNS server and is a way of improving your privacy when browsing the internet.
Simply put, a recursive DNS server such as Unbound calls the DNS root servers directly and then recursively follows the path until it resolves to an IP address your Raspberry Pi can connect to.
This differs from a normal DNS service in which Pi-Hole and your Raspberry Pi will send the entire path to a service such as Cloudflare and then accept the resolved IP Address it returns.
The advantage of using Unbound on your Raspberry Pi is that it will greatly improve your privacy as you don’t have to trust a third-party service not to log the websites you are visiting.
A drawback to using a recursive DNS server like Unbound is that DNS requests can take considerably longer to complete as it needs to traverse a path. After a while, though, the speeds will improve significantly as both Pi-Hole and Unbound caches these requests.
Additionally, using something like Unbound does not prevent your ISP from monitoring your DNS requests. If you want an alternative that offers more privacy, try out DNS-Over-HTTPS. However, this means you have to place all of your trust in your DNS provider.
Please note to follow this tutorial, you will need to have Pi-Hole set up on your Raspberry Pi.
Equipment
Below, you can find a list of the equipment we used when installing and setting up Unbound on the Raspberry Pi.
Recommended
Optional
Installing and Setting Up Unbound on your Raspberry Pi
Over the next few steps, we will show you how to install the Unbound DNS service to your Raspberry Pi. We will then show you how to configure it so your Pi-Hole installation can interact with it.
Installing Unbound
1. Before installing Unbound on your Raspberry Pi, you will want to perform an update and upgrade.
Run the command below to update the package list and upgrade out-of-date packages.
sudo apt update
sudo apt upgradeCopy
2. Once the package list completes, we can install Unbound using the following command.
This command will install Unbound from the default packages repositories.
sudo apt install unboundCopyIf you see an error during installation, don’t worry; that will be solved over the next few steps.
Configuring Unbound on your Raspberry Pi for Pi-Hole
3. With the recursive DNS resolver installed, we can now write a configuration for Pi-Hole. This config file will define the ports and interface Unbound will operate on.
To begin writing this file, use the command below within the terminal.
sudo nano /etc/unbound/unbound.conf.d/pi-hole.confCopy4. Now that the file is open for editing, you will want to type in the following lines.
These lines configure Unbound on your Raspberry Pi to only listen to queries from Pi-Hole. Additionally, it will also enable several security and privacy improvements.
server:
    # If no logfile is specified, syslog is used
    # logfile: "/var/log/unbound/unbound.log"
    verbosity: 0

    interface: 127.0.0.1
    port: 5335
    do-ip4: yes
    do-udp: yes
    do-tcp: yes

    # May be set to yes if you have IPv6 connectivity
    do-ip6: no

    # You want to leave this to no unless you have *native* IPv6. With 6to4 and
    # Terredo tunnels your web browser should favor IPv4 for the same reasons
    prefer-ip6: no

    # Use this only when you downloaded the list of primary root servers!
    # If you use the default dns-root-data package, unbound will find it automatically
    #root-hints: "/var/lib/unbound/root.hints"

    # Trust glue only if it is within the server's authority
    harden-glue: yes

    # Require DNSSEC data for trust-anchored zones, if such data is absent, the zone becomes BOGUS
    harden-dnssec-stripped: yes

    # Don't use Capitalization randomization as it known to cause DNSSEC issues sometimes
    # see https://discourse.pi-hole.net/t/unbound-stubby-or-dnscrypt-proxy/9378 for further details
    use-caps-for-id: no

    # Reduce EDNS reassembly buffer size.
    # IP fragmentation is unreliable on the Internet today, and can cause
    # transmission failures when large DNS messages are sent via UDP. Even
    # when fragmentation does work, it may not be secure; it is theoretically
    # possible to spoof parts of a fragmented DNS message, without easy
    # detection at the receiving end. Recently, there was an excellent study
    # >>> Defragmenting DNS - Determining the optimal maximum UDP response size for DNS <<<
    # by Axel Koolhaas, and Tjeerd Slokker (https://indico.dns-oarc.net/event/36/contributions/776/)
    # in collaboration with NLnet Labs explored DNS using real world data from the
    # the RIPE Atlas probes and the researchers suggested different values for
    # IPv4 and IPv6 and in different scenarios. They advise that servers should
    # be configured to limit DNS messages sent over UDP to a size that will not
    # trigger fragmentation on typical network links. DNS servers can switch
    # from UDP to TCP when a DNS response is too big to fit in this limited
    # buffer size. This value has also been suggested in DNS Flag Day 2020.
    edns-buffer-size: 1232

    # Perform prefetching of close to expired message cache entries
    # This only applies to domains that have been frequently queried
    prefetch: yes

    # One thread should be sufficient, can be increased on beefy machines. In reality for most users running on small networks or on a single machine, it should be unnecessary to seek performance enhancement by increasing num-threads above 1.
    num-threads: 1

    # Ensure kernel buffer is large enough to not lose messages in traffic spikes
    so-rcvbuf: 1m

    # Ensure privacy of local IP ranges
    private-address: 192.168.0.0/16
    private-address: 169.254.0.0/16
    private-address: 172.16.0.0/12
    private-address: 10.0.0.0/8
    private-address: fd00::/8
    private-address: fe80::/10
5. If you happen to have an IPv6 address then before you save you should make one adjustment to this file.
First, find the following line in the file. This line currently disables any IPv6 functionality of Unbound on your Raspberry Pi
do-ip6: noTo activate IPv6 support, replace “no” with “yes“.
do-ip6: yes6. Once you have made changes to Unbound’s configuration, you can save and quit.
If you are using nano, all you need to do is press CTRL + X, followed by Y, then the ENTER key.
Setting the EDNS Packet Limit for DNSMASQ
7. Our next step is to ensure that Pi Hole’s faster-than-light (FTL) daemon adheres to the “edns-packet-max” limit we set in Rebound.
To set this, we need to write a config file within the “/etc/dnsmasq.d” directory by using the command below.
sudo nano /etc/dnsmasq.d/99-edns.confCopy8. You will want to add the following line within this file.
edns-packet-max=1232
Copy
9. With the line added, you can save and quit by pressing CTRL + X, followed by Y, and then the ENTER key.
Disabling Resolvconf.conf Entry for Unbound
10. For those running Raspberry Pi OS Bullseye and newer, you must disable the “Unbound resolvconf” service that is automatically created during installation.
To disable the “Unbound resolvconf” service, use the following command in the terminal.
sudo systemctl disable --now unbound-resolvconf.serviceCopy11. Next, we must disable the “resolvconf_resolvers.conf” file so that it isn’t evoked by resolvconf itself.
sudo sed -Ei 's/^unbound_conf=/#unbound_conf=/' /etc/resolvconf.conf
sudo rm /etc/unbound/unbound.conf.d/resolvconf_resolvers.confCopy
Testing that Unbound is now Running on your Raspberry Pi
12. For our configuration changes to take effect, you mustrestart the Unbound service.
Luckily restarting the service is as straightforward as running the command below.
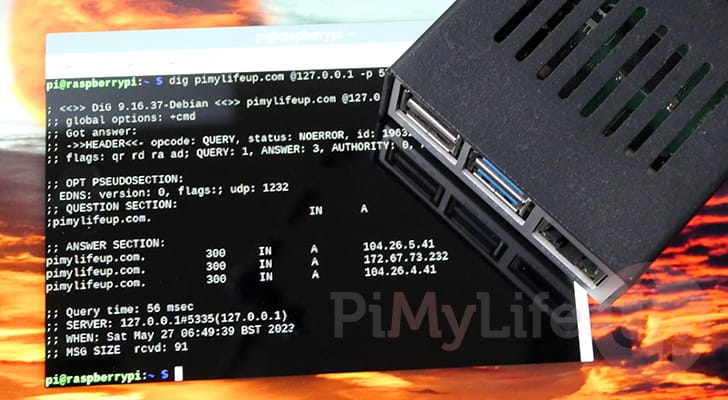
sudo systemctl restart unboundCopy13. Once the service finishes restarting, you can now test that it works by using “dig” to make a DNS request to the Unbound server running on our Raspberry Pi.
The first request from your Raspberry Pi to Unbound will take some time.
dig pimylifeup.com @127.0.0.1 -p 5335
Copy
Your initial request may take a while, but subsequent requests will be faster and faster as Unbound caches parts of the request.
Setting up Pi-Hole to Use Unbound
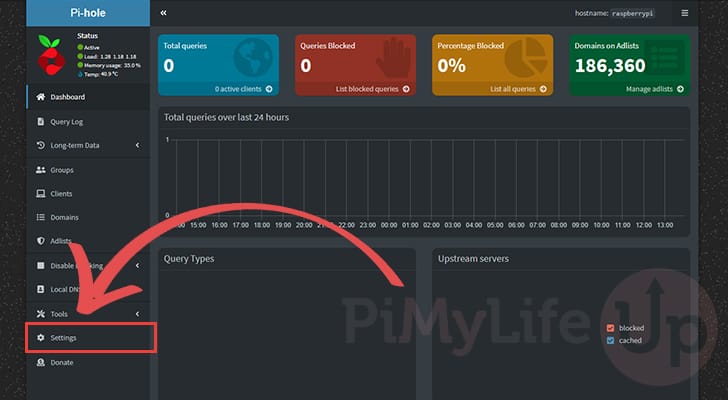
14. At this stage, we can now move on to getting Pi-Hole on your Raspberry Pi to use the Unbound DNS server.
With your Pi-Hole web interface open, you will need to open the settings screen by clicking “Settings” in the sidebar.
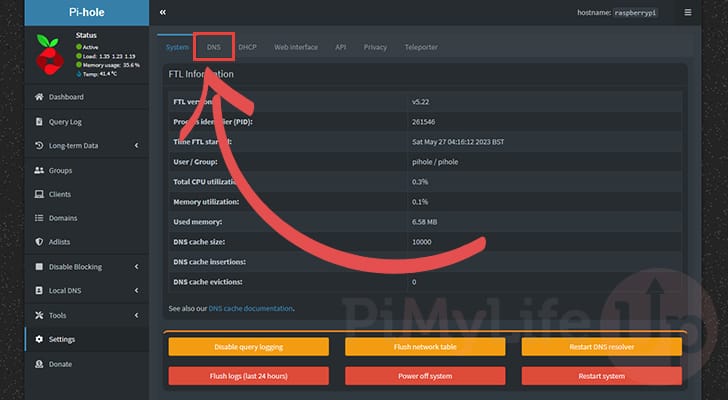
15. Now that you have the settings open, change to the DNS page by clicking “DNS” in the top navigation bar.
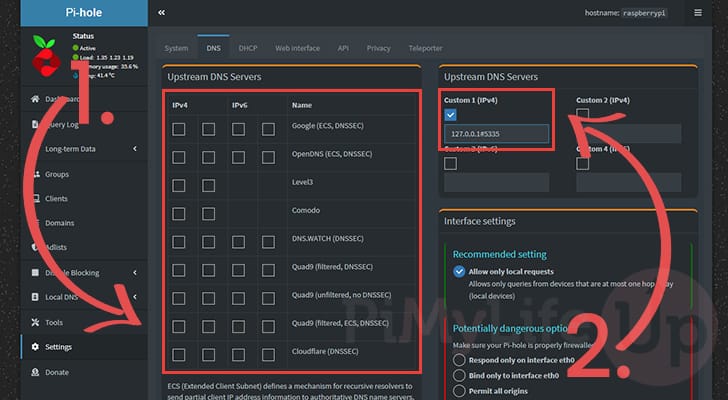
16. With the DNS settings page open, start by ensuring that you have all of the Upstream DNS servers unticked (1.).
Once you have unticked all the upstream servers, enable the “Custom 1” option by ticking the checkbox (2.). Then in the textbox underneath it, type in “127.0.0.1#5335“.
To save your changes, you will need to either press the ENTER key or scroll down and click the “Save” button.
Conclusion
Hopefully, at this point in the tutorial, you will now have Unbound installed on your Raspberry Pi and have successfully connected it to your Pi-Hole installation.
Unbound allows you to run a more private DNS server as it handles the DNS lookups rather than relying on a third-party service. While slower, it means you don’t have a third-party service that can track the websites you visit.
Please comment below if you have questions about setting up Unbound on your device.
If you found this tutorial helpful, be sure to check out our many other Raspberry Pi tutorials.


Never mind my comment from yesterday. I’m not entirely sure what happened, but everything is working now. Of course, my comments about how much I do appreciate your articles still very much applies!
First of all, thanks so much for your great articles. They’s helped me a great deal as I’m learning all this new (to me) tech.
I just finished your PiHole tutorial and it worked great. So I immediately followed up with this article on Unbound. Everything went well until step 11 when I was prompted that that file didn’t exist. But I went on with the rest of the install and integration with PiHole.
Now DNS works, but I no longer have ad blocking., The only think I could think of was that step 11 that hadn’t worked, so i dug deeper. I located a Raspberry Pi text file (/etc/resolvconf/update.d/unbound) that seems to indicate that they’ve changed their minds a couple of times about resolvconf in light of the popularity of Unbound and changed how to turn resolvconf on and off. It was mostly jibberish to me, but I’d be happy to share it with you if you have the time to look into it. If not, I fully understand. We all have ludicrously busy schedules these days!
Thanks again for all the tremendous help you’ve given this beginner to Raspberry Pi and Linux.
Thank you Emmet, it’s very clearly describe, it help me go throught the installation in no time ! thank’s for your effort
But your ISP still knows the sites you visit right? Or your VPN provider if you choose that poison…
Shouldn’t you mention doh?
Thanks for the clear instructions!
Hi Dan,
You make a good point and is something I should definitely cover as well. Will look into expanding this guide with those draw packs and then another guide on settings up DNS over https.
Cheers,
Emmet