In this tutorial, we will show you how to run AdGuard Home on your device using Docker.
AdGuard Home is a network-wide adblocking DNS service that works like the hugely popular Pi-Hole.
Like Pi-Hole, AdGuard acts as your DNS server. It filters out any DNS requests that are for known tracking or domain names. The main difference between these two services is that AdGuard is a little bit more polished but not nearly as configurable, so it is a great alternative for those who want something easy to use out of the box.
The advantage of using a network-wide ad-blocker like AdGuard Home is that you only need to point your devices to your server. There is no need to install specific software on any of your devices to start blocking ads. Additionally, it is great for devices like smart TVs where you can’t install an adblocker.
There are various ways to run AdGuard Home, one of the easiest being to use Docker. Docker is a great solution because it can be up and running in minutes. It also makes it very clean to uninstall if you ever stop using the adblocker.
Remember that if you use an adblocker, you should consider supporting websites that you view often. Ads help pay for content creation and help websites stay online. If you want to support us, we offer a premium ad-free experience.
The official AdGuard Home Docker image that we are using supports almost all major system architectures, so these steps should work on almost all devices, including the Raspberry Pi.
Please note that your device should be set up with a static IP address before proceeding. Using a DHCP reservation through your router is the best way to achieve this.
Installing AdGuard Home using Docker
The following sections will show you how to run AdGuard Home on your machine using Docker.
Using Docker Compose is one of the easiest and fastest ways to get this network-wide adblocker up and running on your device.
Installing Docker to your Machine
1. Of course, to run the AdGuard Home Docker container, you must have the Docker runtime installed on your system. If you already have this runtime installed, you can safely skip to step 2.
Otherwise, you can install Docker on Linux by using our guide. This tutorial will use curl to download and run an install script directly from Docker.
https://pimylifeup.com/linux-docker-install/Preparing for AdGuard Home’s Docker Container
2. With Docker installed, we can start setting up your system to run the AdGuard Home container.
Let us start this installation process by creating a directory to store a Docker Compose file for AdGuard Home. Not only will this directory store the Compose file, but it will also be where AdGuard stores its persistent data.
sudo mkdir -p /opt/stacks/adguardCopy3. We can use the cd command to change into the directory we just created. The rest of this guide will be spent within this directory.
cd /opt/stacks/adguardCopyWriting a Docker Compose File for AdGuard Home
4. We can now move on to the core part of getting AdGuard Home to run using Docker. This next step involves us writing a Compose file. This Compose file is like a set of instructions that the Docker runtime will use to download and run the AdGuard Home container.
Using the following command, we can use the nano text editor to start writing this Compose file.
sudo nano compose.yamlCopy5. Within this file, you will want to type in the following lines.
One thing you will notice with AdGuard is that it requires a lot of open ports. Luckily, Docker will typically handle letting these through your system’s firewall.
services:
  adguardhome:
    image: 'adguard/adguardhome:latest'
    container_name: 'adguard'
    hostname: 'adguard'
    restart: 'unless-stopped'
    volumes:
      - '/etc/localtime:/etc/localtime:ro'
      - './work:/opt/adguardhome/work'
      - './config:/opt/adguardhome/conf'
    ports:
      # Plain DNS
      - '53:53/tcp'
      - '53:53/udp'
      # AdGuard Home Admin Panel as well as DNS-over-HTTPS
      - '80:80/tcp'
      - '443:443/tcp'
      - '443:443/udp'
      - '3000:3000/tcp'
      # DNS-over-TLS
      - '853:853/tcp'
      # DNS-over-QUIC
      - '784:784/udp'
      - '853:853/udp'
      - '8853:8853/udp'
      # DNSCrypt
      - '5443:5443/tcp'
      - '5443:5443/udp'Copy
6. Once you have finished filling out the Compose file, save and quit by pressing CTRL + X, Y, and then ENTER.
Starting the AdGuard Home Container
7. With everything now set up, we can start the AdGuard Home Docker container using the following command.
Docker will download the AdGuard Home image and then spin it up using the details we provided within the Compose file.
docker compose up -dCopyAccessing the Web Interface
8. With the AdGuard Home container running, you can now access its web interface.
Of course, to access the web interface you will need to know the IP address of your machine. You can use the hostname command to easily get the IP addresses that have been assigned to your machine.
hostname -ICopy9. Now, within your favourite web browser go to the following address.
Ensure that you replace “<IPADDRESS>” with the IP of the device you are using to host AdGuard Home.
http://<IPADDRESS>:3000First Time Setup of the AdGuard Home Web Interface
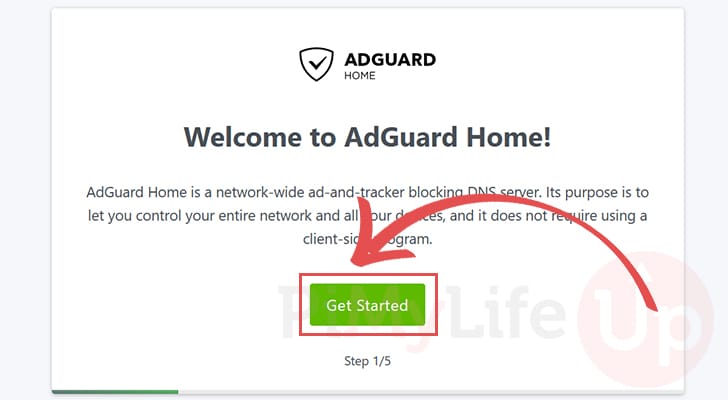
10. When you first access the AdGuard Home web interface you will need to complete the initial setup experience.
To get started with this process, click the “Get Started” button.
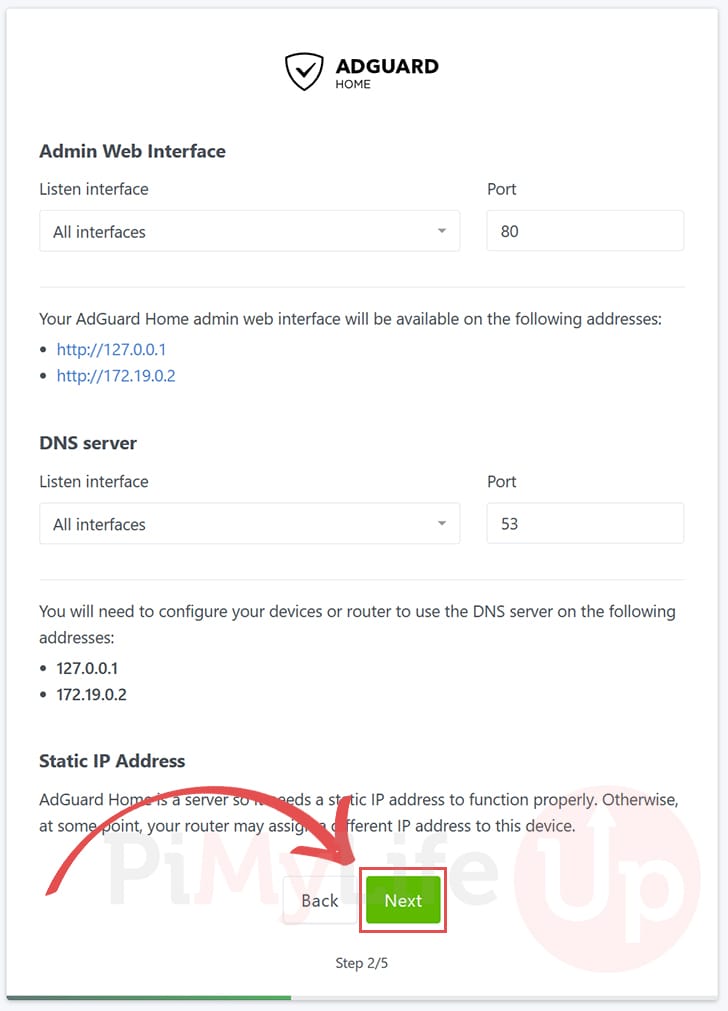
11. This next screen will allow you to adjust the ports and interfaces on which the network ad blocker will listen.
Since this runs within a container, none of these settings should be changed. If you want to use a different port, adjust it using the Docker Compose file, not this interface.
To continue with the setup process, click the “Next” button.
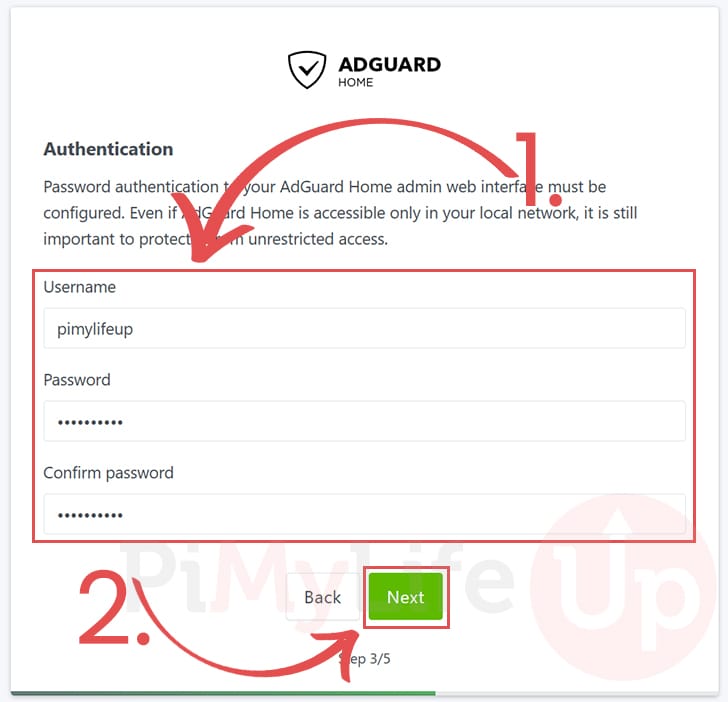
12. You can now create an account to manage your AdGuard Home Docker setup from its web interface.
Use this screen to specify a username and password for your admin account (1.).
Once done, click the “Next” button (2.) to create your admin account.
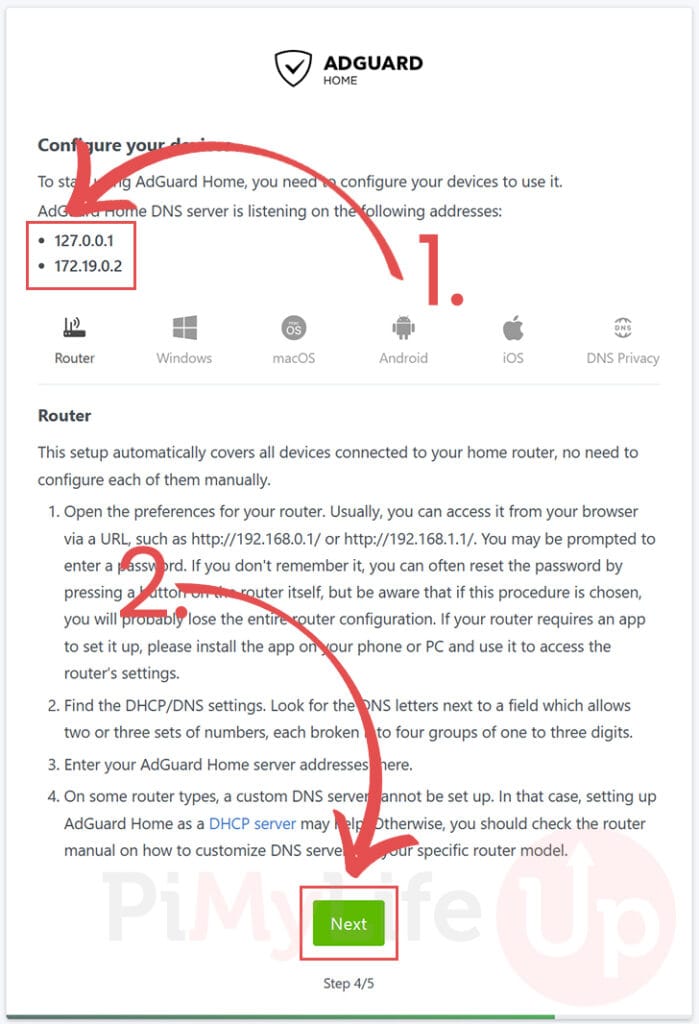
13. The final screen gives steps to configure your devices to use AdGuard Home as your DNS server.
However, one thing we must warn you about is that you must ignore the IP addresses shown on this screen (1.). These IP addresses are the internal ones the Docker container sees, not the external ones belonging to your device.
Once you have configured your devices, click the “Next” button (2.) to complete the setup of AdGuard Home.
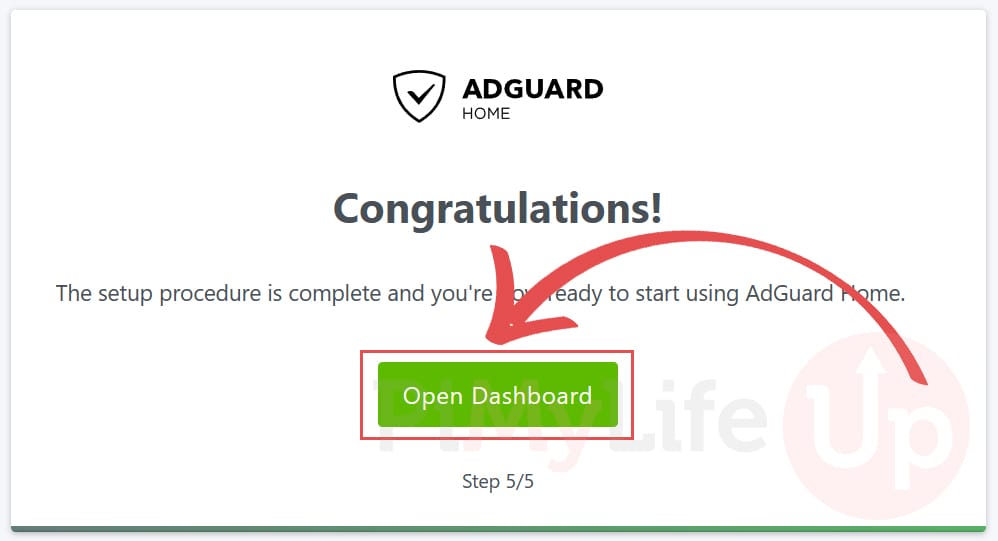
14. You will now see a big message congratulating you for setting up AdGuard.
To go to the dashboard, click the “Open Dashboard” button.
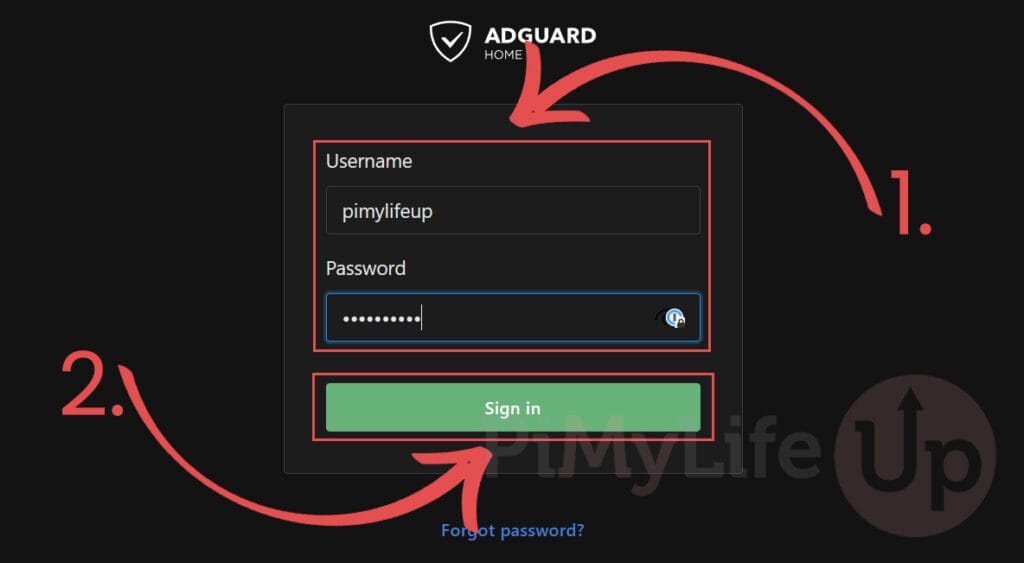
15. Before you can access the dashboard, you will want to enter the username and password for your new admin (1.).
After filling out your details, you can click the “Sign in” button (2.) to access the dashboard.
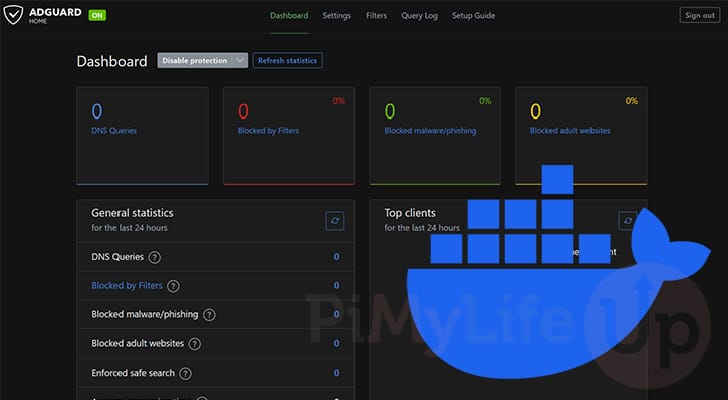
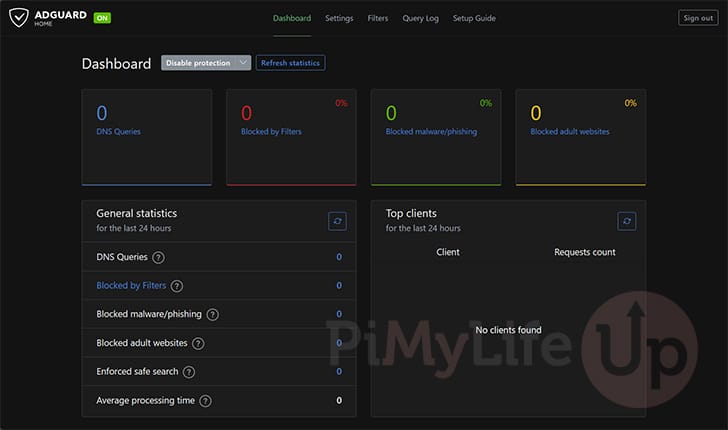
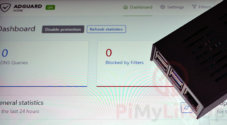
16. Below, you can see that we have successfully set up AdGuard Home using Docker and now have access to its web interface.
You can use this interface to view how your network-wide ad blocker is performing. You can also use it to configure filters and control various settings.
Updating the AdGuard Home Docker Container
As mentioned at the beginning of this guide, one of the great things about using Docker to run AdGuard Home is that it makes updating simple.
In just three simple steps, you can upgrade to the latest available release.
1. Before you can update the AdGuard container, you must change to the directory where we wrote the Compose file.
If you followed our guide exactly, you can change to the correct directory by running the command below.
cd /opt/stacks/adguardCopy2. Once you are in the correct place, getting Docker to download the latest version of AdGuard is as easy as using the following command.
Docker will check the provided repository and download the latest image. However, it will not begin using it immediately.
docker compose pullCopy3. To get Docker to move our running AdGuard Home installation to the new version, we will use the command below.
This command will detect that a new image is available and automatically restart any affected containers to the new release.
docker compose up -dCopyConclusion
Hopefully, at this stage, you will have successfully installed AdGuard Home on your device using a Docker container.
AdGuard is one of the go-to ad blockers known for its great default lists, performance and level of polish.
If you have had issues with getting this software running within a Docker container, please comment below.
Be sure to check out our many other Docker guides if you found this one helpful.

Been using this for awhile…prefer it over Pi-hole. Would like to try using unbound as one of the upstream DNS providers, but I’m struggling to figure out how to accomplish it as well as see how it compares when performing parallel requests.
I saw your instructions for including unbound with pi-hole, but one of the instructions reguarding dnsmasq confused me. What would it take to use unbound with AGH. Could they both be in the same docker container?
recommend to add health check to the compose file to avoid restart failing when the host ip has not being assigned / ready
Please refer to https://github.com/AdguardTeam/AdGuardHome/issues/3290
Hi Sachinw,
I am a bit cautious at introducing a health check as there are several reported issues about this within that issue you linked, as well as a discussion thread where the AdGuard team intentionally removed the health check from the Docker file.
Kind regards,
Emmet