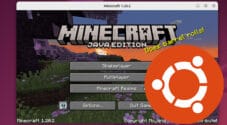
In this tutorial, I will take you through the process of setting up a Java edition Minecraft server on Ubuntu.
Setting up a private Minecraft server on Ubuntu is straightforward, especially if you have experience using a Linux-based operating system.
The number of people the server can handle will vary heavily depending on the specifications of your computer. Since the Minecraft server is RAM hungry, I recommend having a generous amount of memory if you wish to host many people.
You will need to investigate port forwarding if you wish to allow users outside your local network to connect to the server. You may also want to investigate using additional security features to help protect your system, such as UFW.
This tutorial is for running Minecraft on an Ubuntu server or Ubuntu desktop. If you want to run the server on a Raspberry Pi, we recommend following our dedicated Raspberry Pi Minecraft server tutorial. With that said, this tutorial should still work on the Raspberry Pi.
Please note that if you are running the Bedrock version of Minecraft (iOS, Android, Xbox, PlayStation, Windows), you will want to follow our guide on setting up a Bedrock server on Ubuntu instead.
Video
If you prefer a more visual guide on installing the Minecraft Java Edition Server on Ubuntu, then be sure to watch through the video that we have embedded below. Of course, we still have our written guide included below.
Installing the Minecraft Java Edition Server on Ubuntu
The process of installing the Minecraft Java Edition server on Ubuntu is pretty straightforward. Of course, we will be using the server version of Ubuntu, but there is no reason why you cannot do this on the desktop version.
Throughout this tutorial, we will be using the terminal and a range of different commands. The commands are not overly difficult to comprehend, so you should be fine even if you are new to using the command line.
1. Before we begin installing the Minecraft Java Edition server to Ubuntu, we should ensure that our operating system is up to date.
You can update the package list and upgrade any out-of-date packages by using the following two commands.
sudo apt update
sudo apt upgradeCopy
2. Next, we will need to install all the additional packages we require to download and run the Minecraft Java Edition server on our Ubuntu system.
The following command will install version 21 of the Java runtime as well as the curl, wget, grep, jq, and screen packages.
sudo apt install openjdk-21-jre-headless curl wget grep screen jqCopy3. You can verify that Java has been installed on your Ubuntu system by getting it to output its version number.
To get Java to output its version, use the following command in the terminal
java --versionCopyIf everything is working properly you should see a response similar to the one below within the terminal
dev@pimylifeup:~$ java -version
openjdk version "21.0.5" 2024-10-15
OpenJDK Runtime Environment (build 21.0.5+11-Ubuntu-1ubuntu124.04)
OpenJDK 64-Bit Server VM (build 21.0.5+11-Ubuntu-1ubuntu124.04, mixed mode, sharing)Copy
4. For our next step, we need to create a user that our Minecraft Java Edition server will run under on Ubuntu by using the useradd command.
We will call this user “mcserver” and use the “-m” option so that it generates a home directory for the user.
sudo useradd -m mcserverCopy5. After creating this new user, we should add its group to our current user. This will allow us to much easier read and edit files within their new home directory.
You can add the “mcserver” group to our current user by using the following command.
sudo usermod -a -G mcserver $USERCopy6. As we have made changes to our users groups you will need to log off and log back in for the changes to take affect.
You can easily log out of Ubuntu by using the following command in the terminal.
logoutCopy7. We will need to create a directory to store our Minecraft Java Edition server files on our Ubuntu system. This folder will exist within the home directory of the user we created in the previous step.
sudo mkdir -p /home/mcserver/minecraftCopy8. With the directory created, we will now want to change into it by using the cd command.
cd /home/mcserver/minecraftCopy9. We can now use a bit of curl and grep magic to help us get the latest version of the Minecraft Java Edition without having to manually go to the website.
Within the terminal, use the following command to grab the latest download link the for the Java edition server.
This works by grabbing the download page and then passing the contents over to grep which searches for and grabs the download link. The result from these two commands is then stored in the bash variable called “DOWNLOAD_URL“.
DOWNLOAD_URL=$(
  curl -s https://piston-meta.mojang.com/mc/game/version_manifest_v2.json |
  jq -r '.latest.release as $latest
    | .versions[]
    | select(.id == $latest)
    | .url' |
  xargs curl -s |
  jq -r '.downloads.server.url'
)Copy
10. We can now use the wget command to download the latest version of Minecraft Java Edition to your Ubuntu system by using the following within the terminal.
With this command you can see that we are using the bash variable we set in the last step.
sudo wget -U "Mozilla/4.0 (compatible; MSIE 6.0; Windows NT 5.1; JAVA-UPDATER)" $DOWNLOAD_URL -O ./server.jarCopy11. With the “server.jar” file now saved to our system, we need to ensure that it is owned by the “mcserver” user that we created earlier.
Use the chown command to ensure that the “server.jar” file is taken over by the “mcserver” user.
sudo chown -R mcserver: /home/mcserverCopyWe are now ready to launch the server and be one step closer to connecting and playing in our own Minecraft world.
Starting the Minecraft Java Edition Server on Ubuntu
In this section, we will be walking you through a few brief steps for starting the Minecraft Java Edition Server on Ubuntu for the first time. We highly recommend setting up a service to manage your server in the long run, but knowing how to start the server without one is always handy.
1. To launch the Minecraft server, we need to enter a Java command that specifies a few settings and references the server jar file that we downloaded in the previous section.
The options that we will be using to start up the Minecraft server is the following:
-Xmsallows you to specify the initial size of the memory allocation pool. The number is in bytes unless followed by a letter. K or k for kilobytes. M or m for megabytes.-Xmxallows you to specify the maximum size of the memory allocation pool. The number is in bytes unless followed by a letter. K or k for kilobytes. M or m for megabytes.-jaris followed by the jar file that you wish to run.noguiwe set this option as we do not need any GUI (Graphical User Interface) as we’re running the server from the terminal.
Below is an example of what launching the Minecraft Java Edition server would look like. With this we are setting the minimum memory allocation to 1GB (1024M) and the maximum to (2048M). Ensure that you update these memory values to match what your server has available.
sudo java -Xms1024M -Xmx2048M -jar ./server.jar noguiCopy2. As soon as you start the server, it will stop as you will need to agree to a EULA to proceed. This licence agreement dictates what you are allowed to do with your server so it is well worth a quick read.
[10:08:07] [ServerMain/INFO]: Building unoptimized datafixer
[10:08:09] [ServerMain/ERROR]: Failed to load properties from file: server.properties
[10:08:09] [ServerMain/WARN]: Failed to load eula.txt
[10:08:09] [ServerMain/INFO]: You need to agree to the EULA in order to run the server. Go to eula.txt for more infoCopy
3. If you agree with the EULA then you will need to open up the “eula.txt” file that was just generated by using the following command.
This file will be read in by the server every time it starts
sudo nano eula.txtCopy4. Inside this file, you will find a line similar to the one below.
eula=falseCopyOnce found, you must change the “FALSE” value to “TRUE” to say that you are agreeing to the Minecraft EULA.
eula=TRUECopy5. After agreeing to the end user licence agreement, save and exit by pressing CTRL + X, then Y.
6. You will now want to run the java command again to start the Minecraft Java Edition server on your Ubuntu machine.
This time, it the server should start up without any issues. Pay attention to the output to see if any errors occur.
sudo java -Xms1024M -Xmx2048M -jar ./server.jar noguiCopyConnecting to your new Ubuntu Minecraft Java Edition Server
Connecting to the server should be relatively easy as long as you do not have problematic firewalls, routers, and other possible network issues.
If you are running UFW on your Ubuntu machine you will want to allow port “25565” before connecting to the Minecraft Java Edition server.
1. To connect to the server, you will first need the IP. You can use the hostname command on the server to get the IP.
If you want to improve the connection experience we highly recommend setting a static IP address.
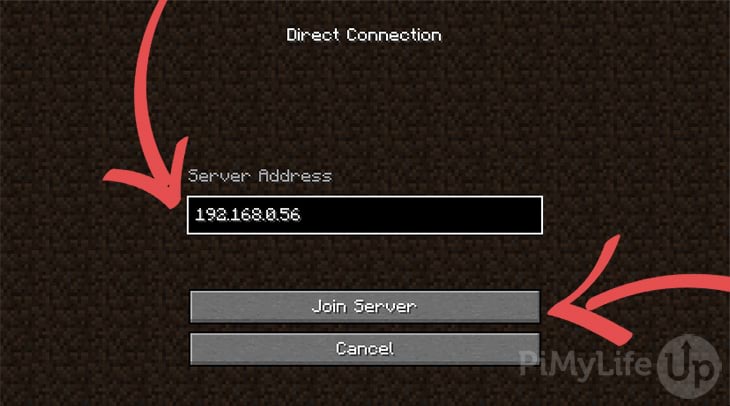
hostname -ICopyThe command should return an IP that is similar to the example below.
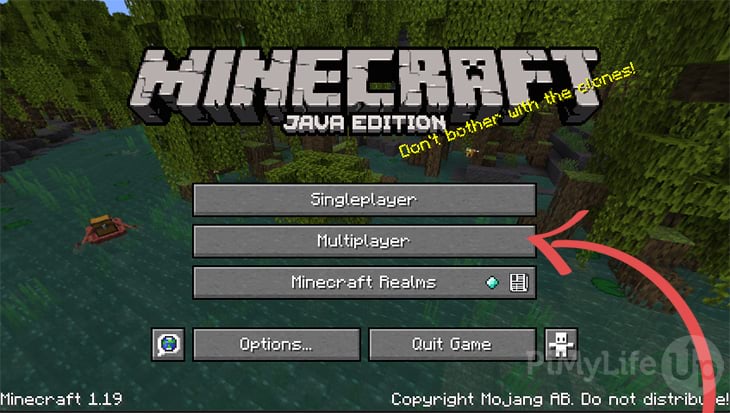
192.168.0.56Copy2. You now need to load the Minecraft Java client on a computer within the same local network as the server.
3. Once the game has loaded, navigate to the “Multiplayer” menu.
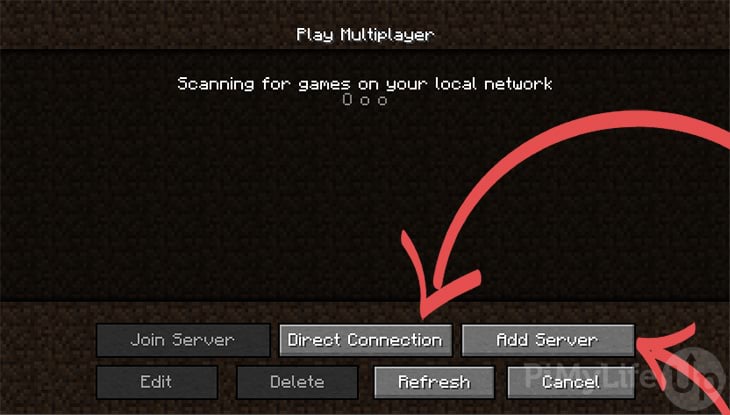
4. Select either “Direct Connection” or “Add Server“. For this tutorial, I will select “Direct Connection“.
5. On the next screen, enter the server’s IP into the server address field. Afterward, click “Join Server“.
5. You should now load into the server successfully. The terminal on your server should also indicate “user joined the game”.
Configuring your Minecraft Java Edition Server on Ubuntu
With the Minecraft Java Edition server now running on your Ubuntu system, you will likely want to configure the server to fit your needs a little better.
For example, you may want to set your user as OP, which allows them to perform admin commands while in-game. You may also want to edit the server properties such as the maximum amount of players, spawning creators, and much more.
Making a User OP
To help administrate the server from within the game, you will likely want to set your user as OP. Luckily, you can easily do this from the terminal on your Ubuntu machine.
After you have launched the Minecraft server and the terminal is accepting input. Enter the following line to make your user OP. Replace the username with the username of your Minecraft account.
op usernameCopyYou should get the following output in the terminal to confirm that the user is now OP.
[04:28:38] [Server thread/INFO]: Made username a server operatorCopyThe easiest way to confirm the change was successful is by changing the time to daytime using the in-game chat. You can bring the chat menu up by pressing the t key.
/time set 0CopyEditing Server Properties
You can edit a range of server properties that will tweak the game’s behavior. For example, you can change the game mode, max players, PVP, simulation distance, NPCs, and more.
To load the server properties file, simply enter the following line into the terminal.
sudo nano /home/mcserver/minecraft/server.propertiesCopyInside the file, you can edit any of the available properties. Most of them are self-explanatory, but others may require more information. You can read more about Minecraft server properties if you require more information.
Once you are done editing the properties file, you will need to make sure you restart your server for the changes to take effect.
Starting the Minecraft Java Edition Server on Boot
To get the Minecraft Java Edition server to start when your Ubuntu systems boots, you will need to follow some extract steps. Luckily, they are pretty straightforward.
With these steps we will be writing two scripts that will make managing your Minecraft server a bit easier. The first script is what starts up the server within a separate screen. This separate screen is important as it allows us to safely shutdown the Minecraft Java Edition server with our second script.
Writing a Script to Start your Minecraft Java Server
1. Our first step is to write a short bash script that will start up the Minecraft Java Edition server on Ubuntu.
To begin writing this script, you will want to run the following command within the terminal.
sudo nano /home/mcserver/minecraft/start_server.shCopy2. Within this file, enter the following lines. This script is pretty basic and essentially just starts up the Minecraft server within a screen called “mcjava“. We create a screen so that we can continue to access the Java edition command line
The one thing you may want to adjust is the minimum (-Xms1024M) and maximum memory (-Xmx2048M) values for the Java edition server. Increase or decrease these values depending on the amount of RAM you have available.
#!/usr/bin/env bash

/usr/bin/screen -dmS mcjava /usr/bin/java -Xms1024M -Xmx2048M -jar /home/mcserver/minecraft/server.jar nogui
/usr/bin/screen -rD mcjava -X multiuser on
/usr/bin/screen -rD mcjava -X acladd rootCopy
3. After filling out this file, save and quit by pressing CTRL + X, Y, and then ENTER.
4. To allow this bash script to be executed by the server, we will need to give it execute privileges by using the chmod command.
sudo chmod +x /home/mcserver/minecraft/start_server.shCopyStopping your Java Edition Server Safely
5. With our start bash script now written, our next step is to write a short one that will stop the Minecraft Java edition server safely on Ubuntu.
You can begin to write this new script by using the command below within the terminal.
sudo nano /home/mcserver/minecraft/stop_server.shCopy6. In this file, you will want to fill out the following lines.
This line that we are adding to this file is super simple. and will just send the message “stop” to the Minecraft Java edition command line
#!/usr/bin/env bash

/usr/bin/screen -Rd mcjava -X stuff "stop \r"Copy
7. After filling out these last couple of lines, save and quit by pressing CTRL + X, Y, and then ENTER.
8. Like the start script, the stop script will also need to be assigned execute privileges by running the command below.
sudo chmod +x /home/mcserver/minecraft/stop_server.shCopyCorrecting Permissions for your Minecraft Java Edition Server on Ubuntu
9. Our next task is to ensure that our “mcserver” user owns all of the files within its directory.
Until now, we have been using the superuser to run the server. However, with the service we will be writing, we will instead rely on our “mcserver” user to run the Minecraft Java Edition server on Ubuntu.
Use the chown command to take ownership of all the files by using the following command within the terminal.
sudo chown -R mcserver:mcserver /home/mcserver/CopyCreating the Service File
10. First, we will need to create a service for our Minecraft server. A service file is a set of instructions that the System manager will follow to run and manage our server.
To do this, enter the following command into the terminal.
sudo nano /etc/systemd/system/minecraftserver.serviceCopy11. Inside this file, you must enter the following configuration.
This file tells the service manager how to run our Minecraft Java edition server on Ubuntu. For example, we are telling the system to run our service using the “mcserver” user we created earlier.
The one thing you will want to adjust within this file is the memory allocations we are using to run the server.
[Unit]
Description=Minecraft Server
Wants=network-online.target
After=network-online.target

[Service]
Type=forking
User=mcserver
Group=mcserver
WorkingDirectory=/home/mcserver/minecraft/
ExecStart=/usr/bin/bash /home/mcserver/minecraft/start_server.sh
ExecStop=/usr/bin/bash /home/mcserver/minecraft/stop_server.sh
Restart=always
TimeoutStartSec=600

[Install]
WantedBy=multi-user.targetCopy
12. Once done, save the file by pressing CTRL + X then Y followed by ENTER.
Starting up the Server
13. After creating the service, you will want to enable it so that Ubuntu will automatically start your Minecraft Java edition server when your server powers on.
You can enable the service by running the command below.
sudo systemctl enable minecraftserver.serviceCopy14. Now instead of having to wait for your Ubuntu device to restart for the Minecraft server to start, you can bootit up immediately by using the following command within the terminal.
The first start of the server may take a couple of minutes as the initial world is generated.
sudo systemctl start minecraftserver.serviceCopyAccessing the Minecraft Java Edition Servers Command Line Interface on Ubuntu
15. One key thing we did within this section is place the MInecraft Java edition server into a separate screen. This screen allows your server to continue to run in the background without us lose complete access to it.
You are able to re-attach this screen at any time by using the following command within the terminal.
sudo screen -r mcserver/mcjavaCopy16. Once re-attached you will begin to interact directly with the server’s command line interface. So, if you want to make a user OP, now is the perfect time.
17. Once you have finished with interacting with the server, you must detach the screen to stop issues arising later.
To detach the screen and place it back into the background, press CTRL + A, then CTRL + D.
Updating your Minecraft Java Edition Server
In this section, we will be walking you through the simple steps you need to follow to update your Minecraft Java edition server on Ubuntu to the latest release. These steps are relatively straightforward and are very similar to
One key thing is that we will be assuming that you went to the extra effort of setting your server to as a service.
1. Before we can download the latest release, you must ensure that the server has been stopped.
If you set up the Minecraft server service, stopping the server is as simple as using the following command within the terminal.
sudo systemctl stop minecraftserverCopy2. Once the server has been safely stopped, we will want to use the following command to “grab” the latest download link from the Minecraft Java edition website.
This command will store the resulting URL within the “DOWNLOAD_URL” variable.
DOWNLOAD_URL=$(curl -H "Accept-Encoding: identity" -H "Accept-Language: en" -s -L -A "Mozilla/4.0 (compatible; MSIE 6.0; Windows NT 5.1; JAVA-UPDATER)" https://www.minecraft.net/en-us/download/server | grep -o '"https.*\.jar"')Copy3. We can now use the wget command to download the latest release over the top of the existing one.
sudo wget -U "Mozilla/4.0 (compatible; MSIE 6.0; Windows NT 5.1; JAVA-UPDATER)" $DOWNLOAD_URL -O /home/mcserver/minecraft/server.jarCopy4. With the server file now been replaced with the latest available version, we must now ensure everything is owned by our “mcserver” user by using the following command.
This will help stop permission changes from breaking your server.
sudo chown -R mcserver:mcserver /home/mcserver/Copy5. With the update complete, start the Minecraft server back up by using the command below within the terminal.
sudo systemctl start minecraftserverCopyConclusion
You should now have a fully functioning Minecraft Java Edition server running on Ubuntu. Depending on your system’s specifications, you should have a server capable of handling quite a few people. You can also tweak the server properties if you find the server is not up to expectations.
This tutorial covered all the basics for setting up the server on a local network. If you want to open it up to the internet, you will need to investigate using port forwarding. However, you should be aware that port forwarding does increase the risk of security issues.
Please let us know if you notice a mistake or an important topic is missing from this guide.


Steps 9 and 10 do not work at all, just results in the following which i’ve been unable to find a way through with the mire of information available on the internet.
wget: missing URL
Usage: wget [OPTION]… [URL]…
Try `wget –help’ for more options.
Hi Wayne,
I have now corrected the command so it should be less prone to failure as we are now using there actual release manifest.
This will require you to install the “jq” package as well which you can do by using the following command.
This should resolve the issue you are running into.
Kind regards,
Emmet
Hi, great guide! I already did the bedrock tutorial 2-3 years ago and it still runs fine, and if I have any problem updating or something related the guide always shows the path to follow, now I’m planning on doing this one but since it’s going to be on the same machine will I have any problem running both of them at the same time? I mean besides changing the name of the worlds and the port in the properties file, is there anything else I should do before creating this one? I don’t want to mess up the bedrock world since I’m planning to keep playing with friends on that one but some want to play on java for the mods
Thanks for the help
Hi Huichoeger,
Yes you should be able run both of these off the same device without any issues. Only thing to watch out for is that you have enough RAM and CPU room to run both comfortably, especially if you are looking into using lots of mods with the Java edition of Minecraft.
From memory the Java edition actually uses a different port to that of the Bedrock server so you may not even need to change that either.
Kind regards,
Emmet
Not sure if Ubuntu has changed it’s default installed apps but I had to run “sudo apt install screen” before I was able to get the auto start script to work. Thanks for the guide BTW.
Hi Grogg,
Thank you for the kind feedback and for the heads up about screen missing.
I have updated the tutorial to ensure that we install screen early on.
Kind regards,
Emmet
Thank you for this guide. I went on installing this without knowing i needed the bedrock version. Now i think i have 2 servers running and i was wondering how do i uninstall the Java version? Im a Windows user so this is totally ned for me and i really just copy paste code :p
Hi Tommy,
Glad you liked this tutorial and that’s definitely a mistake anyone could make.
Uninstalling the server is fairly straightforward. Assuming you followed the tutorial to the end, these steps should remove it.
1. First you will want to disable the service so that it wont attempt to automatically start it when Ubuntu restarts.
2. Next, you must stop the service by using the following command.
3. With the Minecraft server now stopped we can remove the service entirely from Ubuntu by deleting the file we wrote within the tutorial.
4. Finally, you can clean up the directory where we saved the Java Minecraft server to by running the command below.
This command will remove the “minecraft” directory and all files and directories within it.
Hopefully that helps you out.
Kind regards,
Emmet
You have a typo, it says “mcsesrver” in the unit file everywhere.
Otherwise, great instructions!
Hi Charlag,
Thank you very much for pointing out that typo. I have now corrected it!
I am glad that the tutorial was helpful for you.
Cheers,
Emmet