In this guide, we will be showing you how to install Java to your Ubuntu operating system.
The Java runtime environment is required to run any software that has been written in the Java programming language.
This runtime environment takes the compiled Java bytecode and converts it into instructions for the native architecture.
There are two different versions of Java that you can install on Ubuntu.
The first is the OpenJDK. This is the easiest to install as it is available through the package repository. It is a free and open-source implementation of Java.
While Oracle contributes to the development of OpenJDK, it is also developed by the wider community. For the most part, it is on par with the official Oracle JDK but doesn’t perform quite as well.
The second variant that you can install is the Oracle JDK. Due to licensing, we cannot install this version to Ubuntu by using the repository. Instead you have to download it through their website.
For this guide, we will be focusing on using the OpenJDK version of Java on Ubuntu. The Oracle version, while slightly faster, has restrictive licenses you must accept and requires you to signup to download the software.
These steps for installing Java should work for all versions of Ubuntu, including Ubuntu 18.04 and Ubuntu 20.04.
Table of Contents
- Installing the OpenJDK Version of Java to Ubuntu
- Conclusion
Installing the OpenJDK Version of Java to Ubuntu
This section will show you how to install the OpenJDK version of Java to Ubuntu.
This version of Java is available through Ubuntu’s package repository, making it easy to install and update.
Additionally, there are two pieces of software you can install. The first is the Java Runtime Environment (JRE), which allows you to run compiled Java code.
The second is the Java Development Kit (JDK). This kit allows you to compile Java scripts. Installing the JDK will also install the JRE.
If you are running the desktop version of Ubuntu, you can open the terminal by pressing CTRL + ALT + T.
Preparing for Java
Before installing Java to our Ubuntu device, we need to ensure that our package list is up to date.
We will also update the operating system to ensure we have an updated base to work off of.
1. Our first step is to update the package list.
Updating the list is as easy as running the following command.
sudo apt update2. Once the package list has been updated, we can now upgrade existing packages.
All we need to do to update the software is to use the command below.
sudo apt upgradeWhen asked if you want to continue, type in Y, then press the ENTER key.
Installing the Open Java Runtime Environment On Ubuntu
Installing the Open Java Runtime Environment is a simple task as the package is available on Ubuntu’s package repository.
If you intend to compile and write your own Java programs, you should skip to the section below that installs the OpenJDK.
Installing the Default OpenJRE
To install the default version of the open Java Runtime Environment on Ubuntu, run the following command.
By using “default-” in front of JRE it will choose whatever version is currently the default.
sudo apt install default-jreAt the time of publishing, the default version of the JRE is version 11.
Installing a Specific Version of JRE
You can also install specific versions of the OpenJRE by specifying its version exactly.
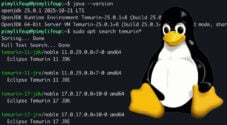
1. We can check what versions of the OpenJDK are available by using the following command.
sudo apt search openjdk-This command will provide a list of packages that contain the name “openjdk-“.
2. For example, if we wanted to install OpenJDK 14, we can use the command below.
sudo apt install openjdk-14-jreVerifying the Installation of the JRE on Ubuntu
Once you have your desired version of the Open Java Runtime Environment installed to your Ubuntu system, we can verify it’s working.
1. Checking the current version of the JRE and its version is as simple as running the following command.
This command will call the JRE and ask it to print out the version.
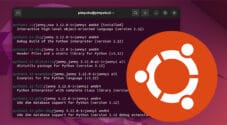
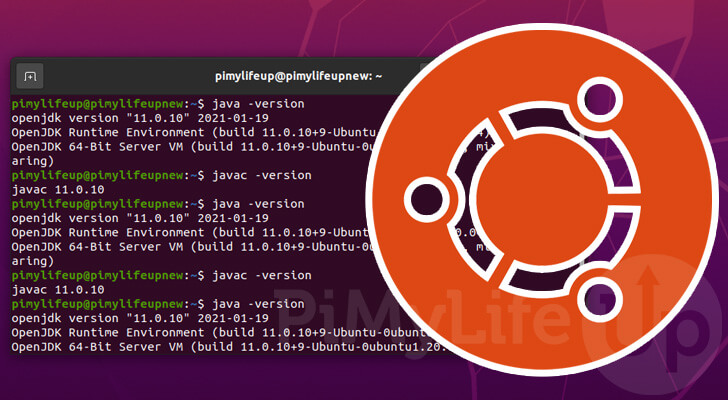
java -version2. From this command, you should get a response similar to what we have below.
This response will show the version of Java that has now been installed on your Ubuntu system.
openjdk version "11.0.10" 2021-01-19
OpenJDK Runtime Environment (build 11.0.10+9-Ubuntu-0ubuntu1.20.04)
OpenJDK 64-Bit Server VM (build 11.0.10+9-Ubuntu-0ubuntu1.20.04, mixed mode, sharing)
Installing the Open Java Development Kit on Ubuntu
This section will show you how to install the Open Java Development Kit to your Ubuntu operating system.
Like the JRE installing the OpenJDK is a straightforward process as it is all available through the package repository.
When you install the JDK to your device, it will also install the Java runtime environment.
Installing the Default OpenJDK
Ubuntu makes installing the default version of the OpenJDK a simple process thanks to the “default-jdk” package.
All you need to do to install the default version of the OpenJDK is to run the command below.
sudo apt install default-jdkThis package automatically comes bundled with the default version of OpenJDK and the Java Runtime Environment.
At the time of publishing, the default version of the JDK that we are installing via this command is JDK 11.
Installing a Specific Version of the OpenJDK
If you want to install a specific version of the OpenJDK software, you need to adjust the command slightly.
1. First, we need to perform a search within the package cache to see what versions of the OpenJDK are available.
All you need to do to perform this search is to run the command below.
sudo apt search openjdk-This command will produce a list of all packages that contain or start with “openjdk-“.
2. Once you identify the Java Development Kit version you want to install to Ubuntu, you can proceed.
Use the following command on your device to install the version of the JDK of your choosing. In our example, we install OpenJDK 14.
sudo apt install openjdk-14-jdkVerifying that OpenJDK is Installed
Finally, we can verify that the OpenJDK software has been installed on your Ubuntu system.
By running the following command on your system you will retrieve the current version of the Java compiler
javac -versionBy using this command, you should see the version outputted to the terminal.
javac 11.0.9.1Conclusion
At this point, you should now have installed the OpenJDK version of Java to your Ubuntu operating system.
Java is a powerful programming language that relies on the JRE to run on your system.
Relying on the JRE to run the code allows Java to be a very portable language. The JRE handles the grunt work of running the code natively.
If you have had any issues with installing Java to Ubuntu, please leave a comment below.
Additionally, be sure to check out our other Ubuntu guides to get better acquainted with the software.