In this tutorial, we will be showing you how to set up a Minecraft bedrock server on Ubuntu.
Minecraft comes in two different flavors. One is the Java edition which is purely on PC. The other is the bedrock edition, which runs across multiple consoles, mobile devices, and Windows PCs.
A server for the Java edition of Minecraft on Ubuntu won’t work for those who are using the bedrock edition.
In this guide, we will show you how you can install the official Minecraft Bedrock server on Ubuntu. Having the official server means you will have the best compatibility with the latest versions.
The following steps will by using the terminal to install and set up this server. Don’t worry, as using the terminal is very straightforward. So before proceeding, make sure you open up the terminal on your Ubuntu device.
If you are using a desktop flavor of Ubuntu, open the terminal by pressing CTRL + ALT + T on your keyboard.
Additionally, you will need access to a user with superuser privileges on your system. Alternatively you can use the root user, however, that is unrecommended.
Video
If you prefer a video guide, be sure to check out our embedded video on installing and setting up a Minecraft Bedrock Server below. Of course, if you like our written guides, be sure to continue on reading.
Preparing Ubuntu for your Minecraft Bedrock Server
Before we install the Minecraft bedrock server to the Ubuntu operating system, we need to complete a couple of tasks.
These tasks ensure we have all the packages we need to download and install the server.
1. Our first step is to ensure our package list is up to date. Before installing any packages, it is usually good practice to ensure this is up to date.
To update the package list, you must use the following command in the terminal.
sudo apt updateCopySince we are using “sudo“, you will be prompted to enter the password for your Ubuntu user. Type in your password and press the “ENTER” key to continue.
2. Once the package list has been updated, we can install all the software we need to install and run the Minecraft Bedrock Server on Ubuntu.
To install all the needed software, run the following command within the console.
sudo apt install curl wget unzip jq screen openssl -yCopyIf you are interested, let us quickly run through what we are using each of these packages for
curl– We use CURL to grab an API page fromMinecraft.net. With this page, we can scan it and make sure we are grabbing the latest download link.
This saves time by ensuring the latest version is always downloaded.wget– The wget package is what we will use to download the Minecraft Bedrock server to Ubuntu.unzip– This package is the simplest package we are installing and is what we need to extract the server from the downloaded archive.jq– We use the jq package to unpack the JSON data from the API page we grab using curl. Unpacking this JSON allows us to get the latest download link easily.screen– Screen will make accessing the servers command line easier remotely when we run the server as a service.
This package allows us to create a detached screen where the Bedrock server will run.openssl– The Minecraft Bedrock server requires the OpenSSL library to run.
3. We also need to install an older version of libssl that, at the time of publishing, the Minecraft Bedrock server requires.
We can download this older version straight from the Ubuntu archive to our device using wget, as shown below.
wget http://archive.ubuntu.com/ubuntu/pool/main/o/openssl/libssl1.1_1.1.1f-1ubuntu2_amd64.deb -O libssl1.1.debCopy4. With the “libssl1.1” package downloaded, we need to install the package to our operating system.
Installing the package is as straightforward as running the following command.
sudo dpkg -i libssl1.1.debCopy5. Once the required version of the libssl package has been installed, we can safely delete the original “.deb” file we downloaded previously.
You can use the rm command to remove this file from the Ubuntu operating system.
rm libssl1.1.debCopy6. We can now create a user that we will run the Minecraft bedrock server under. It is an important step as it is typically good practice to help isolate one program from another.
Using the useradd command, we will create a user called “mcserver“. By using the “-m” option we will create a home directory for this user.
sudo useradd -m mcserverCopy7. Next, we can use the usermod command to add our new users group to the current user.
This will allow you to easily access and edit files within the new users home directory.
sudo usermod -a -G mcserver $USERCopy8. As we made changes to our users groups, you will need to log out and log back in to refresh the users privileges.
You can log out of Ubuntu easily by using the following command in the terminal.
logoutCopy9. Our next step is to create a directory where we will be storing the server itself. We will call this directory “minecraft_bedrock” and create it within our new users directory.
Create this directory using the following mkdir command within the terminal.
sudo mkdir -p /home/mcserver/minecraft_bedrockCopy10. You should now have everything you need to install the Minecraft bedrock server on Ubuntu, so we can move on to installing it.
Installing the Minecraft Bedrock Server on Ubuntu
Now that we have everything we need, we can download and install the Minecraft Bedrock server to the Ubuntu operating system.
1. Before you continue, you must agree to the Minecraft End User License Agreement and the Microsoft Privacy Policy.
These are the terms and conditions that you must abide by when using any Minecraft product, including the Bedrock server.
2. We start this guide by grabbing the download URL for the Minecraft Bedrock server.
To retrieve this download URL from the official website, use the following command within the terminal.
DOWNLOAD_URL="$(curl -s https://net-secondary.web.minecraft-services.net/api/v1.0/download/links | jq -r '.result.links[] | select(.downloadType=="serverBedrockLinux") | .downloadUrl')"CopyThis command uses curl to grab the Minecraft Bedrock server API download links page, which is then piped (| pipe symbol) to the jq command. Using the jq tool, we are able to grab a specific element from the returned JSON data, which, in our case, is the download URL for the Minecraft Bedrock server for Linux.
3. Now, we can use the following command to download the Minecraft Bedrock server to our Ubuntu device.
To download this file, we will be using the wget command, followed by the “DOWNLOAD_URL” variable that contains the link to the bedrock server.
sudo wget -U "Mozilla/4.0 (compatible; MSIE 6.0; Windows NT 5.1; BEDROCK-UPDATER)" $DOWNLOAD_URL -O /home/mcserver/minecraft_bedrock/bedrock-server.zipCopyUsing the “-O” option, we are telling wget to save the file as “bedrock-server.zip” within the directory we created earlier.
4. Once the Bedrock server has been downloaded to Ubuntu, we will need to extract the archive.
Extract this archive by using the following unzip command within the terminal
sudo unzip /home/mcserver/minecraft_bedrock/bedrock-server.zip -d /home/mcserver/minecraft_bedrock/Copy5. With the server now extracted, our last installation task is to clean up some of our mess.
All you need to do is use the following command to delete the archive we just extracted.
sudo rm /home/mcserver/minecraft_bedrock/bedrock-server.zipCopy6. Our final task is to make sure our “mcserver” user has ownership over all of these files.
We can achieve this by using the following command.
sudo chown -R mcserver: /home/mcserver/CopyConfiguring your Minecraft Bedrock Server
With the Minecraft Bedrock server now installed on Ubuntu you may want to configure it before starting.
Using the configuration file, you can adjust a variety of settings. This includes setting the seed, game mode, difficulty, and more.
If you want to verify that the server works, skip to the next section.
1. Within the terminal, you will want to run the following command to begin editing the “server.properties” file.
We will be using the nano text editor as it is a fairly simplistic terminal text editor.
sudo nano /home/mcserver/minecraft_bedrock/server.propertiesCopy2. Now, within this file, you will find a ton of options. We will only run through a few of the options available to you.
You can find each of these options by using the search shortcut by pressing CTRL + W, followed by the search phrase, then the ENTER key.
server-name=Dedicated serverWith this option, you can control the name of your server. For example, we could use this to set our server name to “Pimylifeup Ubuntu Bedrock Server“.
gamemode=survivalUsing this option, you can set the game mode your Ubuntu Minecraft Bedrock server will use.
You have three different options that you can use here “survival“, “creative“, or “adventure“.
difficulty=easyYou can also tweak how difficult the world would be. By default, this option is set to easy.
There are four options that you can use here, with those being “peaceful“, “easy“, “normal“, or “hard“.
max-players=10You can also control the maximum number of players on your Bedrock server at any one time.
allow-list=falseThis option allows you to restrict your Ubuntu Bedrock Minecraft server so only allowed users can connect.
A player must be specified within the “allowlist.json” file to connect.
view-distance=32Using this option you can configure how many chunks the player can see in front of them. Of course, increasing the number of chunks will increase the load on your server.
The view distance has a minimum value of 5.
tick-distance=4With this option, you can control how far away a chunk can be from a player and still be ticked. Changing this distance can affect how your Redstone circuits work.
You can set this option to any number between 4 and 12.
player-idle-timeout=30With this option, you can control how long a player can be idle within your Minecraft Bedrock world before being kicked.
If you set this option to 0, players will never be kicked from the server.
level-name=Bedrock levelYou can use the above option to control the name for your level. You can set this name to any string as long as it doesn’t contain a semicolon symbol, or any invalid filename symbol.
level-seed=The final option we will show you here is the level seed. The level seed is what helps control the way the world is generated.
You can set the level seed to any string. If a string isn’t set, the server will generate a random seed when it first starts up.
3. Over the last step, we ran through several options you can use to control your Ubuntu Minecraft Bedrock server.
There are plenty of other options within this file you may want to explore. Most options come with an explanation of how it affects the server.
4. Once you are happy with your changes, you can quit and save by pressing CTRL + X, followed by Y, then ENTER.
Starting up your Minecraft Bedrock Server on Ubuntu
Now that we have installed the Minecraft Bedrock Server to Ubuntu and configured it, we can finally run it.
Starting the server is straightforward and requires a single command once you are in the correct directory.
1. First, let us use the cd command to change into the directory where we extracted the server.
cd /home/mcserver/minecraft_bedrock/Copy2. Now that we are in the correct directory, you can use the following command to start the server.
This command sets the “LD_LIBRARY_PATH” environment variable to the current directory before launching the Minecraft Bedrock server.
sudo LD_LIBRARY_PATH=. ./bedrock_serverCopy3. If you have successfully set up the server on your device, you should see something like the following within the terminal.
This message tells you that the server has started and gives you additional information, such as the ports the server is running on.
Additionally, you can also use the terminal now to control the server. For example, you can use the “op” command to give a player operator status.
[2022-07-01 22:16:32:813 INFO] Starting Server
[2022-07-01 22:16:32:813 INFO] Version 1.19.2.02
[2022-07-01 22:16:32:813 INFO] Session ID XXXXXXXX-XXXX-XXXX-XXXX-XXXXXXXXXXXX
[2022-07-01 22:16:32:813 INFO] Level Name: Bedrock level
[2022-07-01 22:16:32:815 INFO] Game mode: 0 Survival
[2022-07-01 22:16:32:815 INFO] Difficulty: 1 EASY
[2022-07-01 22:16:32:839 INFO] opening worlds/Bedrock level/db
[2022-07-01 22:16:33:225 INFO] IPv4 supported, port: 19132
[2022-07-01 22:16:33:225 INFO] IPv6 supported, port: 19133
[2022-07-01 22:16:33:393 INFO] Server started.
[2022-07-01 22:16:33:420 INFO] IPv4 supported, port: 35034
[2022-07-01 22:16:33:420 INFO] IPv6 supported, port: 35782
[2022-07-01 22:16:33:444 INFO] ================ TELEMETRY MESSAGE ===================
[2022-07-01 22:16:33:444 INFO] Server Telemetry is currently not enabled.
[2022-07-01 22:16:33:444 INFO] Enabling this telemetry helps us improve the game.
[2022-07-01 22:16:33:444 INFO]
[2022-07-01 22:16:33:444 INFO] To enable this feature, add the line 'emit-server-telemetry=true'
[2022-07-01 22:16:33:444 INFO] to the server.properties file in the handheld/src-server directory
[2022-07-01 22:16:33:444 INFO] ======================================================
4. To safely stop the server you should use the following command within the Minecraft Bedrock terminal.
stopCopyAlternatively, you can press CTRL + C while the server is active. However, this may cause an unclean shut down.
Connecting to the Server
While your Ubuntu Minecraft Bedrock server is running, you will be able to connect to it. In the following steps, we will show you a couple of ways to connect to the server.
You may need to port forward if you are trying to connect to this server outside of your home network,. By default, this will be ports 19132 and 19133.
Before proceeding, you may also want to get your IP Address on Ubuntu.
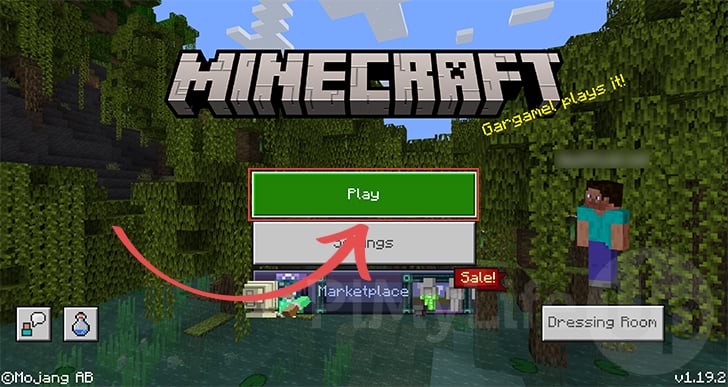
1. When you launch the bedrock edition of Minecraft, you will want to click/tap/select the play button.
The steps will differ if you are trying to connect remotely or locally. Connecting locally is made super easy. However, to connect remotely you will need to provide details about your server.
Connecting on a Local Network to the Bedrock Server
2. To connect to the Minecraft Bedrock server running on Ubuntu from the local network, you will want to change to the “Friends” tab (1.).
Once on the “Friends” tab, your new server should appear under the “LAN Games” heading (2.). Select the server to load into it.
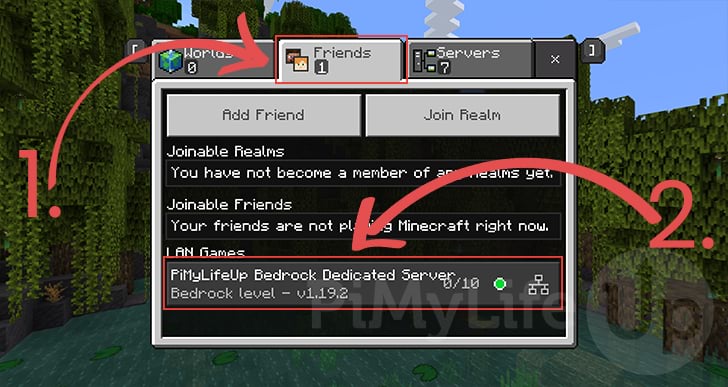
3. Above is all you need to do to connect to a bedrock server while running on the local network.
The connection process should now begin. You can skip down to “Completing your connection“.
Connecting Remotely to your Ubuntu Minecraft Bedrock Server
2. If you want to connect to your Ubuntu Minecraft Bedrock server remotely, you must follow some extra steps.
First, you must change to the “Servers” tab (1.).
Once on the servers tab, scroll down to the bottom of the list and select the “Add Server” button (2.).
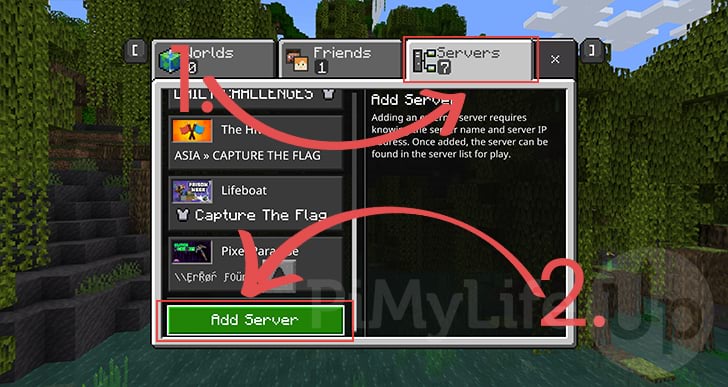
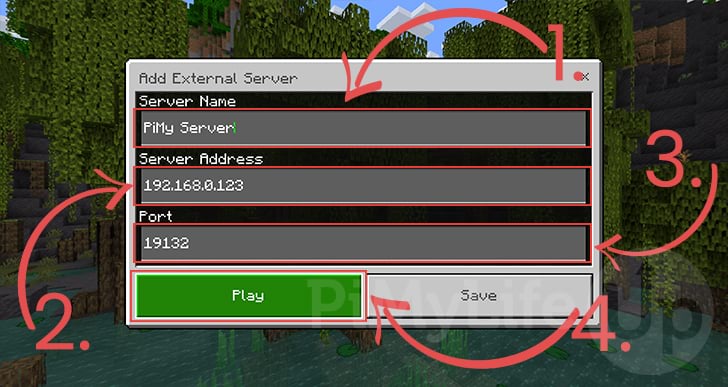
3. To add an external server, you must fill out a few details about your server.
- First, set a name for this server to something you will easily remember (1.).
- Second, you need to provide the IP address of your server (2.).
If you are connecting externally remember this needs to be your network’s external IP address. - Third, you need to set the port your server is using (3.). The default setting should work fine unless you changed it in the “
server.properties” file. - Finally, once you are ready to connect, you will need to click the “
Play” button (4.).
Completing your Connection
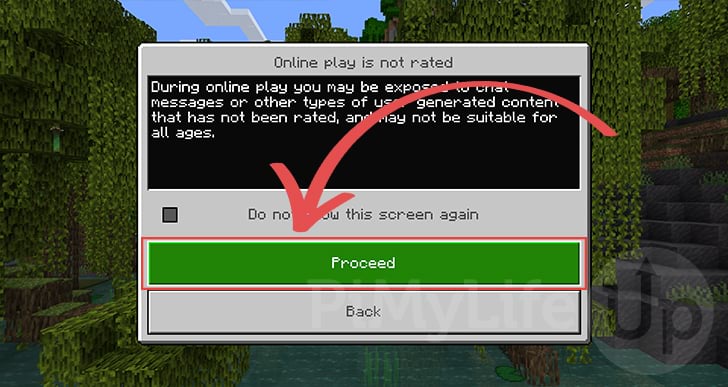
4. If you have never connected to a server before, you will get the following message when you connect.
If you don’t want to see this message again, tick the “Do not show this screen again” checkbox.
You will need to click the “Proceed” button to continue with the connection.
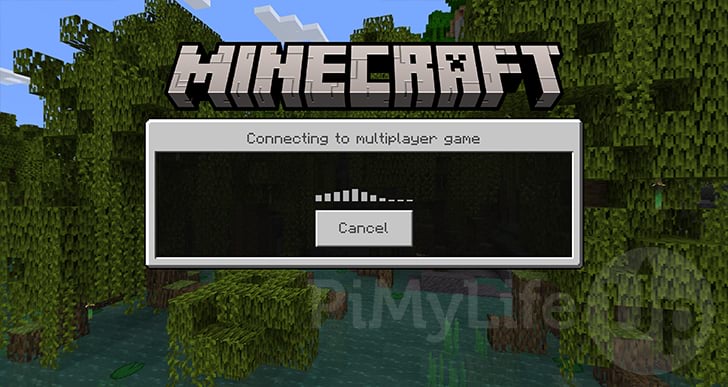
5. Your Minecraft client should now be connecting to your server.
This process can take a few seconds, especially if you are spawning into a new world, as the server has to generate the starting chunks, then send them to you.
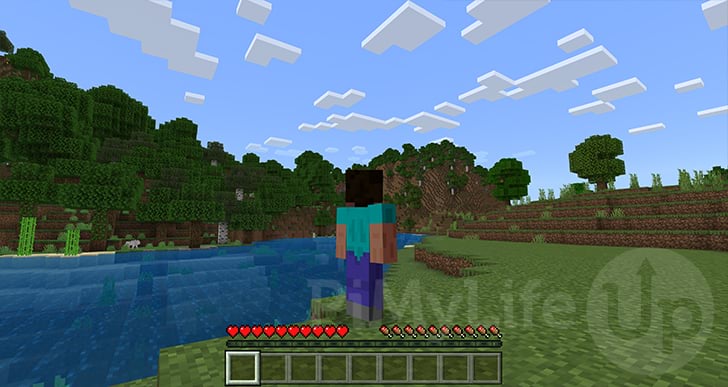
6. Finally, if everything has worked correctly, you should now be connected to your Ubuntu Minecraft Bedrock server.
With any luck, your experience should remain smooth. There are options you can tweak within the “server.properties” file if you are experiencing poor performance from your server.
Start the Minecraft Bedrock Server at Boot on Ubuntu
This section will show you how you can run the Minecraft Bedrock server when Ubuntu boots up.
The easiest way to achieve this is to create a service file. Beyond allowing the server to start at boot, a service will allow you to quickly start, stop and restart the server from the command line.
To cleanly start and stop the server we will also have to write two very short bash scripts.
Writing a Start Script for the Server
1. For our first task, we will write a simple bash script that will start the Minecraft Bedrock server when the system powers on.
We write this as a script so we can do some additional actions like placing the process into a detached screen.
sudo nano /home/mcserver/minecraft_bedrock/start_server.shCopy2. Now, type the following lines into this bash script.
#!/usr/bin/env bash

SERVER_PATH=/home/mcserver/minecraft_bedrock/

/usr/bin/screen -dmS mcbedrock /bin/bash -c "LD_LIBRARY_PATH=$SERVER_PATH ${SERVER_PATH}bedrock_server"
/usr/bin/screen -rD mcbedrock -X multiuser on
/usr/bin/screen -rD mcbedrock -X acladd rootCopy
This script is reasonably straightforward to understand.
We use the “screen” application we installed earlier to launch the Minecraft Bedrock Server on Ubuntu. Doing this allows us to easily access the server command line interface while it is running.
3. Once you have finished adding these lines to the file, save and quit by pressing CTRL + X, then Y, followed by ENTER.
4. With the script created, we should now give it execution privileges using the chmod command.
sudo chmod +x /home/mcserver/minecraft_bedrock/start_server.shCopyWriting a Script to Stop the Bedrock Minecraft Server Safely
1. Our next task is to write a script that will safely stop the Minecraft Bedrock Server on Ubuntu.
If we were to terminate the process, there is a chance you would lose data in the process. This is where we can utilize the screen we create during the server startup script.
Begin writing the script to stop the server by running the following command.
sudo nano /home/mcserver/minecraft_bedrock/stop_server.shCopy2. Now, within this script, you will want to type in the following lines.
#!/usr/bin/env bash

/usr/bin/screen -Rd mcbedrock -X stuff "stop \r"Copy
With this we use the “screen” tool to restore the “mcbedrock” screen created during server start up. It then sends a stop message to the server with the “stop” command before detaching the screen session again.
The advantage of doing this is that we are giving Ubuntu the chance to shut down the Minecraft Bedrock server cleanly.
3. Once you are finished writing the stop script, save and quit out of the file by pressing CTRL + X, then Y, followed by the ENTER key.
4. Now that you have written the stop script, we should give it execution privileges.
You can give the file this permission by running the following command.
sudo chmod +x /home/mcserver/minecraft_bedrock/stop_server.shCopyCorrecting Permissions
1. Before continuing any further we do need to make sure our “mcserver “user owns both of the scripts we just created.
The reason we need to do this is because files tend to inherit their ownership from the user that created them.
Utilize the following command in the terminal to take ownership of all the files within the directory.
sudo chown -R mcserver: /home/mcserver/CopyCreating the Service
1. Let us begin by creating a new service file on our Ubuntu system. We will call this new service “mcbedrock“.
Begin writing this new file by running the following command within the terminal.
sudo nano /etc/systemd/system/mcbedrock.serviceCopy2. Within this file, you must type in the following lines.
[Unit]
Description=Minecraft Bedrock Server
Wants=network-online.target
After=network-online.target

[Service]
Type=forking
User=mcserver
Group=mcserver
ExecStart=/usr/bin/bash /home/mcserver/minecraft_bedrock/start_server.sh
ExecStop=/usr/bin/bash /home/mcserver/minecraft_bedrock/stop_server.sh
WorkingDirectory=/home/mcserver/minecraft_bedrock/
Restart=always
TimeoutStartSec=600

[Install]
WantedBy=multi-user.targetCopy
3. You can save and quit out of this file by pressing CTRL + X, then Y, and finally the ENTER key.
4. With the service created we can now enable it. By enabling a service, systemctl will manage this service and start it when the system boots..
You can enable our Minecraft Bedrock Server service on Ubuntu by running the following command.
sudo systemctl enable mcbedrockCopy5. Even though we just enabled the service, it won’t start the server itself until Ubuntu is restarted.
We can speed up this process by just starting the service now by using the command below.
sudo systemctl start mcbedrockCopyIf everything is working correctly, your server should now be up and running, and you will be able to connect to it.
Controlling your Ubuntu Minecraft Bedrock Server Service
Now that we have created the service let us show you how you can use it to control the Ubuntu Minecraft Bedrock server.
Controlling the server through the service is a straightforward process and revolves around us using the “systemctl” command.
Starting the Ubuntu Minecraft Bedrock Server
You can start the service by running the following command within the terminal. Of course, if the service is already running, then this command won’t do anything.
When starting the service, systemctl will execute the “start_server.sh” script.
sudo systemctl start mcbedrockCopyStopping the Server While it is Running
If your Minecraft Bedrock server is running, you can stop it by using the following command.
This will execute the “stop_server.sh” script we wrote earlier in this guide.
sudo systemctl stop mcbedrockCopyEnabling the Bedrock Server to Start at Boot
When you enable the service, it will allow the service manager to start the service at boot.
sudo systemctl enable mcbedrockCopyDisabling the Minecraft Bedrock Server
You can utilize the following command, if you want to stop the Ubuntu Minecraft Server from starting at boot.
sudo systemctl disable mcbedrockCopyGetting the Status of your Ubuntu Minecraft Bedrock Server
By using the following command you can get the status of the Bedrock service. The status will show you whether the service is currently running
sudo systemctl status mcbedrockCopyAccessing the Ubuntu Minecraft Bedrock Server Command Line
One of the most significant advantages of placing the Minecraft Bedrock Server within a detached “screen” on Ubuntu is that you can access it anytime.
If the service launched the server directly without using “screen“, you wouldn’t be able to access the command line interface easily.
1. To enter the command line interface for the Bedrock server, you will need to use the following command.
This command surfaces our “mcbedrock” screen to the current session.
sudo screen -r mcserver/mcbedrockCopy2. Once you are done interacting with the server, you will need to detach the screen again.
Make sure you press CTRL + A, then CTRL + D to detach the “mcbedrock” screen.
Updating the Minecraft Bedrock Server
Updating the Minecraft Bedrock server on Ubuntu is a fairly straightforward process. However, it requires us to retrace some of our earlier steps.
1. Before updating your server, you need to stop it. If you are using the service, you can stop the Minecraft Bedrock server by running the following command
sudo systemctl stop mcbedrockCopy2. Our first step is to make a copy of our “server.properties” file. This stops you from losing your settings when you extract the new version.
sudo cp /home/mcserver/minecraft_bedrock/server.properties /home/mcserver/server.properties.bkupCopy3. You have to obtain the latest download URL for the Minecraft Bedrock Server before we can continue.
To get this URL use the following command within the terminal.
DOWNLOAD_URL="$(curl -s https://net-secondary.web.minecraft-services.net/api/v1.0/download/links | jq -r '.result.links[] | select(.downloadType=="serverBedrockLinux") | .downloadUrl')"Copy4. With the download URL now stored within a variable, we can use the following command to download the archive.
This archive should contain the latest version of the Minecraft Bedrock server for Ubuntu.
sudo wget -U "Mozilla/4.0 (compatible; MSIE 6.0; Windows NT 5.1; BEDROCK-UPDATER)" $DOWNLOAD_URL -O /home/mcserver/minecraft_bedrock/bedrock-server.zipCopy5. Now that we have downloaded the archive, our next step is to extract it.
When extracting the archive using the following command, unzip will overwrite all files since we are using the "-o” option.
sudo unzip -o /home/mcserver/minecraft_bedrock/bedrock-server.zip -d /home/mcserver/minecraft_bedrock/Copy5. After extracting the server archives contents, we can safely delete the leftover archive.
Use the command below in your terminal to delete the archive.
sudo rm /home/mcserver/minecraft_bedrock/bedrock-server.zipCopy6. Now that we have updated all of the server files, we can use the mv command to move back over our “server.properties” file.
This will ensure that your configuration changes aren’t lost during the upgrade process
sudo mv /home/mcserver/server.properties.bkup /home/mcserver/minecraft_bedrock/server.propertiesCopy7. Let us ensure that unzipping didn’t ruin our users ownership by using the following command. This command will replace ownership of all the files with our “mcserver” user.
sudo chown -R mcserver:mcserver /home/mcserver/Copy8. Your Ubuntu Minecraft Bedrock Server has now been updated. You should now be able to start the server back up safely.
Using our service file, you can start the server back up by using the following command.
sudo systemctl start mcbedrockCopyConclusion
Throughout this tutorial, we have shown you how to install and set up the Minecraft Bedrock server on Ubuntu.
We walked you through several steps of setting up the server, showing you numerous options as well as how to set the server up as a service.
Please comment below if you have questions about running a Minecraft Bedrock server on Ubuntu.
We have numerous other Ubuntu guides if you want to do more with the operating system. We have a wealth of general Linux tutorials available as well.


For anybody who’s interested, I created a script to automatically check the latest published version, compare it to the installed version, and update if necessary. If the installed version doesn’t match the latest then this essentially uses the same commands listed in the above guide’s updating section. I call this daily at 3 AM with a cron job so that my server is always up to date.
Great guide!
Super easy steps to follow for a beginner! 🙂
I sure would like it if you added a part about adding Behavior Packs and Resource Packs to the server.. I’ve been trying to find guides to do this, but it’s way above my head..
Hello having issue with the wget when trying to update the server. Getting error saying missing URL. Have used this guide to update before and did not have this issue. Do you know why this is happening?
Hi Tom,
We made some changes to the tutorial to fix a problem with the original place we were getting the download URL no longer working. This new change requires us to use “jq” to interpret some JSON.
There is a good chance jq is now already installed to your system, and it must not be installed by running the following two commands.
If you continue to run into issues, please let me know the full error you are running into and ill try and work out what exactly is happening.
Kind regards,
Emmet
I’m getting an error on step 3 of the updating the server, and I’ve never had this issue before…
And then when I try to do ‘apt install jq’ I also get errors too:
Hey,
We have made some recent changes to the way the latest version is grabbed that added jq as a dependency for this guide.
You are on the right track with installing now but you missed a crucial step.
With the apt package manager you will typically want to run an update before installing or updating packed. This ensures that its source list is pointing to a mirror that actually exists.
Run the following two commands to install jq then continue with the steps to upgrade to the latest version of the minecraft bedrock server.
Please let me know if you continue to run into issues.
Kind regards,
Emmet
Hello, thanks for writing a decently simple setup tutorial, and especially for the systemd integration. Your guide works well, and can be scripted rather easily.
As for the recent Jun 13 website change again, jq isn’t installed by default on many distributions (as far as I know), so maybe it should be added to the apt install command. On another package management note, is grep still necessary? It doesn’t seem to be used anywhere but in the previous version of the scraping code, so maybe it can be dropped. (And I’m pretty sure it’s installed by default in some POSIX-compliant form nearly anywhere too)
And since grep isn’t used anymore, please update the text too, to something like this for example:
( “This command uses curl to grab the Minecraft Bedrock server download page, which is piped (| pipe symbol) to the grep command, which filters the page for the download URL.” → “This command uses curl to grab the official download links from a computer-friendly text file, which are piped (| pipe symbol) to the jq command for extracting the latest normal download URL”)
Hi Andrin,
Thank you for pointing that out. I have removed the installation of grep from the install command and replaced it with jq to ensure that is now installed. I have also improved the explanation to reflect the recent changes from using grep to jq (And the different URL we now utilize).
You are correct that probably don’t actually need to bother installing grep, but I tend to like to include it as someone always ends up using some weird distribution that for some reason has it removed.
Always appreciate the feedback!
Kind regards,
Emmet
For those of us who successfully followed this and got this setup, is there a part two for creating an automatic Ubuntu / Bedrock version check/backup/update/restore? That would be great!
This works perfect and thank you. This is the first server I have ever put together and it was flawless. I want to add plugins and others. When I check out those forums there are terms like paper servers and other things that I don’t fully understand. Can you tell me what kind of server this is and maybe where I can find compatible plug-in’s. Thank you
Hi Christopher,
Things like Paper, Spigot and Forge are all alternative third-party server software for the Java edition of Minecraft. They offer a couple of things, such as improved performance, the ability to use custom plugins etc, basically things that the official server software does not include. I can definitely look into doing a better guide on using something like PaperMC to set up a Java edition server with mods if there is interested in it.
This particular guide is for the Bedrock edition of Minecraft. This is the version used on game consoles, phones, and is also available on PC. We are using the official bedrock server so it isn’t the most moddable server, but you can install behaviour and resource packs with a bit of tinkering. If you do need assistance on this, I can look into expanding this tutorial a bit to cover it. It seems like the most commonly used website for Minecraft Bedrock addons at this point is
https://mcpedl.com/.Hopefully this helps you out a little.
Kind regards,
Emmet
Big thanks for the reply. I really appreciate it. The server is running great. Mine is on a Ubuntu machine and running in a terminal. Thank you so much for this and I personally would be very interested in anything you want to expand on.
Actually, a video or article on how to setup pterodactyl and migrate this bedrock server to that.
service to start server was failing, solution was to replace /usr/bin/bash with just /bin/bash for my distro
Great work, it was super easy to install and update the bedrock server just fo my family. Maybe you should add a further step to backup the permissions.json and smiliar files prior an update.
Awesome guide. Worked great last week.
It looks like there have been some changes after BDS 1.21.30.03:
The download URL has changed. One solution is to use a “more fuzzy” grep search.
old:
https://minecraft.azureedge.net/new:
https://www.minecraft.net/bedrockdedicatedserver/The new server URL is “
awaiting response” from the wget command. One solution is to pass the browser string in the user switch of the wget command.The following two changes to the “
Updating the Minecraft Bedrock Server” section worked for me:Change Step 3:
Change Step 4
Hi Rexcellent,
Thank you very much for your contribution! It is very much appreciated by us when someone points out an issue, let alone provides the fix for it as well.
I have verified it all works with the new method and updated the guide accordingly.
Kind regards,
Emmet