In this tutorial, we will show you how to set a static IP address on Ubuntu using Netplan.
Netplan is a network configuration tool designed by Canonical for the Ubuntu operating system.
This tool allows you to configure the network on Ubuntu easily and set things such as a static IP address with a couple of lines of code.
While the best way to give your Ubuntu device a static IP address is to do it through your router’s DHCP server, this is not always possible. You may not have access to your router, or your router’s interface, for some reason, doesn’t offer the option to set a static IP address.
The workaround is to use Netplan to set a static IP address on Ubuntu itself. This way, when your Ubuntu device contacts your router, it will ask for that particular IP address. This is never guaranteed to work, especially if the DHCP server has given or reserved that IP for another device.
Over the following steps, we will show you how easy it is to set a static IP address using Netplan and the Ubuntu terminal.
Configuring Ubuntu to Use A static IP Address using Netplan
One of the best things about Ubuntu using Netplan is that it makes setting a static IP address super straightforward.
These following steps will be ran within the terminal. The following steps will be run within the terminal. If you use a desktop flavor of Ubuntu, you can open the terminal by pressing CTRL + ALT + T.
Finding the Right Config File
1. With the terminal open, you will first want to list the Netplan configuration files. Not every distribution has the same configuration files, so we must find the one you need to edit.
You can list the Netplan configuration files using the ls command on your Ubuntu system.
ls -l /etc/netplanCopy2. After running the command above, you should end up finding one of the following files. The steps should remain roughly the same no matter which file you are starting off with
01-network-manager-all.yaml01-netcfg.yaml50-cloud-init.yaml
Our example shows that our Ubuntu installation has a config file named “01-netcfg.yaml“.
total 4
-rw-r--r-- 1 root root 104 Apr 19 2023 01-netcfg.yaml
Editing the Netplan Config on Ubuntu to set a Static IP Address
3. Once you know the name of your Netplan config file, you will want to open it in your favourite text editor.
Run the following command to begin editing this configuration file using the nano text editor. Ensure that you replace “<CONFIGFILENAME>” with the file name you found.
sudo nano /etc/netplan/<CONFIGFILENAME>For example, if your config file is called “01-netcfg.yaml” you would use the command below.
sudo nano /etc/netplan/01-netcfg.yamlCopy4. On Ubuntu Server, you should end up with a configuration file that looks a little like what we have shown below.
The renderer is set to “networked” and a network adapter has been defined, which in our case is our ethernet connect “enp0s3“.
We will be adjusting this ethernet connection to request a static IP address.
network:
  version: 2
  renderer: networkd
  ethernets:
    enp0s3:
      dhcp4: yesCopy
Configuring Netplan
5. Let us break down the changes we must make to the Netplan config to enable a static IP address on Ubuntu.
In this example we will be making changes to our “enp0s3” ethernet connection. The following changes are applied immediately below the “enp0s3” heading. Additionally, the indentation is super important.
a. Let us start with the “dhcp4” option. By default, this option is set to “yes” meaning your network connection will fetch its IP address from the router.
You must set this option to “no” to turn off this functionality.
dhcp4: noCopyb. With the DHCP4 server now disabled, we can now use Netplan’s config to specify the static IP address you want assigned to your Ubuntu device.
Add the following line immediately after the previous line. Ensure you replace “<IPADDRESS>” with the static IP you want assigned to your device. For example, you could use “192.168.0.123“.
addressses: [<IPADDRESS>/24]Copyc. Since we turned off the DHCP4 response, we must now specify some extra options so that Ubuntu still knows how to connect to your network.
The next thing you must do is specify the IP address of your gateway. The below line should work for most basic setups, but you may need to adjust this depending on your network setup.
gateway4: 192.168.1.1Copyd. Finally, we must also specify the name of the servers for Ubuntu to use. Typically, this value is also passed to your device by your router.
Here, you will want to replace “<DNSIP>” with the IP of your nameserver provider. You can specify multiple IPs; just separate them with a comma (,). For example, if you were using Cloudflare’s DNS, you would use the value “1.1.1.1,1.0.0.1“
      nameservers:
        addresses: [<DNSIP>]Copy
Example of a Static IP Config using Netplan on Ubuntu
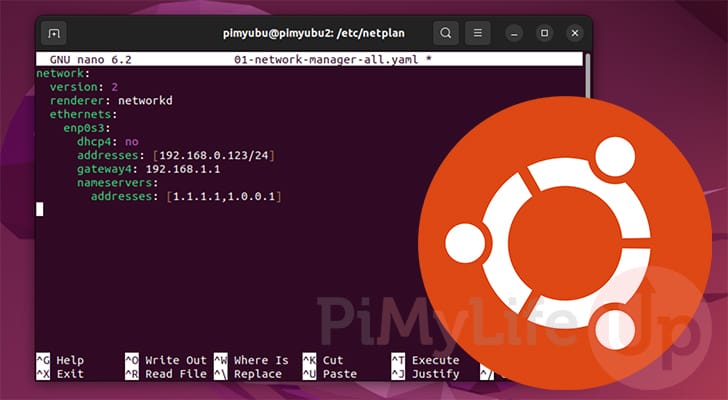
6. If you have configured your Ubuntu device to use a static IP address using Netplan, your configuration file should look somewhat similar to what we have shown below.
network:
  version: 2
  renderer: networkd
  ethernets:
    enp0s3:
      dhcp4: no
      addresses: [192.168.0.123/24]
      gateway4: 192.168.1.1
      nameservers:
        addresses: [1.1.1.1,1.0.0.1]Copy
Saving your Changes
7. After making your changes, you will want to save and quit by pressing CTRL + X, followed by Y, and then ENTER.
Applying Your Static IP using Netplan on Ubuntu
8. Even though we have made the changes to the Netplan config files to set a static IP address on Ubuntu, the changes still need to be applied to the system.
Luckily, applying configuration changes with Netplan is as simple as using the following command within the terminal.
sudo netplan applyCopy9. As the “netplan apply” command causes the network stack to reset, you should hopefully now have the requested static IP address.
If, for some reason, your IP address didn’t change, you can attempt to restart your Ubuntu device. However, be warned that if the router refuses to give you the IP, you may lose network access until you revert the configuration changes.
sudo rebootCopyConclusion
Hopefully, at this stage, you will now have a good understanding of how to set a static IP address on Ubuntu by using Netplan.
Netplan is a neat tool Ubuntu uses to configure its network interfaces easily. As you have seen in this tutorial, you can add a static IP with just a few configuration lines.
Please feel free to leave a comment below if you have any questions about setting a static IP using Netplan.
If you found this tutorial helpful, we highly recommend checking out our many other Ubuntu tutorials.