In this tutorial, I will go through all the steps to set up the Webmin software package for the Raspberry Pi operating system.
Webmin is excellent if you wish to have a web-based interface for system administration. It removes the need to edit configuration files manually and makes administration a lot easier.
You can easily set up, modify, and control applications such as an Apache HTTP server, SQL, Postfix, DHCP, PHP, and many other software packages. These require a bit of setting up, so check out the Webmin wiki page once you have it installed.
There are modules that you can use to extend Webmin’s functionality. For example, Virtualmin is a module that manages multiple virtual hosts through a single interface. Think of software like Cpanel or Plesk.
The tutorial goes through all the basics of setting up Webmin. Due to the sheer number of things you can configure, I recommend that you look at the Webmin wiki after installation.
Equipment List
Below is all the equipment that I used for this Raspberry Pi Webmin tutorial.
Recommended
Optional
- Raspberry Pi Case Amazon
This tutorial was last tested on a Raspberry Pi 5 running the Bookworm version of Raspberry Pi OS.
Installing Webmin
Before we begin, I recommend using the latest version of the Raspberry Pi operating system. These instructions will likely also work on other operating systems, but I cannot guarantee it.
1. First, make sure Raspberry Pi OS is up to date by running the following commands.
sudo apt update
sudo apt upgradeCopy
2. The easiest way to install Webmin is to use their setup script. You can view the script on GitHub if you want to check it before running it.
To download the script, use the following curl command.
curl -o webmin-setup-repos.sh https://raw.githubusercontent.com/webmin/webmin/master/webmin-setup-repos.shCopy3. Run the script by running the following command.
sudo sh webmin-setup-repos.shCopyRespond y to the prompt asking if you want to “Setup Webmin Repository“.
The script will set up the Webmin repository and install the required GPG keys. Having both of these will allow for easy installation and updating on your system.
4. Now we need to install Webmin and any required packages. Using the --install-recommends flag will ask the operating system to install any recommended packages along with Webmin.
sudo apt install webmin --install-recommendsCopyAccessing Webmin
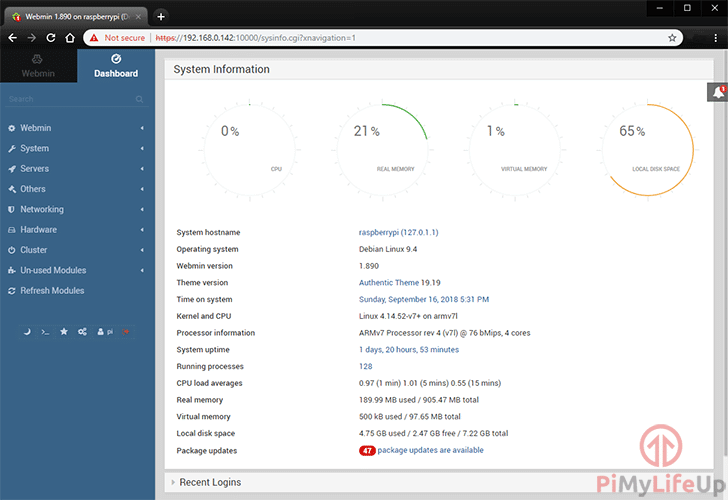
5. You should now be able to access Webmin by going to the Pi’s IP address followed by the port 10000.
You can get the Raspberry Pi’s IP address by using the hostname command.
hostname -ICopyBelow is an example of my address to access Webmin.
https://192.168.0.142:100006. You will receive a warning because the SSL will be invalid. It is safe to ignore this as we can’t receive a valid SSL certificate on an IP address.
7. The username and password will be the same login details you use to login to the Raspberry Pi. For example, previously the default username was pi, and the password was raspberry.
8. You can now move on to configuring any options you wish to alter.
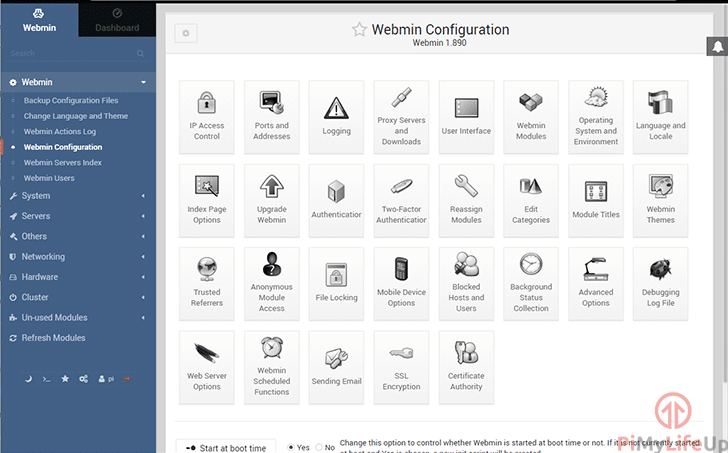
Configuring Webmin
There are a ton of options that you can configure in Webmin. These options include changing your SSL encryption, adding modules, logging, managing users, managing software packages and more.
Since there are so many options to configure, I recommended checking out the Webmin wiki for more information.
I recommend that you secure your admin account by changing the password and setting up two-factor authentication at a minimum.
Conclusion
I hope you have been able to install Webmin on the Raspberry Pi without any issues.
I will be looking at further tutorials on some cool modules you can use with Webmin, such as Virtualmin. In the meantime, we have plenty of other Raspberry Pi projects that I recommend you check out.
If you have feedback regarding this Raspberry Pi Webmin tutorial, please leave us a comment below.


Hi E,
Please make sure that you have run step 2 of the “Installing Webmin” section.
That error indicates that you are missing required packages that we install in that step.
Cheers,
Emmet
You might want to update the instructions to use the Webmin 1.994 released vs. Webmin 1.991 released.
Thanks David, We have updated the tutorial with the new version!
To fix dependency problems,try to use the following command
sudo apt install -f
Thanks for these well documented instructions.
Step 2 needs a slight tweak I think. It has the final package as ‘shared-mime-inf’ should be ‘shared-mime-info’.
I also note that the latest version of webmin is 991 according to the link you provided.
Hi Jonathan,
Thank you for pointing out that mistake, I have now corrected that step so the correct package is referenced.
I have also updated the tutorial to point to the latest version.
Cheers,
Emmet
Hi
Thank you for your guide, not sure if I did something wrong, or if dependencies have change since you wrote this.
The latest version of webmin is 1.990, and the install failed –
Sorted by running “sudo apt install shared-mime-info -y”
Hi Paul,
Thank you for leaving a comment about that issue and your solution.
I have updated our webmin link to point to the latest available version.
Additionally I have added the missing package to the list we install within the tutorial.
Cheers,
Emmet
You may need to install “unzip”.
apt-get install unzip
Hello,
Nice article I have used Webmin with Virtualmin for years. After reading your article i am going to try and give it shot it would be great if virtualmin works on the RPi4 platform. Thanks for your work on this.
Happy New Year! to everyone.
Thank you very much – It works brilliantly!
Thank you. I am just getting into the Raspberry PI and back into using ‘Unix’ style OS. This tutorial was very helpful.
Thanks so much for this simple tut man!… trying to save some money on hosting fees by running my own server!
Thanks for the quick and easy guide! Chrome no longer allows you to skip the SSL /unsafe page warning, so some Webmin config is required. Changing ssl=1 to ssl=0 in /etc/webmin/miniserv.conf does the job! I got some help from https://stackoverflow.com/a/48353997/7723476
Ive been using webmin long before I got my PI so it was the first software I installed on the PI. I recommend installing it first. You wont need anything else. The chron editor is the best. And it can install most software on its own from the interface.