In this tutorial, we will show you how to interact with the ChatGPT API on your Raspberry Pi.
ChatGPT is an impressive AI chatbot developed by OpenAI that can respond to prompts with detailed and readable responses.
This AI has been trained on a considerable amount of data that allows it to be knowledgeable in a variety of fields and can even write code for you when prompted.
While the Raspberry Pi itself cannot run the ChatGPT model, it can interact with an API that allows us to query the AI running in the cloud.
In the following sections, we will show you how to write a Python script that interacts with ChatGPT from your Raspberry Pi.
Please note that the ChatGPT API is not a free service and does have a cost that you can see by visiting OpenAI’s website and looking at “gpt-5.4 mini“.
When you first create an account, OpenAI will often give you some trial credits to use with the service. However, some restrictions are still applied to your account until you set up billing. For example, with ChatGPT, you will be limited to only 3 messages per minute till you set up billing.
Equipment
Below is a list of the equipment we used to access ChatGPT from our Raspberry Pi.
Recommended
Optional
We last tested this tutorial on a Raspberry Pi 400 using the latest version of Raspberry Pi OS Bookworm 64-bit.
Video Tutorial
The video below will take you through all the steps to getting ChatGPT AI set up on your Raspberry Pi. We take you through installing the required packages, signing up for OpenAI, and writing a basic script. Alternatively, you can find the full written tutorial immediately below the video.
Getting an API Key for OpenAI
We must first generate an API key to use the ChatGPT AI from our Raspberry Pi. This key allows us to interact with the API from our Pi.
1. Before being able to get an API key for OpenAI, you will need to sign up for an account.
You can create an OpenAI account by going to their platform’s signup page. If you already have an account, then simply log in to continue.
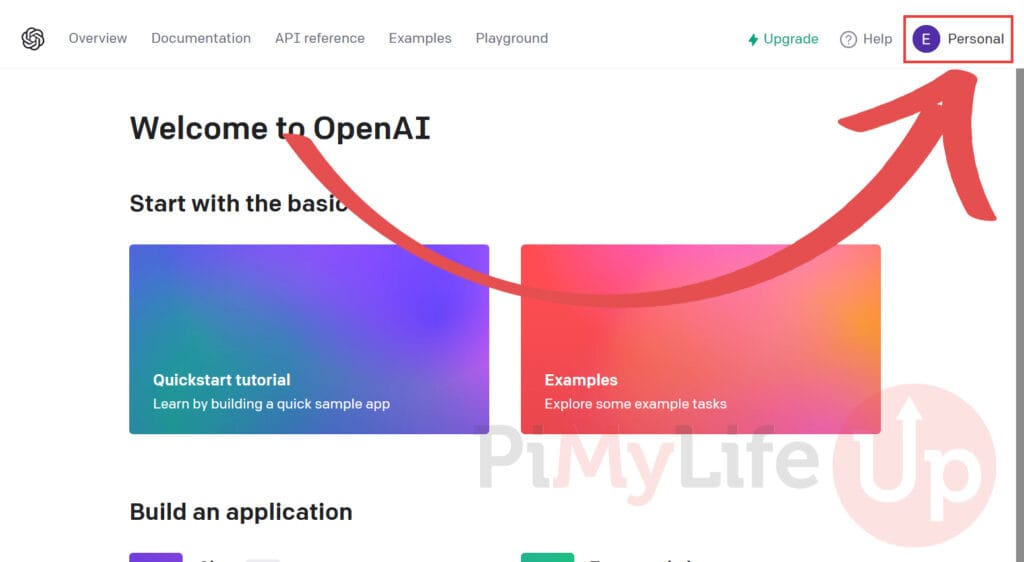
2. Once logged into OpenAI, click your profile in the top-right corner to open up a pop-up menu.
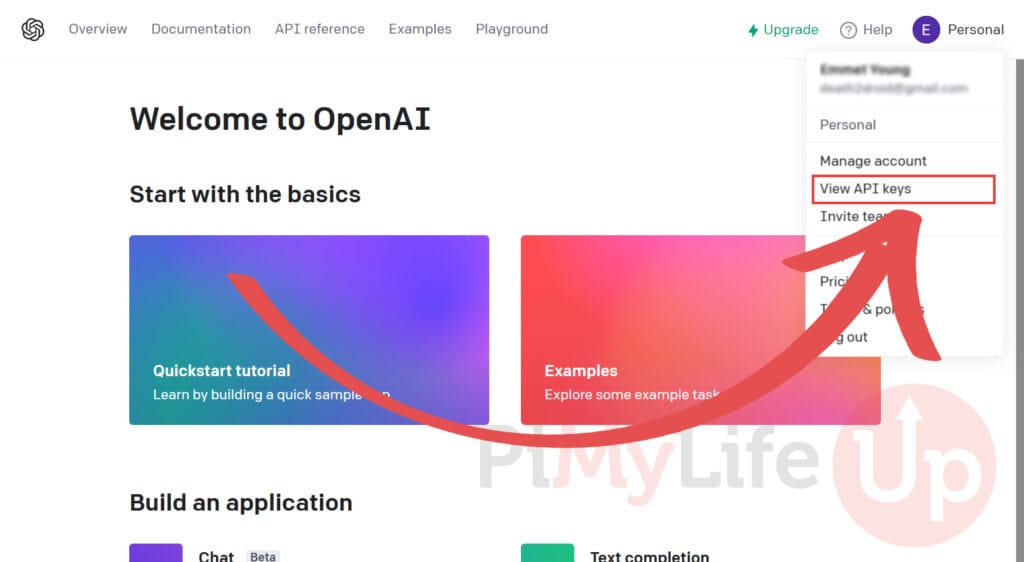
3. Within the pop-up menu, you will want to find the “View API keys” option and click it.
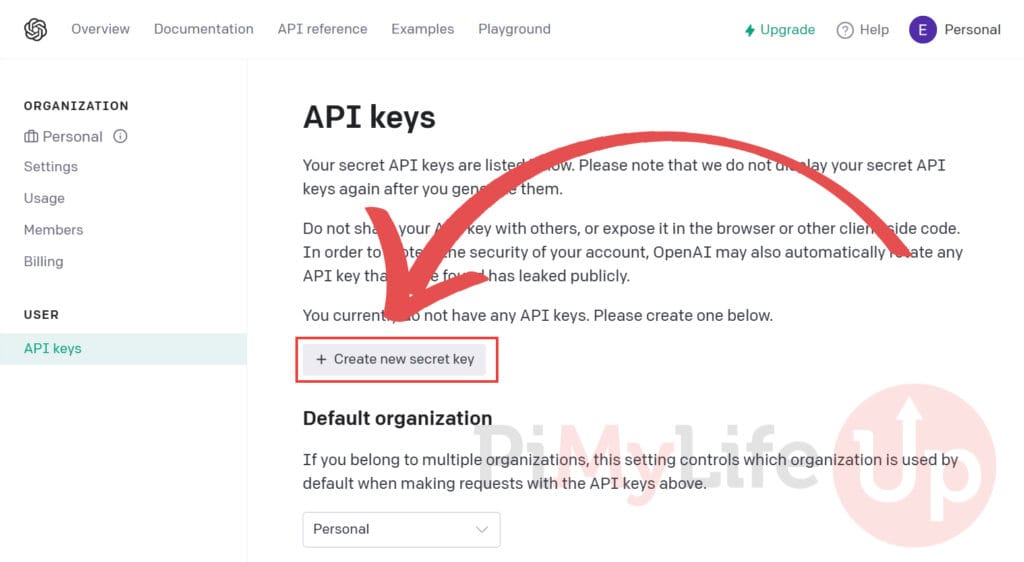
4. Now that we are on the API keys page, we will need to generate a new secret key. We will use this secret key for your Raspberry Pi to interact with the ChatGPT API.
Click the “Create new secret key” button to generate the API key.
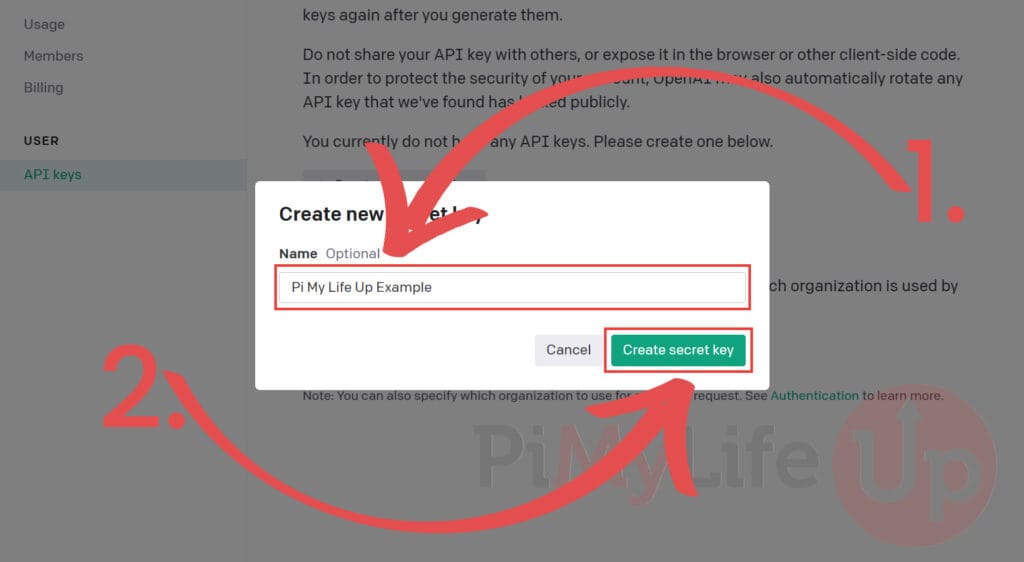
5. Before the key is generated, you will get a chance to give a name for your new key (1.). You can ignore this if you like.
Once you are happy, click the “Create secret key” button (2.) to proceed.
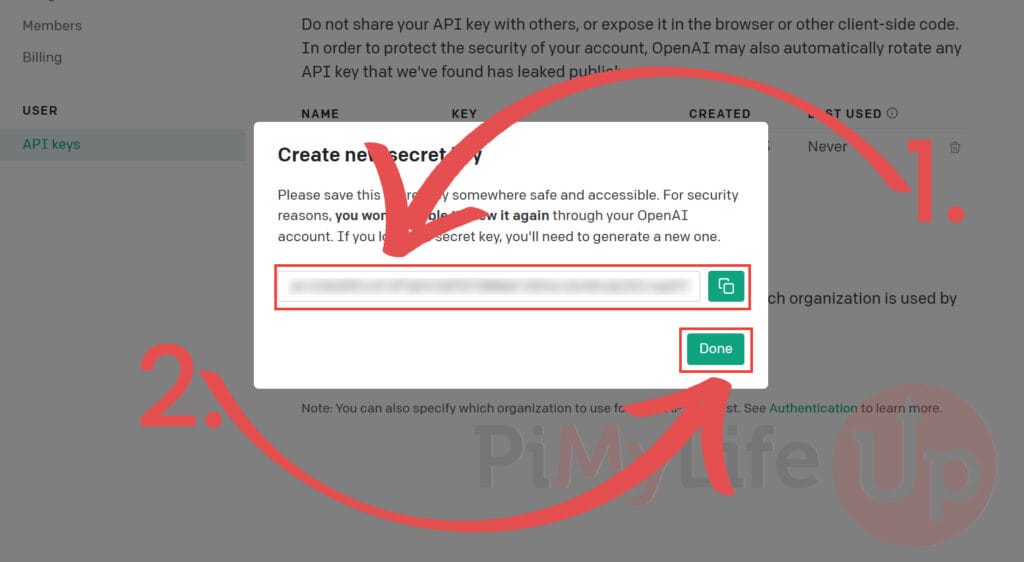
6. You should now have access to the secret key (1.) you require to interact with OpenAI. Copy this key down, as it will only be shown once.
Once you have copied the key, click the “Done” (2.) button.
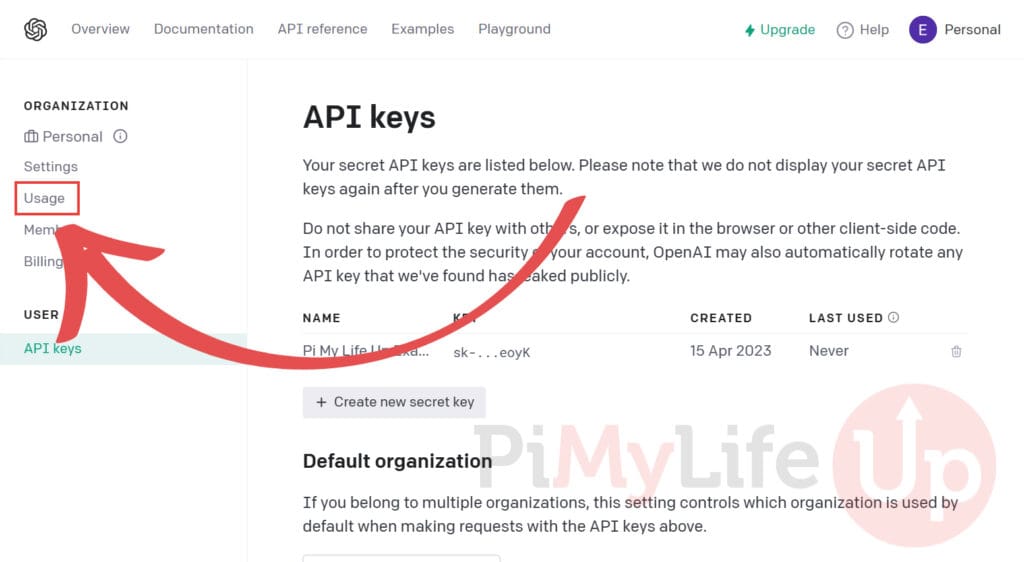
7. With the key generated, you may want to know where to track your usage.
On the left hand of this screen, you should see a sidebar where this is the option “Usage“. Click this option to change to the usage screen.
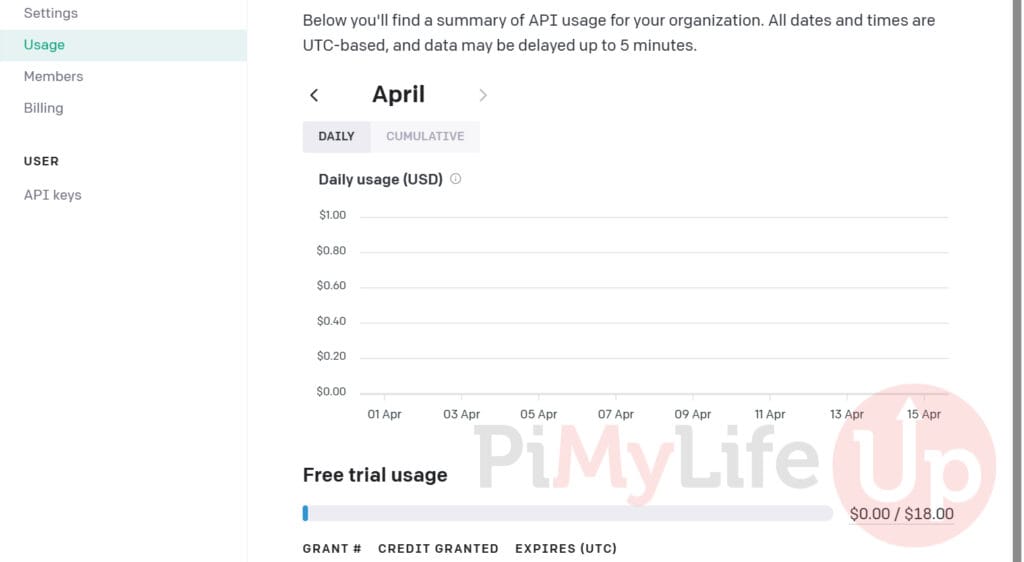
8. Below, you can find out how much you have utilized OpenAI from your Raspberry Pi. This screen allows you to see how many credits you are consuming quickly.
Using Python on the Raspberry Pi to Interact with ChatGPT
To interact with ChatGPT from our Raspberry Pi, we will utilize the OpenAI Python module. This module makes interacting with OpenAI and its various models a simple process.
This script we are writing will take user input, send it to ChatGPT, and then print its response. Hopefully, it will give you a good understanding of how you could implement it into your Pi projects.
Preparing your Raspberry Pi to use ChatGPT
1. Before we begin, we should ensure that our Raspberry Pi is current by grabbing the latest package list and upgrading any out-of-date packages.
You can achieve both of these tasks by using the following command.
sudo apt update
sudo apt upgradeCopy
2. With our Raspberry Pi now updated we need to install any packages that we require.
The two packages we are installing at this point are Python 3 and its package manager called pip. We must use pip to install the OpenAI package in the next step.
sudo apt install python3 python3-pip python3-venvCopySetting up the Python Virtual Environment for OpenAI on the Raspberry Pi
3. Due to changes to Raspberry Pi OS, we must set up a Python virtual environment to install the OpenAI Python library.
To do this let us create a directory where we will write our ChatGPT script.
mkdir ~/openaiCopy4. After creating the directory, we must now change into it by using the command below.
cd ~/openaiCopy5. Once we are in the correct place, we must use Python to generate the Python virtual environment.
This environment is where we can install additional Python packages without the operating system kicking up a fuss.
python -m venv envCopy6. After generating the virtual environment, we must tell the terminal that we want to utilize it. You will need to run this command every time you want to use your ChatGPT script.
We can utilize the virtual environment by using the source command as shown below.
source env/bin/activateCopy7. Our next step is to use pip to install the OpenAI Python package to our virtual environment.
This Python package will allow us to interact with the OpenAI API from our Raspberry Pi and in turn, interact with ChatGPT.
Installing this package is as straightforward as running the following command within the terminal.
python3 -m pip install openaiCopyBeginning Writing our ChatGPT Python Script on the Raspberry Pi
8. To begin writing our Python script, we will run the following command within the terminal.
This command will launch the nano text editor and start writing to a file named “chatgpt.py“.
nano chatgpt.pyCopyFor our guide, we will use the nano text editor to write our code from the command line. However, if you use a desktop flavour of Raspberry Pi OS, you may want to use a GUI code editor like Thorny.
Writing our Simple ChatGPT Script
a. The first thing we need to do in our Raspberry Pi’s ChatGPT Python script is import the “openai” Python library.
This library will allow us to easily send requests to the OpenAI API with a few short lines of code.
from openai import OpenAICopyb. With the OpenAI library now imported, we need to instantiate the library. During the instantiation we must pass in the API key in which we will use to talk with the OpenAI API from our Raspberry Pi.
With the line below we will create a copy of the OpenAI object and store it in a variable called “client“. We then pass in the API key in to this function.
Ensure you replace the word “SECRETKEY” with the key you got earlier in this guide but keep it wrapped in the single quotes (' ') as we have done in the example.
client = OpenAI(
    api_key = 'SECRETKEY'
)Copy
c. The ChatGPT documentation specifies that you must always start with a message that tells the AI how you want the assistant to behave.
The “role” for this message must be “system“, and we must specify the message within the “content” variable. In our example, we will tell the AI that it is an “helpful assistant”.
messages = [
    {
        "role": "system",
        "content": "You are a helpful assistant"
    }
]Copy
d. At this point, we will create an infinite loop so that after every message we send, we will get the chance to respond to ChatGPT’s response.
Creating an infinite loop is as simple as using a while loop with the value of “True“. Remember that as we are using Python the following lines will all need to be indented to remain within the loop.
while True:Copye. At the start of every loop, we need the script to prompt for a response from the user. We can do this in Python using its “input()” function.
The script will wait for you to press ENTER before continuing allowing you to type in the message you want to ask ChatGPT.
message = input("You: ")Copyf. Once we have received input from the user, we must append our new message onto the “messages” list we created earlier. We continue to append to this list on every loop so that ChatGPT can analyze the whole conversation and give it context.
However, this time the “role” will be set to “user“, and the “content” variable will be set to the message we got from the user.
    messages.append(
        {
            "role": "user",
            "content": message
        },
    )Copy
g. Finally, we can now put OpenAI to use and send a message from our Raspberry Pi to the ChatGPT AI. We will need to use the “client.chat.completions.create()” function to achieve this.
For this function, we must pass in two variables that we will quickly explain now.
model– We set the “model” variable to “gpt-5.4-mini“. This model is the latest version of ChatGPT available to us and is the same model that the OpenAI web interface utilizes.messages– Here, we pass in the list that we populated in the previous step. ChatGPT will analyze the messages within this list to create a response that we can output to the user.
The response from ChatGPT will be stored in our “chat” variable.
    chat = client.chat.completions.create(
        messages=messages,
        model="gpt-5.4-mini"
    )Copy
h. We now need to grab the reply from the response data from ChatGPT and store it into a variable where we can easily reference it.
After setting the “reply” variable to the message object ChatGPT sent us, we then use the “print()” function to output the content of the reply.
    reply = chat.choices[0].message

    print("Assistant: ", reply.content)Copy
i. Finally, we append the reply to the “messages” list so that ChatGPT can reference it for your next response.
messages.append(reply)CopyFinal Code
9. The final version of your code should look like what we have shown below. Our script below shows that utilising ChatGPT from your Raspberry Pi is effortless.
You could easily extend this code to fit into your own projects and take input from different sources.
from openai import OpenAI

client = OpenAI(
    api_key = "SECRETKEY"
)

messages = [
    {
        "role": "system",
        "content": "You are a helpful assistant"
    }
]

while True:
    message = input("You: ")

    messages.append(
        {
            "role": "user",
            "content": message
        },
    )

    chat = client.chat.completions.create(
        messages=messages,
        model="gpt-5.4-mini"
    )

    reply = chat.choices[0].message

    print("Assistant: ", reply.content)

    messages.append(reply)Copy
10. When you have finished writing your script, you can save and quit by pressing CTRL + X, followed by Y, then ENTER.
Testing your ChatGPT Python Code on the Raspberry Pi
11. Now that we have written the script, we can use it to start interacting with the ChatGPT AI from our Raspberry Pi.
To run the script, you must run the following command in your terminal.
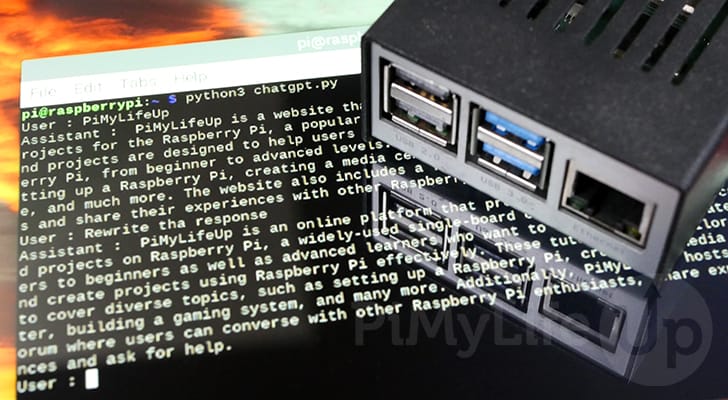
python3 chatgpt.pyCopy12. Upon loading up the script, you will be prompted for your input. For our example, we will send a simple question with “What is PiMyLifeUp?”.
User: What is PiMyLifeUp?Copy13. Below, you can see that ChatGPT read the message our Raspberry Pi sent and then sent us the response below based on our message.
Assistant: PiMyLifeUp is a website that provides tutorials and resources for Raspberry Pi projects and programming. It aims to help beginners and enthusiasts to learn how to use Raspberry Pi to its full potential in various applications, such as home automation, gaming, and media centers. It also covers topics like Python programming, Linux, and electronics.Copy14. You can then ask another question, such as asking ChatGPT to rewrite the previous response.
User: Rewrite that response.Copy15. Below, you can see how ChatGPT remembered its response and then rewrote it differently.
Assistant: PiMyLifeUp is a comprehensive online platform that specializes in offering guidance and materials about Raspberry Pi projects and programming. The website targets both amateur and experienced enthusiasts to help them leverage the full capabilities of Raspberry Pi in several applications ranging from home automation, gaming, to media centers. PiMyLifeUp provides extensive coverage on various subjects including Python programming, Linux, and electronics as they relate to Raspberry Pi.CopyConclusion
Hopefully, by this point, you understand how to use ChatGPT on your Raspberry Pi.
While we cannot run ChatGPT directly on our Pi, the OpenAI team provides an affordable API we can use instead.
Please comment below if you have issues communicating with the ChatGPT AI.
Check out our many other Raspberry Pi projects and Python tutorials to learn more.


2 typos in the code, somewhat frustrating.
There should be single quotes around the secret key, and the variable to assign the key to is api_key, not my_api_key.
Indentation is another problem, the ‘copy’ does not include that, but I will assume anyone writing python will know how to indent.
Hi Matthew,
Apologies for the typos and the frustrations that produced. While I had corrected them in the final code block I had forgotten to go back through the steps themselves that explain the code.
Also thank you for making it known about the problem with the copy functionality. I rewrote how it works last night so hopefully it will now copy the code exactly as it is written.
Cheers,
Emmet
Thanks for your response, I believe I made the corrections but now I get the following message:
File “/home/bills/chatgpt.py”, line 3, in
openai.api_key = sk-cuoxxxxxxxxxxxxxxxxxxxxxxxxxxxxxxxxxxxx
NameError: name ‘sk’ is not defined
I x’d out the full key.
Thanks for your help.
Hi Bill,
Make sure that you keep your key wrapped in single (
' ') or double quotes (" ") as it needs to be defined as a string. For example, it should be the following:Cheers,
Emmet
Followed the instructions and when I run the script I get this:
python3 chatgpt.py
File “/home/bills/chatgpt.py”, line 5
message = input(“You: “)
^
IndentationError: expected an indented block
What do I need to do to correct this?
Thanks
Hi Bill,
Sorry to see that you have ran into an issue.
With Python indentation is incredibly important as that what helps the interpreter determine when code belongs to that particular block.
To correct this, you just need to make sure you indent by at least one space or tab. I personally recommend that for every block you indent by 4 spaces.
I wrote a guide on Python that explains what indentation means for Python a couple of years ago that is worth checking out if you need a better explanation.
Please let me know if you need any extra assistance.
Cheers,
Emmet