In this tutorial, we will be showing you how to stream TV from your Raspberry Pi using Tvheadend and a USB Digital TV Tuner.
Tvheadend is a popular open-source TV streaming and recording server that can run on a Raspberry Pi.
The Tvheadhend software has a wide range of support for various input sources allowing it to function with most TV tuners.
Using this software, you can use your Raspberry Pi to record and stream live tv to various sources.
You can even watch the TV streams provided by the Tvheadend software using the Kodi media center or the VLC media player.
Equipment
For this tutorial on setting up the Tvheadend software on the Raspberry Pi, we used the following equipment.
Recommended
- Raspberry Pi Amazon
- Micro SD Card Amazon (8GB+ Recommended)
- Ethernet Cable Amazon or Wi-Fi Amazon
- Power Supply Amazon
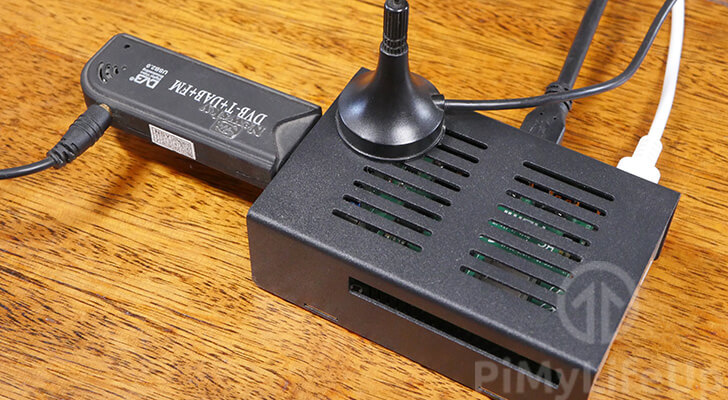
- Digital TV USB Dongle Amazon
Optional
Installing TVheadend on the Raspberry Pi
1. Before we get started with installing the Tvheadend software on our Raspberry Pi, we must first ensure all packages are up to date.
To do this, you will need to run the following two commands within the terminal.
sudo apt update
sudo apt upgrade
2. With the package list up to date, we can go ahead and install the Tvheadend software.
Luckily for us, this process is relatively simple as we can install Tvheadend directly from the Raspbian repository.
Run the command below on your Raspberry Pi to install Tvheadend.
sudo apt install tvheadend3. During the installation process of Tvheadend, you will be asked to enter some additional details.
The first screen will ask you to enter a username for the Tvheadend web interface. For our tutorial, we will be using the username “pimylifeup“.
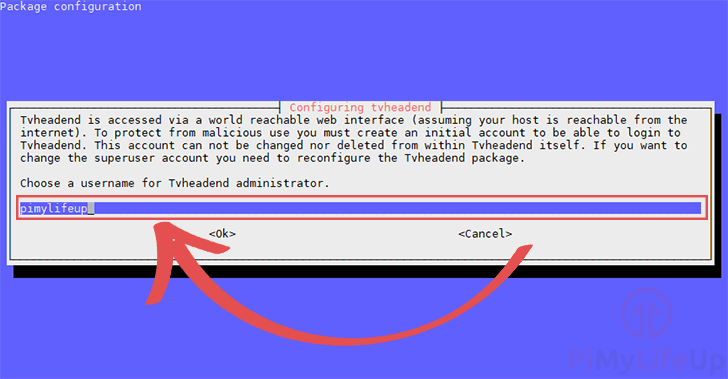
Once you have entered a username, press ENTER to continue.
4. In the next step, you will need to specify a password for your new user.
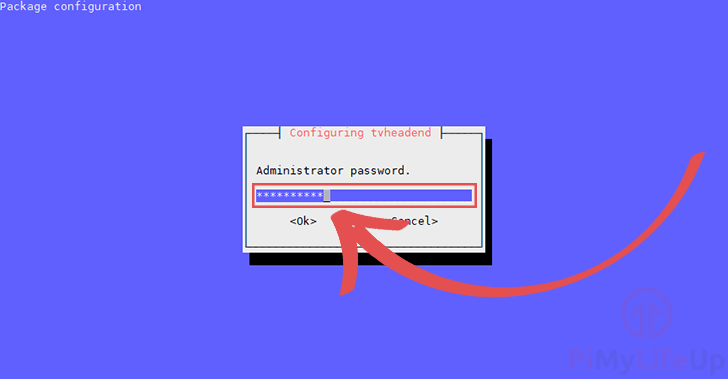
Once you have entered a password, press ENTER to save it.
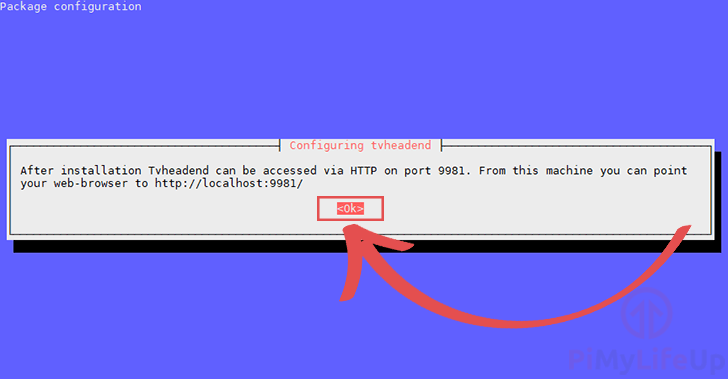
5. At this point, Tvheadend has now finished installing to your Raspberry Pi.
This final message will let you know that Tvheadend is now installed and notify that to access its web interface, you need to go to the port 9881 in a web browser.
Configuring Tvheadend for your Raspberry Pi
1. Before we go to the Tvheadend web interface, we should grab our Raspberry Pi’s IP address.
We can do this by running the following command.
hostname -I2. With your Pi’s IP Address, go to the following web address in your favorite web browser.
Make sure that you replace [IPADDRESS] with the IP you retrieved in the previous step.
https://[IPADDRESS]:9981Upon loading the web interface, you will need to enter the username and password that you set in the initial installation process.
3. The first time you load up your Raspberry Pi’s TVheadend web interface, you will need to complete some initial setup steps.
This first screen will require you to select a language for both the web interface (1.) as well as the language for the EPG (2.)
Once you have set the languages for both of these, click the “Save & Next” button (3.) to continue.

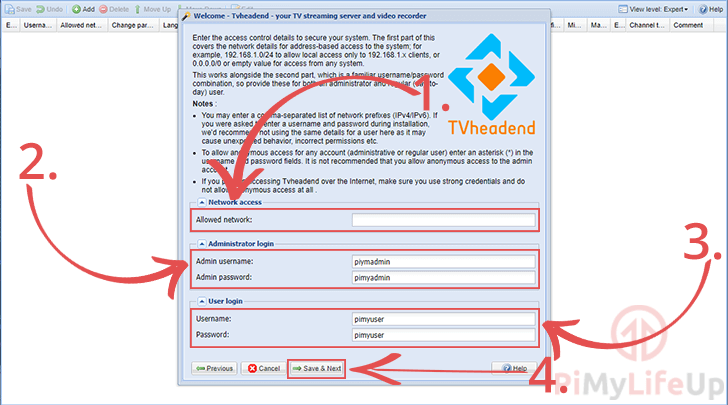
4. This next screen allows you to setup additional users as well as add network restrictions.
If you only want Tvheadend to be able to be accessed from a particular network range, you can specify it in the “Allowed Network” option (1.)
You can also specify a new administrator login. This user will have the same amount of access as the user you created in the previous section (2.).
You can also use this screen to create a user that does not have admin privileges by specifying it under the “User Login” section (3.)
If you don’t want to create an admin or a normal user, use the asterisk (*) in the field instead.
Once done, click the “Save & Next” button (4.).
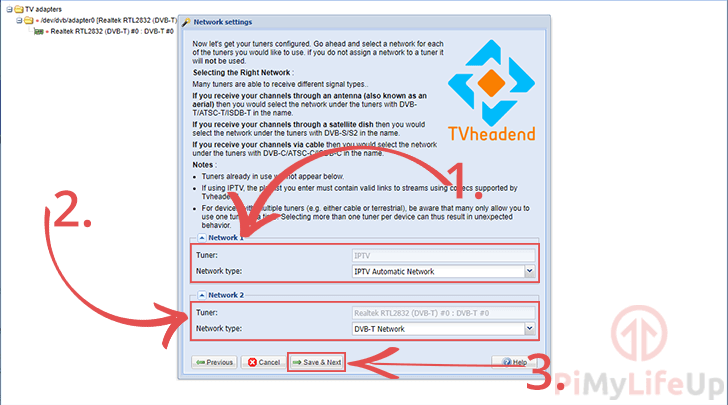
5. Now we need to select the network type for our tuners.
The first available network will be an IPTV one, for our tutorial we set this option to “IPTV AUtomatic Network” (1.)
The second available network should be your digital TV tuner. Select “Network type” to the relevant network. In the case of our tuner, this was set to “DVB-T Network” (2.).
Once you have set all your available networks, save the options by clicking the “Save & Next” button.
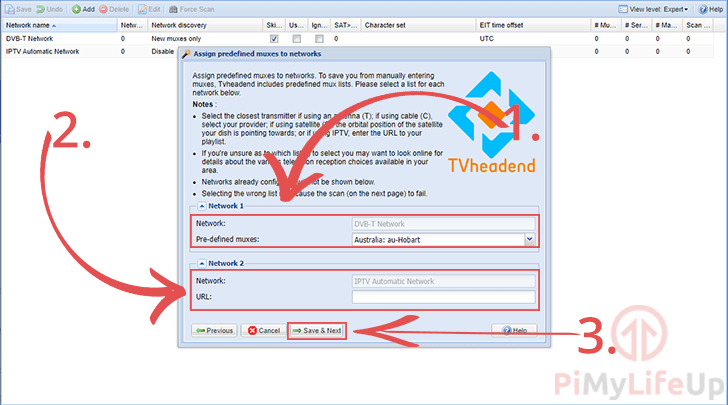
6. With the tuners defined, we need to now select the muxes for it.
The Tvheadend software will use the tuner attached to your Raspberry Pi to scan the specified muxes for channels.
You will be able to select the mux for each of the available tuners (1.).
For IPTV (2.), you can specify a URL for the Tvheadend software to utilize.
Once you have filled in all the required information, click the “Save & Next” button (3.).
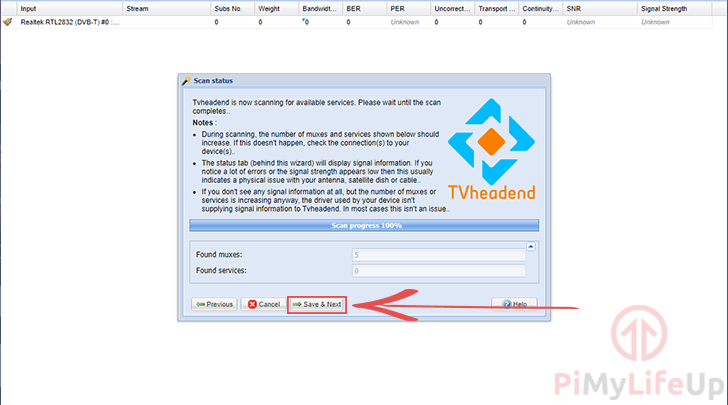
7. The Tvheadend software will now begin to scan the muxes for all available services.
Once the scanning process has completed, you can click the “Save & Next” button.
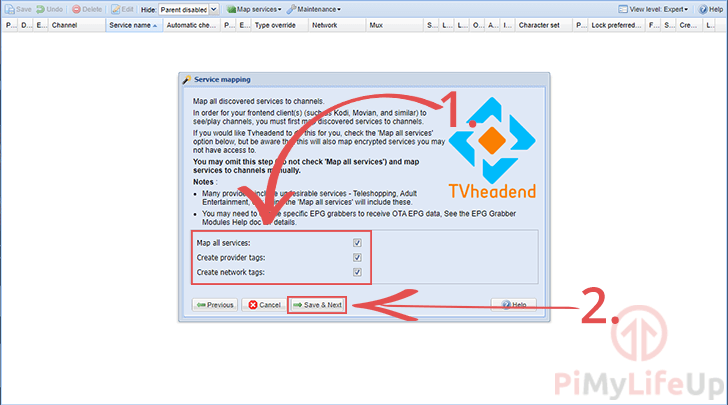
8. You will now be asked how you want to map the services the Tvheadend has detected.
If there are no services that you want to be hidden from Tvheadend, then you can tick the “Map all services” checkbox (1.)
You can now click the “Save & Next” button to complete the setup process.
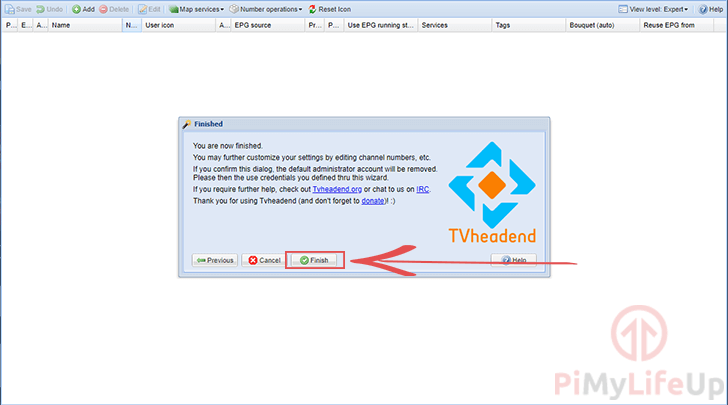
9. At this point, you will now have set up Tvheadend successfully on your Raspberry Pi.
All you need to do now is click the “Finish” button.
If you have run into any issues with setting up Tvheadend on your Raspberry Pi, feel free to drop a comment below.


it works, but the EPG is empty! i even tried a script that added the italian EPG but the list is still empty!
followed the install procedures. there is no choice for US in the muxes list, so i used default. no services found and all muxes reported as failed. Now what?
Figured out partially what the issue was. I set up using a DVB-T dongle… and we us ATSC here in the US.
No comments yet? What a pitty.
This is an excellent tutorial.
Installing and configuring Tvheadend on my Raspi 4B for my Kathrein Sat>IP worked like charm.
Thank you, indeed!