In this Raspberry Pi serial reading and writing tutorial, we will be showing you how to read and write data through the serial GPIO connections that are made available to you on your Raspberry Pi.
We will be showing you how to do these serial writes by using an RS232 to TTL Adapter to create a loop back to the Raspberry Pi, and the same concept will work with any serial device.
You will be learning what GPIO pins you need to utilize to be able to wire up to your serial device to the Raspberry Pi, and we will also be showing the steps you must go through to allow the Raspberry Pi to read and write through the TX and RX GPIO pins.
We will also be teaching you how you would read and write data through the serial ports using the Python programming language, and this should give you a good idea how you would deal with standard serial devices and not just a loopback to the Raspberry Pi.
If you’re interested, we have also go through the steps to handling Arduino’s serial reading and writing too, this in a separate tutorial.
Equipment List
Below are all the bits and pieces that I used for this Raspberry Pi Serial Tutorial.
Recommended
- Raspberry Pi Amazon 2 or newer
- Micro SD Card Amazon
- Power Supply Amazon
- RS232 to TTL converter board Amazon
- USB to Serial Amazon
Optional
Wiring your Raspberry Pi for Serial Pi
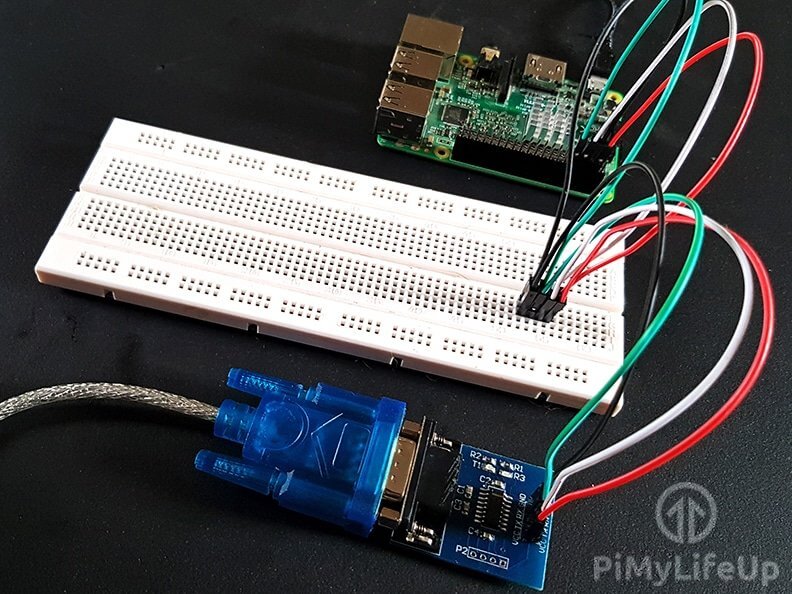
On your RS232 to TTL adapter you should find at least four connections, some circuits do come with more connections, but the only four you need is: VCC (IC Power-supply pin), TX (Transmitted Data), RX (Received Data) and GND (Ground power-supply pin)
You can connect the wires directly to the GPIO Pins or use the breadboard as a middleman as we did in this tutorial. We mainly did this as we didn’t have any female to female breadboard wire available to us.
Wiring your RS232 to TTL adapter to your Raspberry Pi is a simple process, with it requiring only 4 of the GPIO connecting to be wired to the serial connector, even better all 4 GPIO pins needed are in a row, so it is easy to follow. Make use of our table and guide below to connect your serial connector to your Raspberry Pi.
- VCC connects to Pin 4.
- TX connects to Pin 8.
- RX connects to Pin 10.
- GND connects to Pin 6.


Setting up the Raspberry Pi for Serial Read and Write
1. Let’s begin this tutorial by first ensuring the Raspberry Pi is up to date by running the following two commands.
sudo apt update
sudo apt upgrade
2. Now that the Raspberry Pi is up to date we can make use of the raspi-config tool. This tool will allow us to easily disable the serial input/output interface that is enabled by default
sudo raspi-config3. This command will load up the Raspberry Pi configuration screen. This tool allows us to make quite a numerous amount of different changes to the Raspberry Pi’s configuration, for now, though we are only after one particular option. If you are after a more in-depth overview, you can check out our raspi-config tool guide.
Use the arrow keys to go down and select “5 Interfacing Options“. Once this option has been selected, you can press Enter.
4. With the next screen you will want to use the arrow keys again to select “P6 Serial“, press Enter once highlighted to select this option.
5. You will now be prompted as to whether you want the login shell to be accessible over serial, select No with your arrow keys and press Enter to proceed.
6. Immediately after you will be asked if you want to make use of the Serial Port Hardware, make sure that you select Yes with your arrow keys and press Enter to proceed.
7. Once the Raspberry Pi has made the changes, you should see the following text appear on your screen.
"The serial login shell is disabled
The serial interface is enabled".
Before these changes fully take effect, we must first restart the Raspberry Pi. To do this first get back to the terminal by pressing Enter and then ESC.
Type the following command into the terminal on the Raspberry Pi to restart it.
sudo reboot8. Let’s now check to make sure that everything has been changed correctly by running the following command on your Raspberry Pi.
dmesg | grep ttyHere you want to make sure the following message is not displayed in the output, if it is not there then you can skip onto the next section. Otherwise, start over from step 2. These messages indicate that Serial Login is still enabled for that interface.
Raspberry Pi 3 and Raspberry Pi Zero W
[ttyS0] enabledRaspberry Pi 2 and earlier and also the Raspberry Pi Zero
[ttyAMA0] enabledUtilizing Serial Read and Write on your Raspberry Pi
In this segment of the tutorial, you will need to have your USB-Serial adapter plugged into the RS232 adapter. You then want the USB end of the USB-Serial adapter to be plugged into your Raspberry Pi’s USB Ports.
Of course, in a practical application, you will be connecting your serial connection to an actual device such as a modem, a printer or even some RFID readers, in fact, we use a serial connection in our tutorial on setting up the RFID RC522 Chip.
For this Raspberry Pi serial tutorial, we will be just showing you how it all works, and how you can read data that’s coming over the serial lines.
1. Once you have connected your USB-Serial adapter up and it is plugged into the Raspberry Pi, we can run the following command in terminal.
dmesg | grep tty2. In the output of this command, you want to take note of any additional lines that appear that also specify the USB it’s attached to.
For example, my own converter was attached to ttyUSB0 as we have shown in our output below.
Make a note of what your USB device was attached to as you will need this to complete the tutorial.
[ 2429.234287] usb 1-1.2: ch341-uart converter now attached to ttyUSB03. Now that we know what our USB device is attached, we can proceed with programming our two scripts. One of these scripts will read the data through the ttyUSB0 port, and the other will write data through the ttyS0/ttyAMA0 port.
To start off we will be writing our own serial write script, go to the next section to learn how to do serial writes in Python.
Programming the Raspberry Pi for Serial Writing
1. To start off, let’s begin writing our serial_write.py script, this will write data over the serial port.
Run the following two commands on your Raspberry Pi to start writing the file.
mkdir ~/serial
cd ~/serial
nano serial_write.py
2. Within this file write the following lines of code.
#!/usr/bin/env python
import time
import serial
The first line of code is there to tell the operating system what it should try running the file with. Otherwise, it will likely attempt to run it as a standard bash script.
The first import is time. We use this library to temporary sleep the script every now and then for our test counter, and you don’t need this package to be able to do serial writes.
The second import is serial. This library contains all the functionality to deal with serial connections, this allows reading and writing through the serial ports.
ser = serial.Serial(
        port='/dev/ttyS0', #Replace ttyS0 with ttyAM0 for Pi1,Pi2,Pi0
        baudrate = 9600,
        parity=serial.PARITY_NONE,
        stopbits=serial.STOPBITS_ONE,
        bytesize=serial.EIGHTBITS,
        timeout=1
)
counter=0
This section of code primarily instantiates the serial class, setting it up with all the various bits of information that it needs to make the connection with.
- port – This defines the serial port that the object should try and do read and writes over. For Pi 3 and Pi Zero W, this should be tty0. If you are using a Pi 2 and older, or the base Pi Zero then you should be using ttyAM0.
- baudrate – This is the rate at which information is transferred over a communication channel.
- parity – Sets whether we should be doing parity checking, this is for ensuring accurate data transmission between nodes during communication.
- stopbits – This is the pattern of bits to expect which indicates the end of a character or the data transmission.
- bytesize – This is the number of data bits.
- timeout – This is the amount of time that serial commands should wait for before timing out.
while 1:
        ser.write('Write counter: %d \n'%(counter))
        time.sleep(1)
        counter += 1
This code is rather simple, and it loops forever continually writing the text “Write Counter: 1” (where 1 is replaced with the current counter number) to the serial port. It means that any script or device listening on the other side will continually receive that text.
On each loop, we use the time library to sleep the script for 1 second before increasing the counter, and this is to try and not spam the serial port.
3. Once you have finished writing the serial_write.py script it should look somewhat like what is displayed below.
#!/usr/bin/env python
import time
import serial

ser = serial.Serial(
        port='/dev/ttyS0', #Replace ttyS0 with ttyAM0 for Pi1,Pi2,Pi0
        baudrate = 9600,
        parity=serial.PARITY_NONE,
        stopbits=serial.STOPBITS_ONE,
        bytesize=serial.EIGHTBITS,
        timeout=1
)
counter=0

while 1:
        ser.write("Write counter: %d \n"%(counter))
        time.sleep(1)
        counter += 1
Once you are sure you have entered the code correctly, you can save the file by pressing Ctrl + X then pressing Y and then finally hitting Enter.
4. Now that we have completed writing the serial_write.py script we can’t test it just yet. First, we need to write the serial_read.py script. The reason for this is to tell if serial writes are being written through the serial, we need something actually to be receiving them.
In the next section, we will explore writing the serial_read.py script. Don’t worry too much about this as it’s fairly similar to the serial write code.
Programming the Raspberry Pi for Serial Reading
1. To start off let’s begin writing the serial_read.py script, this will basically write data over the serial port. Run the following two commands on your Raspberry Pi to begin writing the file.
mkdir ~/serial
cd ~/serial
nano serial_read.py
2. Within this file write the following lines of code.
#!/usr/bin/env python
import time
import serial

ser = serial.Serial(
        port='/dev/ttyUSB0',
        baudrate = 9600,
        parity=serial.PARITY_NONE,
        stopbits=serial.STOPBITS_ONE,
        bytesize=serial.EIGHTBITS,
        timeout=1
)
Since we have already gone over large amounts of this code, we won’t bother going over it again.
The only difference between this block of code and the one we used in our serial write script is that for the port we are using our USB device. In our case this was ttyUSB0, remember to change this if you got a different result earlier on in this Raspberry Pi serial read and write tutorial.
while 1:
        x=ser.readline()
        print x,
This piece of code is very simple. Basically, it utilizes a function from a serial object that we set up earlier in the code.
This function reads a terminated line, and this means it reads until it hits a line that ends in \n. Anything after that will be rejected. Once it reads the value it stores it into our x variable.
Finally, we print the value that we obtain using the ser.readline() function.
3. Once you have finished writing the serial_read.py, script it should look somewhat like what is displayed below.
#!/usr/bin/env python
import time
import serial

ser = serial.Serial(
        port='/dev/ttyUSB0',
        baudrate = 9600,
        parity=serial.PARITY_NONE,
        stopbits=serial.STOPBITS_ONE,
        bytesize=serial.EIGHTBITS,
        timeout=1
)

while 1:
        x=ser.readline()
        print x
Once you are sure you have entered the code correctly, you can save the file by pressing CTRL + X then pressing Y and then finally hitting ENTER.
Testing our Serial Read and Write Python scripts
1. Now that we have written our serial read and serial write Python scripts we can now finally go onto testing them.
To do this, you will need to have two active terminal windows. It will mean either opening the terminal application twice on your Raspberry Pi or just starting two separate SSH connections.
The reason for doing this is that you can see the serial write script and the serial read script work at the same time.
2. Now in one terminal window, you will want to type in the following two commands to startup our serial_read.py Python script. This script will immediately start reading in all data that is passed through its serial connection by our serial_write.py script.
cd ~/serial
sudo python serial_read.py
3. Now in our other terminal window, type in the following two commands to start up the serial_write.py Python script. Basically, this script will start outputting data through the serial connection which we will soon receive using our other script.
cd ~/serial
sudo python serial_write.py
4. You should now notice that in your first terminal window, that the serial data that we are writing with our serial_write.py script is being displayed.
The display of data in the terminal will mean that we have successfully written our two scripts and that serial_read.py is successfully receiving the data from serial_write.py.
Conclusions
We hope that upon completing this tutorial for the Raspberry Pi that you now have an idea on how to write and read data through the serial bus on your Raspberry Pi.
This tutorial should give you an idea of how you could potentially interact with other devices that use a serial interface.
If you have enjoyed this Raspberry Pi serial tutorial or have any feedback, then feel free to drop a comment below.


thank you very much
My understanding is that all GPIO pins on the Raspberry Pi 3, including the serial pins, require 3.3 volts. I have read that using 5 volt TTL levels will damage the inputs. The point being, make sure your RS 232 to TTL converter is converting the RS232 signal levels to 3.3 volts, not 5 volts.
Hello.
This tutorial was very helpful, I tested the code (only serial_write) on my new Pi 4.
I observe the output on the oscilloscope, and the UART signal is generated successfully with a baud-rate of 10Mbps!
Thanks a lot.
(There is an extra space in line: port=’ /dev/ttyUSB0′,
before /dev , that should be removed for the code to run correctly)
Hi Ali,
Thank you for pointing out the extra space! I have fixed that now.
Great tutorial. Only one minor change needed for me
Using a pi 2
On both scripts changed your code from ser = serial.Serial( port=’ /dev/ttyUSB0′,
to ser = serial.Serial(port=’//dev/ttyUSB0′,
That is //dev/.. not /dev/…
Many thanks
Might want to change that to port=’//dev/ttyAMA0′ for the pi 2
Interacting with a GPS would be a good example and practical. Some modern versions have TT-Serial and older ones are the full RS-232.