In this Raspberry Pi RFID RC522 tutorial, I will be walking you through the steps on how to set up and wire the RFID RC522 chip with your Raspberry Pi.

This project is a cool circuit to play around with and opens you up to quite a wide variety of different projects from using it as an attendance system to using it to open a lock.
The RFID RC522 is a very low-cost RFID (Radio-frequency identification) reader and writer that is based on the MFRC522 microcontroller.
This microcontroller provides its data through the SPI protocol and works by creating a 13.56MHz electromagnetic field that it uses to communicate with the RFID tags.
Make sure that the tags you purchase for your RFID RC522 operate on the 13.56MHz frequency otherwise we will fail to read them.
We will be showing you how to wire up the RC522 as well as showing you how to write Python scripts to interact with the chip so you can both read and write your RFID Tags.
You can extend this tutorial to use something like a 16×2 LCD for the Raspberry Pi, handy if you want to show some information or display a visual prompt to the end user.
Equipment List
Below are all the bits and pieces that I used for this Raspberry Pi RFID RC522 tutorial.
Recommended
- Raspberry Pi Amazon
- Micro SD Card Amazon
- Power Supply Amazon
- RC522 RFID Reader Amazon
- Breadboard Amazon
- Breadboard Wire Amazon
Optional
Video
Below we have a video showing you the process of setting up the RC522 on your Raspberry Pi including setting up all the circuitry.
If you would prefer a more thorough explanation on how to do everything, then you can check out our written guide on setting up the RFID RC522 with your Raspberry Pi below.
Assembling the RFID RC522
One thing you will notice when purchasing an RFID RC522 Reader is that 90% of them don’t come with the header pins already soldered in. The missing pins mean you will have to do it yourself, luckily soldering header pins is a rather simple task, even for beginners.
1. First off, if the header pins you received with your RC522 isn’t the correct size, then snap them down, so you only have a single row of eight pins.
2. Place the header pins up through the holes of your RC522. One handy trick is to put the long side of the header pins into a breadboard and then putting the circuit over the top of the header pins. The breadboard will hold the pins tightly making it easier to solder them to the RFID RC522 circuit.
3. Now using a hot soldering iron and some solder, slowly solder each of the pins. Remember it is best to heat the joint slightly before applying solder to it, this will ensure that the solder will adhere more to the joint and reduce the chances of creating a cold joint. We also recommend being careful with the amount of solder you apply.
4. With the header pins now soldered to your RFID circuit, it is now ready to use, and you can continue with the tutorial.
Wiring the RFID RC522
On your RFID RC522 you will notice that there are 8 possible connections on it, these being SDA (Serial Data Signal), SCK (Serial Clock), MOSI (Master Out Slave In), MISO (Master In Slave Out), IRQ (Interrupt Request), GND (Ground Power), RST (Reset-Circuit) and 3.3v (3.3v Power In). We will need to wire all of these but the IRQ to our Raspberry Pi’s GPIO pins.
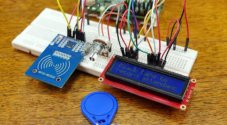
You can either wire these directly to the GPIO Pins or like we did in this tutorial, plug the RFID RC522 into our Breadboard then wire from there to our Raspberry Pi’s GPIO Pins.
Wiring your RFID RC522 to your Raspberry Pi is fairly simple, with it requiring you to connect just 7 of the GPIO Pins directly to the RFID reader. Follow the table below, and check out our GPIO guide to see the positions of the GPIO pins that you need to connect your RC522 to.
- SDA connects to Pin 24.
- SCK connects to Pin 23.
- MOSI connects to Pin 19.
- MISO connects to Pin 21.
- GND connects to Pin 6.
- RST connects to Pin 22.
- 3.3v connects to Pin 1.


Setting up Raspberry Pi OS for the RFID RC522
Before we begin the process of utilizing the RFID RC522 on our Raspberry Pi, we will first have to make changes to its configuration. By default, the Raspberry Pi has the SPI (Serial Peripheral Interface) disabled, which is a bit of a problem as that is what our RFID reader circuit runs through.
Don’t worry though as it is fairly simple to re-enable this interface, just follow our steps below to configure your Raspberry Pi and Raspberry Pi OS to utilize the SPI interface.
1. Let’s begin by first opening the raspi-config tool, and we can do this by opening the terminal and running the following command.
sudo raspi-configCopy2. This tool will load up a screen showing a variety of different options. If you want a more in-depth look into these options, you can check out our raspi-config guide.
On here use the arrow keys to select “5 Interfacing Options“. Once you have this option selected, press Enter.
3. Now on this next screen, you want to use your arrow keys to select “P4 SPI“, again press Enter to select the option once it is highlighted.
4. You will now be asked if you want to enable the SPI Interface, select Yes with your arrow keys and press Enter to proceed. You will need to wait a little bit while the raspi-config tool does its thing in enabling SPI.
5. Once the SPI interface has been successfully enabled by the raspi-config tool you should see the following text appear on the screen, “The SPI interface is enabled“.
Before the SPI Interface is fully enabled we will first have to restart the Raspberry Pi. To do this first get back to the terminal by pressing Enter and then ESC.
Type the following Linux command into the terminal on your Raspberry Pi to restart your Raspberry Pi.
sudo rebootCopy6. Once your Raspberry Pi has finished rebooting, we can now check to make sure that it has in fact been enabled. The easiest way to do this is to run the following command to see if spi_bcm2835 is listed.
lsmod | grep spiCopyIf you see spi_bcm2835, then you can proceed on with this tutorial and skip on to the next section. If for some reason it had not appeared when you entered the previous command, try following the next three steps.
7. If for some reason the SPI module has not activated, we can edit the boot configuration file manually by running the following command on our Raspberry Pi.
sudo nano /boot/config.txtCopy8. Within the configuration file, use CTRL + W to find “dtparam=spi=on“.
If you have found it, check to see if there is a “#” in front of it. If there is, remove it as this is commenting out the activation line. If you can’t find the line at all, add “dtparam=spi=on” to the bottom of the file.
Once you have made the changes, you can press CTRL + X then pressing Y and then Enter to save the changes.
You can now proceed from Step 5 again, rebooting your Raspberry Pi then checking to see if the module has been enabled.
Getting Python ready for the RFID RC522
Now that we have wired up our RFID RC522 circuit to the Raspberry Pi we can now power it on and begin the process of programming simple scripts in Python to interact with the chip.
The scripts that we will be showing you how to write will show you how to read data from the RFID chips and how to write to them. These will give you the basic idea of how data is dealt with and will be the basis of further RFID RC522 tutorials.
Installing the Required Packages for RFID RC522 On the Raspberry Pi
1. Before we start programming, we first need to update our Raspberry Pi to ensure it’s running the latest version of all the software. Run the following two commands on your Raspberry Pi to update it.
sudo apt update
sudo apt upgradeCopy
2. Now the final thing we need before we can proceed is to install python3-dev, python3-pip and python3-venv packages.
Simply run the following command on your Raspberry Pi to install all of the required packages for this guide on setting up your RFID reader.
sudo apt install python3-dev python3-pip python3-venvCopySetting up a Directory for the Python Scripts and Environment
3. Our next step is to create a directory where we will be storing the scripts we are writing as well as the Python virtual environment.
Recent versions of Raspberry Pi OS require packages installed using pip to be stored within a virtual environment.
You can create this directory by using the following command within the terminal.
mkdir ~/pi-rfidCopy4. After creating the directory, change to it by using the following command.
cd ~/pi-rfidCopyCreating a Python Virtual Environment
5. Now, we must use Python to generate a virtual environment within a directory called “env“.
We must use this virtual environment whenever we want to run our scripts and install any other Python packages.
python3 -m venv envCopy6. After Python finishes generating the virtual environment, use the command below to start utilizing it.
Once we use the virtual environment, the Python packages we install using pip will be kept within this environment, not the global one.
source env/bin/activateCopyAfter running the above command, you should see your terminal line starts with “(env)“.
Installing the Python Packages to Use RFID RC522 on the Raspberry Pi
7. Next, we must install the Python Library spidev to our Raspberry Pi using the python “pip” tool that we downloaded in the previous step.
The spidev library helps handle interactions with the SPI and is a key component to this tutorial as we need it for the Raspberry Pi to interact with the RFID RC522.
Run the following command on your Raspberry Pi to install spidev to your Raspberry Pi through pip.
Please note that we use sudo here to ensure that the package is installed so that all users can utilize it and not just the current user.
python3 -m pip install spidevCopy8. Now that we have installed the spidev library to our Raspberry Pi we can now now proceed to installing the MFRC522 library using pip as well.
You can check out the RFID MFRC522 Python code from the PiMyLifeUp Github if you are interested in seeing how the library works or improving its behaviour.
There are two files that are included within our MFRC522 library that we make use of:
“MFRC522.py” which is an implementation of the RFID RC522 interface, this library handles all the heavy lifting for talking with the RFID over the Pi’s SPI Interface.
“SimpleMFRC522.py” that takes the “MFRC522.py” file and greatly simplifies it by making you only have to deal with a couple of functions instead of several.
To install the MFRC522 library to your Raspberry Pi using pip go ahead and run the following command.
python3 -m pip install mfrc522Copy9. With the library now saved to our Raspberry Pi, we can begin programming for our RFID RC522.
To start off with we will be showing you how to write data to your RFID cards by using the RC522. Simply go onto our next section to begin programming our first Python script.
Writing with the RFID RC522
For our first Python script, we will be showing you how to write data from the RC522 to your RFID tags. Thanks to the SimpleMFRC522 script this will be relatively simple, but we will still go into how each part of the code works.
1. Before we begin writing this script, let us ensure we are in the directory we created earlier, and we are using the virtual environment stored within it.
cd ~/pi-rfid
source env/bin/activateCopy
2. Begin by changing directory into our newly cloned folder, and begin writing our “Write.py” Python script.
nano Write.pyCopy3. Within this file, write the following lines of code. This code will basically ask you for text to input and then write that text to the RFID Tag.
a. The first line of this segment of code helps tell the terminal how to interpret the file, and it lets it know that it should use Python when executing it and not something else such as Bash.
Our first import, “RPi.GPIO” has all the functions needed to interact with the GPIO Pins, and we need this to make sure they are cleared when the script finishes running.
The second import, imports in our “SimpleMFRC522” library, this is what we will use actually to talk with the RFID RC522, it greatly simplifies dealing with the chip compared to the base MFRC522 library.
#!/usr/bin/env python

import RPi.GPIO as GPIO
from mfrc522 import SimpleMFRC522Copy
b. This line creates a copy of the SimpleMFRC522 as an object, runs its setup function then stores it all in our reader variable.
reader = SimpleMFRC522()Copyc. Our next block of code we keep within a try statement, this is so we can catch any exceptions and clean up properly. Make sure that you retain the ‘tabs‘ after “try:” as Python is whitespace sensitive, and it is how it differs between blocks of code.
The second line here reads in an input from the command line, and we use “input” in Python 3 to read in all input and store it in our text variable.
With the third line, we utilize “print()” to notify the user that they can now place their RFID tag down onto the reader for writing.
Afterward, on our fourth line of code we use our reader object to write the values we stored in the text variable to the RFID tag, this will tell the RFID RC522 Circuit to write the text values to a certain sector.
Finally, on the 5th line of code, we use “print()” again to notify the user that we have successfully written to the RFID tag.
try:
        text = input('New data:')
        print("Now place your tag to write")
        reader.write(text)
        print("Written")Copy
d. Our final two lines of code handle exiting of the script. Finally, always occurs after the try statement, meaning no matter what we run the “GPIO.cleanup()” function.
These lines are crucial as failing to clean up can prevent other scripts from working correctly.
finally:
        GPIO.cleanup()Copy
4. Once you have finished writing in your script, it should look something like below.
#!/usr/bin/env python

import RPi.GPIO as GPIO
from mfrc522 import SimpleMFRC522

reader = SimpleMFRC522()

try:
        text = input('New data:')
        print("Now place your tag to write")
        reader.write(text)
        print("Written")
finally:
        GPIO.cleanup()Copy
Once you are happy that the code looks correct, you can save the file by pressing CTRL + X then pressing Y and then finally hitting ENTER.
5. Now that we have written our script, we will want to test it out. Before testing out the script make sure that you have an RFID tag handy. Once ready, type the following command into your Raspberry Pi’s terminal.
python3 Write.pyCopy6. You will be asked to write in the new data, in our case we are going to just type in “pimylifeup” as its short and simple. Press ENTER when you are happy with what you have written.
7. With that done, simply place your RFID Tag on top of your RFID RC522 circuit.
As soon as it detects it, it will immediately write the new data to the tag. You should see “Written” appear in your command line if it was successful.
You can look at our example output below to see what a successful run looks like.
pi@raspberrypi:~/pi-rfid $ sudo python3 Write.py
New data:pimylifeup
Now place your tag to write
WrittenCopy
8. You have now successfully written your “Write.py” script, and we can now proceed to show you how to read data from the RFID RC522 in the next segment of this tutorial.
Reading with the RFID RC522
Now that we have written our script to write to RFID tags using our RC522 we can now write a script that will read this data back off the tag.
1. Let’s start off by changing the directory to make sure we are in the right place, we will also use “source” to switch into the virtual environment we creatd
cd ~/pi-rfid
source env/bin/activateCopy
2. Once we are in the right place, we can run nano to begin writing our “Read.py” script.
nano Read.pyCopy3. Within this file, write the following lines of code. This script will basically sit and wait till you put your RFID tag on the RFID RC522 reader, it will then output the data it reads off the tag.
a. The first line of code tells the operating system how to handle the file when a user executes it. Otherwise, it will try and just run it as a regular script file and not a Python file.
The first import is, “RPi.GPIO“. This library contains all the functions to deal with the Raspberry Pi’s GPIO pins, and we mainly import this to ensure that we clean up when the script finishes executing.
The second import is, “SimpleMFRC522“. This script contains a few helper functions to make it an awful lot easier to deal with writing and reading from the RFID RC522, without it the scripts would become quite long.
#!/usr/bin/env python

import RPi.GPIO as GPIO
from mfrc522 import SimpleMFRC522Copy
b. This line is quite important as it calls SimpleMFRC522’s creation function and then stores that into our reader variable as an object so we can interact with it later.
reader = SimpleMFRC522()Copyc. This next block of code is contained within a “try” statement, and we use this so we can catch any exceptions that might occur and deal with them nicely. You need to ensure that you use the ‘tabs‘ as shown after “try:” as Python is whitespace sensitive.
The second line in this block of code makes a call to our reader object, in this case, it tells the circuit to begin reading any RFID tag that is placed on top of the RC522 reader.
With the third and fourth lines we utilize “print()” to print out the information that we received from reading the RFID Chip, this includes the ID associated with the RFID tag and the text that is stored on the tag.
try:
        id, text = reader.read()
        print(id)
        print(text)Copy
d. The two last lines of code handle the termination of the script. The “finally” statement always triggers after the try statement even if we get an exception.
This try statement ensures that no matter what we run the “GPIO.cleanup()” function. It is quite crucial as failing to clean up the GPIO can prevent other scripts from working correctly.
finally:
        GPIO.cleanup()Copy
4. Now that you have finished writing your “Read.py” script for your RFID RC522 it should look something like what is shown below.
#!/usr/bin/env python

import RPi.GPIO as GPIO
from mfrc522 import SimpleMFRC522

reader = SimpleMFRC522()

try:
        id, text = reader.read()
        print(id)
        print(text)
finally:
        GPIO.cleanup()Copy
Once you are sure you have entered the code correctly, you can save the file by pressing Ctrl + X then pressing Y and then finally hitting ENTER.
5. Now that we have finally finished our Read.py script we need to test it out. Before we test out the script, grab one of the RFID tags that you want to read.
Once that you are ready, type the following command into your Raspberry Pi’s terminal.
python3 Read.pyCopy6. With the script now running, all you need to do is place your RFID Tag on top of your RFID RC522 circuit.
As soon as the Python script detects the RFID tag being placed on top, it will immediately read the data and print it back out to you.
An example of what a successful output would look like is displayed below.
pi@raspberrypi:~/pi-rfid $ python3 Read.py
827843705425
pimylifeupCopy
7. If you successfully receive data back from your Read.py script with the text that you pushed to the card using your Write.py script then you have successfully set up your Raspberry Pi to connect with your RFID RC522 Circuit.
You can learn how to setup your RFID RC522 Reader/Writer as a way of checking attendance by following our Raspberry Pi powered RFID attendance system guide.
We will be going into more depth with these scripts and the RFID chip in later tutorials. It will include exploring how to set up a door security system among other cool DIY Pi projects.
If you have enjoyed this Raspberry RFID RC522 tutorial or have any feedback, then feel free to drop a comment below.





I had first some troubles, however then I looked at the documentation of my JOY-IT RFID-RC522 module. There is a difference with the pins for JOY-IT compared to the shown example. Basically, the 8th is left out, and all other pins shift ahead (e.g. 5->4).
Thanks for the tutorial!
This guide is grate it worked perfectly.
thanks alot.
Thank you for a well written and accurate tutorial. It worked perfectly first time.
You’re welcome – I’m glad it has helped 🙂
Testing the various changes to that register, I found the best response with my setup was using the values I posted here. Range actually dropped when using 0x07. Reading the docs it appears 0x07 is reserved for future use.
Thank you so much for this – I had a few false starts – but everything is now working without an issue. I’m well on the way to a bespoke gate lock solution.
Have even managed to tweak the signal on the board to get a slight increase in reading distance. For anyone interested in trying – I followed an example from an arduino forum post (https://forum.arduino.cc/index.php?topic=199983.0).
The file I modified: /usr/local/lib/python2.7/dist-packages/mfrc522/MFRC522.py
At the bottom of the file is the MFRC522_Init function – I added the following line: self.Write_MFRC522(self.RFCfgReg, 0x06<<4)
between the last two lines:
self.Write_MFRC522(self.ModeReg, 0x3D)
self.AntennaOn()
So my file now reads:
self.Write_MFRC522(self.ModeReg, 0x3D)
self.Write_MFRC522(self.RFCfgReg, 0x06<<4)
self.AntennaOn()
You will need to re-initialise your python script once you have made the change.
I was getting reads from about 2.5cm before the change – I'm now getting solid, error free, reads at 5.5cm.
Thank you for this important addition.
Can you confirm self.Write_MFRC522(self.RFCfgReg, 0x06<<4) is correct? Reading the quoted post, one would think self.Write_MFRC522(self.RFCfgReg, 0x07<<4) to be the line intended.
Thank you! I had sixteen raspberries with rc522 readers installed on production machines and one of them was not able to read the tag (cause of a electromagnetic noise caused by a near variable frequency drive)… increasing the reading signal, as your solution, solved the problem!
The Reader was shipped with a dongle and a plastic card.
I can read the dongle without any problems, but I was never able to read the plastic card with the reader. Reading the card works when I use my Phone, so the card should be okay.
I tried to increase the antenna gain as given above, but that didn’t help. Can anybody give me a hint, what I could do to solve my problem?
To my past self: That shipped plastic card was somehow broken (antenna issue or something). With other mifare classic 1k cards everything works perfect.
This was clutch, thanks for the tip!
Thank you so much, very informative and helpful 🙂
Tried a couple other blog/youtube tutorials I found online for the RC522 chip on Pi, and none of them worked right.
This one worked perfectly!
Now to move on to using the readable data in other applications. Thank you SO much for a comprehensive and understandable tutorial to guide me through this process.
Do you know how I could writ a URL to the card? I know that my phone can read RFID cards and open a webpage from them but it doesn’t seem to work with just the URL written as plaintext.
Thanks.
Excellent, very clear tutorial with just the right amount of information for a beginner like me. Thank you so much!!
Would you be able to write information to a student ID card? I tried this and it kept relaying the following error:
AUTH ERROR!!
AUTH ERROR(status2reg & 0x08) != 0
699562167785
Hi Benjamin,
The RFID Card needs to be compatible with the MIFARE protocl that the RC522 is designed to read.
Cheers,
Emmet
What about using the Raspberry Pi 4, does it require different wiring from the RC522 chip to the GPIO’s header pins?
Hi Gerben,
The wiring for the RC522 should be the same with the Raspberry Pi 4.
Cheers,
Emmet
So I made it work on my Rpi 2, but some minor code fixes were necessary – Python didn’t like the || statement, so I changed it to “or” and then included GPIO.setmode with both files too. Could not read any of my office cards though, but programmed a keychain RFID with the digital code of my office card I obtained in a different way and will try it tomorrow 🙂
Hi Alexander,
It looks like i rushed out an update to the library a little to fast last night and didnt check it thoroughly enough. I have now corrected the “or” statement and fixed up the GPIOMode being set correctly within the MFRC522.py file.
Was making it handle cases when someone is using a different GPIO mode better rather then just breaking, hopefully that will now be working as intended.
Cheers,
Emmet
How do I obtain the latest version?
Hi Alexander,
You should be able to update the RC522 Library by running the following command.
sudo pip install mfrc522 --upgradeCheers,
Emmet
The Module for MFRC522 is not getting installed . while writing the code it shows invalid module.
Hi Ankit,
We are unable to reproduce this issue.
The following command
sudo pip install mfrc522Works completely fine for us and succesfully installs the library.
Please provide more information on the error for us to help out.
Cheers,
Emmet
Cheers. So I did all you provided and the code runs without any errors using python2, but nothing at all is happening as well with both Read and Write files. I tried all RFID cards laying around that surely do work and the RC522 simply won’t react. It lights up when connected to the Raspberry Pi so should work, wired properly, all jumpers are connected (I checked via multimeter), so I don’t really know where to look. Any ideas are greatly appreciated
Hi Alexander,
There is a chance that the RC522 reader that you have is faulty. Does it look similar to the one that we have displayed in the tutorial?
If any errors are occurring, you should be getting some response from the library which is the worrying bit.
Besides checking the wiring is all correct there is not a vast amount that I can suggest.
Cheers,
Emmet
Hi Emmet, thanks for answering. The reader indeed looks similar, all connections checked, wiring is correct… However I’am using a Pioneer600 hat by Waveshare and it theoretically somehow may interfere with RC522… That’s my theory I will check using my other RasPi with a clean Raspbian and let you know later.
Hi Alexander,
That is indeed strange, let us know how you get on with working out whats going wrong and whether it was the Pioneer600 hat.
Be interesting to know whether if it is the RFID board or something else.
Cheers,
Emmet
Hello-
Great tutorial! I am encountering an error while trying to test the Write script. In line 4…. ImportError: No module named mfrc522. Can you please help?
Thank you!
Hi Julia,
Make sure that you followed Step 4 in the “Getting Python ready for the RFID RC522” section as this will install the MFRC522 library.
Cheers,
Emmet
Hi Emmet-
Thank you for your continued support. I have followed the tutorial steps exactly as you mentioned. However, when I try to execute the command– sudo python Write.py I still get the following error:
Traceback(most recent call last):
File “Writepy”, line 4 in
from mfrc522 import SimpleMFRC522
ImportError: No module named mfrc522
I have also tried to clone the library from your Github account. I am using a Raspberry Pi 3 B+.
Anything else I can try to get this working?
Thank you so much!
Hi Julia,
That is strange, I have re-ran the tutorial a couple of times and am unable to reproduce the issue.
Installing the mfrc522 library through the “pip” command should ensure that the library exists as it will retrieve it from the pypi servers.
Alternatively could you try running the following and letting us know what the returned result is.
sudo python -m pip install mfrc522Cheers,
Emmet
Hello, I got it to work after running the Setup script in your Github. I now have the MFRC library installed.
Thank you!
Hi, i have a problem. Mfrc522 cant install
Hi Rochelle,
We need to know any errors that have occured to actually be able to help you out as everything works fine on our side.
Cheers,
Emmet
Hello,
I have completed this part with the help of your tutorial. In the next section, I have to send this information to the database, how can I do it?
If any links are available, please help.
Hi, I recommend checking out our attendance system tutorial. We go through storing information into a database.
hello, thank for the tutorial. my question is as follows. I want to be able to write on the card more than once and be able to read the recent data that has been written on the card. Is that possible? I have tried it but all I can read off the card was the first data I wrote to it.
Hi Rberki,
You should be able to write to the same card multiple times in a row, there should be no limitation on this.
Cheers,
Emmet
Can this system be set up to use the following tags ?
https://zipnfc.com/nfc-sticker-midas-tiny-ntag213.html
They seem to be on the same frequency but I get the same error I mentioned earlier when I try to read from or write to them.
AUTH ERROR !|
AUTH ERROR(status2reg & 0x08) != 0
Kind regards
Jim
Hi Jim,
Looking up on it the NTAG213’s may use a slightly different protocol.
I’ll take a look around later to see if its something that i can add support for within the library easily.
Cheers,
Emmet