In this Raspberry Pi RFID RC522 tutorial, I will be walking you through the steps on how to set up and wire the RFID RC522 chip with your Raspberry Pi.
This project is a cool circuit to play around with and opens you up to quite a wide variety of different projects from using it as an attendance system to using it to open a lock.
The RFID RC522 is a very low-cost RFID (Radio-frequency identification) reader and writer that is based on the MFRC522 microcontroller.
This microcontroller provides its data through the SPI protocol and works by creating a 13.56MHz electromagnetic field that it uses to communicate with the RFID tags.
Make sure that the tags you purchase for your RFID RC522 operate on the 13.56MHz frequency otherwise we will fail to read them.
We will be showing you how to wire up the RC522 as well as showing you how to write Python scripts to interact with the chip so you can both read and write your RFID Tags.
You can extend this tutorial to use something like a 16×2 LCD for the Raspberry Pi, handy if you want to show some information or display a visual prompt to the end user.
Equipment List
Below are all the bits and pieces that I used for this Raspberry Pi RFID RC522 tutorial.
Recommended
- Raspberry Pi Amazon
- Micro SD Card Amazon
- Power Supply Amazon
- RC522 RFID Reader Amazon
- Breadboard Amazon
- Breadboard Wire Amazon
Optional
Video
Below we have a video showing you the process of setting up the RC522 on your Raspberry Pi including setting up all the circuitry.
If you would prefer a more thorough explanation on how to do everything, then you can check out our written guide on setting up the RFID RC522 with your Raspberry Pi below.
Assembling the RFID RC522
One thing you will notice when purchasing an RFID RC522 Reader is that 90% of them don’t come with the header pins already soldered in. The missing pins mean you will have to do it yourself, luckily soldering header pins is a rather simple task, even for beginners.
1. First off, if the header pins you received with your RC522 isn’t the correct size, then snap them down, so you only have a single row of eight pins.
2. Place the header pins up through the holes of your RC522. One handy trick is to put the long side of the header pins into a breadboard and then putting the circuit over the top of the header pins. The breadboard will hold the pins tightly making it easier to solder them to the RFID RC522 circuit.
3. Now using a hot soldering iron and some solder, slowly solder each of the pins. Remember it is best to heat the joint slightly before applying solder to it, this will ensure that the solder will adhere more to the joint and reduce the chances of creating a cold joint. We also recommend being careful with the amount of solder you apply.
4. With the header pins now soldered to your RFID circuit, it is now ready to use, and you can continue with the tutorial.
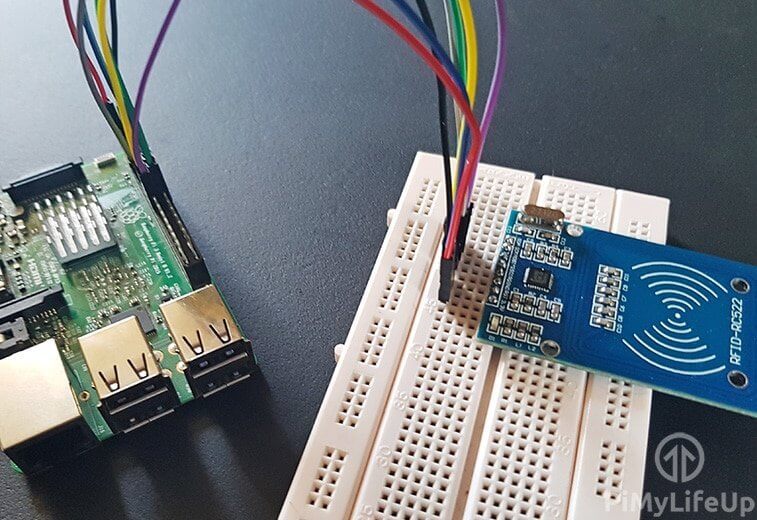
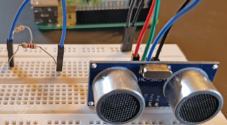
Wiring the RFID RC522
On your RFID RC522 you will notice that there are 8 possible connections on it, these being SDA (Serial Data Signal), SCK (Serial Clock), MOSI (Master Out Slave In), MISO (Master In Slave Out), IRQ (Interrupt Request), GND (Ground Power), RST (Reset-Circuit) and 3.3v (3.3v Power In). We will need to wire all of these but the IRQ to our Raspberry Pi’s GPIO pins.
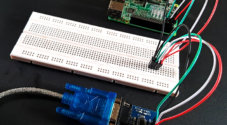
You can either wire these directly to the GPIO Pins or like we did in this tutorial, plug the RFID RC522 into our Breadboard then wire from there to our Raspberry Pi’s GPIO Pins.
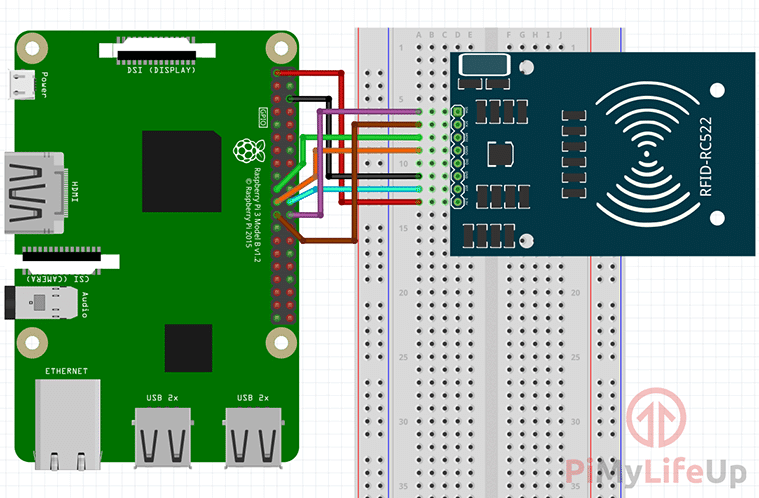
Wiring your RFID RC522 to your Raspberry Pi is fairly simple, with it requiring you to connect just 7 of the GPIO Pins directly to the RFID reader. Follow the table below, and check out our GPIO guide to see the positions of the GPIO pins that you need to connect your RC522 to.
- SDA connects to Pin 24.
- SCK connects to Pin 23.
- MOSI connects to Pin 19.
- MISO connects to Pin 21.
- GND connects to Pin 6.
- RST connects to Pin 22.
- 3.3v connects to Pin 1.

Setting up Raspberry Pi OS for the RFID RC522
Before we begin the process of utilizing the RFID RC522 on our Raspberry Pi, we will first have to make changes to its configuration. By default, the Raspberry Pi has the SPI (Serial Peripheral Interface) disabled, which is a bit of a problem as that is what our RFID reader circuit runs through.
Don’t worry though as it is fairly simple to re-enable this interface, just follow our steps below to configure your Raspberry Pi and Raspberry Pi OS to utilize the SPI interface.
1. Let’s begin by first opening the raspi-config tool, and we can do this by opening the terminal and running the following command.
sudo raspi-configCopy2. This tool will load up a screen showing a variety of different options. If you want a more in-depth look into these options, you can check out our raspi-config guide.
On here use the arrow keys to select “5 Interfacing Options“. Once you have this option selected, press Enter.
3. Now on this next screen, you want to use your arrow keys to select “P4 SPI“, again press Enter to select the option once it is highlighted.
4. You will now be asked if you want to enable the SPI Interface, select Yes with your arrow keys and press Enter to proceed. You will need to wait a little bit while the raspi-config tool does its thing in enabling SPI.
5. Once the SPI interface has been successfully enabled by the raspi-config tool you should see the following text appear on the screen, “The SPI interface is enabled“.
Before the SPI Interface is fully enabled we will first have to restart the Raspberry Pi. To do this first get back to the terminal by pressing Enter and then ESC.
Type the following Linux command into the terminal on your Raspberry Pi to restart your Raspberry Pi.
sudo rebootCopy6. Once your Raspberry Pi has finished rebooting, we can now check to make sure that it has in fact been enabled. The easiest way to do this is to run the following command to see if spi_bcm2835 is listed.
lsmod | grep spiCopyIf you see spi_bcm2835, then you can proceed on with this tutorial and skip on to the next section. If for some reason it had not appeared when you entered the previous command, try following the next three steps.
7. If for some reason the SPI module has not activated, we can edit the boot configuration file manually by running the following command on our Raspberry Pi.
sudo nano /boot/config.txtCopy8. Within the configuration file, use CTRL + W to find “dtparam=spi=on“.
If you have found it, check to see if there is a “#” in front of it. If there is, remove it as this is commenting out the activation line. If you can’t find the line at all, add “dtparam=spi=on” to the bottom of the file.
Once you have made the changes, you can press CTRL + X then pressing Y and then Enter to save the changes.
You can now proceed from Step 5 again, rebooting your Raspberry Pi then checking to see if the module has been enabled.
Getting Python ready for the RFID RC522
Now that we have wired up our RFID RC522 circuit to the Raspberry Pi we can now power it on and begin the process of programming simple scripts in Python to interact with the chip.
The scripts that we will be showing you how to write will show you how to read data from the RFID chips and how to write to them. These will give you the basic idea of how data is dealt with and will be the basis of further RFID RC522 tutorials.
Installing the Required Packages for RFID RC522 On the Raspberry Pi
1. Before we start programming, we first need to update our Raspberry Pi to ensure it’s running the latest version of all the software. Run the following two commands on your Raspberry Pi to update it.
sudo apt update
sudo apt upgradeCopy
2. Now the final thing we need before we can proceed is to install python3-dev, python3-pip and python3-venv packages.
Simply run the following command on your Raspberry Pi to install all of the required packages for this guide on setting up your RFID reader.
sudo apt install python3-dev python3-pip python3-venvCopySetting up a Directory for the Python Scripts and Environment
3. Our next step is to create a directory where we will be storing the scripts we are writing as well as the Python virtual environment.
Recent versions of Raspberry Pi OS require packages installed using pip to be stored within a virtual environment.
You can create this directory by using the following command within the terminal.
mkdir ~/pi-rfidCopy4. After creating the directory, change to it by using the following command.
cd ~/pi-rfidCopyCreating a Python Virtual Environment
5. Now, we must use Python to generate a virtual environment within a directory called “env“.
We must use this virtual environment whenever we want to run our scripts and install any other Python packages.
python3 -m venv envCopy6. After Python finishes generating the virtual environment, use the command below to start utilizing it.
Once we use the virtual environment, the Python packages we install using pip will be kept within this environment, not the global one.
source env/bin/activateCopyAfter running the above command, you should see your terminal line starts with “(env)“.
Installing the Python Packages to Use RFID RC522 on the Raspberry Pi
7. Next, we must install the Python Library spidev to our Raspberry Pi using the python “pip” tool that we downloaded in the previous step.
The spidev library helps handle interactions with the SPI and is a key component to this tutorial as we need it for the Raspberry Pi to interact with the RFID RC522.
Run the following command on your Raspberry Pi to install spidev to your Raspberry Pi through pip.
Please note that we use sudo here to ensure that the package is installed so that all users can utilize it and not just the current user.
python3 -m pip install spidevCopy8. Now that we have installed the spidev library to our Raspberry Pi we can now now proceed to installing the MFRC522 library using pip as well.
You can check out the RFID MFRC522 Python code from the PiMyLifeUp Github if you are interested in seeing how the library works or improving its behaviour.
There are two files that are included within our MFRC522 library that we make use of:
“MFRC522.py” which is an implementation of the RFID RC522 interface, this library handles all the heavy lifting for talking with the RFID over the Pi’s SPI Interface.
“SimpleMFRC522.py” that takes the “MFRC522.py” file and greatly simplifies it by making you only have to deal with a couple of functions instead of several.
To install the MFRC522 library to your Raspberry Pi using pip go ahead and run the following command.
python3 -m pip install mfrc522Copy9. With the library now saved to our Raspberry Pi, we can begin programming for our RFID RC522.
To start off with we will be showing you how to write data to your RFID cards by using the RC522. Simply go onto our next section to begin programming our first Python script.
Writing with the RFID RC522
For our first Python script, we will be showing you how to write data from the RC522 to your RFID tags. Thanks to the SimpleMFRC522 script this will be relatively simple, but we will still go into how each part of the code works.
1. Before we begin writing this script, let us ensure we are in the directory we created earlier, and we are using the virtual environment stored within it.
cd ~/pi-rfid
source env/bin/activateCopy
2. Begin by changing directory into our newly cloned folder, and begin writing our “Write.py” Python script.
nano Write.pyCopy3. Within this file, write the following lines of code. This code will basically ask you for text to input and then write that text to the RFID Tag.
a. The first line of this segment of code helps tell the terminal how to interpret the file, and it lets it know that it should use Python when executing it and not something else such as Bash.
Our first import, “RPi.GPIO” has all the functions needed to interact with the GPIO Pins, and we need this to make sure they are cleared when the script finishes running.
The second import, imports in our “SimpleMFRC522” library, this is what we will use actually to talk with the RFID RC522, it greatly simplifies dealing with the chip compared to the base MFRC522 library.
#!/usr/bin/env python

import RPi.GPIO as GPIO
from mfrc522 import SimpleMFRC522Copy
b. This line creates a copy of the SimpleMFRC522 as an object, runs its setup function then stores it all in our reader variable.
reader = SimpleMFRC522()Copyc. Our next block of code we keep within a try statement, this is so we can catch any exceptions and clean up properly. Make sure that you retain the ‘tabs‘ after “try:” as Python is whitespace sensitive, and it is how it differs between blocks of code.
The second line here reads in an input from the command line, and we use “input” in Python 3 to read in all input and store it in our text variable.
With the third line, we utilize “print()” to notify the user that they can now place their RFID tag down onto the reader for writing.
Afterward, on our fourth line of code we use our reader object to write the values we stored in the text variable to the RFID tag, this will tell the RFID RC522 Circuit to write the text values to a certain sector.
Finally, on the 5th line of code, we use “print()” again to notify the user that we have successfully written to the RFID tag.
try:
        text = input('New data:')
        print("Now place your tag to write")
        reader.write(text)
        print("Written")Copy
d. Our final two lines of code handle exiting of the script. Finally, always occurs after the try statement, meaning no matter what we run the “GPIO.cleanup()” function.
These lines are crucial as failing to clean up can prevent other scripts from working correctly.
finally:
        GPIO.cleanup()Copy
4. Once you have finished writing in your script, it should look something like below.
#!/usr/bin/env python

import RPi.GPIO as GPIO
from mfrc522 import SimpleMFRC522

reader = SimpleMFRC522()

try:
        text = input('New data:')
        print("Now place your tag to write")
        reader.write(text)
        print("Written")
finally:
        GPIO.cleanup()Copy
Once you are happy that the code looks correct, you can save the file by pressing CTRL + X then pressing Y and then finally hitting ENTER.
5. Now that we have written our script, we will want to test it out. Before testing out the script make sure that you have an RFID tag handy. Once ready, type the following command into your Raspberry Pi’s terminal.
python3 Write.pyCopy6. You will be asked to write in the new data, in our case we are going to just type in “pimylifeup” as its short and simple. Press ENTER when you are happy with what you have written.
7. With that done, simply place your RFID Tag on top of your RFID RC522 circuit.
As soon as it detects it, it will immediately write the new data to the tag. You should see “Written” appear in your command line if it was successful.
You can look at our example output below to see what a successful run looks like.
pi@raspberrypi:~/pi-rfid $ sudo python3 Write.py
New data:pimylifeup
Now place your tag to write
WrittenCopy
8. You have now successfully written your “Write.py” script, and we can now proceed to show you how to read data from the RFID RC522 in the next segment of this tutorial.
Reading with the RFID RC522
Now that we have written our script to write to RFID tags using our RC522 we can now write a script that will read this data back off the tag.
1. Let’s start off by changing the directory to make sure we are in the right place, we will also use “source” to switch into the virtual environment we creatd
cd ~/pi-rfid
source env/bin/activateCopy
2. Once we are in the right place, we can run nano to begin writing our “Read.py” script.
nano Read.pyCopy3. Within this file, write the following lines of code. This script will basically sit and wait till you put your RFID tag on the RFID RC522 reader, it will then output the data it reads off the tag.
a. The first line of code tells the operating system how to handle the file when a user executes it. Otherwise, it will try and just run it as a regular script file and not a Python file.
The first import is, “RPi.GPIO“. This library contains all the functions to deal with the Raspberry Pi’s GPIO pins, and we mainly import this to ensure that we clean up when the script finishes executing.
The second import is, “SimpleMFRC522“. This script contains a few helper functions to make it an awful lot easier to deal with writing and reading from the RFID RC522, without it the scripts would become quite long.
#!/usr/bin/env python

import RPi.GPIO as GPIO
from mfrc522 import SimpleMFRC522Copy
b. This line is quite important as it calls SimpleMFRC522’s creation function and then stores that into our reader variable as an object so we can interact with it later.
reader = SimpleMFRC522()Copyc. This next block of code is contained within a “try” statement, and we use this so we can catch any exceptions that might occur and deal with them nicely. You need to ensure that you use the ‘tabs‘ as shown after “try:” as Python is whitespace sensitive.
The second line in this block of code makes a call to our reader object, in this case, it tells the circuit to begin reading any RFID tag that is placed on top of the RC522 reader.
With the third and fourth lines we utilize “print()” to print out the information that we received from reading the RFID Chip, this includes the ID associated with the RFID tag and the text that is stored on the tag.
try:
        id, text = reader.read()
        print(id)
        print(text)Copy
d. The two last lines of code handle the termination of the script. The “finally” statement always triggers after the try statement even if we get an exception.
This try statement ensures that no matter what we run the “GPIO.cleanup()” function. It is quite crucial as failing to clean up the GPIO can prevent other scripts from working correctly.
finally:
        GPIO.cleanup()Copy
4. Now that you have finished writing your “Read.py” script for your RFID RC522 it should look something like what is shown below.
#!/usr/bin/env python

import RPi.GPIO as GPIO
from mfrc522 import SimpleMFRC522

reader = SimpleMFRC522()

try:
        id, text = reader.read()
        print(id)
        print(text)
finally:
        GPIO.cleanup()Copy
Once you are sure you have entered the code correctly, you can save the file by pressing Ctrl + X then pressing Y and then finally hitting ENTER.
5. Now that we have finally finished our Read.py script we need to test it out. Before we test out the script, grab one of the RFID tags that you want to read.
Once that you are ready, type the following command into your Raspberry Pi’s terminal.
python3 Read.pyCopy6. With the script now running, all you need to do is place your RFID Tag on top of your RFID RC522 circuit.
As soon as the Python script detects the RFID tag being placed on top, it will immediately read the data and print it back out to you.
An example of what a successful output would look like is displayed below.
pi@raspberrypi:~/pi-rfid $ python3 Read.py
827843705425
pimylifeupCopy
7. If you successfully receive data back from your Read.py script with the text that you pushed to the card using your Write.py script then you have successfully set up your Raspberry Pi to connect with your RFID RC522 Circuit.
You can learn how to setup your RFID RC522 Reader/Writer as a way of checking attendance by following our Raspberry Pi powered RFID attendance system guide.
We will be going into more depth with these scripts and the RFID chip in later tutorials. It will include exploring how to set up a door security system among other cool DIY Pi projects.
If you have enjoyed this Raspberry RFID RC522 tutorial or have any feedback, then feel free to drop a comment below.


Hi
When trying to clone from your github site in step 4 I am asked for a username and password.
How do I proceed ?
Kind regards
Jim
Hi Jim,
This sounds odd, using the git clone command you should be able to clone from it without needing to authenticate yourself as it is a publicly accessible repository.
Cheers,
Emmet
Hi,
I did try to rerun the tutorial but I’m facing the same issues. In fact at the moment I’m not even able to read or write anything.
Hi Mignei,
Can you please check that your wiring is correct, if your getting no response at all there is a chance that your reader might be faulty.
Cheers,
Emmet
Hi,
thanks for the tutorial which I have followed and sometimes I’m able to read/write but sometimes it doesn’t nothing happens. Can you help?
Hi Mignei,
We were running into these intermittent issues as well, we have gone ahead and done some slight changes, including moving to the spidev library instead of SPI-Py.
Can you please try rerunning the tutorial to see if the issue still persists.
Cheers,
Emmet
I did all steps in the tutorial
But when i put the tag to write. No written statment appeares
. It can’t write the tag
Hi Hala,
Please try going through the tutorial again, we have made several changes to hopefully improve the process, we have moved it from using the SPI-Py library to spidev.
Cheers,
Emmet
hello , first. thanks for this tutorial.
second before few days i tried to make this tutorial step by step but it was error when execute Write.py , today the error get solved/ now i have another problem that when I put the tag on the reader to write data. no data written .nothing appear . what is the problem please I need help
Hi Hala,
I am currently unable to reproduce these issues, can you note the steps that you followed and the data that you tried writing to the RFID card?
Cheers
Hi! I have done this tutorial a month ago and succeeded (really great tutorial btw)but I restarted everything when all my files were erased. So, I did this tutorial again, but, as I was in th Write.py section, I encountered an error when running the file:
pi@raspberrypi:~/MFRC522-python $ sudo python Write.py
[SNIPPED]
File “/home/pi/MFRC522-python/MFRC522.py”, line 123, in Write_MFRC522
spi.transfer(((addr<<1)&0x7E,val))
TypeError: function takes exactly 2 arguments (1 given)
I have done exactly what the tutorial said 3 times, but still get the same error, please help this beginner peasant 🙁
Hi Isaac,
This issue was caused by the SPY-Pi library being changed which in turn broke our MFRC522 library.
We have now made modifications to the MFRC522 library to accomodate these changes and it should now be working when cloning the repository from fresh.
Let us know if you experience any other issues!
Cheers,
Emmet
Could you check your library and code for the newest jessie?
I got this error.
[SNIPPED]
Please help me to solved it.
Hi Hans,
We have updated our MFRC522-python repository to deal with changes that were made to the SPI-Py Library. Cloning a fresh copy of the MFRC522-python library should fix the errors.
Cheers,
Emmet
Thanks a lot! This is beautiful site and quick response admin.
Hello, I found some trouble again after an intense trial and error read and write RFID. RFID could read and write the data if only we tap the tag to the reader before I execute the program.
Error Write.py
[ERROR SNIPPED]
val = spi.transfer(self.spi_fd, (((addr << 1) & 0x7E) | 0x80, 0))
Error Read.py
[ERROR SNIPPED]
val = spi.transfer(self.spi_fd, (((addr << 1) & 0x7E) | 0x80, 0))
Please kindly help me to solve it.
Hi Hans,
We have gone and rewritten parts of the code and moved it to using the spidev library instead of the SPI-Py library that we were relying on previously.
Could you try rerunning through the tutorial.
Cheers,
Emmet
Will you be providing the tutorial for the attendance system at some point?
Great tutorial btw!
Yes it is coming! We should have it ready within the next couple of weeks.
I got
TypeError: function takes exactly 2 arguments (1 given)
Can you please help me solve it
Hi TheJas,
We have made some changes to our MFRC522-python library to remedy the issues, please try cloning it fresh and let us know if you run into anymore issues.
Cheers,
Emmet
I´m Having the same problem
Hi Pavlo,
This issue was solved in the latest version of the repository, you should no longer be running into that error.
Cheers,
Emmet
I tried this for the first time and everything was functioning properly. But after trying to get it to run on Python 3 (IDLE) and failing, then going back to Python 2, I get this error while trying to run the code:
[Error Snipped]
Is there a fix for this? I've tried deleting both the MFRC522-python and SPI-Py file and re-cloning them, and even reinstalling the OS and following the procedure gain… help! I'm very new at this RPi-Python interfacing.
Hi Trevor,
There was recent changes to the SPI-Py library that broke our MFRC522-python code. We have now made changes to the MFRC522-python library to remedy these issues, please try cloning ti fresh again.
Let us know if you run into any issues.
Cheers,
Emmet
facing thise error when am trying to run the Read.py
below is the stack trace for the error am facing when am trying to run the Read.py script..
[SNIPPED]
Hi Sandeep,
There was recent changes to the SPI-Py library that broke our MFRC522-python code. We have now made changes to the MFRC522-python library to remedy these issues, please try cloning ti fresh again.
Let us know if you run into any issues.
Cheers,
Emmet
Thank you for your tutorial! If there are some java interested people, I used this tutorial and my java knowledge to create an Interface between the read/write.py files and java.
If you are interested I provided the code on GitHub:
https://github.com/Sacredgamer/RFID-RC552-Interface
Hey, great tutorial!
Quick question: What is the RC522 card actually reading from the chip? Is there any way to change the actual id of the chip instead of changing the text? Thanks!
Coool tutorial! I succeded everything and the tutorial is very straightforward.
The only thing I didn’t have was soldering wire, so instead I constantly put some pressure on the RFID board to make sure the connections are well when I execute the code.
Thanks!!
maybe you should check your jump wire. use the figure with the number above. not the pi figure.
Hi
Will there be a tutorial about a attendance system as you prommised ?
Hey Lennart,
Yes there will be but it will likely be pushed to the book sometime in the new year and added to the website a few weeks after that.
Cheers
Does this work on a Pi Zero W?
Hey Andy,
Raspberry Pi Zero W uses the same GPIO pins as the Raspberry Pi 3 and Raspberry Pi 2 so the tutorial should work perfectly fine.
Cheers
Thank you!!!!!!!! Your Simple-Library is so helpful!
Thank you so much!!!
You are great.
Sir,
I couldn’t write or read my tags (neither the credit card sized one nor the round keychaind one).
I’ve repeated 3 times re-installing as per your tutorial instructions, checked the wiring. I’m sure SPI is enabled (I checked several times, including
lsmode | grep spiand through the desktop gui “preferences/Raspberry Pi Configuration/Interfaces “options.I created
Write.pyas you instructed and ran the program, which did ask me for my input, which I supplied. It then asked me to place my tag, which I also did but nothing happened (expected a “written” output as programmed but no).What can possible be wrong?
Thank you.
Hey He Lo,
Ensure that you have wired your RFID reader/writer correctly to the Raspberry Pi.
There is a chance that the reader you are using is dead and you may have to purchase another one.
Cheers
Hey,
I have the same problem.
Did u solve it?
The problem is solved. If your module came with the pin header not soldered onto the module board then solder the module pins
Hey I know this is an old question but I was having the same issue. What I did to resolve it was to go back over my solder joints and tidy them up and specifically made sure that none of the joints were touching each other. Worked like a charm after doing this.