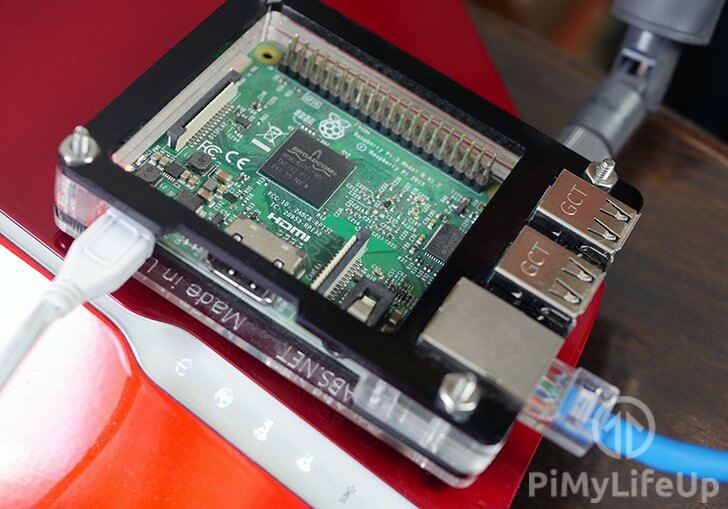
In this Raspberry Pi network scanner project, we will be showing you how you can utilize a software package called Kismet.
This project relies on the Kismet software that utilizes your network interfaces such as your WiFi adapter and your Bluetooth adapter to scan for all available devices across all available frequencies.
Kismet will read in information about devices and monitor their packet traffic. It also will monitor information such as the frequencies they operate on and other things.
Please note that for this tutorial you cannot use the Raspberry Pi’s inbuilt WiFi due to it lacking the functionality to be put into a “monitoring” mode.
It’s important to note that Kismet will work with WiFi, Bluetooth, and some software-defined radio (SDR) hardware. It doesn’t work with Ethernet.
We suggest that you don’t run any other network projects unless you know what you’re doing. You might find that they will conflict with Kismet.
Equipment
Below is all the equipment that you will need for turning your Raspberry Pi into a Network Scanner.
Recommended
- Raspberry Pi Amazon
- 8GB Micro SD Card Amazon
- USB Keyboard Amazon
- USB Mouse Amazon
- HDMI Cable Amazon
- Ethernet Cable Amazon or Wi-Fi Amazon
- Bluetooth Adapter Amazon
Optional
- Raspberry Pi Case Amazon
Video
You can watch our video on setting up and configuring your Raspberry Pi as a network scanner right below.
If you prefer to follow the tutorial step by step with text instructions, then you can follow our written guide underneath the video.
Testing your Wireless Adapter for Network Scanning Support
1. Before we get started with setting up the Raspberry Pi to scan the network lets first make sure that the Pi is up to date by running the following commands.
sudo apt update
sudo apt upgradeCopy
2. Now that we have updated our Raspberry Pi let’s retrieve all our available wireless network devices by using the following command.
We will use a value from this command to verify if our network device can support the monitoring mode that is required for the network scanner software.
iw devCopy3. This command should produce a list similar to the one below. Look for the wireless device that you intend on putting into monitoring mode.
For instance, our interface is the wlan1 device and is not currently connected to any network. So from this, we need to note its physical id which is phy1 (phy#1).
phy#1
        Interface wlan1
                ifindex 4
                wdev 0x100000001
                addr 00:c1:41:07:11:76
                type managed
                channel 11 (2462 MHz), width: 40 MHz, center1: 2452 MHz
                txpower 20.00 dBm
phy#0
        Interface wlan0
                ifindex 3
                wdev 0x1
                addr b8:27:eb:44:ad:fe
                type managed
                channel 11 (2462 MHz), width: 20 MHz, center1: 2462 MHz
                txpower 31.00 dBm
4. Now that we have obtained the physical address of the wireless device we want to use let’s check to see if it can support the monitoring mode that we require by running the following command.
Make sure that you replace phy1 with the address of the device you intend on using.
iw phy phy1 info5. From the output of the phy1 info command, you need to look for a section titled Supported interface modes:.
Once you have found this section, look for * monitor within it. If you can see it then you can proceed with this Raspberry Pi network scanner tutorial. If you can’t find it, then you will need to find a different wireless adapter.
Preparing the Wireless Monitor for Network Scanning
1. Now that we know we can use our wireless adapter, we need to modify our interfaces file by running the following command.
sudo nano /etc/network/interfacesCopy2. At the bottom of this file, we will need to enter the following lines.
These lines do several different things with our wlan1 interface.
The first line allow-hotplug, tells the operating system to wait for the kernel/drivers/udev to detect the device.
The second line sets it so that the wlan1 interface will not be automatically assigned an IP address as these are not required for what we are doing.
The next few lines sets up our actual monitor interface. First, we add a new interface to our phy1 device of the type monitor.
We utilize the pre-up command on these lines so that these actions will occur before the interface is brought up by the operating system.
We then proceed to delete the wlan1 interface as we do not require it for what we are doing.
Using the final line, we bring up the mon1 interface that we just created.
 allow-hotplug wlan1
 iface wlan1 inet manual
 pre-up iw phy phy1 interface add mon1 type monitor
 pre-up iw dev wlan1 del
 pre-up ifconfig mon1 up
3. Once you have finished adding those lines to the file, you should now save it by pressing CTRL + X then Y and finally ENTER.
4. Now that we have completed these changes, we need to reboot the Raspberry Pi by running the following command.
sudo rebootCopy5. Once the Raspberry Pi has rebooted, let’s go ahead and check the network configuration by using the following command.
ifconfigCopy6. From this command you should see the “mon1:” interface appear within the list of network configurations.
If “mon1:” does appear within the list, then our changes to the interface file are working, and you are now able to continue on with this tutorial.
Installing the Kismet Wireless Monitoring Tools from Repo
1. To install Kismet from their repository we will need to download their GPG keys and add it to our package key manager.
We also need to add Kismet’s repository so that it will be read in as an available source repository. We do this by creating a file within our “/sources.list.d/” directory that contains the URL.
Run the following two commands to add the GPG keys as well as the new source.
wget -O - https://www.kismetwireless.net/repos/kismet-release.gpg.key | sudo apt-key add -
echo "deb https://www.kismetwireless.net/repos/apt/release/$(lsb_release -cs) $(lsb_release -cs) main" | sudo tee /etc/apt/sources.list.d/kismet.listCopy
2. With Kismet’s package repository now made available to our operating system, we need to update our package list. Updating the list will grab all the packages from our newly added repository.
To update the package list, you need to run the following command on your Raspberry Pi.
sudo apt updateCopy3. Now that we have successfully updated our package repository list we can proceed to install the Kismet software to our Raspberry Pi.
To do this, we will need to run the following command. This command will install the latest release version of the Kismet software.
Don’t type in just Kismet as that is an older package to the one provided by the repo we added.
sudo apt install kismet2018Copy4. During the installation process of the Kismet software, it will create a new Kismet user and group that has special privileges to configure network interfaces and capture packets.
We now need to add our default pi user to the newly created Kismet group so that it can operate the software without issue.
Run the following command to add the user pi to the kismet group.
sudo usermod -aG kismet piCopy5. After we have run the usermod command, we need to now log out by running the command below.
Logging out causes the operating system to update our user’s permissions and groups list.
logoutCopy6. Once you log back in you can retrieve the list of groups your user belongs to by running the following command. You should see kismet in this list.
groupsCopyYou can now proceed on to the Starting up the Kismet Monitoring Tools section of this Raspberry Pi network scanner tutorial.
Installing the Kismet Wireless Monitoring Tools from Source
1. Now that we have set up our mon1 interface correctly we need to install the packages that we require for compiling the software called Kismet.
To install all the packages that are required by the Kismet software you will need to run the following set of commands on your Raspberry Pi.
We split the install into multiple commands to make it easier to type in or copy and paste.
sudo apt install -y build-essential git libmicrohttpd-dev pkg-config zlib1g-dev
sudo apt install -y libnl-3-dev libnl-genl-3-dev libcap-dev libpcap-dev libncurses5-dev
sudo apt install -y libnm-dev libdw-dev libsqlite3-dev libprotobuf-dev libprotobuf-c-dev
sudo apt install -y protobuf-compiler protobuf-c-compiler libsensors4-dev
sudo apt install -y libusb-1.0-0-devCopy
2. To compile Kismet we will first have to utilize GIT to grab its source code from their official GitHub. Doing this will ensure that we will be running the latest version of Kismet.
To do this, we need to enter the following command within the terminal.
git clone https://github.com/kismetwireless/kismet.gitCopy3. Once the code has downloaded to your Raspberry Pi let’s go ahead and change into its directory and begin the configuration process by running the following command.
The configuration process ensures that we have all the required packages and makes changes to how it needs to compile based on the current operating system.
cd kismet
./configureCopy
4. With the Kismet code now configured for compilation on our Raspberry Pi let’s go ahead and start the actual compiling process. Do this by running the make command.
Please note that the compiling process will take a very long time due to the Raspberry Pi’s limited processing power, so now is a good time to take a break. This compilation process took over one hour on our Raspberry Pi 3B+.
makeCopy5. Once the Raspberry Pi has finished compiling Kismet, let’s install it to Raspbian.
To install Kismet, we will utilize the make program again but utilizing Kismet’s suidinstall.
The extra parameter that we use on the make command will install the program and create the required user and groups for the software.
sudo make suidinstallCopy6. When the installation process of Kismet finishes we need to add the pi user to the kismet group. This extra step is due to permissions required by the Kismet software.
Run the following command to add the user pi to the kismet group.
sudo usermod -aG kismet piCopy7. To refresh the group’s list for the current user you will need to log out then now log back in.
To log out of your Raspberry Pi, you can utilize the following command.
logoutCopy8. Once logged back in, check the current users’ groups by running the following command.
groupsCopyYou should see kismet within the list of groups generated from this command. If you do not see it, then make sure that you typed in the command shown in Step 6 correctly.
Starting up the Kismet Monitoring Tools
1. Before we start Kismet let’s create our configuration file for it by running the following command.
Kismet will read this config file when it launches and utilizes the sources we specify to scan traffic.
Compiled from source code
sudo nano /usr/local/etc/kismet_site.confCopyInstalled from repository
sudo nano /etc/kismet/kismet_site.confCopy2. Within this file enter the following two lines.
These lines tell Kismet to use our mon1 interface as a data source for wireless connections and to also use the hci0 interface as a data source for monitoring Bluetooth connections.
If you are using a Pi that doesn’t support Bluetooth, then ignore the second line.
source=mon1
source=hci0
Once the lines have been entered, you can save the file by pressing CTRL + X then Y and finally ENTER.
3. To connect to Kismet’s web interface, you will need to find out your Raspberry Pi’s local IP address so that you can access it through your web browser.
To see your Raspberry Pi’s local IP address you can use the hostname command.
hostname -ICopy4. Now that we have retrieved our Raspberry Pi’s local IP address we can now proceed to start up the Kismet server so that we can access it through its web interface.
To fire up the Kismet server, you need to run the following command on your Raspberry Pi.
kismetCopy5. Once the Kismet monitoring tools have started up, go ahead and open up your favorite web browser and go to the following URL.
Make sure that you replace our example IP below with the one you obtained in Step 1 of this section. Doing this should load our Kismet network scanner interface running on the Raspberry Pi.
http://192.168.0.145:2501Utilizing the Kismet Monitoring Tools
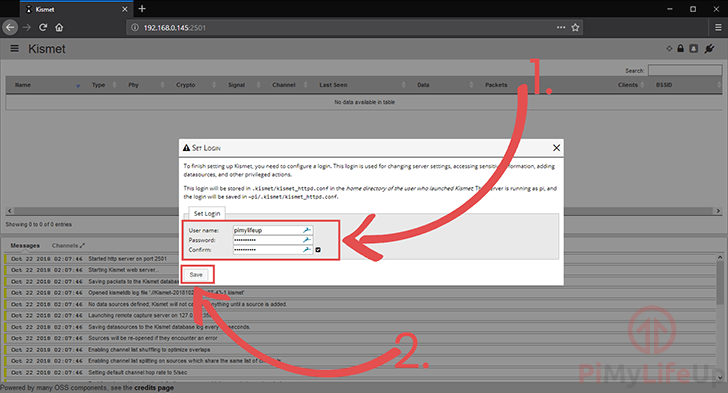
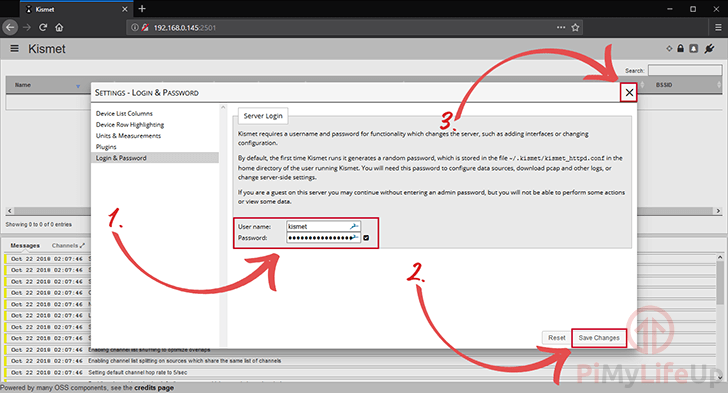
1. Upon your first load of Kismet’s web interface, you will be asked to enter new login details.
Set a username and password (1.) that you will easily remember then click the “Save” (2.) button.
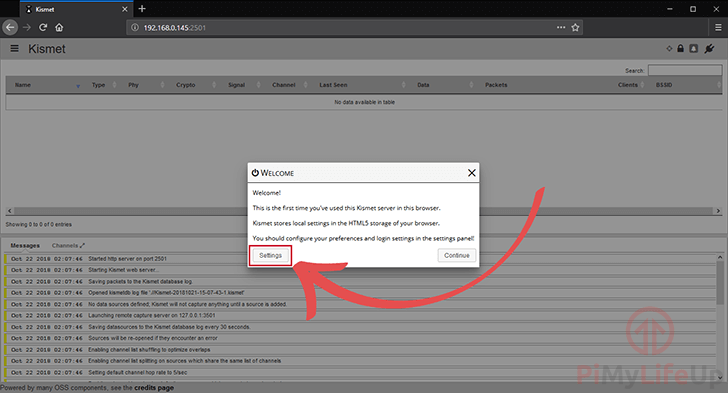
2. After setting your username and password, you will be shown the following screen.
If you ever need to log in with a web browser that isn’t already logged in, then you will need to start by going to the settings screen by clicking the “Settings” button as shown below.
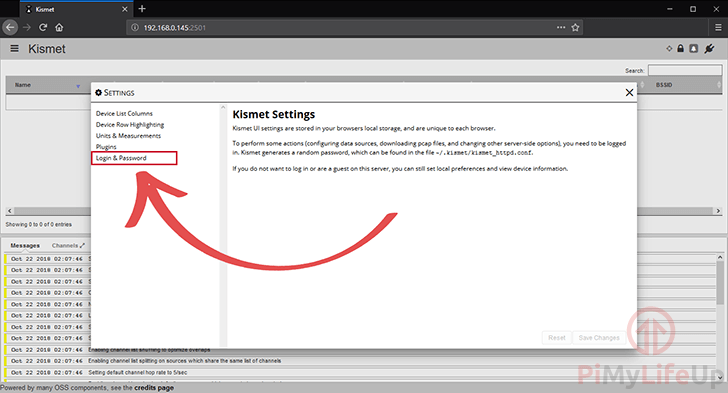
3. Upon entering the Settings screen, you will be greeted with the following screen. This screen explains that the settings for the UI such as Login & Password are saved for each browser.
To continue, click the “Login & Password” tab in the left-hand side-bar as highlighted in the screenshot below.
4. In here, enter the username and password (1.) that you set within Step 1 of this section.
Once you have entered a correct username and password click the “Save Changes” button (2.) located in the bottom right-hand corner on the modal.
Once you have set everything correctly, you can click the “X” (3.) to close the settings box.
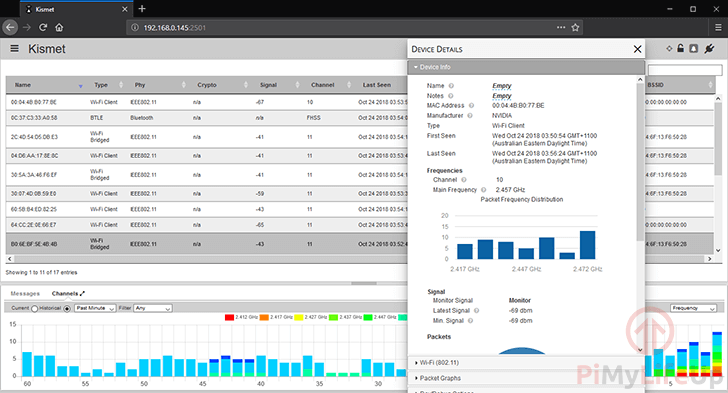
5. You should now see that the table has now been populated with all the WiFi devices and Bluetooth devices that your WiFi adapter and Bluetooth adapter can find.
You can find out more about a specific device by clicking them in the table.
Clicking a device will bring up a Device Details screen that provides more information on that device. This includes the ability to download pcap (packet capture) files for it.
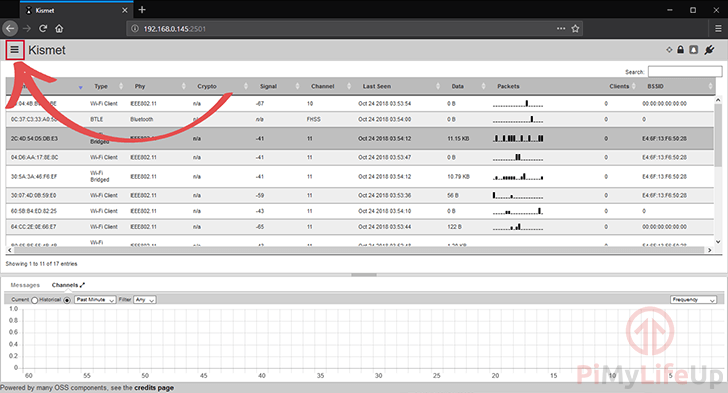
6. You can also manage the devices you are utilizing to capture data through the web interface.
This interface will allow you to enable more devices or change the frequencies that you are scanning.
First, open up the menu by clicking the hamburger icon in the top left-hand corner.
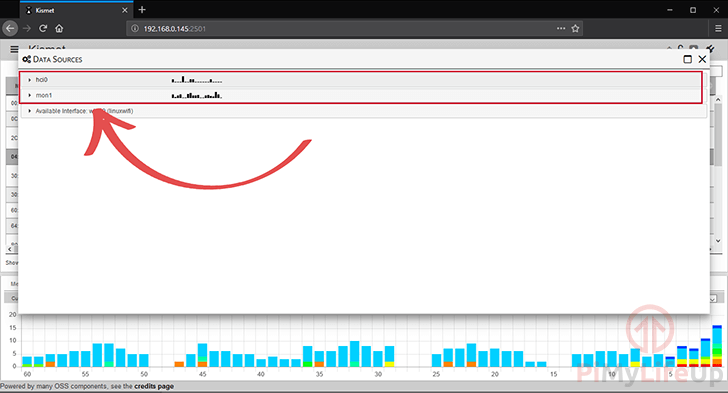
7. Now in the pop-out menu click the “Data Sources” button as shown in the screenshot below.
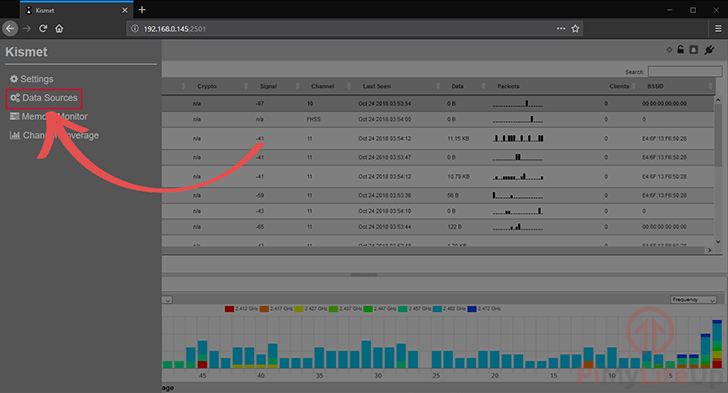
8. Now that we are within the Data Sources setting page we can see all the available data sources, including those that we enabled within the configuration file earlier.
Any interface with Available Interface next to it means that it can be enabled as an active data source. Please note that this does not mean it will work flawlessly and may throw errors when enabled.
For example, if you are using a Pi that uses an inbuilt WiFi chip, make sure that you do not enable wlan0. Otherwise, there will be a flood of errors due to it lacking the ability to enter monitor mode.
9. Upon clicking the already enabled interfaces, you will be greeted with some more options. These options will allow you to configure your data sources better to capture just the information you want it to.
For example with the wireless monitor, you can specify the channels that you want to listen on, as well as whether it should lock itself to a certain channel.
Additionally, you can pause any active data sources.

10. You should now have have an idea on how to view the data that Kismet collects. This includes how to enable, disable and modify data sources.
Learn how to have Kismet start on boot in our next section of this tutorial.
Starting the Network Scanner at Boot
1. Getting Kismet to start at boot is a straightforward process and important if your Raspberry Pi network scanner randomly restarts.
You can skip to step 2 if you installed Kismet through their repository. Otherwise, if you compiled the source code do this step.
We need to begin by first copying the service into the systemd folder. You can do this on your Raspberry Pi by running the following command.
sudo cp /home/pi/kismet/packaging/systemd/kismet.service /lib/systemd/system/Copy2. Now before we go ahead and utilize the systemd service file, we need to make some changes to it so that it will use our pi user rather than the root user.
Begin editing the service file on your Raspberry Pi by running the following command.
sudo systemctl edit kismetCopy3. Within this blank file, enter the following lines.
These lines will override the default settings of the service and make it utilize our pi user rather than the root user.
[Service]
User=pi
Group=kismetCopy
4. You can now save this file by pressing CTRL + X then Y and finally ENTER.
5. Now that we have copied over the Kismet service file and created an override that defines the user and group we can move onto the next stage.
That next stage involves enabling the service file. Enabling the service is incredibly easy to do and involves just typing in the following command.
sudo systemctl enable kismetCopy6. With the Kismet service now enabled let’s also start it up. This will test the service to ensure that everything is working as it should.
By typing in the following command, Kismet will start up, and you should be able to access it through the web interface again.
sudo systemctl start kismetCopy7. Once we have started the Kismet service, we can check on its status at any time by utilizing the following command on your Raspberry Pi.
sudo systemctl status kismetCopyIf the text “Active: active (running)” appears then everything is working as it should be. If something else appears, check the provided log to see the last message printed out by the program.
8. The final test to see if everything is working correctly is to restart the Raspberry Pi by running the following command.
sudo rebootCopyIf everything is fine, you should be able to connect to Kismet’s web interface upon your Raspberry Pi restarting without having to re-enable the software manually.
I hope that this tutorial has shown you everything you need to know for setting up a Raspberry Pi network scanner. If you have some feedback, need help, or anything else then please don’t hesitate to leave a comment below.


Hi, does this work with the latest model of Raspberry Pi 4?
Hi Dasen,
If you are using a separate USB Wi-Fi dongle then yes this should still work on the Pi 4.
However, I haven’t personally tested this myself.
Cheers,
Emmet
Thanks for the great article, just a little detail that made all the difference in my case…
In the section “Installing the Kismet Wireless Monitoring Tools from Repo” I had to use this to get the latest version of kismet (2020-12-R3)
When using *stretch* as stated in this guide I ended up with an outdated version of kismet (Kismet 2016-07-R1) which crashed a lot and I was unable to access via http as stated in this guide.
Hope this helps someone.
Best regards,
Javier
Hi Javier,
Thank you very much for pointing this out.
I have updated the commands we are using so that it will now insert the current release name into the command.
Cheers,
Emmet
Thanks for the write-up! I’m stuck at the instruction to “sudo apt-get install kismet 2018”. The error is “E: Unable to locate package kismet2018”. If I run “sudo apt-get install kismet” (without the “2018”) the package installs, but your write-up indicates that’s an old version. Help please?
Hi John,
It appears as if the Kismet team may of re-arranged there repository.
Can you try just installing the flat “kismet” version?
Cheers,
Emmet
That worked. Thank you! –John
Thanks for a great writeup. But I am trying to use the built in wireless adapter after updating the firmware using your tutorial here – https://pimylifeup.com/raspberry-pi-nexmon/
As a result, I have to modify the instructions to alter /etc/network/interfaces.
I’m guessing that I have to use lines 3 and 5 and alter them like this:
pre-up iw phy phy0 interface add mon0 type monitor
pre-up ifconfig mon0 up
And then refer to Mon0 instead of Mon1 in the Kismet install procedure.
Does this look right to you?
I have turned my pi into a vegetable many times by incorrectly updating files, so I am a little reluctant to try this out.
Hi Al,
Sorry for taking time to reply, we have been quite busy with writing new content and updating old tutorials so we haven’t had as much time to reply to people as we would like.
You are correct in that you should now by pointing towards the phy0 device, but you will also need to modify step 2 of ” Preparing the Wireless Monitor for Network Scanning” so that it uses wlan0 instead of wlan1, as the inbuilt WiFi will operate on that interface.
Step 2 should end up looking something like this.
 allow-hotplug wlan0

 iface wlan0 inet manual

 pre-up iw phy phy0 interface add mon1 type monitor

 pre-up iw dev wlan0 del

 pre-up ifconfig mon0 up
Just make sure you update references in the rest of the tutorial to point to mon0 instead.
Hopefully that helps you out with your issue.
Cheers,
Emmet