In this tutorial, we will be showing you how to install and run Wireshark on the Raspberry Pi.

WireShark is a free and open-source software we can install on the Raspberry Pi to analyze packets sent over its network interfaces.
In networking, a packet is a formatted unit of data written in a way that the receiving network protocol can unpack it and it will remain valid being sent over a network.
Being able to analyze network data coming from your device is helpful in numerous ways. For example, you can use Wireshark to troubleshoot network issues, analyze the data being sent or received by software, and more.
Please note that since Wireshark is a graphical interface, you will need to be using a desktop flavor of Raspberry Pi OS. Do not use the “lite” versions as they are terminal only.
Equipment
Below you can find the list of the equipment we used when installing Wireshark onto our Raspberry Pi.
Recommended
- Raspberry Pi Amazon
- Micro SD Card Amazon
- Power Supply Amazon
- Ethernet Cable Amazon or Wi-Fi Amazon
- HDMI Cable Amazon
- Monitor Amazon
Optional
This tutorial was tested on the Raspberry Pi 400 running the latest version of Raspberry Pi Bullseye Desktop.
Installing and Configuring Wireshark on the Raspberry Pi
Installing Wireshark on a Raspberry Pi is a straightforward process as the software is available through the official package repository.
This short section will show you how to install and configure Wireshark using the terminal.
Installing Wireshark
Being available through the official package repository makes installing Wireshark a breeze. In fact, it is only really one command that we need to run to install the software.
1. Before installing Wireshark onto the Raspberry Pi, we must first update the package list. At the same time, we will also upgrade any existing packages.
You can update the package list and upgrade any out-of-date packages using the following command.
sudo apt update
sudo apt upgradeCopy
If prompted to continue, you will need to type in Y and press the ENTER key to confirm the upgrade.
2. With the package list updated, we only need to run the command below in the terminal to install Wireshark to our Pi.
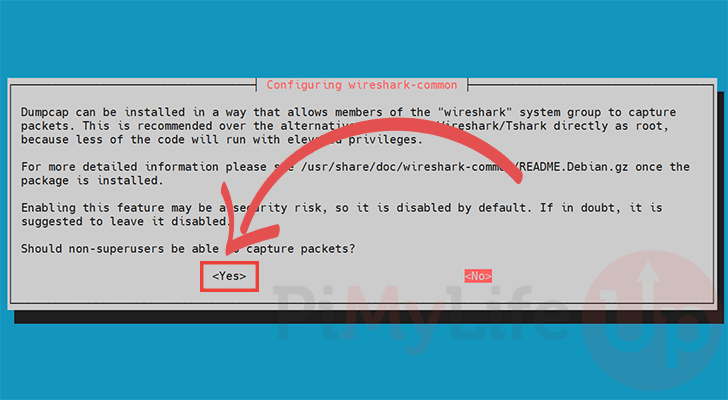
sudo apt install wiresharkCopy3. During the installation of Wireshark, you will be prompted on whether you want the software to be accessible by non-root users.
By selecting “<Yes>", a user will be able to use “dumpcap” and Wireshark as long as it is a part of the “wireshark” group.
Since that is how we plan to set up Wireshark, use the ARROW keys to select “<YES>“, and press the ENTER key.
4. While you now have Wireshark installed on your Raspberry Pi, there is some additional work we need to do within the terminal.
Configuring the Raspberry Pi for Wireshark
Wireshark won’t work as intended out of the box as your default user won’t have access to the required tools. Don’t worry though, all we need to do is add the user to a specific group.
While you can run Wireshark on your Raspberry Pi without doing this, you won’t be able to monitor your network interfaces.
5. The only thing we need to do now is add your user to the “wireshark” group.
By adding the user to this group, it should have access to the “dumpcamp” software that Wireshark utilizes.
To add your user to the “wireshark” group, we will use the usermod command as shown below. Please make sure that you replace “pi” with your username.
sudo usermod -a -G wireshark piCopy6. After making changes to your user’s group, you will need to log off and back on or restart your device entirely.
If you would like to restart your Raspberry Pi, then you can use the following command.
sudo rebootCopyRunning Wireshark on the Raspberry Pi
Now that we have Wireshark installed on the Raspberry Pi, we can now move on to showing you how to run the software on your device.
Opening Wireshark
Wireshark is easy to open thanks to it being automatically added as an application to the Raspberry Pi OS desktop. This section will show you exactly where you can find the software.
1. Before you can use Wireshark, you will, of course, need to open the software. The easiest way to open it is through the Raspberry Pi OS start menu.
Open the start menu by clicking the Raspberry icon in the top-left corner of your screen.

2. With the start menu open on your device, hover over the “Internet” option (1.).
You should now see “Wireshark” pop up as an option within the menu.Click “Wireshark” to open it (2.).

3. You should now have the Wireshark software open on your Raspberry Pi and ready to use.
Basic Usage of Wireshark
To give you a basic idea of how Wireshark works on your Raspberry Pi, we will now quickly run you through its interface. But, of course, this is only a very quick glance at what this packet analyzer is capable of.
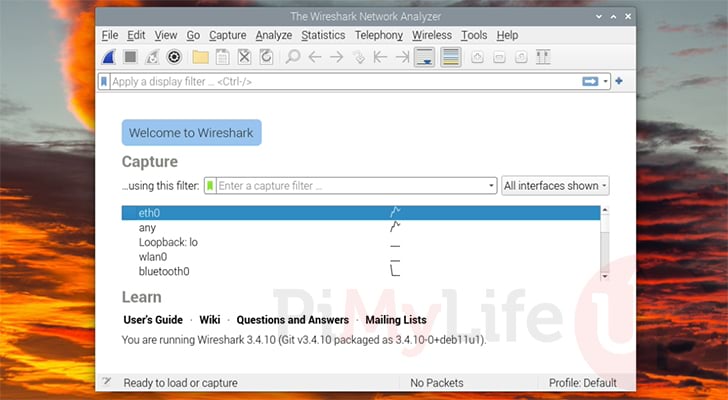
4. Now that Wireshark is open, you will be greeted by a welcome screen.
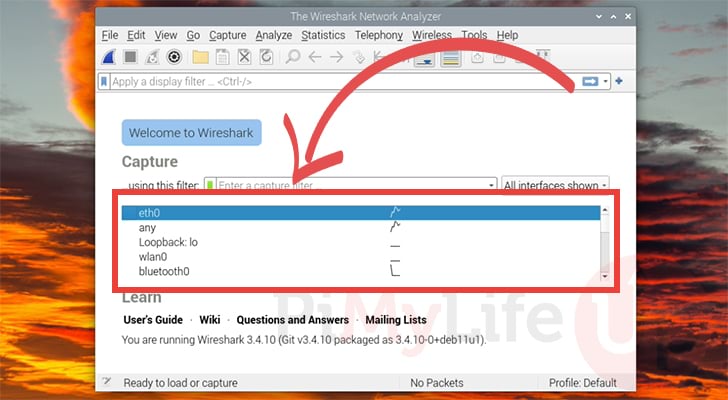
You will want to look at the list of capture devices on this screen. Here you should see a list of your network interfaces.
For example, we will click the “eth0” interface to start capturing packets on that particular network interface.
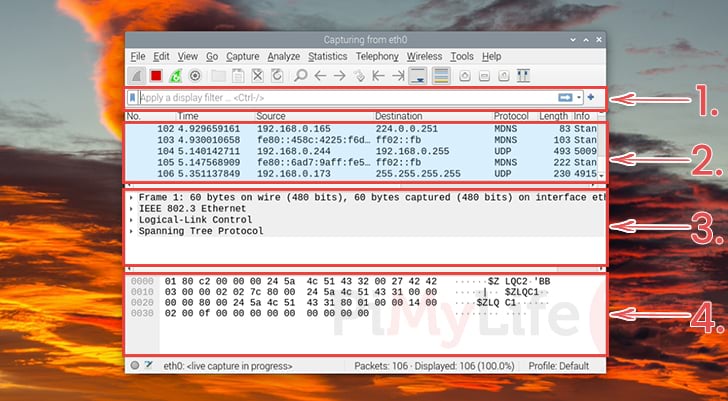
5. Wireshark will begin immediately capturing packets on your chosen interface.
- At the top of this screen, you will see a textbox.
This textbox allows you to set display filters to minimize the amount of data you see. This is especially useful when you know particular things, such as where the data should be sent.
For example, with the TCP protocol, you could use “tcp.port == 80” to filter the packet list to only traffic occurring on port 80. - Next, you will see your packet list.
Here you can scroll through and see every packet Wireshark has captured on your Raspberry Pi. - The next box down gives you details about the currently selected packet.
Within this box, you can see a breakdown of that particular packet in a human-readable format. - The final box on the Wireshark interface allows you to view the exact bytes sent within this captured packet.
Conclusion
Throughout this tutorial, we showed you how you can install and run Wireshark on the Raspberry Pi.
Wireshark is a very powerful packet capture and analysis tool that can monitor any network interfaces on your device. To learn more about this software, we highly recommend checking out the official Wireshark documentation.
Please comment below if you have had any issues with getting Wireshark to run on the Pi.
Be sure to check out our many other Raspberry Pi projects and our selection of networking guides.


hi Bro,
sudo usermod -a -G wirehsark pi. type mistake
Hi Memoli,
Thank you for pointing that out. I have now corrected that typo.
Cheers,
Emmet