This guide will run you through the process of setting up Bluetooth on the Raspberry Pi.

Bluetooth is a popular low powered wireless technology that is designed for sharing data between two devices over a short distance.
Learning how to interact with Bluetooth devices on your Raspberry Pi is an important task with the ever-increasing number of wireless devices.
A wide variety of devices now implement Bluetooth. These devices range from mobile phones to headphones, and even video game controllers such as the Wiimote controllers.
For the best support for Bluetooth on the Raspberry Pi, we recommend using a Raspberry Pi 3 or newer, or the Pi Zero W. The in-built Bluetooth functionality of these Raspberry Pi’s tends to be more reliable than the USB Bluetooth dongles.
Equipment List
Here is all the equipment that we recommend for this Raspberry Pi Bluetooth tutorial.
Recommended
- Raspberry Pi Amazon
- Micro SD Card Amazon
- Power Supply Amazon
- Bluetooth Adapter Amazon (If using a Pi without Bluetooth)
- Ethernet Cable Amazon or Wi-Fi Amazon
Optional
This tutorial was tested on a Raspberry Pi 400 running the latest version of Raspberry Pi Bookworm.
Setting up Bluetooth on the Raspberry Pi
In this tutorial, we make use of the Raspbian operating system (OS), so if you’re using a different OS, then this tutorial may not work.
1. Before we start setting up your Raspberry Pi to be able to use Bluetooth, go ahead, and update all existing packages.
Updating packages ensures that we have the latest firmware for the Raspberry Pi and should help reduce the chances of you running into issues.
To update all installed packages, you need to run the following two commands.
sudo apt update
sudo apt upgradeCopy
2. With everything up to date, let’s proceed to install all the Bluetooth packages we might need for our Raspberry Pi.
We will be installing several packages that provide better Bluetooth support to the operating system. These packages also offer some tools that make dealing with Bluetooth devices simpler.
To install all of these packages, run the command below.
sudo apt install bluetooth pi-bluetooth bluez bluemanCopyOnce we have all the packages installed, we can proceed to learn how to connect to a Bluetooth device using the terminal or the GUI tool.
Using Bluetooth using the GUI
The Bluetooth GUI that we installed earlier makes connecting to devices from your Raspberry Pi incredibly easy.
1. To load the Bluetooth GUI tool on Raspbian, you need to first click the raspberry icon in the top left-hand corner (1.) to open the start menu.

2. Now that you have the start menu open, hover over the “Preferences” option (1.).
In the pop-up menu, you must click “Bluetooth Manager” (2.).

3. When you first open the Bluetooth manager you may be asked if you want the software to start up at boot.
Select yes to this option to continue.
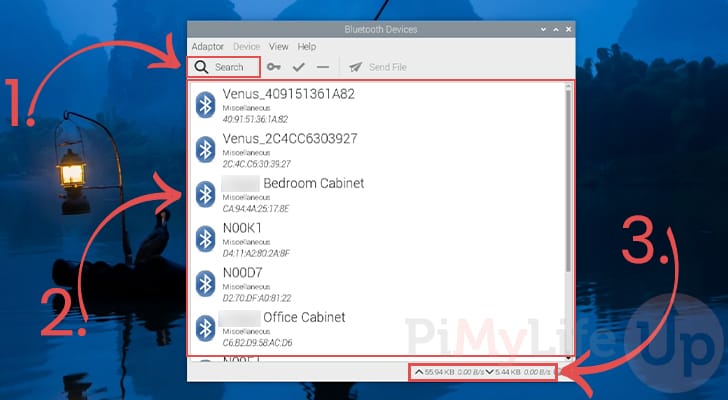
4. Within the interface, you can get your Raspberry Pi to scan for other Bluetooth devices by clicking the Search button (1.)
As your Pi searches for other Bluetooth devices, you should see them appear in the box below the toolbar (2.).
You can see the current data usage of Bluetooth on your Raspberry Pi by looking at the bottom toolbar (3.). This interface shows both current usage and total usage.
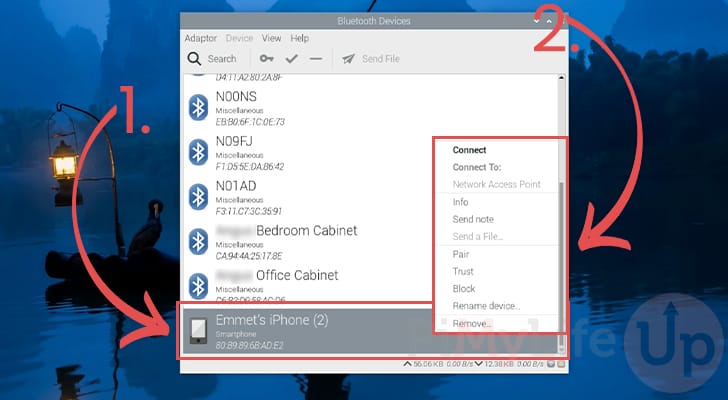
5. By right-clicking any of the displayed devices (1.), you will bring up a box showing everything you can do with that device.
Using this pop-up box (2.), you can easily pair, trust, or block a device.
The Bluetooth interface will even try to work out what the device is and will offer different ways of connecting to it.
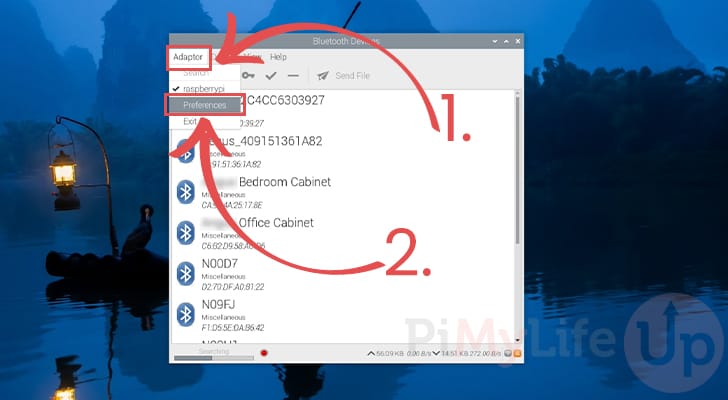
6. Using this interface on your Raspberry Pi, you are also able to change the options for your Bluetooth adaptors.
To get to the configuration page, you need first to click “Adaptor” in the menu bar (1.)
Next, you need to click “Preferences” to open up the settings page (2.)
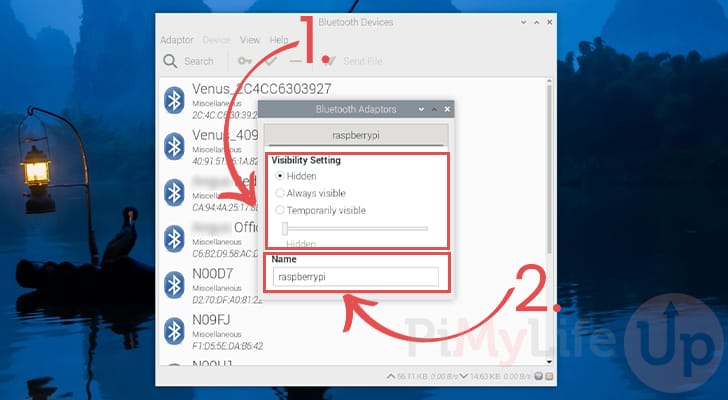
7. Within this interface, you can change the visibility for your Raspberry Pi’s Bluetooth adaptor (1.)
By default, this is always set to “Hidden“. However, you can set this to “Always visible” so that other devices can always find it, or set it to only be available for up to 30 minutes.
You are also able to change the “Friendly Name” for your Bluetooth adaptor (2.).
The friendly name is the name that other Bluetooth devices will see you as.
For example, instead of a random identifier, they would see “raspberrypi” as the device that is trying to connect.
8. From now on you should be able to access the Bluetooth manager on your Raspberry Pi through the status bar.
To open the manager, click the white and solid blue Bluetooth icon (1.). Additionally, if you right-click the icon you can see some quick access options (2.).

Using Bluetooth within the Terminal
In this section, we are going to run you through the steps to using Bluetooth on your Raspberry Pi by using the terminal.
1. To load the Bluetooth command-line tool, you need to enter the following command on your Raspberry Pi.
bluetoothctlCopy2. Now that we are in the Bluetooth command-line tool, we need to go ahead and turn the agent on.
Switching the agent on will allow us to search for and pair with other Bluetooth devices.
You can do this by using the command below.
agent onCopy3. The next step is to tell the Bluetooth device on our Raspberry Pi to scan for other devices.
By scanning for devices, we can retrieve their MAC address and begin the process of pairing that device with the Raspberry Pi.
To start the scan process, all you need to do is enter the following command.
scan onCopyFrom this command, you should start seeing a result like what we have below.
[bluetooth]# scan on
Discovery started
[CHG] Controller DC:A6:32:05:7F:06 Discovering: yes
[NEW] Device 51:B8:16:6A:6F:C6 51-B8-16-6A-6F-C6
[NEW] Device 40:23:43:3F:4E:58 BRAVIA 4K UR2
The two columns you will probably want to pay attention to the most are the third and fourth columns.
The third column specifies the MAC address of the device that triggered the event. This address is what you will use if you want to pair the device.
The fourth column is the descriptor. For a newly found device, this is typically the device name.
4. Once you have found the MAC address of the device you want to connect to, you can now proceed to pair your Raspberry Pi with it.
To get Bluetooth to pair the device to your Raspberry Pi, you need to make use of the following command.
pair [XX:XX:XX:XX:XX:XX]5. When you first pair a device, you will be immediately connected to it.
However, once you have gone out of range of the Raspberry Pi’s Bluetooth, you will need to re-connect the device by using the following command.
connect [XX:XX:XX:XX:XX:XX]Copy6. If you don’t want to have to re-pair your device, then you can make use of the trust command.
This command works just like the other two commands and requires the MAC address of the Bluetooth device that you want to trust.
trust [XX:XX:XX:XX:XX:XX]CopyYou can only trust a Bluetooth device on your Raspberry Pi after you have completed the initial pairing.
Conclusion
Hopefully, at this point, you will now have Bluetooth up and running without any issue.
If you have any feedback on this Raspberry Pi Bluetooth tutorial or have run into any issues, then feel free to drop a comment below.


Great giude. Just a point: specify bluetoothctl must be opened as root, otherwise it does not start the scan.
Not on new distros, but you might need to add the user to the group ‘bluetooth’ if you are on a lite raspbian.
Great ! This tuto did the job perfectly !
Thank you !
Thanks for this straightforward tutorial ! I had just a bluetooth mouse availalbe, and as such I had to use the command line to install it with the keyboard.