In this tutorial, we will show you how to connect the DHT22 humidity sensor to the Raspberry Pi and how you can use Python to read the data.
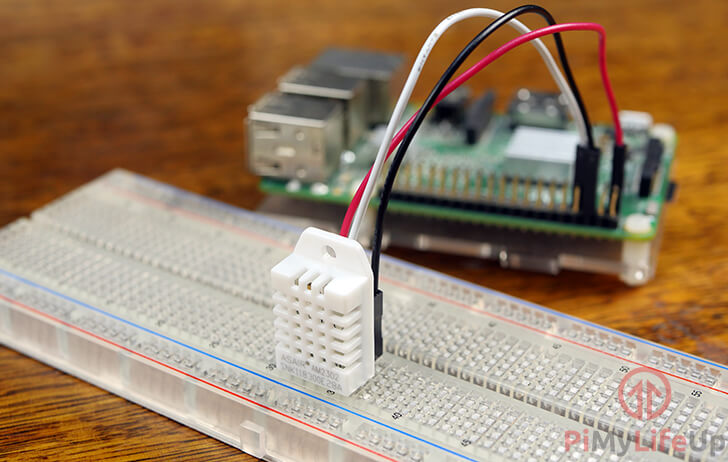
The DHT22 is a versatile and low-cost humidity sensor that can also calculate the temperature of an area.
This sensor has a relatively long transmission distance, allowing the sensor to transmit data through wires up to 20m away from the Raspberry Pi.
As a bonus, the DHT22 is a digital sensor with an inbuilt analog to digital converter. The converter makes it a lot easier to connect the sensor to the Raspberry Pi as you do not need to deal with any additional chips.
The biggest downside to the DHT11 and DHT22 sensors is that they are quite slow sensors. They have a sampling rate of once every second for the DHT11 and once every 2 seconds for the DHT22.
You can also use the DHT22 with the Arduino, so be sure to check that tutorial if you would rather use an Arduino board.
While this tutorial covers connecting the DHT22 to the Raspberry Pi, it will also work with the DHT11 and AM2302 humidity sensors as they all use the same pinouts.


Equipment
Below is all the equipment that you will need to connect the DHT22 Humidity Sensor to your Raspberry Pi.
Recommended
- Raspberry Pi Amazon
- 8GB Micro SD Card Amazon
- Breadboard wire Amazon
- DHT22 Humidity Sensor Amazon
- 10k ohm resistor Amazon (Brown, Black, Orange, Gold)
Optional
- Raspberry Pi Case Amazon
Video
The video below will take you through the steps to assemble the humidity circuit and how to connect it to your Raspberry Pi. It also covers the steps on how to write a simple Python script to talk with the DHT22 sensor.
If you prefer a written tutorial, you can find it right underneath the video.
Raspberry Pi Humidity Sensor Hardware Setup
In this section of the tutorial, we will show you the process on how to connect your DHT22 humidity sensor to the Raspberry Pi.
Thanks to the DHT22 being a digital sensor, it is incredibly straightforward to connect to the Raspberry Pi. The single data pin is able to connect directly to the Raspberry Pi’s GPIO pins.
You can follow our guide below to see how to connect the DHT22 to your Raspberry Pi.
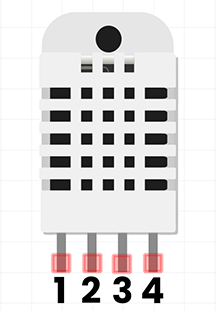
DHT22 Pinout
To make things easier when assembling the humidity sensor circuit we have included the pinout of the DHT22 sensor.
This diagram should help you work out where each pin needs to go on the Raspberry Pi.
- Pin 1 is VCC (Power Supply)
- Pin 2 is DATA (The data signal)
- Pin 3 is NULL (Do not connect)
- Pin 4 is GND (Ground)
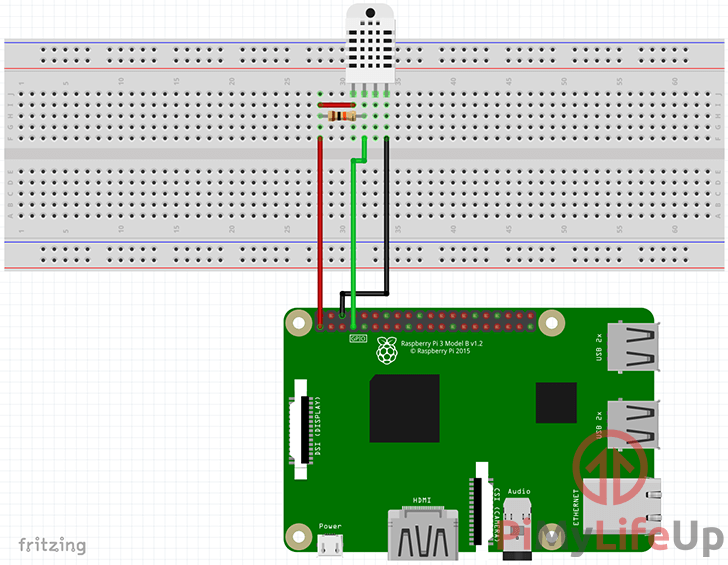
Raspberry Pi DHT22 Circuit
Here, we have included a couple of ways to assemble the Raspberry Pi Humidity sensor circuit.
You can refer to our two diagrams below to see which pins need to be connected to which, or follow the written steps below.
- Place a 10k resistor between Pin 1 and Pin 2 of the DHT22
- Wire Pin 1 of the DHT22 to Physical Pin 1 (3v3) on the Pi
- Wire Pin 2 of the DHT22 to Physical Pin 7 (GPIO4) on the Pi
- Wire Pin 4 of the DHT22 to Physical Pin 6 (GND) on the Pi

Preparing the Raspberry Pi to talk with the Humidity Sensor
In this section, we will prepare your Raspberry Pi to communicate with the DHT22 humidity sensor.
Primarily, we need to install Python 3 on the Pi and set up a Python Virtual Environment.
Setting up your Raspberry Pi
1. Before we get started with programming a script for the Raspberry Pi humidity sensor, we must first ensure that we have the latest updates on our Raspberry Pi.
We can do this by running the following two commands to update both the package list and installed packages.
sudo apt update
sudo apt upgradeCopy
2. With our package list now up to date, we need to go ahead and install both python 3 and pip. We will be using both of these packages to interact with our humidity sensor.
Install both “python3-dev” and “python3-pip” by running the command below.
sudo apt install python3-dev python3-pipCopy3. Before we proceed any further, you will need to install the LGPIO library onto your Raspberry Pi. Failing to do so will cause errors down the track when you go to install the DHT22 library that we rely on.
To install this library, please follow our guide that will show you how to compile the library directly on your Pi.
https://pimylifeup.com/raspberry-pi-install-lgpio/Setting up a Python Virtual Environment for the DHT22 Humidity Sensor
4. Our first step is to create a directory where we will store the Python virtual environment for the DHT22 humidity sensor.
You can create a directory called “dht22” in your user’s home directory by running the following command.
mkdir ~/dht22Copy5. After creating the directory, you must now change to it by using the cd command.
cd ~/dht22Copy6. We now need to use Python to generate the virtual environment. All of the libraries that we will be using will be installed to this environment.
Generate the Python virtual environment by typing the following command.
python3 -m venv envCopy7. Once the virtual environment has been generated, we will need to tell the terminal to utilize it as its source.
You will need to run this command every time you want to interact with your DHT22 humidity sensor script. The reason for this is that the Python library we are using will be installed only in this environment.
source env/bin/activateCopy8. Now using pip, we will go ahead and install Adafruit’s DHT library to the Raspberry Pi.
We will be using this Python library to interact with our DHT22 Humidity and temperature sensor.
As a bonus, the library also supports the DHT11 and AM2302 humidity/temperature sensors, making it a great library to learn how to utilize.
Run the following command to install the DHT library on your Raspberry Pi.
python3 -m pip install adafruit-circuitpython-dht lgpio RPi.GPIOCopyProgramming for the Raspberry Pi humidity sensor
1. Now that we have installed the Adafruit DHT library on our Raspberry Pi we can proceed to program with it.
First, we must make a Python script where we will store all our code. To begin writing this file, you can enter the following command into your Raspberry Pi.
nano ~/dht22/humidity.pyCopy2. Within this file, we need to enter the following lines of code. We will explain each section of the code as we go along.
a. The first library we will be importing in this script allows us to sleep the script between readings. This setup stops the script from constantly reading from the sensor when it doesn’t need to.
import timeCopyb. This line imports the “Adafruit_DHT” library that we obtained using pip in the previous section.
We will be using this library to talk and interact with the DHT22 sensor. The library enables us to easily retrieve the temperature and humidity data from the sensor with just a few lines of Python code.
import adafruit_dhtCopyc. The Adafruit DHT22 Library also required us to import the “board” library.
This library is used internally by Adafruit to select the pins to which your humidity sensor is attached.
import boardCopyd. Our next step is to create our “dht_device” variable that points to Adafruit DHT22 library. In this function call, we pass in the pin to which our DHT22 sensor is connected on our Raspberry Pi.
We use this object to get the current temperature and humidity from the sensor.
Since we are using the GPIO4 pin, we need to use the “D4” option from the board library.
dht_device = adafruit_dht.DHT22(board.D4)Copye. Since we want our Python script to get readings from the humidity sensor constantly, we will need to start an infinite loop. This loop causes the script to run continually until you terminate it.
All code that is within this loop must be indented.
while True:Copyf. One problem with the DHT22 library is that it can commonly throw errors. This issue isn’t necessarily a problem with the DHT22 library or your Raspberry Pi, but more with how the sensor itself works.
To prevent an error from stopping the script, we must run our code within a “try” block.
Indent the code by another four spaces after this block.
try:Copyg. Finally, within our try block, we can get our first temperature value from our sensor. Reading a value from the sensor is as simple as grabbing the “temperature” value from the “dht_device” object.
Since the DHT22 reports temperature in Celsius, we will store the value in a variable called “temperature_c“.
temperature_c = dht_device.temperatureCopyh. While the DHT22 humidity sensor might not give us the value in Fahrenheit, luckily, it is very easy to convert the value.
The following line of code converts our Celsius temperature to Fahrenheit and stores it in a variable called “temperature_f“.
temperature_f = temperature_c * (9 / 5) + 32Copyi. Luckily, the humidity reading is super simple and is returned as a percentage that we store within the “humidity” variable.
humidity = dht_device.humidityCopyj. Finally, once we have gotten the temperature and humidity values from our DHT22 sensor, we can print them to the terminal by making use of the “print()” function.
print("Temp:{:.1f} C / {:.1f} C Humidity: {}%".format(temperature_c, temperature_f, humidity)Copyk. Now that we are finished with our try block, we must end it with the following block of code.
This code catches any errors that might be caused by the DHT22 library on our Raspberry Pi and prints the error to the terminal. By catching the error, the script will continue to run.
    except RuntimeError as error:
        print(err.args[0])Copy
l. Finally, we end every loop by running a short 2-second sleep of the script. This sleep allows us time between recordings and reduces the likelihood of encountering errors.
time.sleep(2.0)Copy3. Once you have finished entering the code, it should look like what we have displayed below.
import time
import adafruit_dht
import board

dht_device = adafruit_dht.DHT22(board.D4)

while True:
    try:
        temperature_c = dht_device.temperature
        temperature_f = temperature_c * (9 / 5) + 32

        humidity = dht_device.humidity

        print("Temp:{:.1f} C / {:.1f} F    Humidity: {}%".format(temperature_c, temperature_f, humidity))
    except RuntimeError as err:
        print(err.args[0])

    time.sleep(2.0)Copy
4. When you are happy that all the code you entered is correct, you can then save the file by pressing CTRL + X, then Y followed by ENTER.
5. With the script now saved, let’s go ahead and run it so that we can start to see the data from the humidity sensor.
You can run this script by running the following command.
python3 ~/dht22/humidity.pyCopy6. From this command, you should start seeing results like what we have below. The temperature and the humidity should be displayed through the command line.
Temp:24.0 C / 75.2 F    Humidity: 47%
Temp:24.0 C / 75.2 F    Humidity: 48%
Temp:24.0 C / 75.2 F    Humidity: 49%
Temp:24.0 C / 75.2 F    Humidity: 52%
7. In the next section of the tutorial, we will show you how you can modify this script so that it logs the data to a file. The file will be able to be read by a program such as Microsoft Excel or Google Spreadsheets.
Logging the Data from the Raspberry Pi Humidity Sensor
1. Let’s start by creating a new script. This script will be similar to our previous script, but with a few changes made to allow us to write to a file.
Start by running the following command to begin writing our new script.
nano ~/dht22/humidity_logger.pyCopy2. Within this file, enter the following lines. We will only be explaining the new additions to the script in this section.
a. Here we add the import for both the “os” and “time” libraries. We utilize the “os” library to check if our CSV file exists before attempting to write to it.
We use the “time” library to timestamp each new row with the current date and time.
import os
import time
import adafruit_dht
import boardCopy
b. There is no difference with this line, keep it as you had in the previous script.
dht_device = adafruit_dht.DHT22(board.D4)Copyc. Here we wrap everything within a try statement to handle any potential errors.
We open up a handle to our “/home/pi/humidity.csv” file with the “a+” tag applied. The a+ tag means that any data written to the file will be appended to the end of it.
Next, we use the “os” library to see if we have ever written to this file before. If the size returns as 0 we then write an initial line to the file. This line will contain our column headers, so you can understand the data easier.
try:
    f = open('/home/pi/humidity.csv', 'a+')
    if os.stat('/home/pi/humidity.csv').st_size == 0:
            f.write('Date,Time,Temperature C, Temperature F,Humidity\r\n')
except:
    passCopy
d. Here we have our while loop again. We utilize the DHT Library to read data from our DHT22 humidity sensor again.
This function stores the data it reads from the sensors into our “humidity” and “temperature” variables.
while True:
        temperature_c = dht_device.temperature
        temperature_f = temperature_c * (9 / 5) + 32

        humidity = dht_device.humidityCopy
e. Our big change to this section of code is that instead of printing the temperature and humidity to the console, we write it to our “humidity.csv” file. We do this by using the file handle we opened earlier.
We format the text written to the file to include both the current date, current time, our formatted temperature, and humidity.
At the end of the loop, we sleep the script for 30 seconds. If you want to make it sleep longer or poll more often, then modify this number.
        f.write('{0},{1},{2:0.1f}*C,{2:0.1f}*F,{3:0.1f}%\r\n'.format(time.strftime('%m/%d/%y'), time.strftime('%H:%M'), temperature_c, temperature_f, humidity))
    except RuntimeError as err:
        print(err.args[0])

    time.sleep(30)Copy
3. Once you have finished entering the code, it should look like what we have displayed below.
Ensure that you replace “pi” with your own username.
import os
import time
import adafruit_dht
import board

dht_device = adafruit_dht.DHT22(board.D4)

try:
    f = open('/home/pi/dht22/humidity.csv', 'a+')
    if os.stat('/home/pi/dht22/humidity.csv').st_size == 0:
            f.write('Date,Time,Temperature C, Temperature F,Humidity\r\n')
except:
    pass

while True:
    try:
        temperature_c = dht_device.temperature
        temperature_f = temperature_c * (9 / 5) + 32

        humidity = dht_device.humidity

        f.write('{0},{1},{2:0.1f}*C,{2:0.1f}*F,{3:0.1f}%\r\n'.format(time.strftime('%m/%d/%y'), time.strftime('%H:%M'), temperature_c, temperature_f, humidity))
    except RuntimeError as err:
        print(err.args[0])

    time.sleep(30)Copy
4. Once done, save the file by pressing CTRL + X, then Y followed by ENTER.
5. Now, like our last script, let’s go ahead and run it by entering the following command.
python3 ~/dht22/humidity_logger.pyCopy6. Once you exit the script, you will now be able to check out the “humidity.csv” file to see all the results that you have logged over time.
If you run the following command, you should see the contents of the file.
nano ~/dht22/humidity.csvCopy7. Below is an example of the contents that you should see within this file.
Date,Time,Temperature,Humidity
05/04/19,05:47,22.3*C,50.6%
05/04/19,05:48,22.2*C,50.4%
05/04/19,05:48,22.2*C,50.6%
05/04/19,05:49,22.2*C,50.4%
05/04/19,05:49,22.2*C,50.4%
05/04/19,05:50,22.2*C,50.3%
05/04/19,05:50,22.2*C,50.3%
05/04/19,05:51,22.2*C,50.2%
Once you have verified that the file is being written successfully, you are finally done programming your Raspberry Pi humidity sensor.
If you need a waterproof temperature sensor, then be sure to check out our DS18B20 temperature sensor tutorial. It covers everything you need to know, and it works perfectly alongside this sensor.
Conclusion
I hope that everything has worked correctly for you and that you’re not experiencing any issues with the humidity and temperature readings. You can easily extend this setup to either display the data using a web interface or send it to a platform like Home Assistant.
If you want to leave some feedback, please don’t hesitate to leave a comment below.


RPi lgpio and permissions stop this project dead in its tracks either fix it or scrub this project. like so many projects that have become useless due to Debian/ raspberry pi security issues!!!! please help;; I can not afford to waste money on RPI adafruit arduino stuff that is not usable!!
Hi Lee,
Sorry for the late response but coming up with a solution did take a little longer. I haven’t run into any permission issues yet (Outside of the annoying of having to use a Python virtual environment) but I have found that the LGPIO library won’t install normally.
We have added an additional step that will take you to our guide that covers installing this particular library by compiling it from its code. This should resolve the issue.
Kind regards,
Emmet
Just curious Adafruit just pulled the plug on dht22 software which makes my 2 week project a complete waste of time…My printers don’t work because of greedy ink sales and software lic. why buy anything it will not work in a month.. really fed up with the computer industry!!! interface drivers kaput microsoft trashing personal computers bios..
No it is not your fault just venting.. thank you for the tips and help
Lee Hyde
Hello, I’m following the first portion of this article and it won’t run for me. I’ve followed the steps exactly and I keep getting the error “ModuleNotFoundError: No module named ‘RPi’ from the import board line. I have a fresh install of Bookworm on a pi 4b.
Hi Andrew,
I ran into a similar error and got it working. It turns out installing lgpio and RPi.GPIO did the trick.
We have updated the tutorial to reflect this fix. Let us know if it still gives you trouble.
Thank you, that solved my issue. Great tutorial, simple and straight forward, I appreciate it.
I have tried several combo of effort. Same thing here
went down after upgrade that was installed yesterday
Good luck
hello
adafruit circuit python “import dht22 module no longer works or available
your instruction set is NO LONGER workable any suggestions???
Lee Hyde
Hi Lee,
I quickly tested the tutorial and fail to see any issues. Is there any particular error you are running into?
Additionally, you must ensure that you are within the Python virtual environment when you run the code. You should see “(env)” at the start of the terminal line. For example:
Kind regards,
Emmet
Hi – I completed the steps up to #5 and I received the following errors:
[Error Snipped]
ModuleNotFoundError: No module named ‘RPi’
Hi Data-Dan,
We have updated the tutorial to fix the issue that you are experiencing.
Installing lgpio and RPi.GPIO should fix the issue.
I am fairly new to programming in Python but have been able to follow your guide so far; I keep failing when trying to install lgpio and RPi.GPIO.
– it starts with a module not found error with swig
– then failed to build lgpio
– finally failed-wheel-build-for-install
I am doing all of this in a virtual environment (won’t let me do it otherwise). What am I missing? Any help would be appreciated.
Hi Alex,
We have now added an additional step to this tutorial that requires you to follow our guide on compiling and installing the LGPIO library from scratch. It should resolve all of the issues that you are running into.
Kind regards,
Emmet