In this Arduino humidity sensor tutorial, we will be going through the steps on how to set up the circuit and code for the DHT22 sensor.
Within this tutorial, we will be showing you the process of wiring a DHT22 sensor to your Arduino. Thanks to the simplicity of the DHT22 sensor this is a straightforward process.
Alongside this, we will be showing you how to use Adafruit’s DHT library to talk and interact with the DHT22 sensor so that you can easily read both the temperature and humidity from the sensor on your Arduino.
As a bonus, the DHT library also works with several other DHT sensors such as the DHT22, DHT21 and the DHT11 making it an excellent library to know how to use on your Arduino.
If you don’t need humidity, then you can also consider using the DS18B20 temperature sensor with the Arduino. It is also a digital sensor and has onewire support, unlike the DHT sensors.
Convinced? Let’s get to it and build this Arduino Humidity sensor circuit and bring it to life with some easy to follow code.
Equipment
You will need to have the following pieces of equipment to complete this Arduino humidity sensor tutorial.
We have written this tutorial around the DHT22 humidity sensor, so we highly recommend you use that model. Otherwise, you may run into issues later on in the tutorial.
Recommended
- Arduino Uno Amazon
- Breadboard Amazon
- Breadboard wire Amazon
- DHT22 Humidity Sensor Amazon
- 10k ohm resistor Amazon (Brown, Black, Orange, Gold)
Video
The video below will take you through the steps to assembling the circuit and deploying the code to the Arduino.
If you prefer a written tutorial, then you can find that right underneath the video.
The DHT22 Humidity & Temperature Sensor
There are various reasons why we went for the DHT22 sensor in this tutorial, for starters it is both small and highly affordable.
The DHT22 has a long transmission distance, with the cable length being able to be 20m. This distance makes the sensor highly suitable for Arduino projects where you want the Arduino to be in a central location.
This sensor is digital thus doesn’t need to deal with the Arduino’s analog pins. Being digital also makes the DHT22 less susceptible to being distorted by electrical noise over longer distances.
One of the only downsides to the sensor is that it has a reasonably slow polling rate. You will only be able to retrieve data from the humidity sensor every two seconds.
To make use of the DHT22 with your Arduino, you will want to use a 10k ohm resistor to act as a pull-up resistor on the data line.
One of the coolest things with this sensor is that it can track both the humidity and temperature. These two measurements will come in handy with a lot of different projects.
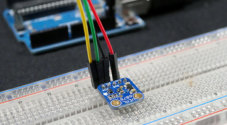
DHT22 Pins
The pin numbering starts from the left and increments towards the right with the sensor facing towards you.
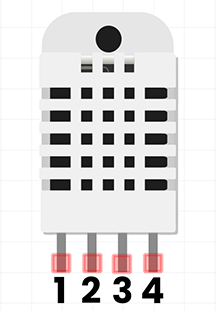
- Pin 1 is VCC (Power Supply)
- Pin 2 is DATA (The data signal)
- Pin 3 is NULL (Do not connect)
- Pin 4 is GND (Ground)
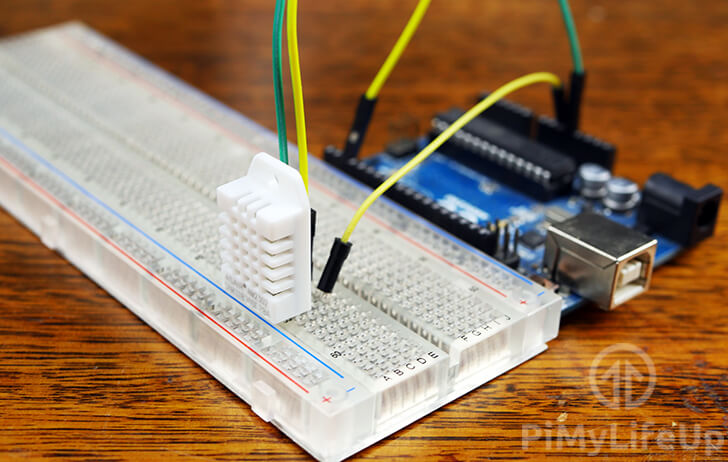
Setting up the Arduino Humidity Sensor Circuit
The circuit for this sensor is pretty straightforward and doesn’t require any complex parts or wiring.
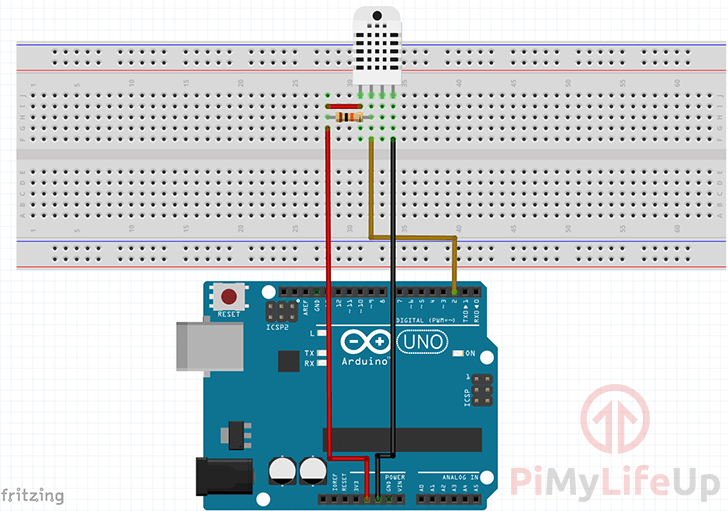
- Place the 10k resistor from pin 1 to pin2 on the humidity sensor.
- Wire Pin 1 to the 5v Pin on the Arduino
- Wire pin 2 to pin 2 on the Arduino
- Do not use pin 3 on the sensor.
- Lastly wire pin 4 to GND on the Arduino.
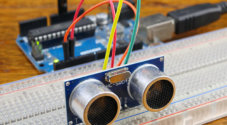
The diagram below will also help with assembling the DHT22 circuit correctly with your Arduino Uno.
It’s a simple process with only a couple of connections so you shouldn’t have any issue.
Arduino DHT22 Humidity Sensor Code
The code for this tutorial is pretty simple thanks to a library that we will use to communicate with the sensor.
We will be making use of two libraries to bring our humidity sensor to life. The first is the Adafruit DHT sensor library and the second is the Adafruit unified sensor library.
Importing the Correct Libraries
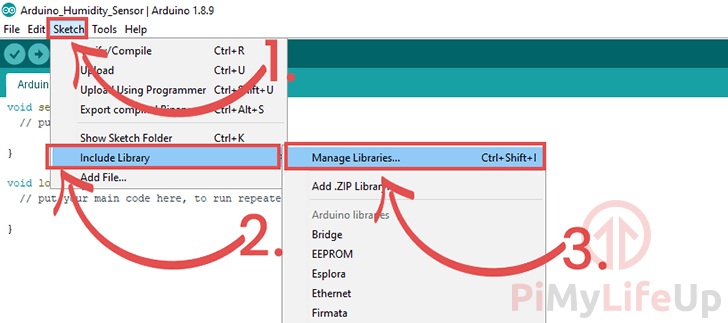
Firstly, open up the library menu within the Arduino IDE by going to Sketch (1.) -> Include Library (2.) -> Manage Libraries (3.)
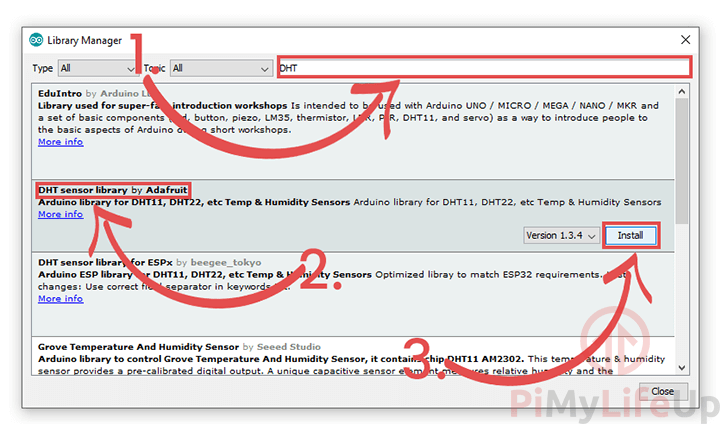
In this window, search for DHT (1.) and find the DHT sensor library by Adafruit (2.).
Install the latest available version of the library by clicking the “Install” (3.) button as shown below.
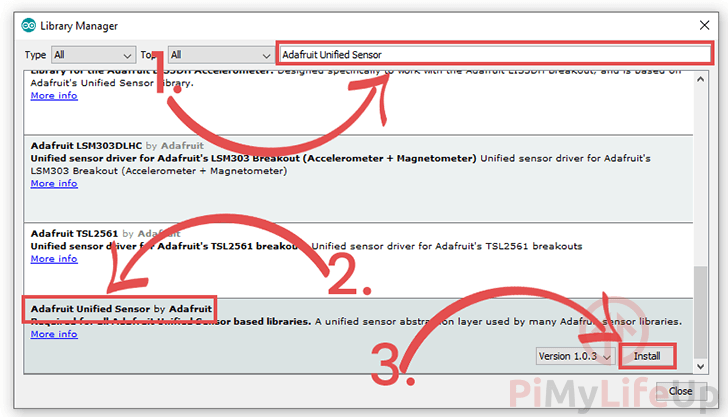
Now, in the same window, search for Adafruit Unified Sensor (1.) and find the library (2.).
Once found, click the “Install” (3.) button to proceed.
That’s all the libraries we will need for interacting with the DHT22 on the Arduino.
Writing the Code
Thanks to Adafruit’s DHT Library the code we need to write is very straightforward as the library handles the majority of the work.
Below we will walk you through the code and explain what each section does.
If you would prefer to grab the full code without the explanation, you can either get it from our DHT22 GitHub or skip to the end of this section.
#include <DHT.h>CopyThe first thing we need to do is import our header for the DHT library that we obtained earlier in the tutorial. You can manually type it in, or you can select under Sketch -> Include Library -> DHT sensor library
This library contains all the code that we need to deal with the DHT22 sensor on an Arduino.
#define dataPin 2
#define DHTType DHT22Copy
We now need to define two constant values. The first is our “dataPin” constant. This constant holds the pin number that you have connected the DHT22. The value for this constant should be 2 unless you are utilizing a different digital input pin on your Arduino.
Also, we to define the model of humidity sensor we’re using, this is assigned to our “DHTType” constant. The library that we are utilizing has support for the DHT22, DHT21 and DHT11 sensors.
DHT dht = DHT(dataPin, DHTType);CopyNext, we instantiate the DHT library, utilizing the dataPin and DHTType constants that we defined at the start of the script.
This code will prepare the DHT library to interact with our DHT22 sensor and will store the prepared object in our “dht” variable.
void setup() {
    Serial.begin(9600);
    dht.begin();
}Copy
The setup function will start by initializing the serial monitor using the baud rate of 9600, this will allow us to utilize a serial monitor to read data back from the Arduino.
Secondly, we make a call to the dht object that we instantiated earlier to run its begin function. Running the DHT libraries begin function will allow it to start reading the data from the sensor.
void loop() {
    delay(2000);
    float h = dht.readHumidity();

    float t = dht.readTemperature();Copy
Here we start by delaying the script for 2000 milliseconds (2 seconds), we do this as we can only poll the DHT22 for new information every 2 seconds.
Next, we read the humidity from the sensor using our “dht” object. We store the resulting value in our “h” variable.
Likewise, for the temperature, we retrieve this using the temperature and store the value into our “t” variable.
    if (isnan(h) || isnan(t)) {
        Serial.println("Failed to read from the DHT sensor, check wiring.");
        return;
    }Copy
In this section of code, we do some sanity checks to ensure that the values that we have read are what we are expecting.
Using the “isnan()” function, we check both our “h” and “t” variables to see if they are in fact numbers. If either one of the variables isn’t a number, we print a message through the serial connection and return to the start of the loop.
    Serial.print("Humidity: ");
    Serial.print(h);
    //Print out the Temperature
    Serial.print("% || Temperature: ");
    Serial.print(t);
    Serial.print("°C ");

    //Print new line
    Serial.println();
}Copy
In the final section of code we utilize our serial connection again, but this time we print out both the humidity and temperature values that we received from our sensor.
Using a serial monitor such as Arduino IDE’s you will be able to retrieve these values being output by your Arduino.
Testing the Arduino DHT22 Sensor Code
1. To upload the code to your Arduino go ahead and click the “Verify” button (1.) and then click the “Upload” button (2.)
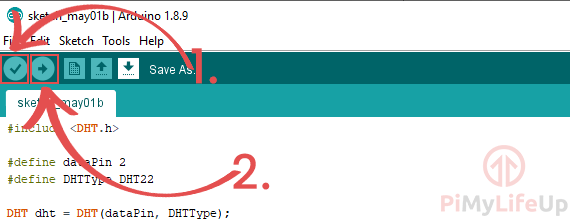
If you run into issues, check the code to make sure everything is correct.
Also, verify that your Arduino is connected and you have it selected under Tools -> Port:
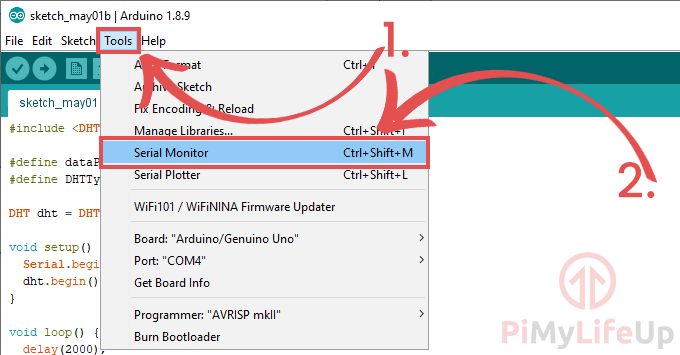
2. Your Arduino humidity sensor should now be up and recording. Now is the best time to load up the Serial Monitor so that you can see the temperature and humidity measurements.
You can open up the Arduino serial monitor software by “Tools” (1.) then clicking “Serial Monitor” (2.)
3. Within the serial monitor, you should see results like below.

I hope that this Arduino humidity sensor tutorial has taught you enough to get the DHT22 or DHT11 setup with your circuit. If you have some feedback, then please don’t hesitate to leave a comment below.