In this tutorial, we will be showing you how to use the DHT11 Humidity and Temperature sensor with your Raspberry Pi.
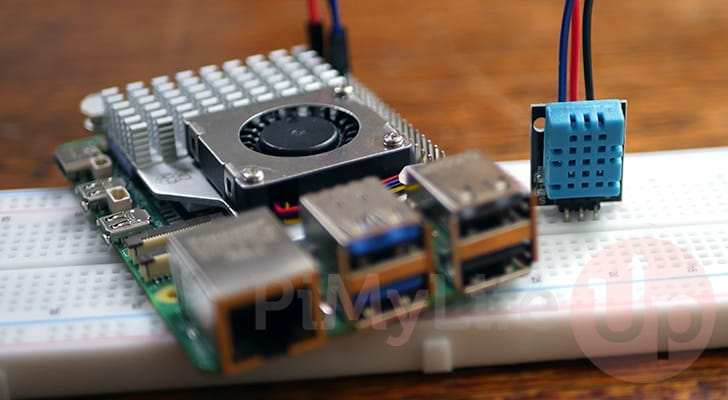
The DHT11 is a super affordable humidity and temperature sensor with a digital output. A digital signal makes this sensor incredibly easy to use with the Raspberry Pi.
You can even wire this sensor up to 20 meters away from your Pi without losing its signal. This allows you to track the humidity and temperature of areas without your Pi’s heat affecting its reading. It also means you can wire the sensor where you may not have power for the Raspberry Pi.
This humidity and temperature sensor is the cheaper version of the popular DHT22 sensor. The DHT11 has a worse temperature and humidity range while also sacrificing accuracy. It makes up for this by being a little bit cheaper, so if you have a use case where you don’t need accuracy and want to save some money, you can use the DHT11.
The following section will explain how to wire the DHT11 sensor to your Raspberry Pi. After wiring the sensor, we will write a Python script to read data from this temperature and humidity sensor.
Equipment
You will find a list of the equipment we used when connecting our Raspberry Pi to the DHT11 sensor.
Recommended
- Raspberry Pi Amazon
- Micro SD Card Amazon
- Breadboard wire Amazon
- DHT11 Temperature and Humidity Sensor Amazon
- 10k ohm resistor Amazon (Brown, Black, Orange, Gold)
Optional
- Raspberry Pi Case Amazon
This tutorial was tested with a Raspberry Pi 5 running the latest version of Raspberry Pi OS Bookworm 64-bit.
Connecting the DHT11 Sensor to the Raspberry Pi
This section will show you how to write the DHT11 humidity and temperature sensor to your Raspberry Pi.
As mentioned in this guide, the DHT11 is a digital sensor, meaning we don’t have to worry about using an analog-to-digital converter. This makes wiring the sensor to your Pi simple.
There are only three pins you have to worry about. One of the pins isn’t used at all. You can even make things simpler by buying versions of the DHT11 that contain a pull up resistor, making it even more straightforward to use.
DHT11 Pinout
Let us start by exploring the pin out of the DHT11 sensor so you can understand what each pin provides. While having four pins, there are only three that you will use when wiring this temperature and humidity sensor.
Using the diagram below, you can check each pin against our list to see what each pin is used for.
- Pin 1 is VCC (Power Input)
- Pin 2 is DATA (Digital Data Signal)
- Pin 3 is NC (Not Connected)
- Pin 4 is GND (Ground Connection)

You will find only three pins if you use a module that breaks out this sensor, such as the DHT11 sensor from SunFounder. In that scenario, consider pin 4 to be pin 3.
Wiring the DHT11 to the Raspberry Pi
Now that you know the pin out of this sensor, let us explore how to wire it to your Raspberry Pi. As mentioned earlier, this is simple as there are only three pins you need to worry about, and most of these can go straight to the Pi itself.
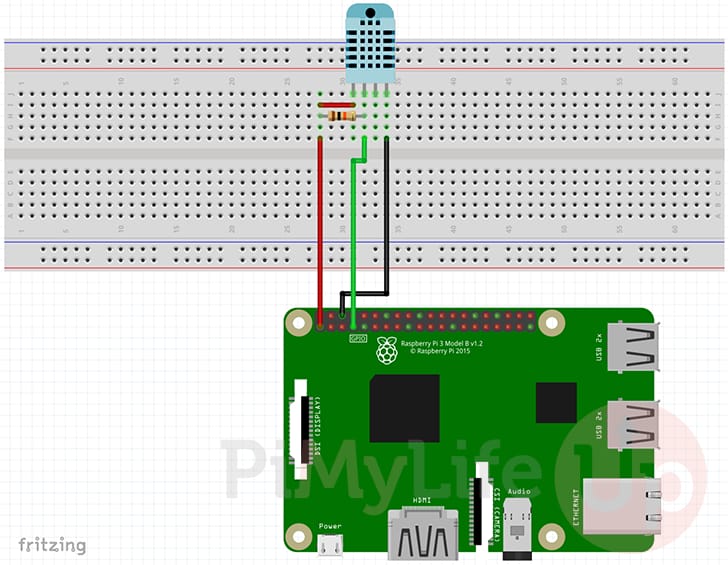
We have included two diagrams here to make understanding where each pin needs to connect easier.
- First, place a 5k ohm resistor between Pin 1 and Pin 2 of the DHT11 sensor. This resistor is used as a “pull up” to give us a common known state on the signal line.
If you are using a version of the sensor that includes this resistor, you can skip this step. - Next, wire Pin 1 of the humidity and temperature sensor to the Physical Pin 1 (3v3) on your Raspberry Pi.
- The next wire you want to run is from Pin 2 of the DHT11 Sensor to Physical Pin 7 (GPIO4) on your Raspberry Pi.
- Finally, wire Pin 4 of the DHT11 to Physical Pin 6 (GND) on your Pi.

Retrieving Data from the DHT11 Sensor on the Raspberry Pi
Once you have the DHT11 sensor wired to your Raspberry Pi, we can retrieve the temperature and humidity using a short Python script.
This section will involve using Python and the Adafruit DHT library. Both are very useful tools and are also super simple to utilize.
Preparing your Raspberry Pi
1. Before we begin, we need to ensure our Raspberry Pi is up to date.
We can update the package list and upgrade any out-of-date packages by typing in the following two commands.
sudo apt update
sudo apt upgrade -yCopy
2. Once the upgrade is complete, you can install the packages we rely on.
The packages we are installing are Python 3, its package manager called pip, and finally, the Python virtual environment module.
sudo apt install python3 python3-pip python3-venvCopy3. Before we can continue with setting up and talking with our DHT11 sensor, we must compile and install the LGPIO library on our Raspberry Pi from its source code.
This process isn’t very complicated, but it is a little long to include here directly. To learn how to compile this code, please follow our guide on compiling the LGPIO library on a Raspberry Pi.
https://pimylifeup.com/raspberry-pi-install-lgpio/Setting up the Python Virtual Environment
4. Next, we must create a directory to store the Python virtual environment and the script we will use to interact with the DHT11 sensor.
We create a Python virtual environment to separate the Python libraries we will be using from the rest of your system.
mkdir ~/dht11Copy5. After creating the directory, let us change to it by running the following command.
cd ~/dht11Copy6. Our next step is to generate a virtual environment for this directory. This is where we will install the Adafruit DHT library that will make interacting with the DHT11 sensor a breeze.
To create this Python virtual environment, use the command below.
python3 -m venv envCopy7. After creating the virtual environment, you must start using it by running the following command.
You must rerun this command whenever you want to use this Python script to interact with your DHT11 sensor.
source env/bin/activateCopy8. Now that we are in our virtual environment, we must install the Adafruit DHT library.
This library will simplify reading the temperature and humidity on your Raspberry PI from the DHT11 sensor.
You can install this library by running the following command within the terminal.
python3 -m pip install adafruit-circuitpython-dht lgpio RPi.GPIOCopyUsing Python on the Raspberry Pi to Read from the DHT11 Sensor
9. We are finally at the point where we can begin writing our Python script to read data from the DHT11 sensor.
You can begin writing this script by running the following command within the terminal.
nano dht11.pyCopy10. Within this file, you will want to write the following lines of code. These lines will use the DHT library to read from the DHT11 sensor you have wired to your Raspberry Pi.
a. This first line imports the time library. We can use this library to sleep the script in between readings. You don’t want to be constantly reading from the sensor.
import timeCopyb. On the next line, we import the Adafruit DHT library. We will use this library to read and interpret the data from the DHT11 sensor.
import adafruit_dhtCopyc. Now, we must also import the Adafruit board library.
This library makes referencing the Raspberry Pi pins easier and is how the DHT library expects the pins to be passed in.
import boardCopyd. We can now create our “dht_device” variable pointing to the DHT11 sensor. We only need to pass into this function the pin our DHT11 sensor is plugged into on our Raspberry Pi.
In our case, it is GPIO4, which is “D4” within the Adafruit library.
dht_device = adafruit_dht.DHT11(board.D4)Copye. Next, we will begin an infinite Python while loop. This loop will run until you terminate the script.
All lines after this will need to be indented. For our code, we will be using four spaces as our indentation.
while True:Copyf. Since the DHT11 library likes to throw errors, we must catch them to prevent them from breaking the entire script.
We can start this by opening up a “try:” block. This block is where Python will catch errors and is also where we will be reading data from the sensor.
try:Copyg. Within this try block, we can start using our Raspberry Pi to read data from the DHT11 sensor.
The first value we will grab is the temperature. The DHT11 reports its temperature in degrees Celsius, so we store that within a variable called “temperature_c“.
temperature_c = dht_device.temperatureCopyh. Luckily, converting from Celsius to Fahrenheit is a straightforward process. It just requires some math.
The next line converts the Celsius temperature reported by the sensor into Fahrenheit and stores it in a variable called
“temperature_f“.
temperature_f = temperature_c * (9 / 5) + 32Copyi. The final value we want to read from the DHT11 is the humidity. The humidity is reported as a percentage, so we don’t need to do anything with this data besides storing it in a variable called “humidity“.
humidity = dht_device.humidityCopyj. Now that we have all the temperature and humidity from the sensor, we can output it to the terminal by using the “print()” function within Python.
print("Temp:{:.1f} C / {:.1f} C Humidity: {}%".format(temperature_c, temperature_f, humidity)Copyk. At the end of the try block, we need to reference the type of error we are trying to catch.
Here, we are looking to catch any runtime errors and will print the error to the terminal.
    except RuntimeError as error:
        print(err.args[0])Copy
l. Finally, at the end of the while loop, we will want to sleep the Python script for two seconds.
This sleep will give us a nice gap between readings.
time.sleep(2.0)Copy11. The final version of the script should look a bit like what we have shown below.
import time
import adafruit_dht
import board

dht_device = adafruit_dht.DHT11(board.D4)

while True:
    try:
        temperature_c = dht_device.temperature
        temperature_f = temperature_c * (9 / 5) + 32

        humidity = dht_device.humidity

        print("Temp:{:.1f} C / {:.1f} F    Humidity: {}%".format(temperature_c, temperature_f, humidity))
    except RuntimeError as err:
        print(err.args[0])

    time.sleep(2.0)Copy
12. After typing in the lines above, you can save and quit by pressing CTRL + X, Y, and then the ENTER key.
Testing your DHT11 Sensor on the Raspberry Pi
13. With the Python script now written, we can test the DHT11 sensor from your Raspberry Pi.
To start reading the humidity and temperature from this sensor, you only need to run the script we wrote earlier.
python3 dht11.pyCopy14. You should now start seeing the temperature and humidity readings from the sensor displayed within the command line.
Below is a sample of the data returned by the sensor connected to our Pi.
Temp:24.0 C / 75.2 F    Humidity: 47%
Temp:24.0 C / 75.2 F    Humidity: 48%
Temp:24.0 C / 75.2 F    Humidity: 49%
Temp:24.0 C / 75.2 F    Humidity: 52%
Temp:25.0 C / 77.0 F    Humidity: 54%
Temp:25.0 C / 77.0 F    Humidity: 54%
Temp:25.0 C / 77.0 F    Humidity: 53%
Conclusion
Hopefully, you will now have your DHT11 temperature and humidity sensor wired to a Raspberry Pi at this stage.
This sensor is affordable and very easy to wire to a Pi. It even provides decent results for those not after highly accurate readings.
However, if you need a sensor to be accurate, check out using the DHT22 with the Raspberry Pi. It isn’t hugely more expensive and provides better accuracy and a larger reading range.
Please feel free to leave a comment below if you have had any issues with reading results from your sensor.
If you found this tutorial helpful, we have a wealth of other Raspberry Pi projects worth checking out.


Hi Emmet, Thanks again for a great tutorial, however when I run the script I get the following error:
Any assistance would be appreciated.
Ian.
Hi Ian,
Can you try installing the Python3-rpio-lgpio package by using the following command.
Kind regards,
Emmet
I followed the instructions to the letter but this what I got: (env) adrian@raspberrypi:~/dht11 $ python3 dht11.py
Hi Adrian,
Can you try installing the lgpio package by running the command below.
King regards,
Emmet
Very interesting. Can more than one DHT11 be used with the same Raspberry Pi? I’m thinking in terms of an indoor-outdoor set up.
Yes, you can use more than one DHT11 sensor with a single Raspberry Pi for an indoor-outdoor setup. You will need to use separate GPIO pins for each DHT11 sensor’s data line. Each sensor needs its own dedicated GPIO pin, and pull-up resistor. However, they can share the same 3v3 pin and ground pin.
In the code you can simply reference each sensor like the following.
I hope that all helps!
Thank you for the great tutorial Emmet. Very clean and precise, thank you!
Hey,
I’ve followed your instructions step-by-step but in the last phase where you execute the script, mine just says: Unable to set line 4 to input. I have tried the original method that my course suggests with the regular Adafruit_Python_DHT library, but it only gives RuntimeErrors saying it is a unknown platform. I have tried for days now and on both Rpi3B+ and 5, please help!
HI Mark,
I’ve re-ran the guide and can’t seem to reproduce the issue.
One thing you could try doing is explicitly disabling PulseIO.
Find the following line within the script.
And replace it with the following.
Please let me know if that solves the issue you are running into.
Kind regards,
Emmet
Hello Emmet, I have used the use_pluseio=False and it actually worked, and I don’t see that message (Unable to set line 4 to input) anymore for my DHT11 sensor. I had an issue with that when using raspberry pi OS bookworm 64bit on my pi4 and thanks to your suggestion it works well. Your guide had actually helped me to solve my problem. Thank you! 🙂