In this project, we are going to show you how to self-host Bitwarden on your Raspberry Pi.

Bitwarden is an entirely free and open-source password management service. It allows you to retain complete control over how your passwords are stored.
The software is widely considered to be the best free solution for those wanting a secure password manager.
A Raspberry Pi makes an excellent self-hosted solution for Bitwarden as it consumes relatively low power. This helps make it cheap to have running all the time.
Your Bitwarden clients can connect to this server to synchronize your password data.
As the Raspberry Pi isn’t the most powerful device, we will need to use a non-official version of the server software.
This version is a re-implementation of the Bitwarden server API but entirely written in Rust. It has been written to minimize the amount of resources it consumes, which is perfect for our Raspberry Pi.
Table of Contents
- Preparing your Raspberry Pi for Bitwarden
- Installing Bitwarden to the Raspberry Pi
- Setting up an NGINX Proxy for Bitwarden
- Accessing the Bitwarden Web Interface
- Enabling the Bitwarden Admin Panel
- Generate the Admin Token
- Accessing the Admin Page
- Accessing the Bitwarden Admin Panel
- Disable New User Creation
- Conclusion
Equipment
Below is a list of the equipment that you need for self-hosting Bitwarden on the Raspberry Pi.
Recommended
Optional
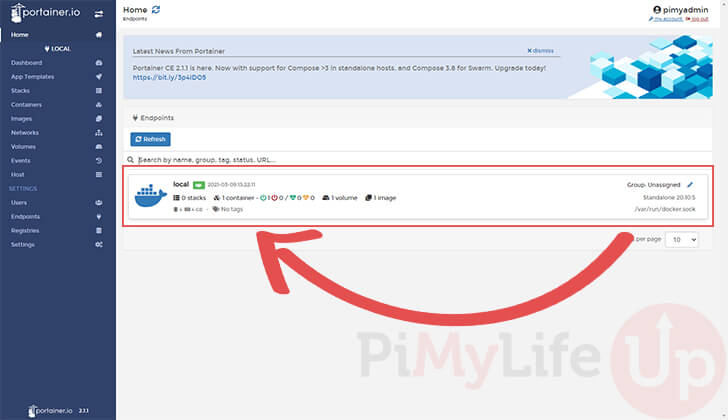
We tested this tutorial on a Raspberry Pi 400 running on the latest release of Raspberry Pi OS Buster.
Preparing your Raspberry Pi for Bitwarden
There are a few things we must do before we can self host our Bitwarden server. One of these steps includes installing Docker.
1. First, as Bitwarden will be running within a Docker container, you need to install it.
We have a guide that walks you through the process of setting up Docker on the Raspberry Pi.
Once you complete this guide, you can safely move on to the next step.
2. You can also choose whether you want to use Portainer to manage your Docker container.
You can either run it directly using the command line or add it to Portainer. Portainer will allow you to manage your Bitwarden container using its straightforward web interface.
Follow our guide on installing Portainer to the Raspberry Pi if you choose to go down that route.
3. After you have Docker installed and chosen whether you want to use Portainer, we can update our operating system.
Updating our Raspberry Pi helps ensure we have an optimized system to run Bitwarden on.
You can update your system by running the following two commands.
sudo apt update
sudo apt upgradeCopy
Installing Bitwarden to the Raspberry Pi
Now that we have prepared our Raspberry Pi, we can move on to installing the Bitwarden software.
As Bitwarden RS is available as a Docker container, the installation process is straightforward.
We have written two guides, one that will show you how to use Portainer to install Bitwarden and one on how to install it using Docker directly.
Using Portainer to Install Bitwarden
For our first section, we will show you how to install Bitwarden on your Raspberry Pi by using the Portainer web interface.
As we mentioned earlier, Portainer is an excellent solution as it will allow you to manage Bitwarden without having to SSH into your Raspberry Pi.
Prepare for the Bitwarden Container
Let us now prepare Portainer so that we can install our Bitwarden container. There are a few steps involved in this process, but they don’t take very long.
1. Start by loading up the Portainer web interface.
This should be accessible by going to your Raspberry Pi’s IP address, followed by port 9000.
https://[PIIPADDRESS]:9000Ensure that you replace “[PIIPADDRESS]” with your Raspberry Pi’s IP.
2. When you load up the interface, you need to change to the local Docker endpoint.
Click this endpoint so that we can manage the containers available on it.
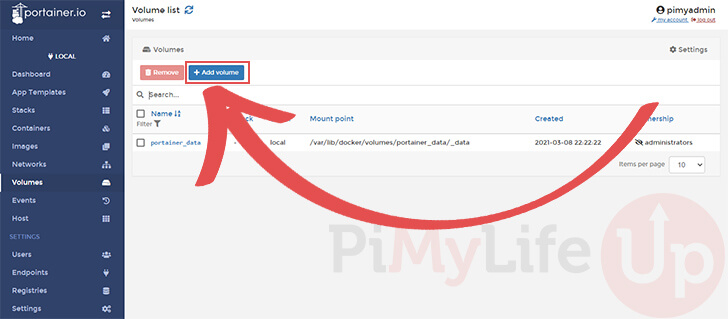
3. Before we can create the Bitwarden container, we need to make a volume for it.
In the sidebar, you should see the “Volumes” option, click it.

4. Within this menu, you should see a list of volumes you have created already.
At the top of this list, there should be an “Add volume” button. Click the button to switch to the volumes menu.
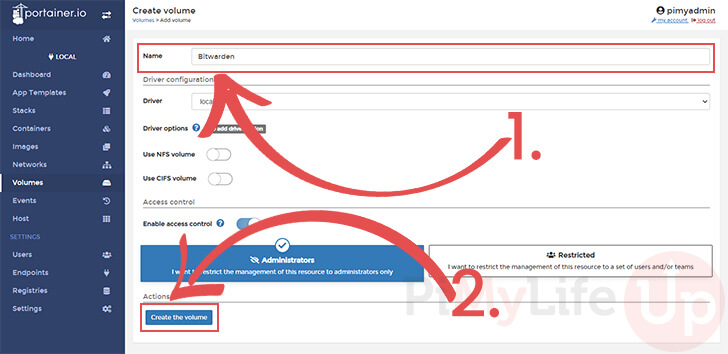
5. We need to choose a name to give this new volume. For our tutorial, we will be sticking with “Bitwarden” (1.).
Once you have chosen a name for your Raspberry Pi Bitwarden’s volume, click the “Create the volume” button (2.).
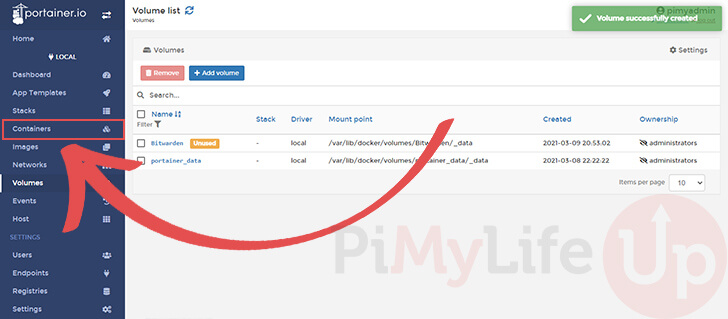
6. With the volume created, we need to change to the “Containers” menu.
You can switch to this by clicking the “Containers” option in the sidebar.
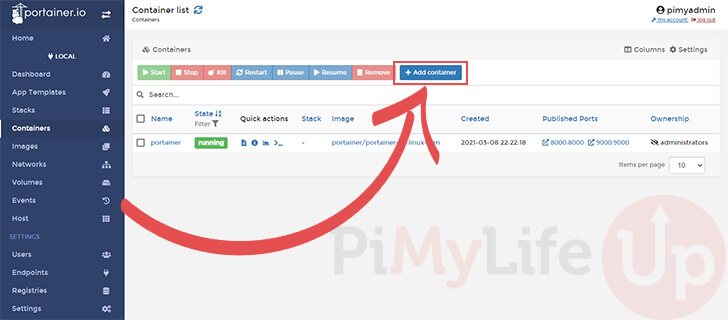
7. Below, you should see a list of containers available on your Raspberry Pi.
At the top of this page, click the “Add container” button.
Creating the Bitwarden RS Container for the Raspberry Pi
Now that we have done the initial preparatory work, we can now deploy the Bitwarden container onto our Raspberry Pi.
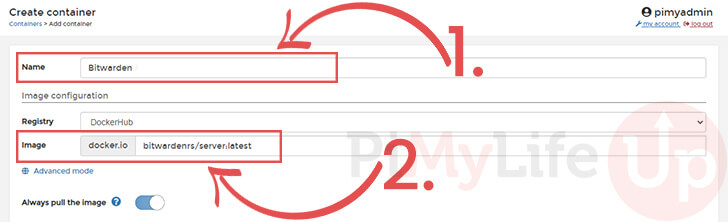
1. The first thing you need to do for your container is give it a name (1.). We will be calling our own container “Bitwarden“.
Next, we need to specify the image that we want to pull from the Docker hub. In our case, this will be the Bitwarden container for the Raspberry Pi.
Make sure you enter “vaultwarden/server:latest" in the text box next to “Image” (2.)
2. Next, we need to set the network settings for our container. Look for the “Network ports configuration” header.
Underneath this header, you will need to click the “publish a new network port” button (1.) twice.
You should now have two sets of boxes on the screen that will allow us to set the ports we want to expose from Bitwarden.
2) In the first box, you will need to set both the host to “127.0.0.1:8080“.
You will also need to set the container port to 80 (2.). This is the port that Bitwarden’s web interface will be accessible from.
3) For the second step, you will be required to set the host to “127.0.0.1:3012“.
The “container” port should be set to 3012 (3.). Bitwarden utilizes this port for web socket connections.
We should note that we have bound both of the host ports to the local device.
The reason for this is that we don’t need external devices to access these. Instead, these will be exposed using an NGINX reverse proxy.

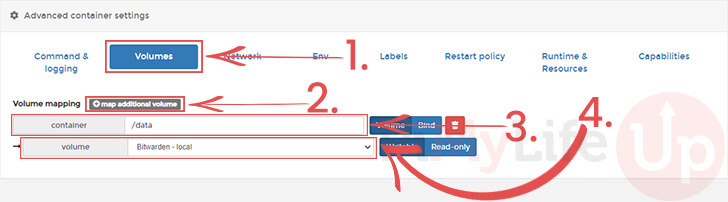
3. Scroll down to the bottom of the page till you find the “Advanced container settings” header.
In this section, change to the “Volumes” tab by clicking it (1.).
Next, you need to click the “map additional volume” button so that we can add our Raspberry Pi’s volume to the container (2.).
For the “container” option, make sure you set this to “/data” (3.).
Finally, we need to set the volume to the one we created in the previous section. This should be called “Bitwarden-local” (4.).
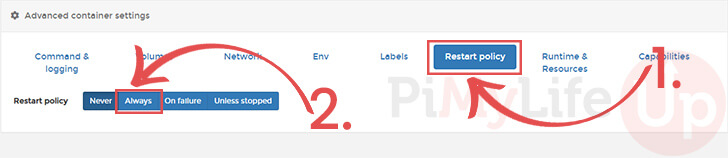
4. Next, we want to make sure Bitwarden is kept online on our Raspberry Pi. We can do this by setting the restart policy.
On this page, click the “Restart policy” option to change the tab (1.).
We want to change the restart policy to “Always“. This will ensure Docker tries to keep the container online when it fails for some reason (2.).
5. Once we have finished configuring the Bitwarden container, we can finally deploy it.
Under the “actions” header on this page, you need to click the “Deploy the container” button.

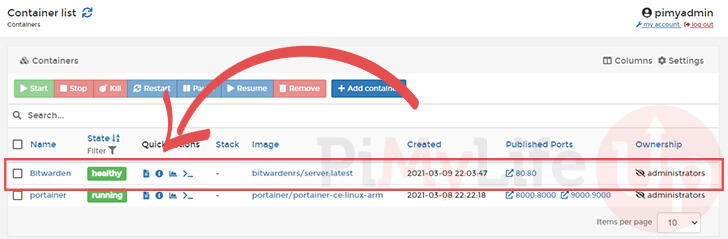
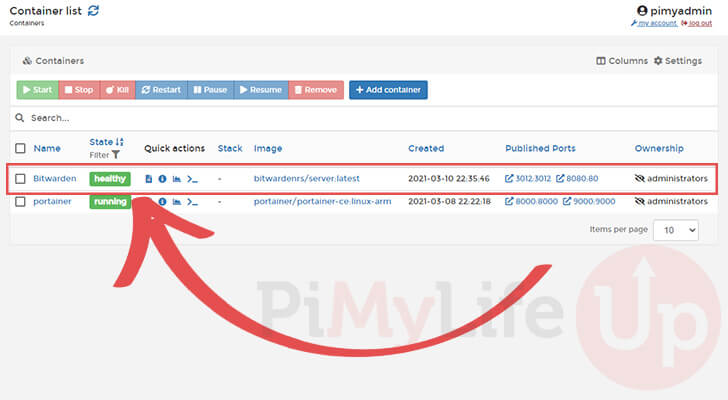
6. Once Portainer finished pulling the Bitwarden docker image to your Raspberry Pi, it will become available in the containers list.
Below, we have a screenshot of our container list after it finished setting up Bitwarden.
Installing Bitwarden using the Docker CLI
If you would prefer not to install and utilize Portainer to use Bitwarden on your Raspberry Pi, using the CLI is easy.
Following the steps below, we will get you to pull the Bitwarden image to your device then run it.
1. Our first step is to pull the latest version of Bitwarden RS using Docker.
These steps will download that latest version of the server and make it available to run.
docker pull vaultwarden/server:latestCopy2. Once Docker finishes downloaded Bitwarden RS to your Raspberry Pi, you can now continue.
Our next step is to run the image itself. We can do this by running the following command.
sudo docker run -d --name bitwarden \
    --restart=always \
    -v /bw-data/:/data/ \
    -p 127.0.0.1:8080:80 \
    -p 127.0.0.1:3012:3012 \
    vaultwarden/server:latestCopy
This command will launch the Bitwarden RS server that we downloaded the image for.
We then define the ports that we want Docker to forward from the Bitwarden image.
In our case, we are exposing the webserver on port “8080“.
We then expose port “3012“, which is the port Bitwarden’s web sockets use to communicate on.
Both of these ports will be locked to the Raspberry Pi’s localhost (127.0.0.1). The proxy server we create in the next section will allow outside access to Bitwarden by setting up HTTPS.
Setting up an NGINX Proxy for Bitwarden
Even though we have Bitwarden up and running now, it isn’t possible to use it until we set up HTTPS.
This is because Bitwarden’s web interface uses certain JavaScript functions that browsers only allow when running on an HTTPS connection.
To achieve support for HTTPS, we are going to have to set up a proxy using NGINX.
NGINX will sit in front of our Raspberry Pi’s Bitwarden server and proxy the requests.
Preparing NGINX on the Pi
Before we can use Bitwarden, we are required to set up NGINX. .
To do that, you need to install the webserver software then generate an SSL certificate for us to use for the HTTPS connection.
1. Before starting this section, we require you to have NGINX already installed.
Follow our guide that shows you how to install NGINX to your Raspberry Pi. You only need to follow the first section as PHP is not required to operate a proxy server.
2. Once you have NGINX installed, we need to generate an SSL certificate for it.
There are two different ways you generate a certificate on your Raspberry Pi.
a) If you plan on using a domain name, you can utilize Lets Encrypt to create a signed SSL certificate.
You can’t generate a signed certificate if only use an IP address as the domain name is used as part of the issuance.
If you choose to go down this route, you will need to note the directory your cert is stored. Once done, skip to step 5 of this section.
b) The alternative is to generate a self-signed certificate. While these are still secure, you will receive a warning that the browser can’t guarantee its authenticity from a certificate authority.
We can generate this cert on the Raspberry Pi by using a single command making it simple to use.
3. If you choose to Let’s Encrypt, you can skip to step 5 of this section. Otherwise, you can continue.
You can use the following command to generate a self-signed certificate.
sudo openssl req -x509 -nodes -days 365 -newkey rsa:4096 -keyout /etc/ssl/private/nginx-bitwarden.key -out /etc/ssl/certs/nginx-bitwarden.crtCopyThis self-signed certificate will last for 365 days and will be stored in the “/etc/ssl/private/” and “/etc/ssl/certs/” directories.
4. During the SSL generation process, you will be asked to provide some additional details.
OpenSSL will write these details to the certificate to help you identify whether or not it’s a forgery.
Country Name (2 letter code) [AU]: AU
State or Province Name (full name) [Some-State]: Tasmania
Locality Name (eg, city) []: Hobart
Organization Name (eg, company) [Internet Widgits Pty Ltd]:Pi My Life Up
Organizational Unit Name (eg, section) []:
Common Name (e.g. server FQDN or YOUR name) []: raspberrypi_ip_address
Email Address []: youremail@yourdomain.com
Answer all of the required questions to finish generating the certificate for your Raspberry Pi’s Bitwarden installation.
5. Our final bit of preparation task is to create a strong Diffie-Hellman group.
This is used to help improve the security of your device’s SSL connections.
sudo openssl dhparam -out /etc/ssl/certs/dhparam.pem 2048CopyPlease note that this process can take a little while to complete.
Configuring NGINX to act as Proxy
We can now create a virtual host for NGINX that will allow it to proxy connections to Bitwarden.
Luckily for us, configuring NGINX to act as a proxy is a very straightforward process.
1. First, let us remove the default config file for NGINX.
You don’t need to do this if you are planning on using Bitwarden alongside a domain name.
sudo rm /etc/nginx/sites-enabled/defaultCopy2. We need to create a new configuration file for NGINX.
Begin writing this new config file by using the nano text editor by running the command below.
sudo nano /etc/nginx/sites-enabled/bitwarden.confCopy3. Within this file, type in the following lines of text.
This first block that we are adding will redirect any traffic from http (port 80) to https (port 443).
server {
    listen 80;
    listen [::]:80;
    server_name _; #Change this to your domain name
    return 301 https://$host$request_uri;
}Copy
4. Next, we need to add our server block that will handle the proxying and the HTTPS connection.
Additionally, if you used Lets Encrypt to generate the certificate, you will need to swap out the paths for both “ssl_certifcate” and “ssl_certificate_key“.
server {
  listen 443 ssl http2;
  server_name _; #Change this to your domain name

  ssl_certificate      /etc/ssl/certs/nginx-bitwarden.crt;   #Swap these out with Lets Encrypt Path if using signed cert
  ssl_certificate_key  /etc/ssl/private/nginx-bitwarden.key; #Swap these out with Lets Encrypt Path if using signed cert

  ssl_dhparam /etc/ssl/certs/dhparam.pem;

  # Allow large attachments
  client_max_body_size 128M;

  location / {
    proxy_pass http://0.0.0.0:8080;
    proxy_set_header Host $host;
    proxy_set_header X-Real-IP $remote_addr;
    proxy_set_header X-Forwarded-For $proxy_add_x_forwarded_for;
    proxy_set_header X-Forwarded-Proto $scheme;
  }

  location /notifications/hub {
    proxy_pass http://0.0.0.0:3012;
    proxy_set_header Upgrade $http_upgrade;
    proxy_set_header Connection "upgrade";
  }

  location /notifications/hub/negotiate {
    proxy_pass http://0.0.0.0:8080;
  }
}Copy
5. You may need to change a few things depending on how you plan on using your Raspberry Pi Bitwarden server.
If you are using a domain name, you need to replace servername _; to include it.
For example, our server name would be the following “server_name bitwarden.pimylifeup.com“.
6. Once done, your file should end up looking like what we have below.
server {
    listen 80;
    listen [::]:80;
    server_name _; #Change this to your domain name
    return 301 https://$host$request_uri;
}

server {
  listen 443 ssl http2;
  server_name _; #Change this to your domain name

  ssl_certificate      /etc/ssl/certs/nginx-bitwarden.crt;   #Swap these out with Lets Encrypt Path if using signed cert
  ssl_certificate_key  /etc/ssl/private/nginx-bitwarden.key; #Swap these out with Lets Encrypt Path if using signed cert

  ssl_dhparam /etc/ssl/certs/dhparam.pem;

  # Allow large attachments
  client_max_body_size 128M;

  location / {
    proxy_pass http://0.0.0.0:8080;
    proxy_set_header Host $host;
    proxy_set_header X-Real-IP $remote_addr;
    proxy_set_header X-Forwarded-For $proxy_add_x_forwarded_for;
    proxy_set_header X-Forwarded-Proto $scheme;
  }

  location /notifications/hub {
    proxy_pass http://0.0.0.0:3012;
    proxy_set_header Upgrade $http_upgrade;
    proxy_set_header Connection "upgrade";
  }

  location /notifications/hub/negotiate {
    proxy_pass http://0.0.0.0:8080;
  }
}Copy
7. Once done, you can save this file by pressing CTRL + X, followed by Y, then the ENTER key.
8. Now, all we need to do is restart the NGINX service.
Without restarting the service, it will not be aware of any of our recent changes.
On your Raspberry Pi, run the following command to restart NGINX.
sudo systemctl restart nginxCopyAccessing the Bitwarden Web Interface
With a proxy server setup, we can now access and use the Bitwarden web interface running on our Raspberry Pi.
1. To access your Bitwarden interface, you need to go to the following address in your favorite web browser.
Make sure that you replace “YOURPIIPADDRESS” with the IP for your Raspberry Pi.
Alternatively, if you are using a domain name, you will need to use that instead.
https://YOURPIIPADDRESSIf you are using a self-signed certificate, you will receive a warning message.
As you know that you generated this certificate yourself and know that you are connecting to your Raspberry Pi, you can ignore this message.
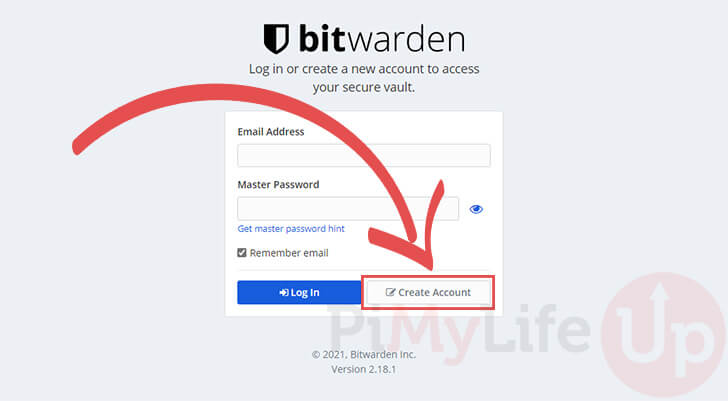
2. Before you can start using Bitwarden, you will need to create an account.
On the login screen, you should see the “Create Account” button. Once you find this button click it.
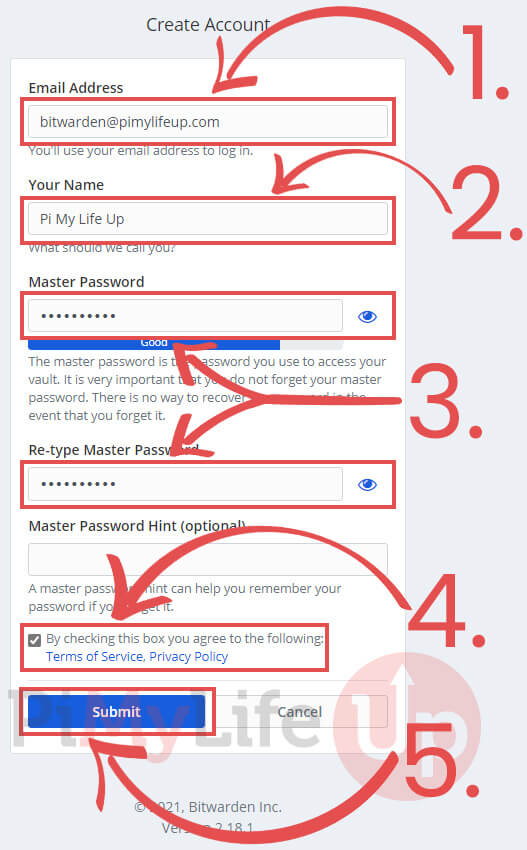
3. You can now start to fill out the information for your new account.
The first thing you need to do is enter the email for this Bitwarden account (1.). This email address is what you will use to login.
Next, you need to give a name for Bitwarden to use within its interfaces (2.).
Then you will need to set a password for this account. Make sure that you set this to something secure and not easy to guess (3.).
Before you can finalize the account’s creation, you will be required to agree to Bitwarden’s terms of save and privacy policy (4.).
Once you are happy with all your settings, you can create the account by clicking the “Submit” button (5.).
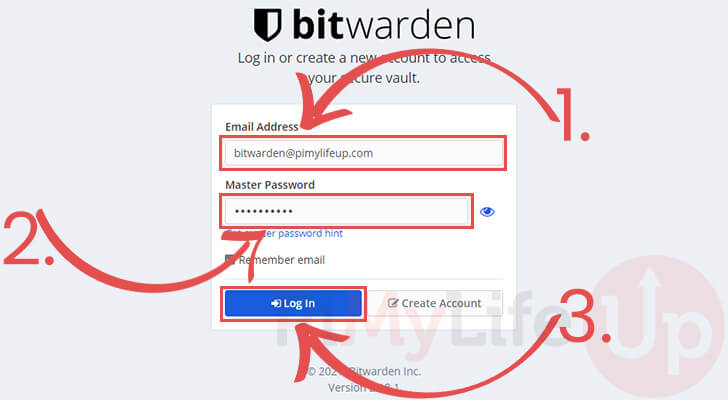
4. As you have now created your account, you can log in to your new Bitwarden vault.
First, you need to fill out the email address you assigned to your account (1.).
Next, you need to enter the password that you set for your new account (2.).
Finally, you can log in by clicking the “Log In” button (3.).
5. You can now start storing information in your brand new Raspberry Pi Bitwarden vault.

Enabling the Bitwarden Admin Panel
Now that you have created an account, we can now generate the admin token.
The admin token is what you will be using to access the Bitwarden admin panel. This will require us to make changes to our Docker containers configuration.
Within the admin panel, you will be able to view all registered users and delete them. You can even generate invites for new users even if you have disabled the functionality.
This interface is also used to configure the numerous Bitwarden options. Such as whether you want people to be able to sign up.
Generate the Admin Token
Our first step is to generate a new admin token for Bitwarden to utilize.
As this token needs to be a relatively long string of strong randomly generated characters, we will be using openssl.
To generate this secure string, you can run the following command on your Raspberry Pi.
openssl rand -base64 48CopyEnsure you keep this token secret as this will let anyone have full access to the Bitwarden RS server.
Accessing the Admin Page
We now need to feed this new admin token into our Raspberry Pi’s Bitwarden Docker container.
It is possible to do this using the Portainer web interface or by modifying the command line to feed it in.
Setting the Admin Token using Portainer
To set the admin token, you will need to fire up the Portainer interface and return to the container list.
1. Within the container list, you need to identify the Bitwarden container.
Once you have found it click it to go into its information page.
2. At the top of this next page, there should be a “Duplicate/Edit” button.
You need to click this button to begin editing the the settings of the container.

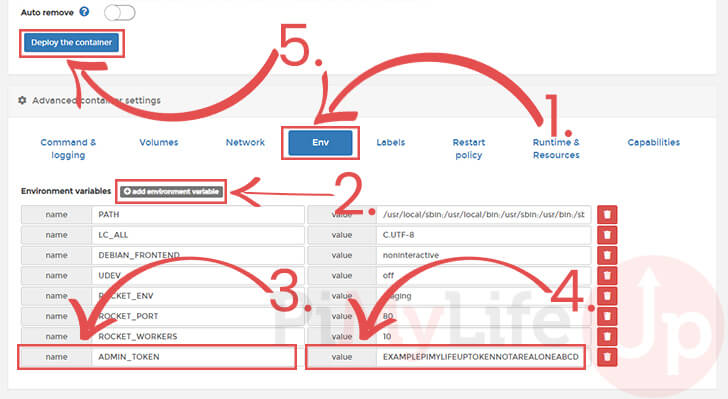
3. Scroll down this page until you find the “Advanced container settings” heading.
Underneath this heading, you will need to change tabs by clicking the “ENV” option (1.).
You need to click the “add environment variable” so that we can add the admin token (2.).
Clicking this button should add two new text boxes to the bottom of the page.
In the “name” text box, you need to type in “ADMIN_TOKEN” (3.).
For the “value” box, you will need to enter the admin token you want to use (4.).
Finally, once you have the admin token created, you can now click the “Deploy the container” button (5.).
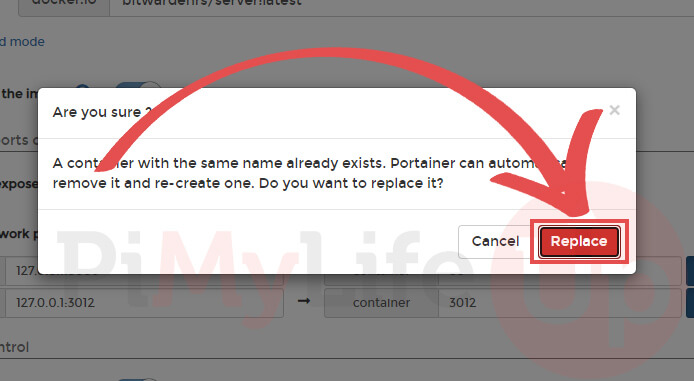
4. Before Portainer will update your Raspberry Pi’s Bitwarden container, you will see the message below.
This message is warning you that it will replace the existing container as the name matches.
You need to click the “Replace” button.
Setting the Admin Token within the Command Line
Updating a container is slightly more complicated when using the command line, as you have to delete the existing container manually.
1. Before we can delete our Raspberry Pi’s Bitwarden container, we will need to take it offline.
You can stop a currently running container by using the following command.
sudo docker stop bitwardenCopy2. Next, we need to remove the existing container.
Docker will not let us recreate the container if one already exists using the same ports and name.
Remove the existing Bitwarden container by running the command below.
sudo docker rm bitwardenCopy3. Finally, we need to re-run the docker command.
This time we will be passing in the admin token that we generated earlier.
sudo docker run -d --name bitwarden \
    -e ADMIN_TOKEN=<strong>EXAMPLEPIMYLIFEUPADMINTOKEN</strong> \
    --restart=always \
    -v /bw-data/:/data/ \
    -p 127.0.0.1:8080:80 \
    -p 127.0.0.1:3012:3012 \
    vaultwarden/server:latestCopy
When you run this new command, make sure that you replace “EXAMPLEPIMYLIFEUPADMINTOKEN” with the token you generated earlier.
Accessing the Bitwarden Admin Panel
Once you have finally gotten your Raspberry Pi’s Bitwarden installation to accept your newly generated admin token, you can now access the admin page.
1. In your web browser, you need to go to the following address.
Make sure that you replace “YOURPIIPADDRESS” with the address to your Raspberry Pi.
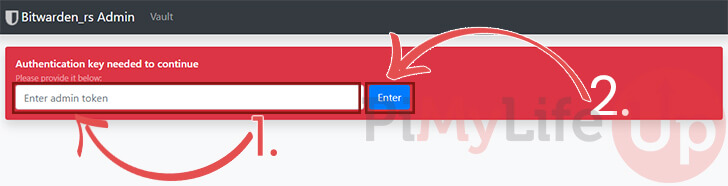
https://YOURPIIPADDRESS/adminGoing to this address will take you to the Bitwarden admin panel.
2. On this page, you will need to enter the admin token you generated (1.).
Once you have the token entered, you can log in by clicking the “Enter” button (2.).
3. You will now have access to the Bitwarden admin panel.
Using these pages, you can manage your users as well as configure Bitwarden’s settings.
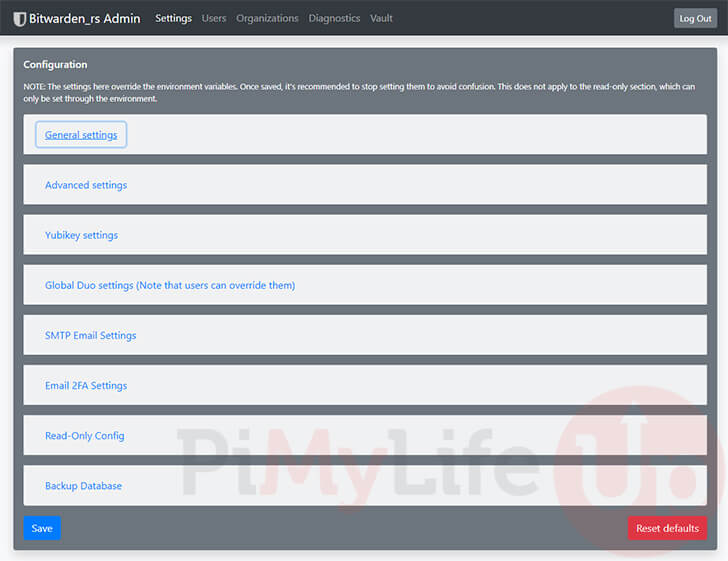
Disable New User Creation
Once you have created an account and set up access to the admin panel, you can choose to disable the user registration menu.
This means that only users you invite personally will be able to create users on your Bitwarden vault.
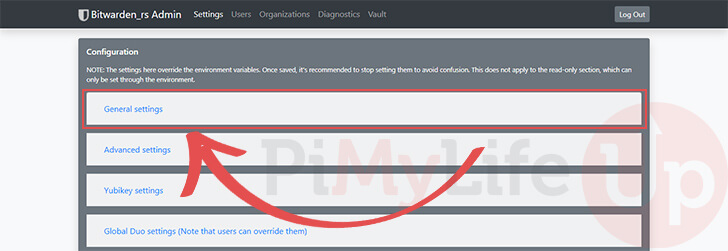
1. To disable new user creation on your Raspberry Pi’s Bitwarden menu, you will need to load up the admin panel.
Once you are within the admin panel, you can proceed.
2. The option for disabling new user signups is located within the general settings page.
Click the “General settings” menu to reveal all the options hidden under that panel.
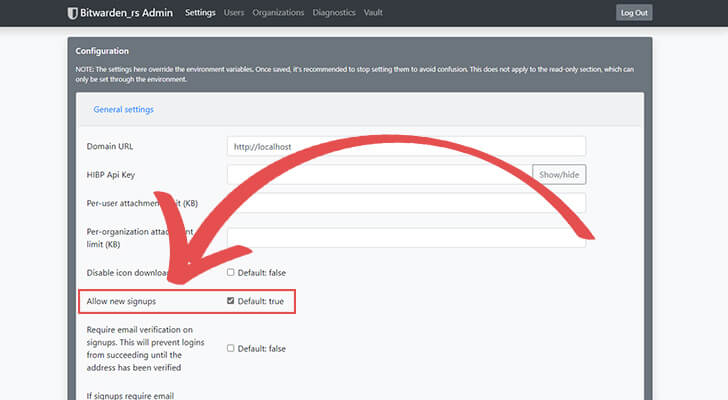
3. Within the “General settings” list of options, you should find one named “Allow new signups“.
You need to click the checkbox next to this option to disable it.
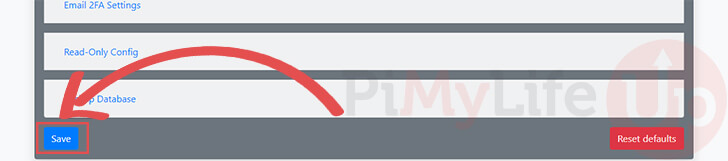
4. To confirm the setting changes, you need to scroll to the bottom of the page.
At the bottom, you should see a blue button with the word “Save” on it. Click this button to save these changes.
Conclusion
You should now have Bitwarden up and running on your Raspberry Pi.
Bitwarden is an open-source and free password management software that has clients on most devices.
You can run your own Bitwarden cloud server on your Pi by utilizing a port of the official client that is aimed at not being as resource intensive.
If you have issues with running the server on your device, feel free to leave a comment below.
Be sure to check out some of our other Raspberry Pi server projects or our IoT guides.


Hey there,
thanks for this guide. Really helped and has been working nicely. However, tonight I got a new ISP (Aussie broadband) and with it a new router. This broke everything I had and I re-setup all my port forwarding stuff, restarted my Pi and NAS, etc. The NAS works nicely (meaning the ports are forwarded) but the Pi does not seem to want to cooperate. I have a dynamic IP and set my domain name to it automatically through cloudflare and some other service on my Pi – the IP is accurate. I can access the Bitwarden interface locally. But there’s a problem with nginx. Here’s the status error I get, but have no idea what the issue is, my config files look the same as in this guide. There are no duplicate entries or anything like that.
Any tips? (Alternatively this might just sort itself out overnight if there’s an issue with leases or whatever)
Thanks in advance.
Oct 12 22:09:30 raspberrypi systemd[1]: Starting A high performance web server and a reverse proxy server…
Oct 12 22:09:30 raspberrypi nginx[6778]: nginx: [warn] conflicting server name “(My domain name)” on 0.0.0.0:80, ignored
Oct 12 22:09:30 raspberrypi nginx[6778]: nginx: [warn] conflicting server name “(My domain name)” on [::]:80, ignored
Oct 12 22:09:30 raspberrypi nginx[6778]: nginx: [warn] conflicting server name “(My domain name)” on 0.0.0.0:443, ignored
Oct 12 22:09:30 raspberrypi nginx[6779]: nginx: [warn] conflicting server name “(My domain name)” on 0.0.0.0:80, ignored
Oct 12 22:09:30 raspberrypi nginx[6779]: nginx: [warn] conflicting server name “(My domain name)” on [::]:80, ignored
Oct 12 22:09:30 raspberrypi nginx[6779]: nginx: [warn] conflicting server name “(My domain name)” on 0.0.0.0:443, ignored
Oct 12 22:09:30 raspberrypi systemd[1]: Started A high performance web server and a reverse proxy server.
Hi JL,
Do you have any other website configuration files within the “/etc/nginx/sites-enabled/” directory?
You can list the files within this directory by using the following command.
Cheers,
Emmet
Hey Emmet, thanks for the quick reply! I forgot to respond earlier, my apologies. This turned out to be an issue with my ISP, my IP was configured with CG-NAT which broke all port forwarding features (seems that Plex, which is on my NAS, does something else to deliver content).
My config then began to work normally despite the double configurations (it “just works”).
Hey Emmet,
I previously asked about using the android app with this tutorial and you mentioned adding your custom certs public key to your Android device. Can you point me in the right direction on how to accomplish that?
Thanks,
Anthony
Hi Anthony,
Sadly, I don’t have an Android phone on hand to test those exact steps. However, Google does have an article that covers adding and removing certificates.
The file in particular you want to copy over will be the public cert. That cert is stored at “/etc/ssl/certs/nginx-bitwarden.crt”
Please let me know if that helps with your issue.
Cheers,
Emmet
Hey
I am already using pi hole on pi 4. How can setup with this to same port or do i have do something else ? New to this can you help me out?
Thanks
Hi SupeRMan,
You would likely need to change the port that Bitwarden/Vaultwarden will operate from on your Raspberry Pi. The downside of doing this is that you will have to remember the ports you set as the web browser won’t magically go to it as HTTP uses port 80 and HTTPS uses port 443 by default.
Within the NGINX configuration file that we create during this tutorial you will want to find the following two lines and change the ports used to something different.
Within the following, find and replace “443” with an alternative port.
Find and delete the following section as it is not required if you aren’t going to be using port 80.
I’m sorry if this still leaves you slightly confused on what to do. However, hopefully it sets you in the right direction.
Cheers,
Emmet
Hey thanks for this tutorial. Install was a breeze. I’m having trouble tring to set up my local hosted bitwarded to the official android app. Any help would be appreciated.
Hi Anthony,
The issue with connecting from Android is typically caused by the self-generated certificate that we are utilizing within this tutorial.
The Bitwarden app expects the connection it makes to have a valid and verifiable certificate. You can either add your custom certs public key to your Android device to get around this or set up a domain name and generate a valid certificate using Lets encrypt.
Cheers,
Emmet
Got it up and running. Could not go the domain name route as have another pi that already uses port 443/80, so did it via self certificate. Is there any way to have two Pi’s on my network, and both are used as servers?
Anyways thanks a lot, i really love your website and awesome tutorials
Hi Adrian,
If you mean for port forwarding then at the top off my head I don’t believe so, you will need another IP address to be able to route to the Pi’s separately. Hopefully someone will have an idea and comment it!
Really glad to hear that these tutorials have been helpful to you.
Cheers,
Emmet
Thank you, it was not Apache (i did do the remove apache step first..) but lighttpd that was installed, i have no recollection of installing that but i must have.
Thank you
Hi, i have the same issue as above user Cereal, followed the tutorial, installed Bitwarden, then changed to Nginx tutorial but get an error when trying to start nginx.
My pretty clueless beginner mind thinks its because both nginx and bitwarden try to use port 80. Output from :sudo systemctl status nginx
Hi Adrian,
Bitwarden/Vaultwarden on your Raspberry Pi shouldn’t be conflicting with it as it is only running on port 80 within its own container. With the way we configure the container, it should be exposed on port 8080 instead.
There is a chance that you may have Apache already installed and running on your system which would be gobbling up that port for itself.
Can you try running the following command within the terminal and see whether it fixes the issues you are having with NGINX not running.
If it does fix the issues you can either uninstall Apache2 by using the following command.
Or by stopping its service from starting by using the following command.
IF you happen to not have Apache2 installed and there is something else using the port,can you please try using the following command in the terminal and letting me know what it returns.
Hopefully this solves the issues you are facing.
Cheers,
Emmet
Hello! I was struggling to get this working with apache and I just figured it out. I thought I would share encase anyone else was having similar issues. I configured my apache ssl with letsencrypt and I want to access my bitwarden through
https:///bitwarden. My server is not open to the internet but I find it much easier to use a letsencrypt certificate then a self signed certificate.Step 1. Add environmental variable to container.
DOMAIN=https:///bitwardenStep 2. Add apache conf file (
sudo nano /etc/apache2/sites-available/bitwarden.conf)Step 3: Enable site in apache and restart
I also wanted to point out that I did find one issue with your tutorial. When adding the network setup to docker it did not work when I used
127.0.0.1:80and127.0.0.1:3012, I had to use0.0.0.0:80and0.0.0.0:3012.Thanks again for your wonderful tutorials.
In para 6. of “Configuring NGINZ to act as Proxy”, where do I locate the Lets Encrypt Path to replace the lines below? I am using a signed certificate.
When I start NGINX with sudo systemctl restart NGINX, I get the following errors:
I suspect it is due to the Lets Encrypt Path issue above but not too sure how to find that path. Appreciate any help with this issue.
Hi Grunter,
Lets Encrypt typically will store its certificates within the following path.
Within this folder you will find the fullchain.pem file (ssl_ceritificate), and the privkey.pem file (ssl_certificate_key)
For example, if your domain name was “
pimylifeup.com” you would use the following.I hope this helps you with your question.
Cheers,
Emmet
Just wanted to leave a quick thanks! Was able to setup Bitwarden with Nginx and LetsEncrypt in no time thanks to your fantastic guides, thanks a ton!
When installing Nginx on Debian 11 (Bullseye) PHP version 7.3 is not available, change the install command to – version 7.4 as shown below.
‘sudo apt-get install php7.4-fpm php7.4-mbstring php7.4-mysql php7.4-curl php7.4-gd php7.4-curl php7.4-zip php7.4-xml –y’
When editing ‘sudo nano /etc/nginx/sites-enabled/default’ add the following closing bracket } at line 92 or else ‘sudo systemctl restart nginx will fail’ with a default:92 error code.
Heya! Nice tutorial.
I’ve been through the tutorial, sucessfuly deployed it but i have a question.
With Self signed certificate our browser shows us that it’s insecure right?
I thought i was doing something wrong, but when i look closer on the SSL, i could see the certificate i created was implemented but it wasn’t considered secure according to browsers in general.
Hi n3xu7s,
That is correct that the browsers would be showing it as insecure.
The problem with a self signed certificate is that there is nothing proving the authenticity of that certificate (Hence self-signed). So the browser is doing the right thing as it can not verify that the certificate is authentic.
If you are allowing outside access to your Bitwarden setup it can definitely be worth looking into using something like Lets Encrypt that will provide you a signed certificate. Of course you will need to purchase a domain name for this option to work.
CHeers,
Emmet
I got everything up and running with your tutorials, many thanks!
Now I would like to change the port Bitwarden is running on and changed it in the bitwarden.conf and recreated the docker container using 8888 instead of 80. But I always get Bad Gateway from nginx. Any idea? My plan is to run Nextcloud next to Bitwarden which needs apache and Port 80.
Hi Kilian,
You should actually be fine keeping the Docker container setup as we have it in the tutorial as we expose that to port 8080.
What you need to modify is the NGINX configuration as that is currently set to operate on port
80and port443To make them not conflict begin by editing the NGINX configuration file we created during this guide.
1. If you don’t to use port 80 you can safely remove the following block.
All this block does is redirect any HTTP traffic (port 80) to HTTPS (port 443). If we are using non standard ports then we can safely remove this block.
2. The next block is the one that handles the proxy pass. This text will be within the second server block on the page.
Within the following line you need to find the port number
443and change it.3. For example if you want to use port 8888 instead that line would end up looking like the following.
4. Once you have made the changes, save the file.
You can save and quit by pressing CTRL + X, then Y, followed by the ENTER key.
5. Finally restart NGINX so that it hooks itself to the new ports.
After this you should be able to access your Bitwarden installation at
https://YOURPISIPADDRESS:8888.I hope this helps as a workaround for getting Nextcloud to run alongside the Bitwarden interface.
Cheers,
Emmet
Thank you very much for taking the time to answer me with such detail! It helped me out alot!
After “Configuring NGINX to act as Proxy”, and all went smooth.
accessing bitwarden gives me “502 bad gateway”..
how to fix this?
resolved
state of container was stopped for some reason after NGINX configuration
Got it up and running fairly easily with the tutorial. only thing is do I have to be connected to the local domain to access it or am I able to do it from anywhere and if so how? Fairly new to all this!
Thanks for the tutorial ,
I am fairly newbie in this ,
I want to do this setup ;
access my vault by vpn on my local network , all on my raspberry pi .
Do i need to create a domain to access the vault ?
When i try to reach my domain:8080 and enter my account , it says this browser requires https or failed to fetch
Hi Mike,
You do not need a domain name to run Bitwarden on your Raspberry Pi. It is possible to use an IP address instead, you just need to use a self signed certificate.
You need to visit the
https://IP/DOMAINwithout specifying a specific port to access.so many,many and MANY thanks for this great tutorial!
after pulling my hairs out for 3 days without the self signed cert drama (don’t want a domain name at all for now, not skilled enough to keep the bad guys out) with this guide i have my web vault up and running in a 10 min time window!
again,thank you so much!
did you used portainer or docker?
Great tutorial, many thanks! I tried for days putting Bitwarden onto a Debian, without Docker: no chance! So I dug up an ol’ raspy and w. you help it worked 🙂
With self-signed certs Opera and Brave on macOS won’t let me connect to my new Bitwarden site “NET::ERR_CERT_INVALID”. With Safari and Firefox it works on Mac.
Bitwarden app on iOS also complains about the certs and doesn’t let me in.
Import your certificate in your browser
Hi! what should i put here? i leave it as you wrote it and the ip in browser just open the ngix test and everything i try makes an error when i restar the service.
server_name _; #Change this to your domain name
I dont have a domain, i used the self-signed certificate.
Thanks and sorry, im new in all of this
Hi dmn,
It should be fine to use the config file as it is if you are using your IP.
Can you please provide the result produced by the following command after restarting the service.
Cheers,
Emmet
I coypasted as it is in the guide since you said that it should work as it is, restarted the service but when i go to the ip in the browser still shows the ngix test
I used pastebin to keep the format
https://pastebin.com/p2h0i6TW
Hi dmn,
It looks like you still have the default configuration file present. Bitwarden is configured in this tutorial to run out of the base URL (
/).This means the default configuration file is taking precedent and displaying the default NGINX page instead of showing Bitwarden.
Make sure that you run the following command (You will need to restart the NGINX service).
Alternatively you can also use the following command to list the files currently in the enabled directory.
If you are want to use Bitwarden in a subdirectory instead then that will require some modifications to the config file. (E.G. Make it accessible from
https://ipddress/bitwardeninstead ofhttps://ipaddress/)Cheers,
Emmet
i did what you say but still not working, so i started the config nginx over and when i edit the conf, i pasted all the conf stats as it is in the guide, then restarted the service and get this error.
[– PASTEBIN REMOVED AS UNACCESSIBLE –]
Hi dmn,
I re-ran the tutorial again and found a slight mistake in the configuration.
The proxy pass was routing to port 80 instead of port 8080. That has now been corrected within the tutorial.
It should now work without any issues and the port mistake doesn’t explain the errors you were experiencing .
If you are still experiencing errors you may need to try re-doing this tutorial on a clean installation of Raspbian Buster.
On another note the pastebin that you linked in your comment was marked as private so I was unable to view its contents.
Cheers,
Emmet
Hi!
I try to do this third time but nginx not starting after I create the bitwarden config file:
Job for nginx.service failed because the control process exited with error code.
See “systemctl status nginx.service” and “journalctl -xe” for details;
The unit nginx.service has entered the ‘failed’ state with result ‘exit-code’.
Failed to start A high performance web server and a reverse proxy server.
A start job for unit nginx.service has finished with a failure.
The job identifier is 1136 and the job result is failed.
raspberrypi sudo[2044]: pam_unix(sudo:session): session closed for user root
I just copied the final config file, I do not need domain or letsencrypt.
Thanks! Best regards!
Hi Cereal,
Can you please provide the result produced by the following command after restarting the service.
Cheers,
Emmet