In this tutorial, we will show you how to install and run the Vaultwarden Docker Container.
Vaultwarden is a third-party alternative to the official Bitwarden server written in Rust. It is a lightweight alternative to the more heavyweight official server. Being lightweight makes it an excellent choice for devices such as a Raspberry Pi or a low-memory VPN.
For those who do not know, Bitwarden is an open-source password manager that allows you to self-host instead of relying on its cloud servers.
The Vaultwarden server attempts to maintain compatibility with the core functionality of the Bitwarden server. The official Vaultwarden Wiki lists missing features.
In this guide, we are using Docker to run Vaultwarden as it makes the whole setup process incredibly simple. Outside of installing Docker, you don’t have to worry about installing any other software to run this password manager server.
Before proceeding, Vaultwarden works best when you have a domain name for your server. This is because the clients need a signed certificate to work correctly.
While it is possible to use a self-signed certificate, Bitwarden is incredibly difficult to use. You will have to add the certificate to every device you use.
Additionally, you must forward ports 80 and 443 and point your domain to your IP address so that Caddy can grab a signed certificate for your domain.
Running Vaultwarden using Docker
In the following sections, we will walk you through setting up and running Vaultwarden as a Docker container.
Preparing for the Vaultwarden Docker Container
1. If you don’t already have the Docker runtime installed on your system, you can follow our quick and easy guide on installing Docker on Linux.
If you already have Docker installed, you can skip to the next step.
https://pimylifeup.com/linux-docker-install/Preparing your System for the Vaultwarden Docker Container
2. We need to use the mkdir command to create a folder to store the Vaultwarden Docker containers compose file.
By using the “-p” option, the command will create all missing directories within the path.
sudo mkdir -p /opt/stacks/vaultwardenCopy3. With the directory created, you will want to change into it by using the cd command.
cd /opt/stacks/vaultwardenCopyWriting a Docker Compose file for Vaultwarden
4. Using the following command, you can begin writing the Docker Compose file for Vaultwarden.
We use the nano text editor as it is relatively straightforward for most users to pick up and use.
sudo nano compose.yamlCopy5. Within this file, you will want to enter the following lines. We have two separate blocks; the first one includes Caddy, which will operate as a reverse proxy and provide HTTPS.
<DOMAINNAME>: Replace this with the domain name you intend to use to interact with your Vaultwarden server.<EMAIL>: As we use Caddy to automatically fetch a signed certificate, you must provide an email address. The cert provider uses this email to inform you of any issues.
services:
  vaultwarden:
    image: vaultwarden/server:latest
    container_name: vaultwarden
    restart: always
    environment:
      DOMAIN: "https://<DOMAINNAME>"
    volumes:
      - ./vw-data:/data

  caddy:
    image: caddy:2
    container_name: caddy
    restart: always
    ports:
      - 80:80
      - 443:443
    volumes:
      - ./Caddyfile:/etc/caddy/Caddyfile:ro
      - ./caddy-config:/config
      - ./caddy-data:/data
    environment:
      DOMAIN: "https://<DOMAINNAME>"
      EMAIL: "<EMAIL>"
      LOG_FILE: "/data/access.log"Copy
This second alternative block is the one you should use if you already have a reverse proxy that you want to use. The main change here is that we don’t include Caddy and expose port 80 from the container.
services:
  vaultwarden:
    image: vaultwarden/server:latest
    container_name: vaultwarden
    restart: always
    environment:
      DOMAIN: "https://<DOMAINNAME>"
    volumes:
      - ./vw-data:/data
    ports:
      - 80:80Copy
6. After filling out this file, save and quit by pressing CTRL + X, Y, and ENTER.
Writing a Caddyfile for Vaultwarden
7. If you choose to use the Caddy web server, you will need to write a simple Caddyfile.
To begin writing this file, run the command below within the terminal.
sudo nano CaddyfileCopy8. Within this file, type out the following lines. These lines are relatively simple and set up Caddy to proxy all requests to the Vaultwarden Docker container.
You don’t have to replace any text within this file, as it is automatically filled in from the Docker environment variables.
{$DOMAIN}:443 {
  log {
    level INFO
    output file {$LOG_FILE} {
      roll_size 10MB
      roll_keep 10
    }
  }

  # Use the ACME HTTP-01 challenge to get a cert for the configured domain.
  tls {$EMAIL}

  encode gzip

  reverse_proxy vaultwarden:80 {
       header_up X-Real-IP {remote_host}
  }
}
9. After writing your Caddyfile, save and quit by pressing CTRL + X, Y, and then ENTER.
Starting up the Password Manager Server
10. With the Compose and Caddyfile written, we can start the Vaultwarden Docker container by running the command below.
This may take a few minutes as it must download both the Vaultwarden and Caddy containers. During start up, Caddy will automatically attempt to fetch an SSL certificate for your domain name.
We use the “-d” option so that Docker will detach from the current terminal session.
docker compose up -dCopyAccessing the Vaultwarden Docker Container Web Interface
11. In your favorite web browser, you will want to go to the following address.
Ensure you replace “<DOMAINNAME>” with the domain you specified earlier in this guide. For example, if we set up our domain name as “vaultwaden.pimylifeup.com” we would use that.
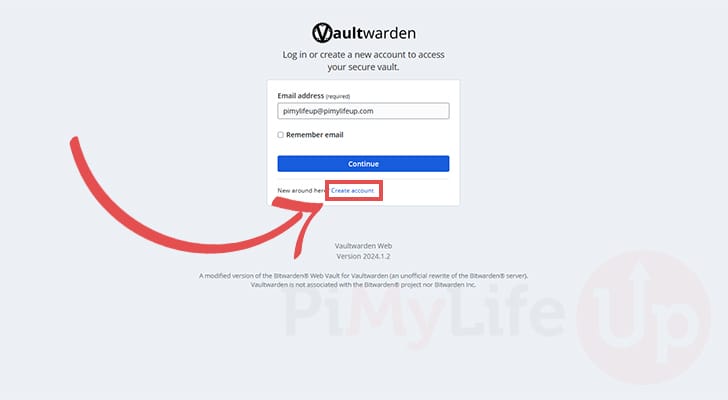
https://<DOMAINNAME>12. When you first access Vaultwarden, you must create your own account.
To begin this process, click the “Create account” link.
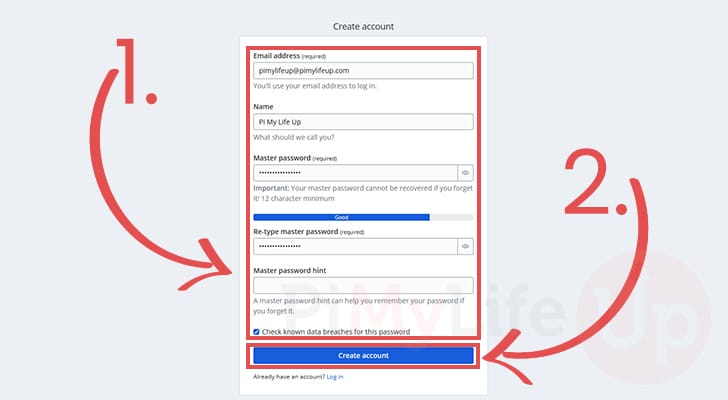
13. On this next screen, you will want to fill out the information you want to use for your account.
Ensure that you use a secure password, as this is where you will store passwords for all of your other accounts. Do not use a password that you have used before.
After filling out your information, click the “Create account” button.
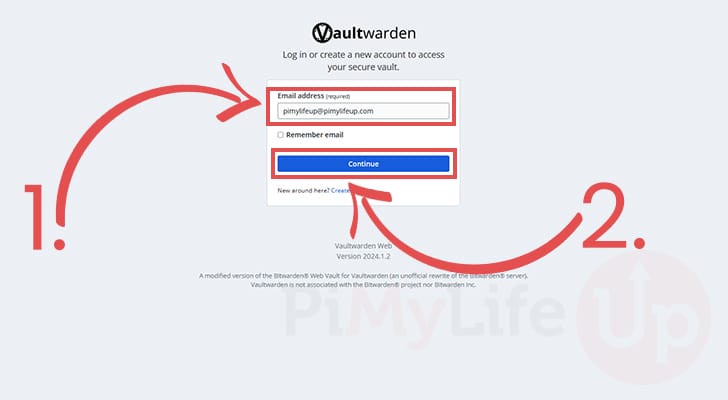
14. With your account created, you can log in and use your new Vaultwarden installation.
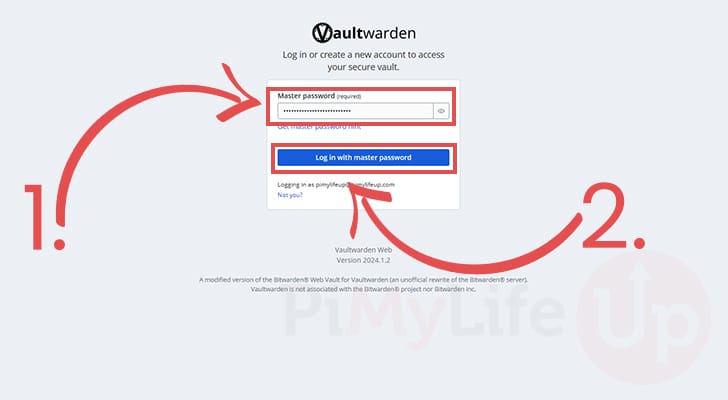
Start the login process by entering the email you created the account for (1.) and then click the “Continue” button (2.).
15. On the next screen, enter your account password (1.) and then click the “Log in with master password” button (2.).
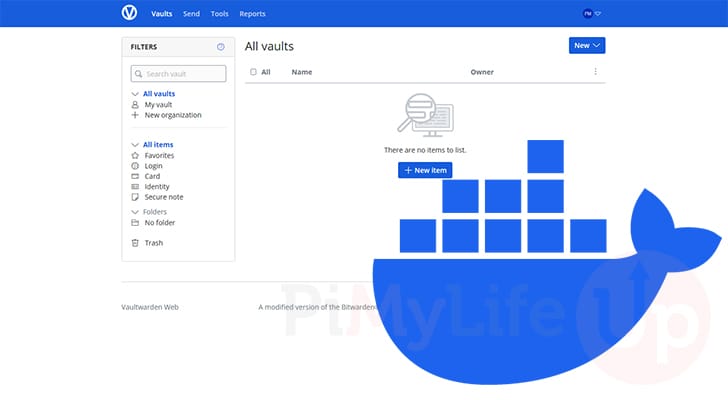
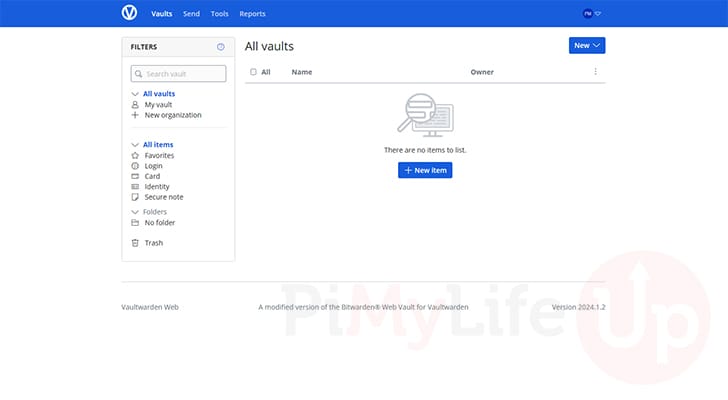
16. Thanks to the Docker container, you should now successfully have Vaultwarden running on your device.
Now is an excellent time to start connecting with the various Bitwarden-compatible clients.
Disabling Sign Ups
17. Once you have created your account, you may want to disable sign-ups. By default, Vaultwarden allows anyone to sign up for your installation.
You will want to use the command below to get Docker to turn off the Vaultwarden container.
docker compose downCopy18. Our next step is to begin modifying the Compose file. In particular, we need to add a new environment variable.
sudo nano compose.yamlCopy19. With your Compose file open, look for the “environment” section next to where Vaultwarden is defined. The block should look similar to what we have shown below.
    image: vaultwarden/server:latest
    container_name: vaultwarden
    restart: always
    environment:Copy
Underneath the “environment” header you will want to add the following. This line sets the “SIGNUPS_ALLOWED” option and to “false“.
- SIGNUPS_ALLOWED: falseCopy20. After you have made this change, save and quit by pressing CTRL + X, Y, and then ENTER.
21. Start the Vaultwarden Docker container again by running the command below.
docker compose up -dCopyUpdating the Vaultwarden Docker Container
One key advantage of using Docker to run Vaultwarden on your system is that it makes updating very simple.
This quick section will walk you through the simple steps of updating Vaultwarden.
1. First you must change into the directory where we wrote the Compose file earlier in this guide.
You can change to this directory by using the following command.
cd /opt/stacks/vaultwardenCopy2. Once we are in the right place, we can get Docker to pull the latest version of the Vaultwarden image.
If you use Caddy, this command will also download a new version of that container if one is available.
docker compose pullCopy3. If new versions of your images were downloaded, you can get Docker to start using them by using the command below.
Docker will check if a new version of the Vaultwarden image is available and restart the container using it if it is.
docker compose up -dCopyConclusion
Hopefully, at this stage in the tutorial, you will have successfully started the Vaultwarden Docker container.
Vaultwarden is a lightweight alternative to the official server. It is great for those who are trying to run it on devices with little memory or a relatively weak CPU.
Please comment below if you have any questions about setting up this service using Docker.
If you found this guide helpful, we highly recommend checking out our many other Docker guides.


in ‘Disabling Sign Ups’ step 19
it turns out that
'- SIGNUPS_ALLOWED=false'must be
'SIGNUPS_ALLOWED: false'Thank you, we have corrected that step.
So besides the whole domain name issue, cause I suffer from that problem like Brian Fry, what if port 80 is already be allocated for another service, I’m using docker to run multiple services like this one, nextcloud, home assistant, and whatever else. Is there a way to deconflict the port issue or something?
Hi Seth,
The port issues is a significantly easier thing to deal with. Within the Docker Compose file you will see a line that looks similar to what we have shown below.
This line does two things. First it defines the port that should be opened on your host system (left side number), and then on the right side it will defines the port that is being exposed within the container itself.
For example, if we wanted to change Vaultwarden to use a different port, say 8383 we would update this line to look like the following.
Hopefully that helps you.
Kind regards,
Emmet
Does Vaultwarden require a domain name or can the ip be used?
Also curious, what would change in compose / setup if one only wanted to access vaultwarden locally (no exposing lan to internet) and sync devices when back at home?
And finally, appreciate the tutorials, I’m new at this and finding your site to be very helpful!!!
Hi Brian,
Unfortunately, Vaultwarden and by extension Bitwarden as a whole is kind of painful to deal with without having a domain name. The software relies on HTTPS and some of the functionality browsers only implement when a HTTPS connection is available.
While you can work around this by setting up a self-signed certificate, it makes the software super painful to use as you will need to manually copy this certificate on to every device that you want to use Bitwarden on.
Probably the cleanest way to make this all work would be to get a cheap domain name and then use Cloudflare DNS Challenges to help generate the certificates without needing you to expose your local network. I don’t have the exact steps for this unfortunately and probably would need to create a separate guide on setting it all up.
In our own personal setup, we use Pangolin to give us access to our services and enable us to easily have HTTPS support for our various applications.
Kind regards,
Emmet