In this project, we are going to show you how to install Asterisk on the Raspberry Pi.
Asterisk is an open-source voice over internet protocol private branch exchange (PBX) system that can run on the Raspberry Pi’s limited hardware.
Using Asterisk as your PBX you are able to automatically manage your incoming and outgoing phone calls, including distributing your calls amongst different.
You can even use a PBX to handle voice mails, conference calling, and even interactive voice response (phone menus).
For all of this to work on your Raspberry Pi, you will need to be making use of a voice- over IP phone system. You can even use “softphones” on your computer or smartphone as part of your PBX. Two different softphone systems that can be used with Asterisk is 3CX and Zoiper.
For the best experience, the connection between your Raspberry Pi and the VOIP phones should be using ethernet. Using ethernet will reduce the chances of latency or drop out issues that can happen with wireless solutions.
To get the Asterisk software to run on our Raspberry Pi, we will be making use of the RasPBX distribution. This distribution saves us the hassle of compiling the Asterisk software, a process that can take several hours.
Equipment
Below is the equipment that we used to install the Asterisk software on the Raspberry Pi.
Recommended
Optional
We tested this tutorial on installing Asterisk using a Raspberry Pi 4 running the latest available version of RasPBX.
Downloading Asterisk for the Raspberry Pi
In this section, we will be getting you to download the latest version of RasPBX. RasPBX is the distribution that contains the compiled versions of Asterisk.
Not having to compile Asterisk from its source code saves considerable time and potential trouble. Additionally, it comes with FreePBX, which is an open-source, web-based management tool for Asterisk.
You can download the latest version of RasPBX from the Raspberry Pi Asterisk official website or our websites CDN.
All versions of RasPBX are built upon the official Raspberry Pi OS releases.
Asterisk for Raspberry Pi 2, 3, and 4
The latest version of RasPBX includes support for almost every single Raspberry Pi, including the Pi 4.
The only Pi’s that arent supported by this release is the original Raspberry Pi and the Pi Zero series.
You can download the latest available version of RasPBX (11-11-2019) straight from our CDN.
Asterisk for Raspberry Pi 1, Zero and Zero W
Support for the Raspberry Pi 1 and Pi Zero was dropped in the latest version, so you will need to download an older release.
This older version of RasPBX is built upon the Raspbian Stretch and uses version 13 of Asterisk and version 14 of FreePBX.
Download this older build of RasPBX (04-04-2018) from our CDN.
Writing the Asterisk Distribution to our Raspberry Pi
With the RasPBX image downloaded to your device, we will now use the Etcher tool to write it to an SD card.
Etcher is a useful tool that can run on Windows, Linux, and macOS systems. You can use other image writing tools to achieve the same task.
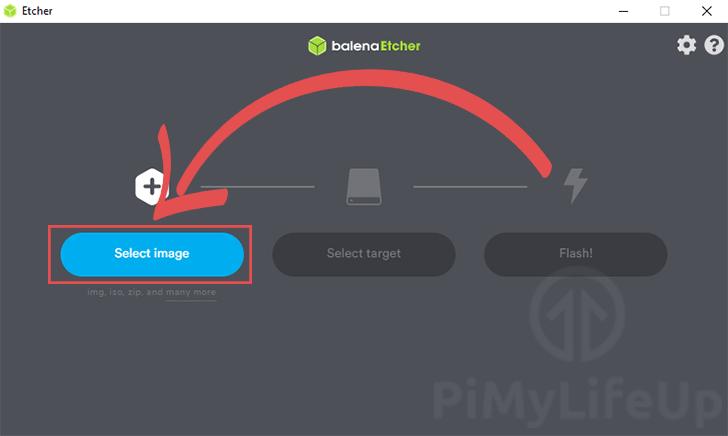
1. With Etcher open, click the “Select image” button.
This button will bring up a file dialog that will allow you to select the RasPBX image you downloaded earlier.
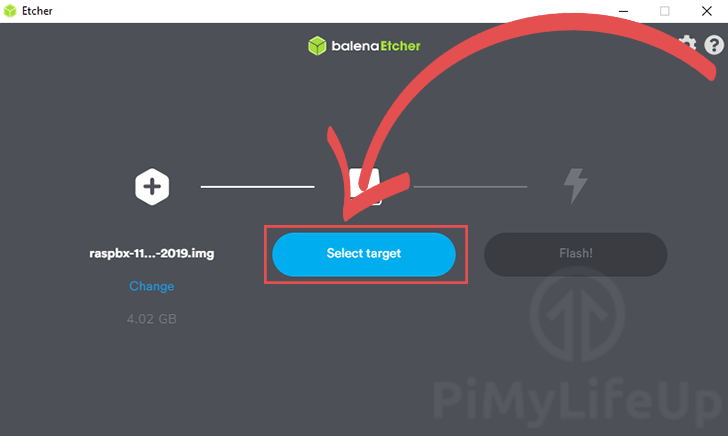
2. Our next step is to choose the SD card/drive we want to write the Asterisk distribution to.
To select a drive, you can click the “Select target” button.
The Etcher software will try to select an available drive to write to automatically.
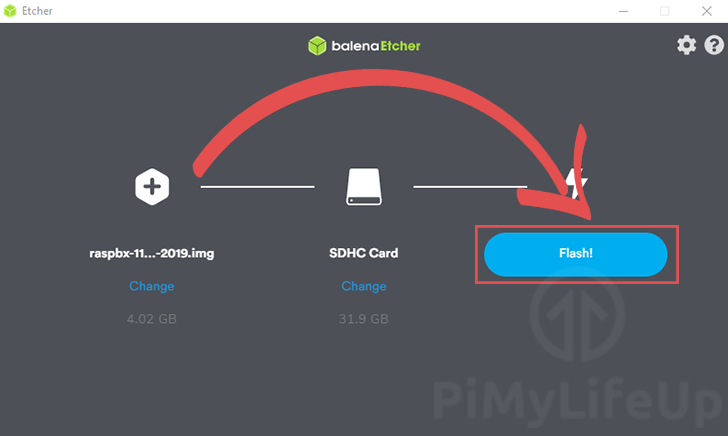
3. With everything set, you can now flash the RasPBX image to your SD card.
To start this process, click the “Flash” button.
4. You can now proceed to plug the SD card into your Raspberry Pi and start it up.
First Boot of Asterisk on your Raspberry Pi
In this section, we will take you through some of the first tasks you should do when first starting up your Raspberry Pi.
As we are using the RasPBX image to implement Asterisk support, there is a special update command we can run to ensure everything is up to date.
To achieve this, you can either use the command line or connect over SSH.
1. When connecting to your Raspberry Pi, you will be asked to enter some login details.
The user that you will be using is the root user.
The default password for the root user is raspberry.
2. Once you have logged in, your first task is to upgrade the system.
We can make use of rasPBX’s upgrade utility by making use of the following command.
raspbx-upgradeUpgrading the system ensures that you are running the most up to date packages, making your system more secure and stable.
3. Before we continue, we should regenerate the SSH host keys.
The reason for this is that the RasPBX distribution that we are using already comes with some. These are distributed around and aren’t as secure.
To regenerate the SSH host keys, run the following command.
regen-hostkeysPlease note that the next time you connect to your Raspberry Pi, you will be warned that the SSH keys have changed.
Below we will go through some of the tasks you should do to get Asterisk running smoothly on your Raspberry Pi.
Expanding the Filesystem
The RasPBX distribution, by default, only consumes the size of its image. What this means is that you will not have access to the rest of the filesystem offered by your SD card.
In this section, we are going to show you how to expand the filesystem so that you have full access to your SD card space.
1. We can now expand the partition, so that it fills up the entirety of the SD card.
To expand the filesystem, we will be making use of the raspi-config tool.
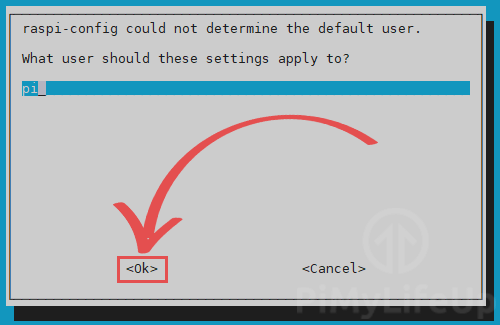
raspi-config2. When you launch the config tool on this custom Asterisk distribution, you will be asked to type in the user to use.
This doesn’t matter for us as we are just expanding the filesystem, press the ENTER key to continue.
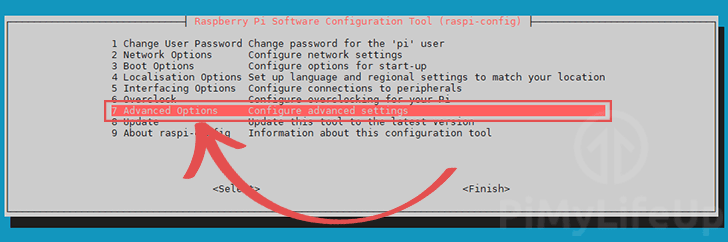
3. Now that we are in the config tool, we need to open the advanced options.
Go to 7 Advanced Options using the ARROW keys then press ENTER.
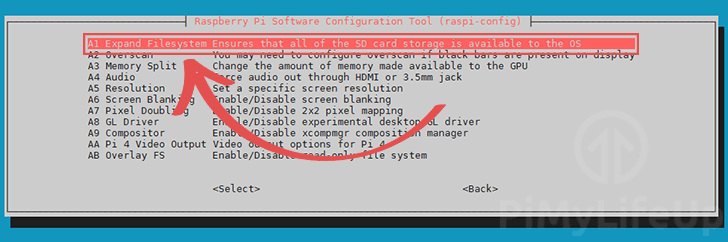
4. Within the advanced options menu, select the A1 Expand Filesystem option then press the ENTER key.
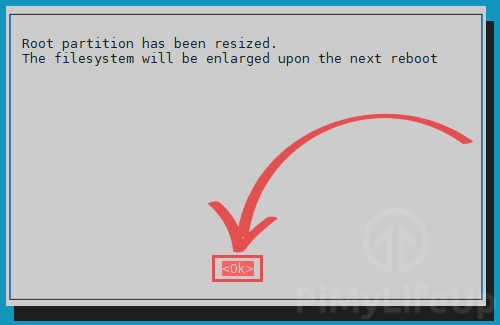
5. Once the tool has finished resizing the filesystem, you will be greeted with the following message.
You can now safely quit out of the tool.
6. For the filesystem changes to take effect, we need to restart the Raspberry Pi.
You can restart the Raspberry Pi by running the command below.
sudo rebootCorrecting the Timezone for Asterisk
One of the first tasks you should perform when setting up Asterisk on your Raspberry Pi is to make sure you are using the correct timezone.
1. As time is crucial for phone systems, we need to make sure that Asterisk runs in the right timezone.
To start configuring the timezone, we need to run the following command.
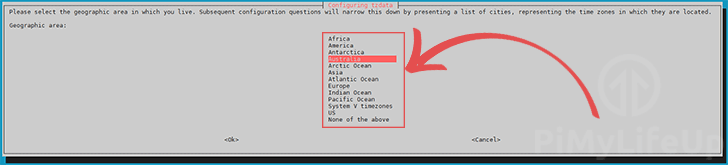
configure-timezone2. First, you will need to select the geographic area that you live in.
Selecting this will allow the timezone tool to narrow down your location and offer a better selection of cities and regions.
To navigate this menu, use the ARROW keys, with an area selected, press the ENTER key.
3. Now you can select the city or region that corresponds to your time zone.
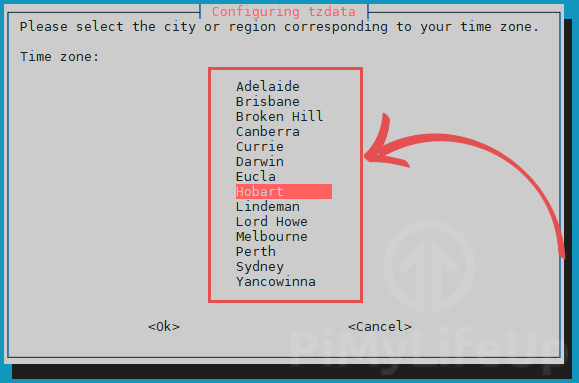
The tool will now update the timezone on your system.
Finding your Raspberry Pi Asterisk Box’s IP Address
For the next steps, we will need to know the IP address of your Raspberry Pi.
The easiest way to find this out is to run the following command on your device.
hostname -IThis command will return the local IP address that has been assigned to the Raspberry Pi by your router.
There are also other ways to find the IP address of your Raspberry Pi, but this method is one of the easiest.
It also might be a good idea to configure your Raspberry Pi so that it has a static IP address.
Connecting to the Raspberry Pi’s Asterisk Web Interface
In this section, we will show you how to access the web interface for Asterisk running on our Raspberry Pi.
This web interface is provided by FreePBX, an open-source management tool for PBX systems like Asterisk.
1. To access the web interface running on our Raspberry Pi, we need to use a web browser.
In your favorite web browser, go to the following address.
http://raspbx/If this does not work for some reason, we can instead try using the Pi’s IP address.
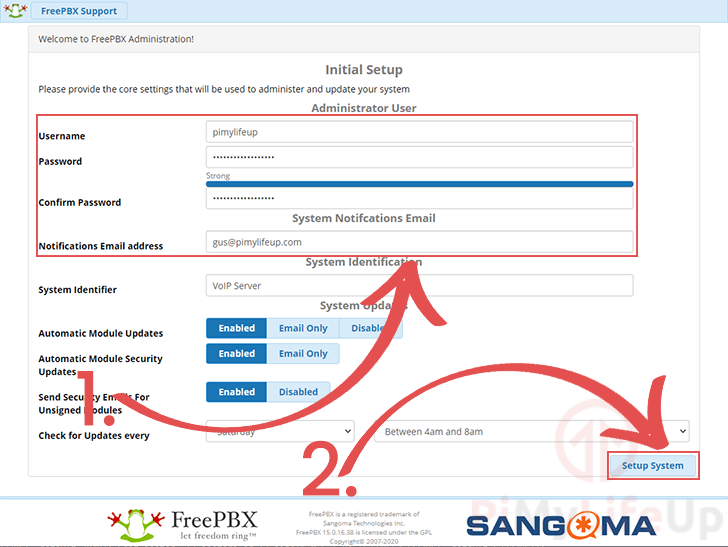
http://[RASPBERRY PI IP ADDRESS]/2. When you first load up the web interface, you will be asked to create and configure an administrator user.
Fill out the details for your account (1.). Make sure you set a password that’s not easily guessable.
Once done, click the “Setup System” button in the bottom right corner (2.).
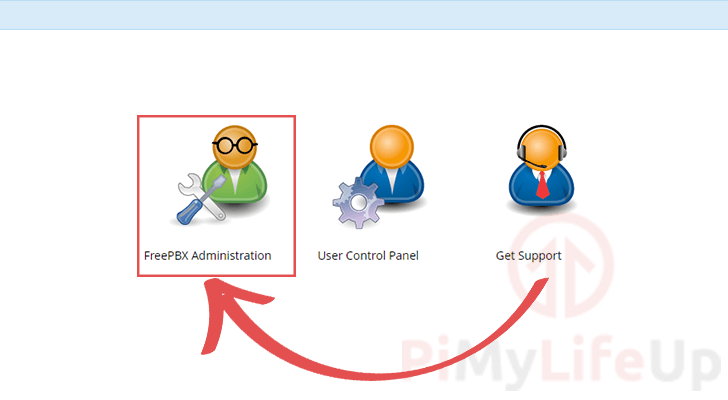
3. After creating an account, you will be greeted by the screen below.
We are after the admin screen, so click the “FreePBX Administration” icon.
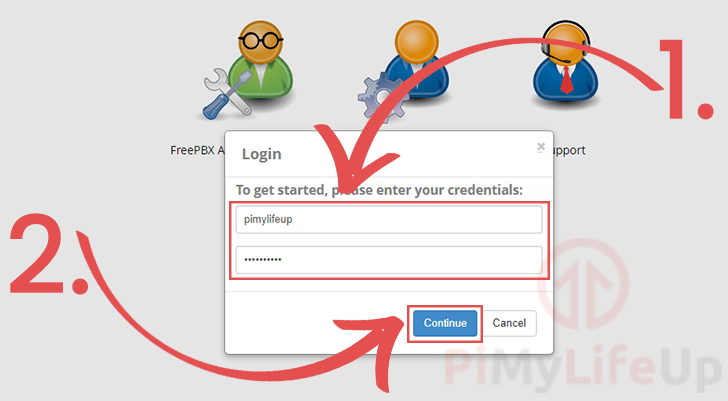
4. To proceed, you will need to log in to your brand new administrator user (1.).
Once you have entered your login details, click the “Continue” button.
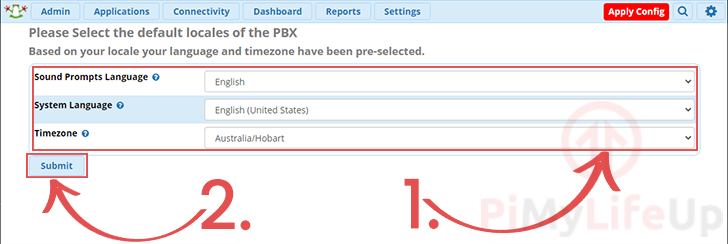
5. Next, you will be asked to select the default locals for Asterisk on your Raspberry Pi.
These settings will default to the ones we configured earlier. If these are incorrect, you can correct your sound language, system language and timezone (1.)
Once the changes are done, click the “Submit” button (2.).
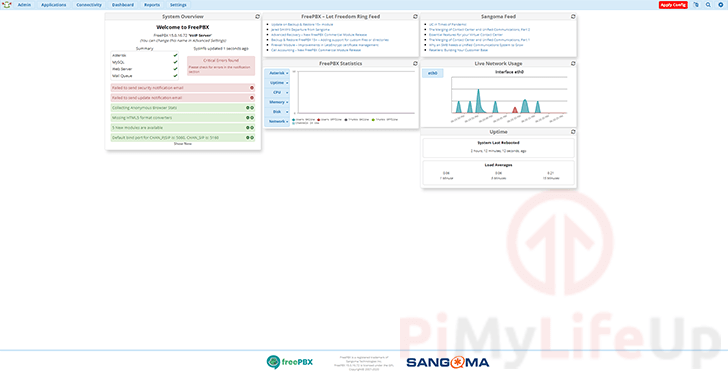
6. You now have access to the FreePBX web interface.
Using this interface, you can configure your Asterisk powered PBX running on your Raspberry Pi.
At this point, you should now have Asterisk running on your Raspberry Pi.
You can now use the FreePBX web interface to configure Asterisk by adding your VOIP providers and adding extensions for your internal VOIP network.
Most VOIP providers will provide you with steps to use the FreePBX web interface to connect to their services.
You will also need to point each of your VOIP phones to your Raspberry Pi’s IP address so that they can connect to the Asterisk server.
If you run into any issues setting up Asterisk on your Raspberry Pi, feel free to leave a comment below.
Also be sure to check out some of our other great Raspberry Pi projects.