With this tutorial, we will be showing you the process of installing the UniFi Controller on a Raspberry Pi
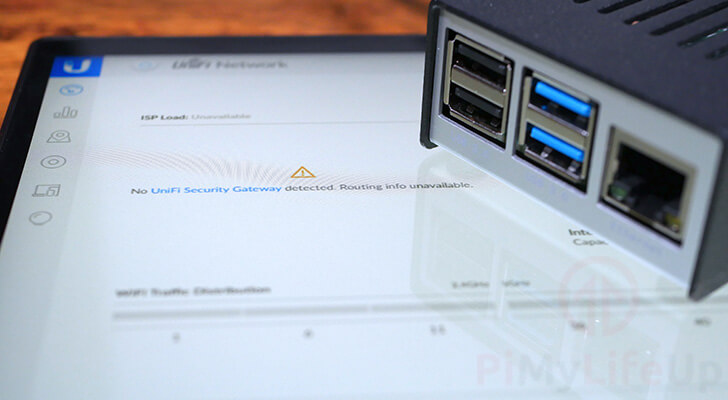
UniFi is a range of network devices created by Ubiquiti. These devices range from Wi-Fi access points to security gateways and switches.
Setting up the UniFi software on a Raspberry Pi is a fairly straightforward process as it just relies on the multi-platform Java runtime to run.
Using the UniFi network controller, you can manage all the UniFi devices that are a part of your network. You will also be able to use this dashboard to see the statistics of your UniFi network.
Please note that before proceeding you will need to be running a 64-bit version of Raspberry Pi OS for this tutorial to work. Recent changes to UniFi have broken support for 32-bit operating systems.

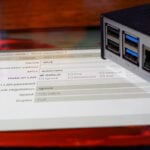
Equipment List
Below is a list of the equipment that you will need to set up the Unifi Network Controller software on your Raspberry Pi
Recommended
Optional
This tutorial on setting up the UniFi Network Controller was tested on a Raspberry Pi 5 running the latest version of Raspberry Pi OS Bookworm 64-bit.
Video
The video we have embedded below will walk you through all of the steps needed to set up the UniFi network server on your Raspberry Pi. If you prefer to go at your own pace, be sure to follow our written instructions below instead.
Preparing your Raspberry Pi for the UniFi Controller
In this section, we will prepare the operating system to run the UniFi software. These steps mainly revolve around getting the database server UniFi requires installed on your Raspberry Pi.
Getting Ready
1. The first thing you should do is ensure that your Raspberry Pi is running up to date packages.
To update all packages, you will be required to run the following command.
sudo apt update
sudo apt upgradeCopy
Adding Entropy using rng-tools
2. To improve the startup speed of the UniFi controller software on our Raspberry Pi, we need to install rng-tools.
We will utilize this package to ensure the Raspberry Pi has enough entropy for the random number generation that the UniFi software uses.
sudo apt install rng-toolsCopy3. We now need to make a slight change to the rng-tools configuration.
Begin editing the config file by running the following command.
sudo nano /etc/default/rng-tools-debianCopy4. Within this file, find and uncomment the following line.
Find
#HRNGDEVICE=/dev/hwrngCopyReplace With
HRNGDEVICE=/dev/hwrngCopyBy uncommenting this line, we are adding to the amount of entropy (The amount of randomness) that the system has available.
The Raspberry Pi features an integrated random number generator that we can utilize to increase the entropy pool.
5. Once you have made the change, save the file by pressing CTRL + X, then Y, followed by ENTER.
6. Finally, restart the rng-tools service by running the command below.
sudo systemctl restart rng-toolsCopyOnce the service has finished restarting, it should now be safe to proceed to the next section of this guide.
Installing LibSSL1.1
7. Due to the version of MongoDB that we will be utilizing, we will need to install LibSSL 1.1 to our Raspberry Pi.
You can install this release of LibSSL by using the following command in the terminal.
sudo apt install libssl1.1CopyInstalling MongoDB to your Raspberry Pi for the UniFi Controller
8. To use the UniFi Controller on your Raspberry Pi, we will need to install MongoDB.
This is the database server that UniFi uses to store all of its data. As we can’t rely on the package repository, we will need to follow some additional steps.
For this first step, we will download MongoDB 4.4.18 to our Pi. We are installing 4.4 as this is currently the only supported release for the UniFi Controller that is compatible with the Raspberry Pi.
wget https://repo.mongodb.org/apt/ubuntu/dists/focal/mongodb-org/4.4/multiverse/binary-arm64/mongodb-org-server_4.4.18_arm64.deb -O mongodb.debCopy9. Once the package is downloaded, install it by using the following command within the terminal.
sudo dpkg -i mongodb.debCopy10. Now that we have installed the MongoDB server, set it to start when your Raspberry Pi boots using the command below.
sudo systemctl enable mongodCopy11. Finally, start MongoDB by running the command shown below in the terminal.
This will start the server immediately, so we won’t have to wait till our device restarts.
sudo systemctl start mongodCopyInstalling the UniFi Controller to the Raspberry Pi
1. Our first task is to add the UniFi repository to our sources list.
We can achieve this by running the command below.
echo 'deb [arch=amd64 signed-by=/usr/share/keyrings/ubiquiti-archive-keyring.gpg] https://www.ui.com/downloads/unifi/debian stable ubiquiti' | sudo tee /etc/apt/sources.list.d/100-ubnt-unifi.list >/dev/nullCopyYou might notice that we are using “amd64” and not “arm64” or “armhf“. This is due to Ubiquiti not having their repository set up to mark “arm64” as compatible. However, it doesn’t hugely matter as, at the moment, it will still download files compatible with our Raspberry Pi.
2. We now need to add the repositories GPG key by using the following command.
curl https://dl.ui.com/unifi/unifi-repo.gpg | sudo tee /usr/share/keyrings/ubiquiti-archive-keyring.gpg >/dev/nullCopyThe GPG key is what helps tell the package manager it is downloading the correct package.
3. As we made changes to the repositories, we need to now update the package list by running the command below.
sudo apt updateCopy4. Now finally, we can install version 17 of the OpenJDK runtime as well as the Unifi Controller software itself to our Raspberry Pi by running the following command.
sudo apt install openjdk-17-jre-headless unifiCopyInstalling UniFi through this method will automatically set up a service. This service will automatically start the UniFi software at boot.
Additionally, we are installing version 17 of the Java runtime environment as it is currently the only version supported by the UniFi controller.
First Boot of the UniFi Controller on your Raspberry Pi
In this section, we are going to walk you through the initial configuration steps of the UniFi software.
1. First, retrieve the local IP address for your Raspberry Pi.
If you have terminal access to your Pi, you can use the following command.
hostname -ICopy2. With your Raspberry Pi’s IP address handy, go to the following web address in your favorite web browser.
Ensure that you replace “<IPADDRES>” with the IP of your Raspberry Pi.
https://<IPADDRESS>:8443If you run into a certificate error, it is safe to ignore it as we know what device we are connecting to.
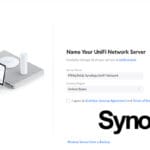
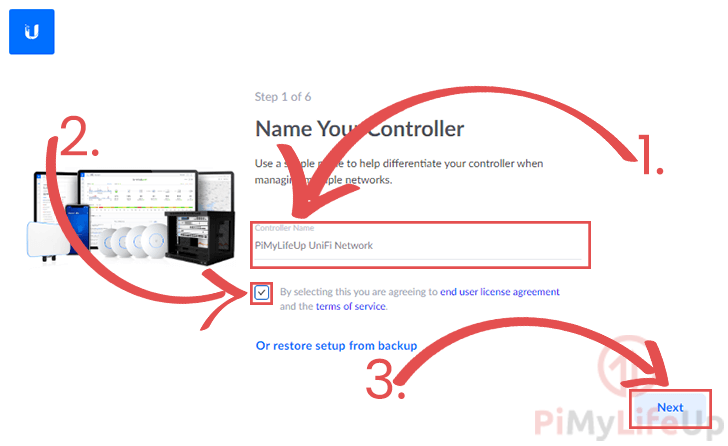
3. The first step requires you to give a name for your Raspberry Pi powered UniFi controller (1.).
You are also required to agree to the end-user license agreement and terms of service from UniFi, once you have read through them, click the checkbox (2.).
Once all done, click the “Next” button (3.) to proceed.
4. Next, you will need to sign in to your Ubiquiti account (1.).
If you don’t already have an account, you can register at the Ubiquiti website.
Once you have entered your login details, proceed by clicking the “Next” button.

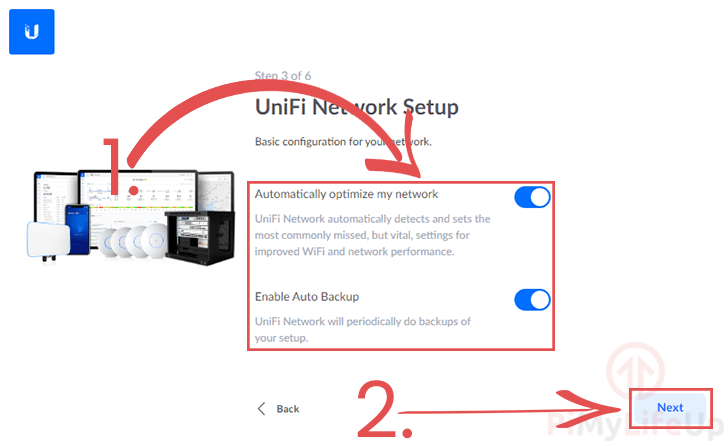
5. Tweak the settings on this page that best suits your needs.
Once configured, click the “Next” button.
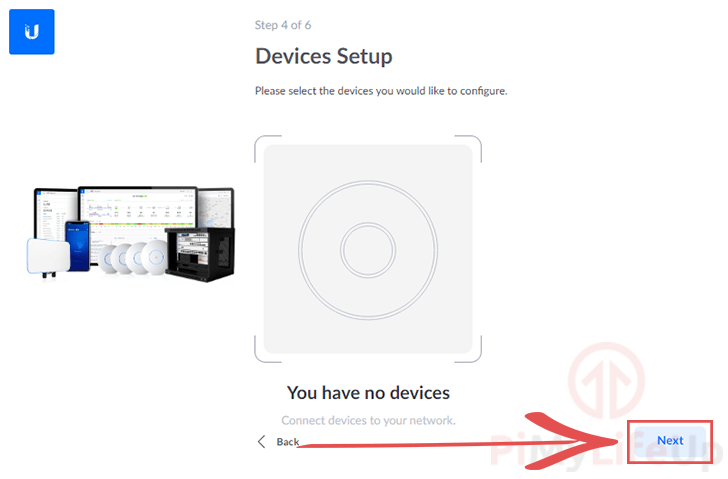
6. Use this screen to connect your Pi UniFi Network controller to the devices on your network.
To proceed, click the “Next” button.
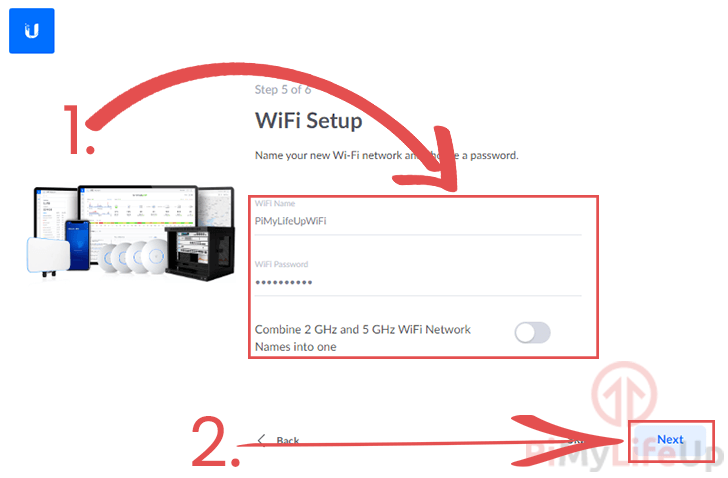
7. Now give your new Wi-Fi network a name and a password.
Once you have configured your WiFi details (1.), click the “Next” button to proceed (2.).
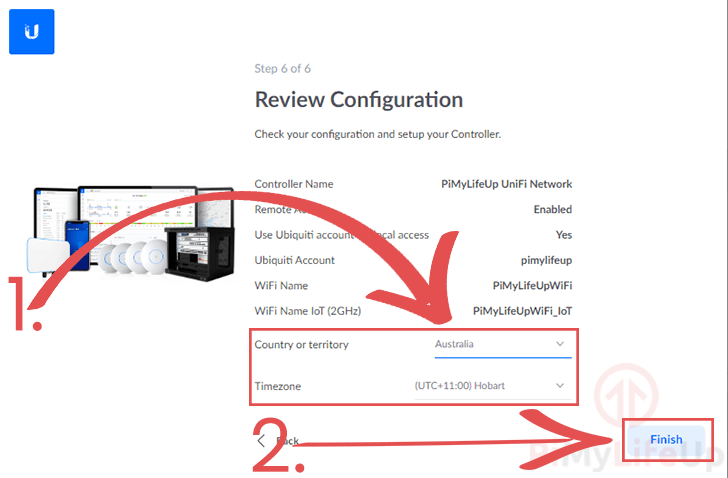
8. This final screen will get you to review all your settings.
You will also be able to use this screen to set both the country and timezone (1.). Make sure you set these before continuing.
Once you have verified everything is correct, you can now click the “Finish” button (2.) to finish the setup process.
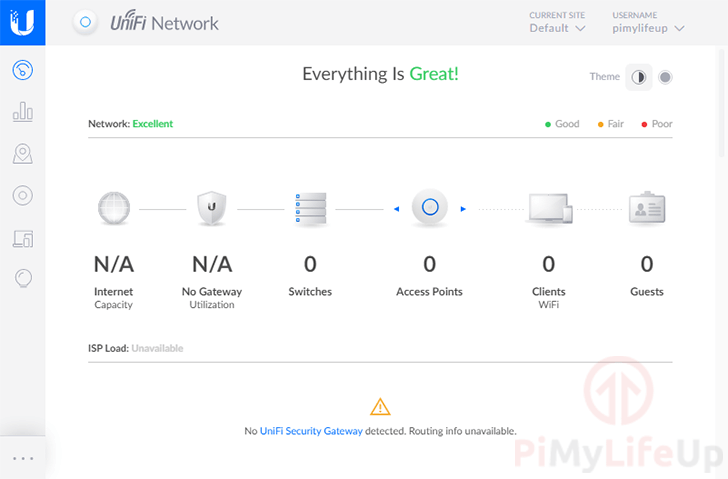
7. At this point, you should now have successfully set up the UniFi network controller on your Raspberry Pi.
Conclusion
Hopefully, at this point in the tutorial, you will now have the UniFi controller installed and running on your Raspberry Pi.
The Pi is a great base for your network controller as it can run 24/7 with little power.
If you have run into any issues setting up the UniFi software, feel free to comment below.
Check out our many other Raspberry Pi tutorials to learn more about this versatile system.


Thankfully, a Raspberry Pi tutorial that worked a charm 1st time with no issues. I had previously installed an earlier version of UNIFI but this stopped working when the system was changed to 64 bit. I had been using Windoze server in the mean time (forgive me) until I got around to rebuilding a Raspberry Pi 4 based system again.Tip, Install latest Raspberry OS Bookworm 64 bit with minimum desktop environment if needed. Don’t use UBUNTU or other Debian based OS as Raspberry OS has the other required libraries and files from install. Yes I know Raspberry OS is based on UBUNTU?Debian but it’s not the same. You have been warned!
Hi, I just tried to follow that tutorial but got stuck with the libssl1.1. On my Raspberry Pi 4 running Ubuntu 24.04 LTS it says I can’t install libssl1.1 as `Couldn’t find any package by glob ‘libssl1.1’`
And later when I tried to install unifi, it said that I had unmet dependencies, but it’s unable to correct the problem.
How can I get around that?
Hi Matth,
This tutorial was written with Raspberry Pi OS in mind, but luckily it isn’t to painful to work around this issue with Ubuntu. Like with Pi OS you will need to be using a 64-bit operating system.
First, download the libssl package to your system from the Ubuntu package repository by running the command below.
Then install said package by using the following command.
You should be able to continue with the tutorial fine after that point. Please let me know if you continue to run into issues with getting Unifi installed on to your Raspberry Pi.
Kind regards,
Emmet
My Pi finally detected the 9.1.120 version of unifi a couple of weeks after it released. I got this prompt which I had to respond yes to after running sudo apt update.
E: Repository ‘https://dl.ui.com/unifi/debian stable InRelease’ changed its ‘Codename’ value from ‘unifi-9.0’ to ‘unifi-9.1’
N: This must be accepted explicitly before updates for this repository can be applied. See apt-secure(8) manpage for details.
Do you want to accept these changes and continue updating from this repository? [y/N]
Thank you, Emmet! I really appreciate this helpful tutorial. Well Done!
Setting up my Pi as headless (Pi OS Lite), everything went fine until I struggled in the “First Boot of the UniFi Controller…” section at points #3 and #4: The first setup page offers to choose a region. That was not possible as the dropdown list was unpopulated. Then, logging in to my Unifi Account just didn’t work. I guess, the issue is related to the 2FA and something in the background was not able to handle this.
In a second attempt, I re-ran through the same procedure using the full (Desktop) Pi OS. Now, the region dropdown list was populated correctly and also the 2FA procedure was handled propperly.
Any idea why this is? Would there be a chance to fix the procedure for the headless case?
Hi Oliver,
That is truly bizarre and not an issue I’ve ever ran into. My testing and run-throughs of this tutorial is always perofrming on Raspberry PI OS Lite and I’ve never seen that issue pop up before. Only time I’ve ever used the desktop OS is when I was recording the video for setting up the UniFI controller on the Raspberry Pi.
Will put it down as something I mighht need to look into further. But technically, there shouldn’t be anything major missing that would break that sort of functionality.
Kind regards,
Emmet
Thank you for this tutorial! I used it to set up a Raspberry Pi as a UniFi Controller, and it’s been working great for almost a year.
That being said, I have noticed recently that the UniFi application hasn’t been updating for the past few months when I update the Pi. When I checked the version of the UniFi application that I am running, it looks like it is version 9.0.114. As best I can tell, the most recent version of the UniFi network application is 9.1.118 (as of 04/21/2025). Does anybody know if I need to reconfigure anything to install the more recent UniFi application on my Pi?
Hi John,
Really glad to hear that it has continued to run well for you!
Version 9.0.114 is the current stable release as of the 22nd of April 2025, 9.1.188 is currenntly in the “release candidate” stage so you should see this update become available sometime in the next few days or weeks.
The easiest way to check what is the current stable release is through the UniFi downloads page.
Kind regards,
Emmet
Thank you for the clarification! I greatly appreciate it.
Can you update this tutorial to include the Mongo client as well as the server ? That way in case there are database issues, there is a client available.
That is simply using the mongodb-org path and leaving off the server string ?
Hi Dave,
I can definitely see how having the MongoDB client would definitely come in handy, and is something I might implement more thoroughly through the tutorial down the track. For now let me quickly go through the steps for you.
First you will want to download Mongo SH to your Raspberry Pi which you can do by using the following command. This command will get version 2.4.2 which should remain compatible with the version of MongoDB that we are currently stuck with.
Once the package is downloaded, you can install it by using the following command.
You should now be able to access the MongoDB command line tool to manage your UniFi installation. You can open up a new session by typing in “mongosh” into the terminal.
Please let me know if these same steps work fine for you.
Kind regards,
Emmet
To spare anyone the unnecessary hassle I had. I thought why install MongoDB 4.4.18 if there is 4.4.29 available (current version of 4.4). Don’t do it. Unifi installation hangs during the configuration phase. Stay with 4.4.18 and everything will be fine!
Are there any plans to update the guide now that Unifi v9 supports MongoDB v8.0.x and Java 21? I’ve done some experimenting on the MongoDB side of things but I can’t seem to get Unifi to install.
Hi Bobby,
Unfortunately, technically MongoDB 8.0 is not supported on the Raspberry Pi 4 or older due to the ARM processors they use not supporting ARMv8.2a (The Raspberry Pi 5’s processor however does).
So, I’m a bit conflicted on whether to update to the newer versions or stick with what is still support by the older Pi’s. MongoDB 4.4 is still marked as a supported version for the Unifi controller. Java however, in theory should be a clean change over.
Kind regards,
Emmet
Thank you for taking the time to reply and for this site; it’s such a great resource.
I believe the 8GB SD card I tried had not enough capacity so I have it running with a 32GB card. That was an extremely easy tutorial. Thank you.
Hi Daniel,
I had been meaning to look into the issue you ran into further but have been busy. Thank you for taking the time to respond with your fix, it is always much appreciated.
Kind regards,
Emmet
Everything went well up to the point when I type the pi’s ip address into my browser to setup UniFi I get:
This site can’t be reached
192.168.1.130 refused to connect.
Although I can ping this address successfully. SSH works just fine.
Thanks very much. I have it working now!
Hi Emmet. Thank you for posting this tutorial. I am really excited to use my Pi4B as a dedicated Unifi Controller.
This is my first try and I got to “curl” step without error. Next step is “sudo apt update” and that’s where I get the following:
So is this okay? I don’t know much about repos and packages but it looks like ‘donwloads’ is misspelled and I’m not sure where that came from.
Hi Tom,
You will need to redo step one of the “Installing the UniFi Controller to the Raspberry Pi” section as you have mistyped the URL. There is a copy button on the top-right of the code block to make it easie.
The URL you have entered is “
https://wwwlui.com/donwloads/unifi/debian” when it should be “https://www.ui.com/downloads/unifi/debian“.After correcting the broken source, you will need to run “
sudo apt update” again before you will be able to install UniFi to your Raspberry Pi.Kind regards,
Emmet
Kind regards,
Emmet
Emmet,
I apologize for the first comment I wrote. I think that I must have made a mistake somewhere in the “echo” or “curl” command. I was hand typing these as I read them from one PC browser into the Pi CLI. Today I went back to the Pi and brought up your tutorial there; used the copy/paste starting with the “echo” line. All good now. I got everything done prior to connecting the UniFi Controller which I have to do at a different location. Anyway, I hope I did not waste your time. Thank you, again!!!
Ha! I did not see your reply to me until after my second message. But you were right. Thank you again!
Hi, thanks for this step by step tutorial.
Works fine on my side.
Excellent tutorial. First time I could run through a setup smoothly without adjusting things because something was changed or renamed. Thanks
i’ve just done
sudo apt update
sudo apt upgrade
to Upgrade to 8.1.127 on rpi4 and everything works fine
Emmet, can’t thank you enough, along with another YouTube phenom. Set up the pi (currently running Jellyfin) with the unifi controller and easily migrated, via backup, the controller from a laptop to the “always on” pi. Working like a champ. You guys rock!
I followed the tutorial (great tutorial!) and got it running but after approx 24 hours the pi hangs (and it is on a remote site…) anyone else having this problem?
If you’re using a Pi with only a gig of memory you could try increasing the swap size to 1024; that seems to be working for me.
https://pimylifeup.com/raspberry-pi-swap-file/
Thank you for this tutorial. I have been wanting to move my controller off of a laptop for a while. Maybe this as a weekend project. Question: Is it absolutely necessary to have a Ubiquiti account? Haven’t had one in the past, and not sure it’s necessary.
Again, thank you for the tutorial and walk-through.
Hi Bushman,
From memory, it is possible to skip signing in to an Ubiquiti account. The steps will differ slightly from what we have shown in this guide, but it should definitely be possible unless things have changed since I last checked.
Kind regards,
Emmet
I an not get the GPG key and download the package. The curl command keep failing. Has something change? I have had this running on a pi before and it was great!!
Hi Brian,
I quickly ran through the tutorial again and everything seems to be working fine, especially with grabbing the GPG key. Would you be able to post the error that you ran into?
There is a chance it could of been caused by a temporary network issue.
Kind regards,
Emmet
My tests: now, works only with mongodb 4.4.18 (pi4, ubuntu 20 and RaspiOS 12 lite