This tutorial will show you how to set up a firewall on your Raspberry Pi.
A firewall is crucial for protecting any device from a network-based attack. In principle, firewalls are very simple tools that allow or block an incoming or outbound connection.
Setting up a firewall on your Raspberry Pi helps protect a bad actor from potentially causing issues on your device or accessing services you don’t want to be accessed.
Most Linux operating systems, such as Raspberry Pi OS, already have a firewall built into the kernel. This is controlled by the somewhat complicated nftables. Nftables allows complicated firewall routing, but for most users, it can be a bit daunting.
Luckily, setting up and controlling firewall rules on your Raspberry Pi can be made significantly simpler as you will see over the following sections.
Equipment
Below is a list of equipment we used when setting up a firewall on our Raspberry Pi.
Recommended
Optional
We last checked this tutorial on a Raspberry Pi 5 running the latest version of Raspberry Pi OS Bookworm.
What is a Firewall, and Why use One on your Raspberry Pi?
A firewall is a key component to protecting any device that is exposed to the internet. It acts as a barrier between connections and a device such as your Raspberry Pi.,
Without a firewall, someone can attempt a connection to your Raspberry Pi on any port that it has software listening on. This could be your SSH connection, a web server, or even a game server you are running off your Pi.
Even if you are behind a firewall on your router, running one on your Pi is still good practice as it allows you to ensure that only the ports you want open are accessible.
You can combine your firewall with tools such as fail2ban to help keep your Raspberry Pi even more secure. Fail2ban works with your firewall to block incoming connections than trigger a particular rule.
Additionally, if you have your Pi exposed to the internet in any way then setting up a firewall is a must.
Setting up the Firewall on your Raspberry Pi
As mentioned above, the default way of managing the firewall on your Raspberry Pi can be messy. Nftables, while very powerful, can be a bit tricky to deal with if you don’t use Linux very often.
Luckily, there are many tools that make this process much simpler, the most popular of which is UFW. In the following sections, we will walk you through how to install this tool and use it to manage the firewall on your Raspberry Pi.
Preparing your Pi
1. Before we can install the tools we will use to manage your Pi’s firewall, you must update the package list cache.
While we update the package list cache, we will also upgrade any out-of-date packages using the following two commands.
sudo apt update
sudo apt upgradeCopy
2. With the next command, we can install the UFW tool we will use to manage the firewall. This process is relatively simple as the package is available from the official repository.
sudo apt install ufwCopySetting up some Basic Firewall Rules on your Raspberry Pi
3. By default, UFW configures your Raspberry Pi’s firewall to block all incoming connections.
Luckily, this rule will not become effective until we enable the software, so we can allow some essential services that you may already be relying on.
Before we dive into a few key ports you might want to allow through your firewall, let us explore the syntax for the commands.
Allowing a port through your firewall is as simple as using the following syntax.
sudo ufw allow <PORT>CopyYou can even take this a step further by adding the protocol you expect a connection to communicate on with this port.
sudo ufw allow <PORT>/<PROTOCOL>Copy4. If you are connecting to your Raspberry Pi remotely, the two protocols that you are likely to use are SSH and VNC.
You must allow the service you are using through your firewall to stop yourself from getting blocked from accessing the device.
You can use the command below to allow port 22 through your Raspberry Pi’s firewall. 22 is the default port for the SSH service.
sudo ufw allow 22Copy5. Alternatively, if you are using a service such as VNC to access your Pi, you must allow port 5900 through the firewall.
sudo ufw allow 5900Copy6. Continue to allow all the other services you want through your Raspberry Pi’s firewall. As long as you have a way of accessing your Pi, you will be able to add as many rules as you want later.
For example, if you use a web server such as Apache or NGINX you will want to allow ports 80 and 443.
Activating the Firewall on your Raspberry Pi
7. Once you are happy that you have any important ports opened on your Raspberry Pi’s firewall you can now switch it on.
Enabling your firewall using UFW is as simple as using the following command within the terminal.
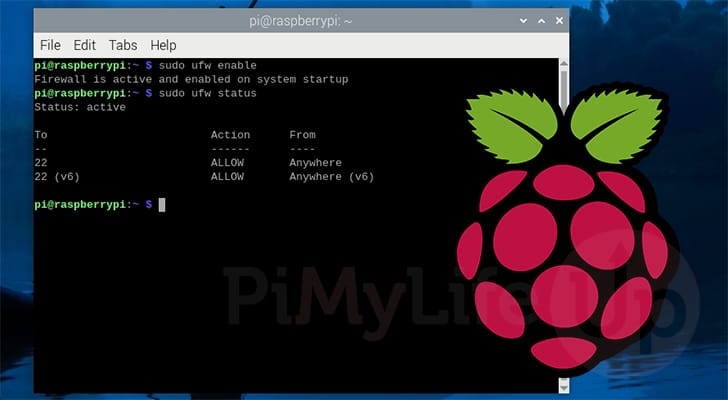
sudo ufw enableCopyBefore the firewall is enabled, you will see a message that it can potentially disrupt existing SSH connections. If you added port 22 to your firewall, this shouldn’t be an issue.
If you are happy everything is correct, type “y” and then press ENTER to enable the firewall.
Command may disrupt existing ssh connections. Proceed with operation (y|n)? yYou should see the message below when your Raspberry Pi’s firewall has been turned on.
Firewall is active and enabled on system startup8. You can verify that your firewall is now up and operating on your Raspberry Pi using the UFW tool to output its status.
This command will also tell you any rules you have added to your firewall.
sudo ufw statusCopyBelow, you can see that our firewall has been enabled, and we have allowed the SSH service to be allowed through it.
Status: active

To                         Action      From
--                         ------      ----
22                         ALLOW       Anywhere
22 (v6)                    ALLOW       Anywhere (v6)
9. If, for any reason, you don’t want the firewall anymore or are running into networking issues, you can disable the firewall at any time by using the command below.
sudo ufw disableCopyConclusion
At this stage, you should understand how to enable and use the firewall on your Raspberry Pi.
We have touched on the basics of allowing access to ports on your Pi. If you would like a more in-depth explanation of controlling your firewall, check out our more complete guide on using UFW.
If you have any questions about using your firewall, please feel free to comment below.
Once you have finished with this tutorial, we highly recommend browsing our growing list of Raspberry Pi projects.