This quick guide will show you how to install and run Redis on the Ubuntu operating system.
Redis is an in-memory storage system that uses a key-value store. This store is known for its flexibility and performance. Like MongoDB, it is considered to be a NoSQL database.
By holding data in memory, Redis can read and write incredibly fast as its not limited by disk speed. This speed allows Redis to be a great solution for storing data temporarily or as a cache.
On top of being a super-fast data store, it is also incredibly easy to install and runs on almost all operating systems, including Ubuntu.
In the following sections, we will show you how to install and run the Redis server on your Ubuntu system and how to set a password to help secure your installation.
Installing Redis onto your Ubuntu System
In this section, we will show you how to install the latest version of Redis on your Ubuntu system.
To get the latest version, we will walk you through adding the official package repository. While you could install Redis directly from the Ubuntu repository, you can get stuck with older releases.
Preparing your System for Redis
1. Before we install Redis on Ubuntu, we should ensure we have an updated system to work off of.
You can update the package list cache and upgrade any out-of-date packages using the following two commands.
sudo apt update
sudo apt upgrade -yCopy
2. Next, we must ensure that the “lsb-release“, “curl” and “gpg” packages are installed on your system.
We will use these packages to grab and set up the Redis repository in the next section.
sudo apt install lsb-release curl gpgCopyAdding the Official Redis Repository on Ubuntu
3. Now that our operating system is ready, we can add the official Redis repository on Ubuntu.
The first part of this step is to grab the GPG key for the Redis repository. This key authenticates that the packages we are installing did, in fact, come from Redis.
Download and store the key on your system using the command below within the terminal.
curl -fsSL https://packages.redis.io/gpg | sudo gpg --dearmor -o /usr/share/keyrings/redis-archive-keyring.gpgCopy4. With the GPG key saved to our system, our next step is adding the Redis repository. You can add this repo by running the following command.
echo "deb [signed-by=/usr/share/keyrings/redis-archive-keyring.gpg] https://packages.redis.io/deb $(lsb_release -cs) main" | sudo tee /etc/apt/sources.list.d/redis.listCopy5. The apt package manager will be unaware that it can download Redis from this new repository until we update the package list cache.
You can update the package list by using the command below.
sudo apt updateCopyInstalling Redis
6. At this point, all we need to do to install the Redis server on Ubuntu is run the below command.
The package manager will then fetch Redis from the official repository and install it.
sudo apt install redisCopy7. We can verify that Redis has been installed by getting the status of the “redis-server” service.
You can get the status of this service by using the following command.
sudo systemctl status redis-serverCopyIf you see that the service is running, you should now be able to connect to the database server.
Active: active (running)Testing your new Ubuntu Redis Server
8. Now that we have gotten the Redis database server up and running on Ubuntu, let us test it.
The easiest way to test this server is to use the Redis command line interface.
redis-cliCopy9. The Redis-cli will automatically attempt to connect to the local server. You can verify a successful connection by running the command below.
pingCopyIf your server is reachable by the tool, you should receive a “PONG” in response.
PONG10. Our next step is to try storing data on our Redis server. We can do this by using the “set” command. For this example, we will set the key “helloworld” to the value “pimylifeup“.
set helloworld "pimylifeup"If the value was successfully added to the data store, you should see an “OK” response.
OK11. To verify that Redis stored our new value, let us use the get command to retrieve the value stored in our “helloworld” key.
get helloworldIf everything has worked correctly, you should see the value you stored output in the terminal.
"pimylifeup"12. Once you have finished testing your Ubuntu Redis server, use the exit command to return to the terminal.
exitConfiguring your Redis Server on Ubuntu
Now that you have the Redis server running on Ubuntu let’s move on to configuring it. In this section, we will show you various ways to adjust how Redis operates.
If we are missing something important from this section, please feel free to comment below.
Securing Redis by Setting a Password
In this section, we will show you how to set a password for your Redis server on Ubuntu. Setting a password forces someone to authenticate before sending any commands to the server.
Since Redis is incredibly fast, you must set a very long and secure password. On a fast machine, an attacker can perform over a million requests a second.
Configuring Redis to Require a Password
1. As mentioned at the start of this guide, if you want to open up Redis to outside access, you must set a secure password.
This password should be as long as your software supports, as it helps significantly reduce the chance of a successful attack.
For example, you can use the command below to generate a random string that you could use as a password.
openssl rand 60 | openssl base64 -ACopy2. Once you have a random password that you want to use to connect to your Redis server, we can move on to setting it.
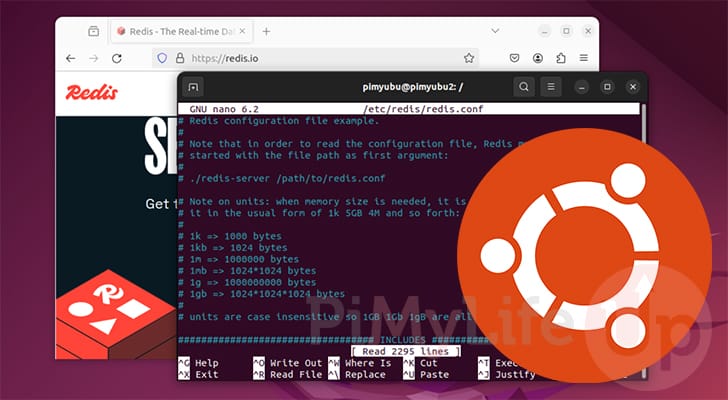
Using the command below, you can begin editing the Redis config files.
sudo nano /etc/redis/redis.confCopy3. Within this file, you will want to find the following line. Press CTRL + W to search this file for a particular string.
# requirepass foobaredReplace this line with the following. Replace “<LONGRANDOMSTRINGHERE>” with the password you want to use to protect your Ubuntu’s Redis server.
requirepass <LONGRANDOMSTRINGHERE>4. Once you have set a password, you can save and quit by pressing CTRL + X, Y, and then ENTER.
5. For your new password to take effect, we must restart the server.
You can restart Redis on your machine by running the command below.
sudo systemctl restart redis-serverCopyAuthenticating with Redis
6. With a password now set for your Redis server, let us show you how you can authenticate with it using the command line interface.
Launch the CLI by using the command below.
redis-cliCopy7. Before we authenticate, try setting a value as we have done below.
set helloworld "pimytest"If you have successfully set a password, you should run into an error message like the one below. This message indicates you must authenticate to continue.
(error) NOAUTH Authentication required8. Authenticating with your Ubuntu Redis server is as simple as using “auth” followed by the password you set earlier in this guide.
auth <PASSWORD>If you have successfully authenticated with the data store, you should see “OK” appear in the terminal.
OK9. We can now try setting the same value again using the Redis “SET” command.
set helloworld "pimytest"Since we are now authenticated, Redis indicated this value was successfully set.
OK10. Verifying that this value was actually set is as simple as using the “GET” command.
get helloworldYou should see the value you set output to the terminal if everything has worked correctly.
"pimytest"11. Now that you have verified that your Redis server requires authentication, you can return to the terminal.
exitAllow Remote Access to your Ubuntu Redis Server
1. In this section, we will show you how to allow remote access to your Ubuntu Redis server.
By default, this server has been configured to only listen on the local host. To change this behavior, edit the Redis configuration using the command below.
sudo nano /etc/redis/redis.confCopy2. Within this file, look for the following line. This line is what binds the Redis server to the localhost.
bind 127.0.0.1 -::13. Once you have found this line, you will want to adjust it to listen on the IP address of your Ubuntu machine. This will allow access over that particular IP address.
For example, if your machine’s IP address was “192.168.0.1“, you could use the following line.
bind 192.168.0.1Alternatively, you can use the line below if you want Redis to listen on all IP addresses and interface.
bind * -::*4. After making this change, you will want to save and quit by pressing CTRL + X, Y, and then ENTER.
5. For this change to take effect, you must restart the Redis server on your machine by running the command below.
sudo systemctl restart redis-serverCopy6. If the Redis server is still inaccessible ensure that you have allowed port 6379 through your firewall.
Conclusion
At this stage, you should have the Redis server up and running on your Ubuntu system.
Redis is a powerful, fast, and versatile data store. It has many use cases and is a key part of many caching systems.
Please feel free to comment below if you have any issues getting Redis to run on your system.
If you liked this tutorial, we recommend that you check out our many other Ubuntu tutorials and guides.