In this tutorial, we will be showing you how to install and use NordVPN on Ubuntu.
NordVPN is one of the most popular VPN services around, known for its fast and diverse network while managing to maintain privacy.
VPN stands for Virtual Private Network and allows you to create a secure tunnel between two locations. This tunnel is heavily encrypted, meaning no one can see what’s occurring inside it. In addition, services will see you connecting from the VPN provider’s IP address and not your own.
For Linux systems such as Ubuntu, the NordVPN team maintains its own client. This client has some benefits over using the Wireguard or OpenVPN apps but requires you to use the desktop version of Ubuntu.
The most significant advantage of using NordVPN’s client is that it gives easy access to all their additional features, such as an automated kill switch, auto-connect, and NordLynx protocol.
In the following sections, we will show you how to install the official NordVPN client and connect it to your account.
While these steps are straightforward, they must all be completed within the terminal. NordVPN does not provide a graphical interface on Linux systems. You can open the terminal on Ubuntu desktop by pressing CTRL + ALT + T.
Before proceeding, make sure that you have an active NordVPN account. You won’t be able to use this VPN service without one.
All the products I mention on this website I have personally purchased and used at least once. Some of the links on this website are affiliate links that earn me a small commission whenever a sale is made.
Installing the Official NordVPN Client on Ubuntu
This section will prepare your Ubuntu device to install and run the NordVPN client. Most of these steps involve setting up the NordVPN repository.
Installing Any Dependencies
1. Our first step is to update the Ubuntu package list cache to have the latest available list.
This list is used by the package manager when we go to install packages.
sudo apt updateCopy2. Now that the package list has been updated, we need to make sure that we have curl available on our system.
All we need to do is use the following command within the terminal.
sudo apt install curlCopyAdding the NordVPN Repository
3. Our next step is downloading the NordVPN repository GPG key to our package managers’ keychain.
This key is used to verify that we are downloading an authentic version of NordVPN to Ubuntu.
To download this key, you will want to use the command below in the terminal.
curl -L https://repo.nordvpn.com/gpg/nordvpn_public.asc | gpg --dearmor | sudo tee /usr/share/keyrings/nordvpn-archive-keyring.gpg >/dev/nullCopy4. With the GPG key added, our next step is to add the actual NordVPN repository into the “sources.list.d” directory. The apt package manager reads this directory for any files containing a repository link.
We can write the NordVPN repository into its own file on Ubuntu by using the following command within the terminal.
echo "deb [signed-by=/usr/share/keyrings/nordvpn-archive-keyring.gpg] https://repo.nordvpn.com/deb/nordvpn/debian stable main" | sudo tee /etc/apt/sources.list.d/nordvpn.listCopy5. Any changes that are made to the available package repositories require us to perform another update of the package list cache.
Refresh the package list cache again by using the following command.
sudo apt updateCopyIf we don’t refresh the cache, Ubuntu will be unaware it can now download the NordVPN client package.
Installing the NordVPN Client Package
6. With everything in place, we can finally install NordVPN to Ubuntu using the following simple command.
This command will download and install the VPN client from our added repository.
sudo apt install nordvpnCopy7. After installing NordVPN, you will want to add your current user to the NordVPN group.
Adding your user to the group will allow you to use the NordVPN client without elevating to the superuser.
sudo usermod -aG nordvpn $USERCopy8. Since we changed our user’s groups, we need to log out and back in for the change to take effect.
The easiest way to logout while using the terminal is to use the following command.
logoutCopyUsing the Official NordVPN Client on Ubuntu
In the following sections, we will cover how you can utilize the official NordVPN client on Ubuntu. These steps will cover logging into your account and connecting to the VPN network.
We will also show you how to enable features like NordVPN’s kill switch or auto-connect functionality.
Logging into your NordVPN Account
Let us start by showing you how to log in to your NordVPN account through the official client. You won’t be able to utilize the VPN network until you have authenticated yourself with their servers.
For the following steps, you will need to use your Ubuntu device’s desktop interface.
1. If you don’t already have an account, you must sign up for NordVPN.
2. Once you have an account with NordVPN, you can now connect to it from Ubuntu.
To begin this process, you will want to use the following command in the terminal.
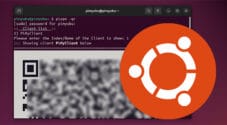
nordvpn loginCopy3. After running the above command, you will see a message similar to the one we have shown below.
You will want to go to the URL provided in this message in your favorite web browser. (You can right-click the link in the Ubuntu terminal and click “Open Link” to open it in the default web browser).
Continue in the browser: https://napps-1.com/v1/users/oauth/login-redirect?attempt=4. Follow the prompts to log in to your NordVPN account and add your device as a trusted “browser”.
You will eventually be asked if the web browser can open the terminal or “xdg-dialog“. You will want to select “Yes” to this option, which will authenticate your device with NordVPN.
Connecting to the Nearest NordVPN server
You can follow the steps below if you aren’t fussed about what NordVPN server Ubuntu connects to. NordVPN will automatically detect the closest server and connect to it.
1. Once you have finished utilizing the VPN on Ubuntu, you can disconnect by using the following command within the terminal.
To connect to the nearest server, all you need to do is utilize the following command.
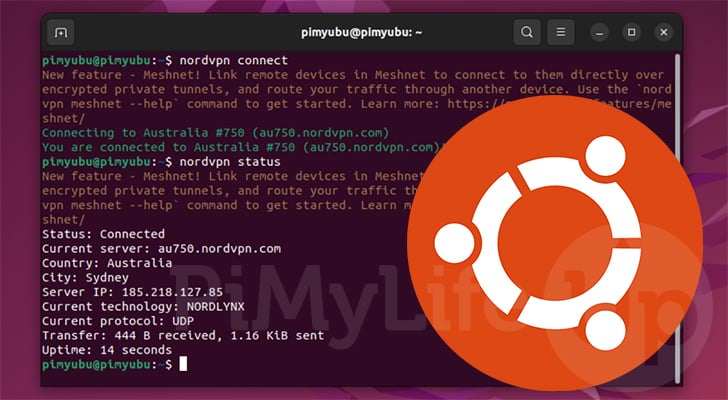
nordvpn connectCopy2. Below, you can see that NordVPN detected “AU 731” as the closest server and connected to it.
Once you see “You are connected” your traffic is now being routed through NordVPN’s servers.
Connecting to Australia #731 (au731.nordvpn.com)
You are connected to Australia #731 (au731.nordvpn.com)!
Disconnecting from the VPN
1. Once you have finished utilizing the VPN on Ubuntu you can disconnect by using the following command within the terminal.
nordvpn disconnectCopy2. When the disconnection process has been completed, you will see the following message displayed within the terminal.
You are disconnected from NordVPN.Connecting to a Specific NordVPN Server from Ubuntu
NordVPN will default want to connect your Ubuntu device to its nearest server. However, it is possible to override this behavior by specifying the name of a city where their servers are located.
1. We can start by listing all the countries where NordVPN has servers using the following command.
nordvpn countriesCopyAfter running the above command, you should see a list of countries. Pick the country where you want to connect to.
If you are not fussed about where you connect to within that country, you can skip to step 3.
Albania                 Greece                  Portugal
Argentina               Hong_Kong               Romania
Australia               Hungary                 Serbia
Austria                 Iceland                 Singapore
Belgium                 Indonesia               Slovakia
Bosnia_And_Herzegovina  Ireland                 Slovenia
Brazil                  Israel                  South_Africa
Bulgaria                Italy                   South_Korea
Canada                  Japan                   Spain
Chile                   Latvia                  Sweden
Costa_Rica              Lithuania               Switzerland
Croatia                 Luxembourg              Taiwan
Cyprus                  Malaysia                Thailand
Czech_Republic          Mexico                  Turkey
Denmark                 Moldova                 Ukraine
Estonia                 Netherlands             United_Kingdom
Finland                 New_Zealand             United_States
France                  North_Macedonia         Vietnam
Georgia                 Norway
Germany                 Poland
2. With a country in mind, you can list all the cities within that country where NordVPN has servers by using the command below.
Ensure that you replace “COUNTRY” with the name of the country you want to get the cities for.
nordvpn cities COUNTRYCopyFor example, using this with Australia as the country yielded the following result.
Adelaide Brisbane Melbourne Perth Sydney3. With your country or city in hand, you can now connect your Ubuntu device to that NordVPN location.
All you need to do is use “nordvpn connect“, followed by the name of that country or city.
nordvpn connect COUNTRYORCITYCopyFor example, you would use the following command if you wanted to connect to the Adelaide server in Australia.
nordvpn connect AdelaideCopyGetting the Status of your NordVPN Connection on Ubuntu
1. To get the status of the NordVPN connection, you can use the following command.
nordvpn statusCopy2. By running the above command, you will get various information about your connection. This includes the current server you are connected to, the server IP, and more.
You can also use this information to see how much data you have sent or received over the VPN.
Status: Connected
Current server: au533.nordvpn.com
Country: Australia
City: Sydney
Server IP: 103.1.212.123
Current technology: NORDLYNX
Current protocol: UDP
Transfer: 13.57 KiB received, 9.33 KiB sent
Uptime: 59 seconds
Enabling the NordVPN Auto-kill Functionality
One of the reasons you may want to use the official NordVPN client on Ubuntu is its extra set of built-in functionality.
A key piece of this functionality is called “kill switch”. What this will do is kill your Ubuntu devices network whenever the connection to the VPN is lost.
Please note you may also want to enable the auto-connection functionality while enabling this option.
1. To enable NordVPN’s kill switch on Ubuntu, all you will need to do is run the following command in the terminal.
nordvpn set killswitch onCopy2. If the kill switch has been successfully enabled you should see the following message appear in the terminal.
Kill Switch is set to 'enabled' successfully.Auto Connect to NordVPN at Ubuntu Startup
The last thing we will be touching on in this guide is enabling NordVPN to start up and connect when your Ubuntu device boots.
1. Getting NordVPN to start at boot is as straightforward as using the following command.
After running this command, Ubuntu will attempt to connect automatically to NordVPN’s servers when it boots.
nordvpn set autoconnect onCopy2. You should see the message below if this feature of the official NordVPN client has been successfully enabled.
Auto-connect is set to 'enabled' successfully.Conclusion
At this point in the guide, you should now hopefully have NordVPN set up and running on your Ubuntu device.
The official NordVPN client comes packed with numerous features out of the box. it also has support for NordLynx which is essentially a modified version of the Wireguard protocol.
Please comment below if you have issues getting NordVPN to work on Ubuntu.
Be sure to check out many other Ubuntu tutorials. We also have many guides that cover general Linux usage and commands.


This is by far the simplest, best, way to install NordVPN. It just works.
Having tried both versions on Nord and several other attempt, PiMyLife is the winner.
I use Kubuntu with KDE Plasma. There are two plasmoids which help your already cool system. One gives a connection server popup and one gives status.
I came up to No 7. At this point I received the notice: “cannot lock /etc/passwd; try again later.” And that’s it. I don’t have any idea how to continue.
Hi Yonatan,
Sorry to hear that you are having issues. Can you please try adding “sudo” in front of the command.
I have updated the tutorial to reflect this change.
Cheers,
Emmet