This tutorial will show you how to install PostgreSQL on the Ubuntu operating system.
PostgreSQL is a relational database management system that implements the SQL language.
It is entirely free and open-source and was developed with a focus on extensibility and SQL compliance.
If you have ever used MySQL or MariaDB on Ubuntu, working with PostgreSQL is very familiar.
One of the most significant advantages of using PostgreSQL on Ubuntu over other similar database systems is its extensibility. It offers support for advanced data types not supported by its competitors and allows you to implement your own.
Over the following sections, you will learn how to install and use PostgreSQL on your Ubuntu device.
Preparing Ubuntu for PostgreSQL
In this section, we will be showing you how to prepare Ubuntu to install and run PostgreSQL. These steps primarily focus on adding the official PostgreSQL repository to your device.
While PostgreSQL is available through the default Ubuntu repository, these are often locked to whatever version was shipped with that release. By adding the official repository, we can always download the latest release.
Installing any Required Packages
1. Before we add the official PostgreSQL repository to Ubuntu, we should perform an update and upgrade of the operating system.
Use the following two commands to update the package list cache and update any out-of-date packages.
sudo apt update
sudo apt upgradeCopy
2. Once the update completes, we can ensure we have all the required packages. We only need to ensure that both the “curl” and “lsb-release” packages are installed on the system.
To install both packages, run the following command in the terminal.
sudo apt install curl lsb-releaseCopycurl– We will use the curl package to grab the GPG key for the PostgreSQL server.lsb-release– This package allows us to get the release name for whatever version of Ubuntu you are using.
Adding the Official PostgreSQL to Ubuntu
3. We can now use the curl command to grab the GPG key for PostgreSQL’s repository. This key is what verifies the packages are authentic.
Grab this key and store it within the keyrings directory using the following command.
curl -L https://www.postgresql.org/media/keys/ACCC4CF8.asc | gpg --dearmor | sudo tee /usr/share/keyrings/postgresql-archive-keyring.gpg >/dev/nullCopy4. Our next step is to add the PostgreSQL repository to Ubuntu’s sources list.
Use the following command to add this repository to the “/etc/apt/sources.list.d/” directory.
echo "deb [arch=amd64 signed-by=/usr/share/keyrings/postgresql-archive-keyring.gpg] http://apt.postgresql.org/pub/repos/apt $(lsb_release -cs)-pgdg main" | sudo tee /etc/apt/sources.list.d/postgresql.listCopy5. Since we made a change to the available sources, we will need to perform an update again by using the command below.
The apt package manager will be unaware of the freshly added repository without an update.
sudo apt updateCopyInstalling PostgreSQL on Ubuntu
Now that we have added the PostgreSQL repository, we can move on to installing the server to Ubuntu. The installation process is super straightforward and only has a couple of steps we need to follow.
1. Thanks to adding the official repository, installing the latest version of this database server is straightforward.
To install the latest release of PostgreSQL on Ubuntu, run the command below.
sudo apt install postgresqlCopy2. With the PostgreSQL server now installed, we should ensure that the installation process started the service.
To ensure the database server is up and running on Ubuntu, use the following command.
sudo systemctl start postgresqlCopyConfiguring PostgreSQL on Ubuntu
With PostgreSQL now installed on your Ubuntu device, we can now move on to configuring it. These steps will show you how to create a new PostgreSQL user and more.
Adding a new User to PostgreSQL
By default, PostgreSQL on Ubuntu is only set up with a user called “postgres“. Therefore, you must use this user when interacting with the server.
However, we can luckily create our own user. If you name this user the same as your Ubuntu user, then you can interact with the server without having to elevate to superuser privileges.
1. Our first step is to utilize the “su” command to change from our current user to the “postgres” user.
To change to the “postgres” user, run the following command in the terminal.
sudo su postgresOnce you have changed users, you should see the line now starts with “postgres@“.
2. Now that we are running commands under the “postgres” user, we can create a new Postgres user.
To begin this process, you will want to use the command below.
createuser -P --interactiveCopyUsing the "-P” option we will be giving the new user a password. If you want this user to be passwordless, you can exclude this option and skip to step 5.
A passwordless user will use the “ident” plugin for authentication. An Ubuntu user with the same name can access that particular Postgres user.
3. Upon running the above command, you will be prompted to give this new PostgreSQL role a name.
If you want your current user to be able to use this user, keep it the same as yours. For example, our user is called “pimyubu” so we will be naming this role “pimyubu“.
Enter name of role to add:4. If you use the password option, you will be prompted to enter a password for this user.
Type in a secure password for your new role.
Enter password for new role:
Enter it again:
If you want a password manager to generate and store passwords securely, we highly recommend checking out NordPass. NordPass is a password manager developer by the same team behind NordVPN. (Affiliate Link)
5. Next, you will be prompted whether this new role should be a superuser. A superuser can do anything with your PostgresSQL server on Ubuntu, including creating new users.
For our guide, we will be setting this to “y” and creating our new user as a superuser. If you choose not to create a superuser, you will be prompted to set additional permissions.
Shall the new role be a superuser? (y/n)6. You have now successfully created your first PostgreSQL role on Ubuntu.
You can exit the “postgres” user by using the following command.
exitCopyExample of using PostgreSQL
Now that you have PostgreSQL installed on your Ubuntu device, let us show you a couple of ways to utilize this database system.
Connecting to the PostgreSQL Server using the Terminal
1. To interact with the PostgreSQL server on Ubuntu, you must utilize the command below.
This command will open up the Postgres command line interface and allow you to interact with the server.
psql -d postgresCopySince Postgres requires a database connection, we will use the default “postgres” database by specifying the “-d” option followed by “postgres“.
If you choose not to create a user matching your current user’s name as we did earlier, you will need to elevate to superuser privilege and use the following command instead.
This command uses “su” to launch the PostgreSQL interface on Ubuntu as the “postgres” user.
sudo -u postgres psqlCopyCreating a Database using PostgreSQL
2. Creating a database within the PostgreSQL command line interface is a straightforward process, especially if you are familiar with the SQL syntax.
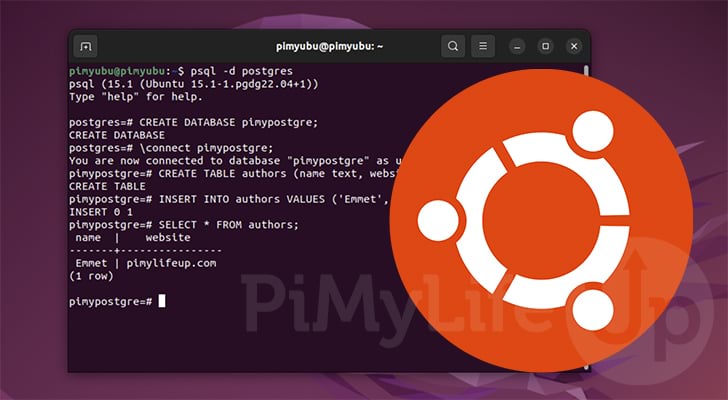
To create a database, you only need to use “CREATE DATABASE” followed by a name for that database. So, for example, if you wanted to make a database called “pimyubu” we would use the following.
CREATE DATABASE pimyubu;CopyIf a database name matches a user, they connect directly to the specified database.
3. After freshly creating a database on your Ubuntu’s PostgreSQL server, you will need to connect to it before you can modify its contents.
To connect to a particular database, you must use a backward slash (\) followed by connect, then the name of the database you want to connect to.
For example, you can run the following command to connect to the database we just created.
\connect pimyubu;CopyIf you are successfully connected to your new database, you will see the following message appear in the terminal.
You are now connected to database "pimyubu" as user "pimyubu".
Manipulating Data in your new Ubuntu PostgreSQL Database
4. Now that we have connected to a PostgreSQL database on Ubuntu, let us try adding a new table. A table is where data is stored within a database.
We will create a table called “authors” with only two columns. Both of these columns will use the “text” data type.
Create this table using the following command within the PostgreSQL command line interface.
CREATE TABLE authors (name text, website text);Copy5. With a table created, we can insert a new row. This row will set the author column to “Emmet” and the website column to “pimylifeup.com“.
Use the following SQL within the command line to add these new values.
INSERT INTO authors VALUES ('Emmet', 'pimylifeup.com');Copy6. With a new value added, we can utilize the “SELECT” command to grab all rows and columns from our “authors” table.
SELECT * FROM authors;CopyAfter running the above command, you can see the data stored within Ubuntu’s PostgreSQL database.
 name  |    website
-------+----------------
 Emmet | pimylifeup.com
(1 row)
Conclusion
You should have successfully installed PostgreSQL on your Ubuntu device at this point in the tutorial.
PostgreSQL is a relational database system that utilizes the SQL language. It is an excellent alternative to MariaDB and MySQL thanks to its extensibility.
Please comment below if you have any questions about installing PostgreSQL on Ubuntu.
If you found this tutorial to be helpful, be sure to check out our many other Ubuntu tutorials.