This guide will walk you through the process of how to disable IPv6 support when running Ubuntu.
The IPv6 standard makes up a part of the backbone of the internet. It is a protocol that is being worked on to deal with the shortcomings of IPv4.
The largest problem that IPv6 is designed to deal with is IPv4 address exhaustion. This exhaustion is caused by there being way more devices than what IPv4 was intended to handle.
Protocols like IPv4 and IPv6 are crucial to how the internet is connected. The addresses provided by these standards help with routing your connections across the world.
While we won’t go too much into the benefits of IPv6 in this guide, we will put it simply that the future of the internet will eventually rely on the IPv6 standard.
However, IPv6 support can be incredibly patchy, many service providers don’t implement it at all, and others have it configured poorly, leading to connection issues.
If you ever run into issues when connecting using IPv6, it is possible to disable support for it on your system.
Since Ubuntu 18.04, the operating system has had the IPv6 protocol enabled by default.
If you are unsure what version of Ubuntu you are running, be sure to check out our guide.
Please note that if you are not experiencing any issues with connecting to devices, then there is no real need for you to disable IPv6.
All of the following steps will need to be completed in the terminal. On the desktop version of Ubuntu, you can easily open the terminal by pressing CTRL + ALT + T.
Table of Contents
Disabling IPv6 on Ubuntu using sysctl
The first method for disabling IPv6 on Ubuntu that we will show you is to utilize the sysctl package.
You can utilize this package to modify system’s kernel’s attributes so that IPv6 is never enabled.
Temporarily Disabling IPv6
Using this method, it is possible to disable the IPv6 protocol temporarily.
When your Ubuntu device restarts, the IPv6 module will turn back on.
Doing this is super simple as we only need to input two separate commands.
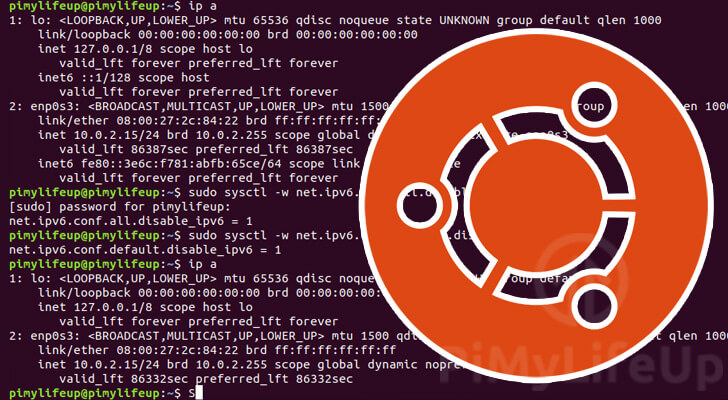
1. On your device’s terminal, run the following two commands.
These commands change the configuration for IPv6 for all network devices as well as the default value.
We change these values from the default of 0 to 1 so that IPv6 will be disabled.
sudo sysctl -w net.ipv6.conf.all.disable_ipv6=1
sudo sysctl -w net.ipv6.conf.default.disable_ipv6=1
2. You can verify that IPv6 has now been disabled on your Ubuntu system by using the ip command.
Run the following in your terminal to output the details of your network interfaces.
ip aWe use the “a” argument to tell the “ip” command that we want to print out all network interfaces’ status.
3. From this result, you should hopefully see that there is no “inet6” entry.
If you still see the value, you may have to try utilizing one of the other methods, as this indicates that IPv6 is still enabled.
Disabling IPv6 on Ubuntu at Start-Up
Now that you know how you can use sysctl to disable IPv6 on Ubuntu, we will show you how to make the change permanent.
The previous section’s problem is that while these commands work, the changes are reset once your device reboots.
To make these changes persistent, we need to modify the “sysctl.cfg” config file.
1. To edit the sysctl configuration file, we are going to utilize the nano text editor.
While you can use whatever text editor you want, we find nano to be one of the easiest to use, especially for beginners.
sudo nano /etc/sysctl.conf2. To the bottom of this file, add the following lines.
You can use CTRL + W, then CTRL + V to jump to the bottom of the file.
net.ipv6.conf.all.disable_ipv6=1
net.ipv6.conf.default.disable_ipv6=1
When your Ubuntu system restarts, these settings will be set from the get-go, and IPv6 should be disabled.
3. With these changes written, save them by pressing CTRL + X, followed by Y, then the ENTER key.
4. Now, we have to deal with a problem caused by /etc/init.d/propcs being called too early during the boot process.
As it can start up too early, some settings like our IPv6 disable option might never get applied.
It is possible to work around this by creating a file that runs later in the boot sequence that fires off the script we need.
Begin writing this file by using the following command on your Ubuntu device.
sudo nano /etc/rc.local5. Within this file, you need to enter the following lines.
These lines will call procps so that it will reload our sysctl configuration.
As this is called later in the boot process, our IPv6 disabling lines should now be working as intended.
#!/bin/bash
#/etc/rc.local

/etc/init.d/procps restart

exit 0
Once done, please save the file by pressing CTRL + X, then Y, followed by ENTER.
6. Before we finish up, we need to adjust the permissions of our new file.
We will use the following chmod command to give this file execution privileges for all users.
sudo chmod 755 /etc/rc.localWithout execution privileges, the system would have been unable to use the file on startup.
8. Finally, we can restart the device by using the following command.
Restarting our Ubuntu device allows us to ensure that our config to disable IPv6 is working as intended.
sudo reboot9. Once your Ubuntu device restarts, you can verify that IPv6 is now disabled.
To check the status of your network devices, you can utilize the ip command.
ip aFrom this command, you should see that there is no inet6 value in the output.
2: eth0: <BROADCAST,MULTICAST,UP,LOWER_UP> mtu 1500 qdisc mq state UP group default qlen 1000
    link/ether dc:a6:32:d3:28:99 brd ff:ff:ff:ff:ff:ff
    inet 192.168.0.193/24 brd 192.168.0.255 scope global noprefixroute eth0
       valid_lft forever preferred_lft forever
Disabling IPv6 on a Specific Interface
It is possible to modify the previous two sections to disable IPv6 on a specific network interface.
These changes are fairly straightforward and only require you to know the name of your network interface.
1. You can retrieve the name of all of your network interfaces by utilizing the following command.
ip link2. From this command, you should see a list of your network interfaces, as we have below.
1: lo: <LOOPBACK,UP,LOWER_UP> mtu 65536 qdisc noqueue state UNKNOWN mode DEFAULT group default qlen 1000
    link/loopback 00:00:00:00:00:00 brd 00:00:00:00:00:00
2: enp0s3: <BROADCAST,MULTICAST,UP,LOWER_UP> mtu 1500 qdisc fq_codel state UP mode DEFAULT group default qlen 1000
    link/ether 08:00:27:2c:84:22 brd ff:ff:ff:ff:ff:ff
As Ubuntu utilizes predictable network names there are two things you can tell.
First, any network name that starts with “en” is an ethernet interface.
Likewise, any network starting with “el” is a wireless network interface.
Identify the interface you want to disable IPv6 on, then move on to the next step.
3. Now, you can follow the other two sections.
However, this time you will need to do things slightly differently.
net.ipv6.conf.all.disable_ipv6=1
net.ipv6.conf.default.disable_ipv6=1
Instead of the above text, you will use the following config instead, where “NETWORKNAME” is the name of the network interface you want to disable.
net.ipv6.conf.NETWORKNAME.disable_ipv6-1For example, we would use the following bit of text to disable IPv6 on our ethernet interface.
net.ipv6.conf.enp0s3.disable_ipv6=1Using GRUB to disable IPv6 on Ubuntu
An alternative to utilizing the sysctl to disable IPv6 on your Ubuntu system is to use GRUB.
GRUB is the boot loader and manager that Ubuntu has utilized since version 9.10.
By modifying the settings for GRUB, we can tell it to disable IPv6 at startup.
1. Let us begin by modifying the grub configuration file.
Be careful when modifying this file as it is possible to break your Ubuntu installation.
sudo nano /etc/default/grub2. Within this file, you need to find the following two lines.
If you are using nano, you can use CTRL + W to find these lines quicker.
GRUB_CMDLINE_LINUX_DEFAULT=""
GRUB_CMDLINE_LINUX=""
3. To both of these lines, you need to add ipv6.disable=1 within the double quotes (" ")
For example, your lines should end up looking something like we have below.
GRUB_CMDLINE_LINUX_DEFAULT="ipv6.disable=1"
GRUB_CMDLINE_LINUX="ipv6.disable=1"
If your GRUB_CMDLINE lines already had text in them, make sure you separate the new value from it by using a space.
4. Save your changes to the GRUB configuration file by pressing CTRL + X, then Y, then ENTER.
5. As we have made changes to the GRUB configuration, we now need to run the update-grub software.
This software saves your changes to the boot loader, so next time you boot your device, IPv6 should be disabled.
sudo update-grub6. For our changes to take effect, we will need to restart our Ubuntu device.
You can restart Ubuntu by running the following command.
sudo reboot7. You can now verify that IPv6 is disabled on your Ubuntu device by utilizing the ip command.
Use the following to list out the status of all of your network interfaces.
ip aIf everything is working, you should see that there is no inet6 entry returned from this result.
Conclusion
At this point, you should now have successfully disabled IPv6 on your Ubuntu system.
Disabling IPv6 can help various scenarios, such as connecting to a service that has misconfigured their IPv6 handling.
While you shouldn’t have to disable IPv6, you can’t help scenarios where it has been set up poorly.
Disabling the IPv6 functionality allows you to focus solely on only accept the old IPv4 standard.
If you have had any issues with disabling IPv6, feel free to leave a comment below.
Be sure to check out some of our other Ubuntu and Linux guides.


Wow, that restarting procps via rc.local saved me. Tried to disable ipv6 already for quite some time now. Eventually a tutorial that works !