In this tutorial, we are going to show you how to set up MiniDLNA (ReadyMedia) on your Raspberry Pi.
MiniDLNA is a piece of server software that implements the DLNA/UPnP streaming protocols. The software also goes by the name ReadyMedia.
These protocols will allow your Raspberry Pi to stream media files such as music, pictures, and videos over your home network.
You can use any client that supports the DLNA protocols to stream media files from your Raspberry Pi. An example of some clients that support DLNA is Kodi and the VLC media player.
Using MiniDLNA can be a lightweight alternative to running software like Plex on your Raspberry Pi.
Equipment List
Below is a list of equipment that we used to set up MiniDLNA on the Raspberry Pi.
Recommended
Optional
For this tutorial, we will be assuming that you are running the Raspbian operating system. We tested this tutorial on a Raspberry Pi 3 using Raspbian Buster.
Installing the MiniDLNA software on the Raspberry Pi
In this section, we will be walking you through the process of installing the MiniDLNA software to a Raspberry Pi.
This process is relatively straightforward and should only take a few minutes to complete
1. Before we install MiniDLNA, we should first ensure that our Raspbian installation is entirely up to date.
We can update both the package list and all the installed packages by running the following two commands.
sudo apt update
sudo apt upgrade
Depending on how long it has been since you last ran an update, this process can take some time.
2. Once the update has completed, we can now proceed to install MiniDLNA on our Raspberry Pi.
Because MiniDLNA is available as a part of the Raspbian repository, we can install it by using the command below within the terminal.
sudo apt install minidlnaOnce the installation process has completed, we can now proceed to configure it for our media folders.
Configuring MiniDLNA for your Media Files
Before we begin this section, you should already have your media set up somewhere. That can either be on your Raspberry Pi’s SD card or an external hard drive.
In this section, we will be showing you how to configure MiniDLNA so that it will share the data available in your media folders.
1. Begin modifying the MiniDLNA configuration file by using the following command on your Raspberry Pi.
sudo nano /etc/minidlna.conf2. Within this file, we need to find the following section. This section is where we will be adding each of our folders that we want to scan for our media.
# * "A" for audio (eg. media_dir=A,/var/lib/minidlna/music)
# * "P" for pictures (eg. media_dir=P,/var/lib/minidlna/pictures)
# * "V" for video (eg. media_dir=V,/var/lib/minidlna/videos)
3. Below this section, we need to add our folders that we want MiniDLNA to serve files from.
The format for specifying a media folder is the following.
media_dir=[TYPE],[PATH]For [TYPE], we have three different letters that we can use. Each letter specifies a different media type.
- The letter
Afor audio files Pis used to specify pictures- Finally,
Vis used for folders containing videos
For example, if we had a folder called /mnt/mediaDrive/ that contained a folder for our music, pictures, and movies, we could add the following into the configuration file.
media_dir=A,/mnt/mediaDrive/audio
media_dir=P,/mnt/mediaDrive/pictures
media_dir=V,/mnt/mediaDrive/videos
4. The next thing we might want to configure is the name our DLNA server presents to its clients.
We can change this by finding and changing the following line.
Find
#friendly_name=Replace With
friendly_name=PiMyLifeUpMiniDLNA5. You should now have finished configuring your MiniDLNA server on your Raspberry Pi.
You can save this file by pressing CTRL + X, followed by Y, then ENTER.
6. As we have made changes to the configuration of the MiniDLNA software, we will now need to restart its service.
We can restart the MiniDLNA service by making use of the following command.
sudo systemctl restart minidlnaIf you don’t restart the MiniDLNA service, none of your changes will take effect.
7. At this point, you should now be able to see your Raspberry Pi’s MiniDLNA server pop up on your various devices.
Checking the Status of your MiniDLNA Server
In this section, we will show you how to quickly check the status of your MiniDLNA server through its web interface.
1. To start this section, we will need to find out what the local IP address of our Raspberry Pi is.
There are various ways to get your Pi’s local IP address, but one of the easiest ways is to run the following command on your Raspberry Pi.
hostname -I2. With your Raspberry Pi’s IP address, you can go to the following address in your favorite web browser.
Make sure that you replace [IPADDRESS] with the IP you retrieved in the previous step.
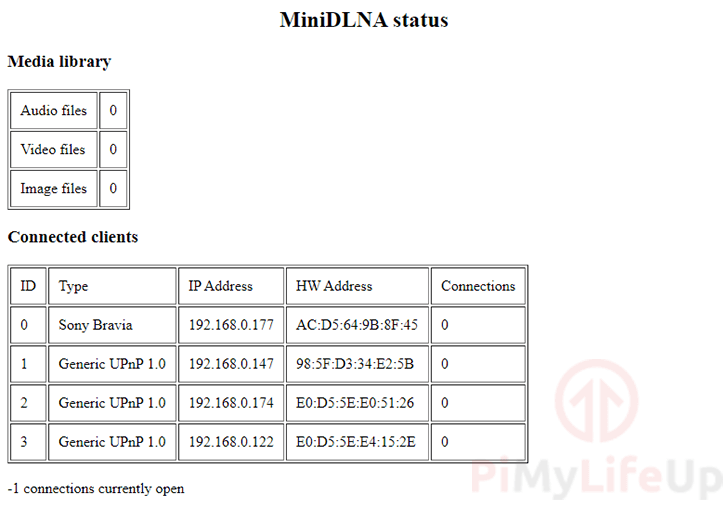
http://[IPADDRESS]:82003. Once you load up the page, you will be greeted by the following page.
This page shows you the number of files available in your media library, as well as a list of all the currently connected clients.
At this point, you should now have successfully set up the MiniDLNA server software on your Raspberry Pi.
If you have run into any issues with setting up the software, feel free to drop a comment in the section below.

Great explanation, just what I was looking for. Worked the first time.
Can I put media on the same drive as the pi is running from or must it be another drive?
Hi John,
It can be on the same drive as the Pi. It would likely be easier since permissions are a bit easier that way
Kind Regards,
Emmet
On Windows 10 if you don’t see the DLNA client, just add it manually through network or in This PC → Ribbon above → Access Media
I like this project as an alternative to Plex. Its straightforward and probably the easiest pi project I have ever completed. The hardest part was editing the fstab file to mount the external SSD. But then the sweet fruit is always high on the tree.
Anyone knows a solftware that acts like a dlna renderer, that can be controled by a dlna controler, running on raspberry pi ? I want to use the RPI as a network sound card pluged to my stereo. Kodi can do it. But is there any alternatives ?
I had to edit ‘/lib/systemd/system/minidlna.service’ and change the user and group to pi to make it work with an external HDD in ntfs format
Thanks.
Thanks for this. I could not work out why the service was running, but could not see my external usb HDD, even though paths were correct. In my case I had to change user and group to root as this what I used in the config files.